
Extension for the AUTOMATIC1111 Stable Diffusion WebUI that generates infinite-dimensional grids.
An "infinite axis grid" is like an X/Y plot grid, but with, well, more axes on it. Of course, monitors are 2D, so this is implemented in practice by generating a webpage that lets you select which two primary axes to display, and then choose the current value for each of the other axes.
The primary goal is to let people generate their own fancy grids to explore how different settings affect their renders in a convenient form.
Another goal of this system is to develop educational charts, to provide a universal answer to the classic question of "what does (X) setting do? But what about with (Y)?" - The MegaGrid. There is a built in ability to add description text to fields, for the specific purpose of enhancing educational page output.
The advantage of this design is it allows you to rapidly compare the results of different combinations of settings, without having to wait to for generation times for each specific sub-grid as-you-go - you just run it all once in advance (perhaps overnight for a large run), and then after that browse through it in realtime.
The disadvantage is that time to generate a grid is exponential - if you have 5 samplers, 5 seeds, 5 step counts, 5 CFG scales... that's 5^4, or 625 images. Add another variable with 5 options and now it's 3125 images. You can see how this quickly jumps from a two minute render to a two hour render.
Here's a big MegaGrid using almost every mode option in one, with detailed educational descriptions on every part: https://sd.mcmonkey.org/megagrid/
Here's a very small web demo you can try to test how the output looks and works: https://mcmonkeyprojects.github.io/short_example and you can view the generated asset files for that demo here.

Current overall project status (as of December 2023): Works well, actively maintained. Has been generally well tested. The core has been ported to other environments and stress-tested for multiple real projects that depend on large grids and rapid grid analysis.
A version of this project is also available for StableSwarmUI, here which also lets you use it with Comfy and other backends
- You must have the AUTOMATIC1111 Stable Diffusion WebUI already installed and working. Refer to that project's readme for help with that.
- Open the WebUI, go to to the
Extensionstab - -EITHER- Option A:
- go to the
Availabletab with - click
Load from(with the default list) - Scroll down to find
Infinity Grid Generator, or useCTRL+Fto find it
- go to the
- -OR- Option B:
- Click on
Install from URL - Copy/paste this project's URL into the
URL for extension's git repositorytextbox:https://github.com/mcmonkeyprojects/sd-infinity-grid-generator-script
- Click on
- Click
Install - Restart or reload the WebUI

- Basic usage is very simple!
- select the script under
Scripts - Leave file as
Create in UI - Select
Axis 1 Modeas whatever mode you want, likeSeedorSampler - In the
Axis 1 Valuebox, you can type a comma-separated list like1, 2, 3, or a double-pipe separated list like1girl, booru style, prompt || 1boy, has commas, so pipes avoid problems - Repeat for as many axes as you want. When you configure axis #4, it will automatically add 4 more rows of axes to fill in. Leave any extras empty.
- Click your main
Generatebutton and wait for it to finish. - When it's done, click the button labeled
Page will be at (Click me) outputs/...to view the full page. - Note that a
config.ymlis saved in the output directory, which you can copy to yourassetsfolder if you want to reuse it.
- select the script under
Usage comes in three main steps:
- 1: Build a grid definition
- 2: Generate its contents
- 3: View/use the generated output page
- You can also expand your grid later

- Grid information is defined by YAML files, in the extension folder under
assets. Find theassets/short_example.ymlfile to see an example of the full format.
If you do not want to follow an example file:
- You can create new files in the assets directory (as long as the
.ymlextension stays), or copy/paste an example file and edit it. I recommend you do not edit the actual example file directly to avoid git issues. - I recommend editing with a good text editor, such as VS Code or Notepad++. Don't use MS Word or Windows Notepad as those might cause trouble.
- All text inputs allow for raw HTML, so, be careful. You can use
<for<, and>for>,:for:, and&for&. - The file must have key
grid, with subkeytitleanddescriptionto define the file data.- It must also have
formatasjpgorpng - It can optionally also have
paramsto specify any default parameters. - It can optionally define
show descriptions,autoscale, andstickyastrueorfalseto change default web-viewer settings. - It can optionally define
x axis,y axis,x super axis, andy super axisas axis IDs to change the default web-viewer axes.
- It must also have
- The file can optionally have key
variableswith subkey/value pairs as replacements, for example(type): waffle- then later in a param value you can usea picture of a (type)to automatically fill the variable. These can be in any format you desire, as they are simple text replacements. They apply to all values, including titles, descriptions, and params (this was added for valconius in issue #16). - The file must have key
axesto define the list of axes. This is a map-list key - meaning, add subkeys to create a list of each axis.- The simplest format for an axis is a setting name as the key and a comma-separated list of values inside.
- For example,
seed: 1, 2, 3is a valid and complete axis. - If commas may be problematic, you many instead use two pipes
||to separate values - for exampleprompt: 1girl, booru style, commas || 1boy, more commas, etc. If||is used, commas will be ignored for splitting - For numeric inputs, you can use ellipses notation to quickly shorthand long lists. For example:
seed: 1, 2, ..., 10automatically fills to1, 2, 3, 4, 5, 6, 7, 8, 9, 10. Or,cfg scale: 7.0, 7.1, ..., 7.8automatically fills to7.0, 7.1, 7.2, 7.3, 7.4, 7.5, 7.6, 7.7, 7.8.- Note that you must have two entries before and one after - the step rate is defined as the space between the two prior and the total range is defined as between the one prior and the one after.
- You can use ellipses multiple times in one set, for example
1, 2, ..., 6, 8, ... 14will fill to1, 2, 3, 4, 5, 6, 8, 10, 12, 14(note how 1-6 are spaced 1 apart, but 6-14 are spaced two apart).
- For example,
- Each axis must have a
title, andvalues. It can optionally have adescription.- You can also optionally have
default: (value_id)to set the default selected tab. - There are two ways to do a value in the value list:
- Option 1: just do like
steps=10... this will set title to10, and paramstepsto value10, with no description. - Option 2: Add a submapping with key
title, and optionaldescription, and thenparamsas a sub map of parameters likesteps: 10- A value with a full format can be set to skip rendering via adding
skip: true. This is useful for eg if some values are only valid in certain combinations, you can do runs with some skipped. Skipped values will be kept in the HTML output. - A value may specify
show: falseto default uncheck the 'Show value' advanced option.
- A value with a full format can be set to skip rendering via adding
- Option 1: just do like
- You can also optionally have
- The simplest format for an axis is a setting name as the key and a comma-separated list of values inside.
Micro example:
grid:
    title: Tiny example
    author: someone
    description: This is just to show core format. View the example `.yml` files in assets for better examples.
    format: jpg
axes:
    sampler: Euler, DDIM
seed: 1, 2, 3- Names and descriptions can always be whatever you want, as HTML text.
| Name | Type | Example | Notes |
|---|---|---|---|
Sampler |
Named | DDIM, euler, ... |
|
Model |
Filename | sd-v1-5 |
Note that Model and VAE are global settings, and as such you should not have an axis where some values specify one of those params but others don't, as this will cause an unpredictable model selection for the values that lack specificity. |
VAE |
Filename | kl-f8-anime2 |
See note on Model above |
Prompt |
Text | a cat |
|
Negative Prompt |
Text | gross, weird, bad |
|
Prompt Replace |
Text-Pair | some_tag = new text here |
Note the = symbol to separate the original text with the new text. That will change a prompt of for example my prompt with some_tag stuff to my prompt with new text here stuff.Unlike other modes, the PromptReplace is case-sensitive - if you use capitals in your prompt, you need capitals in your replace matcher. If you want multiple replacements in one value, you can number them, like Prompt Replace 1 and Prompt Replace 2 and etc.When building a simple list in UI, you can just do eg cat, dog, waffle and it will understand to replace cat in the base prompt first with cat, then dog, then waffle (ie you can skip the = for simple usages). |
Styles |
Text | photo, cartoon, ... |
Automatically includes UI styles to your prompt. Can use comma-separated list to have multiple. Note this means in the UI you can do for example `photo, cinematic |
Seed |
Integer | 1, 2, 3, ... |
|
Steps |
Integer | 20, 50, ... |
|
CFG Scale |
Decimal | 5, 7.5, 12, ... |
|
Width |
Integer | 512, 768, ... |
Initial generation width. |
Height |
Integer | 512, 768, ... |
Initial generation height. |
Out Width |
Integer | 512, 768, ... |
What resolution to save the image as (if unspecified, uses Width). Useful to save filespace. |
Out Height |
Integer | 512, 768, ... |
Refer to Out Width. |
Clip Skip |
Integer | 1, 2 |
Use 2 for NAI-like models, 1 for the rest. |
Var Seed |
Integer | 0, 1, ... |
Variation seed, use with Var Strength. |
Var Strength |
Decimal | 0, 0.5, ..., 1 |
Variation seed strength. |
Restore Faces |
Named | true, false, GFPGan, CodeFormer |
Limited to the given example inputs only. |
CodeFormer Weight |
Decimal | 0, 0.5, ..., 1 |
Only applicable if Restore Faces is set to CodeFormer. |
Denoising |
Decimal | 0, 0.5, ..., 1 |
Denoising strength for img2img or HR fix. |
ETA |
Decimal | 0, 0.5, ..., 1 |
? |
ETA Noise Seed Delta |
Integer | 0, 31337 |
use 31337 to replicate NovelAI results, use 0 for anything else. Not very useful. |
Sigma Churn |
Decimal | 0, 0.5, ..., 1 |
Sampler parameter, rarely used. |
Sigma Tmin |
Decimal | 0, 0.5, ..., 1 |
Sampler parameter, rarely used. |
Sigma Tmax |
Decimal | 0, 0.5, ..., 1 |
Sampler parameter, rarely used. |
Sigma Noise |
Decimal | 0, 0.5, ..., 1 |
Sampler parameter, rarely used. |
Tiling |
Boolean | true, false |
Useful for textures. |
Image Mask Weight |
Decimal | 0, 0.5, ..., 1 |
Conditional image mask weight. Only applies to img2img or HR fix. |
Enable Highres Fix |
Boolean | true, false |
Required for other HR settings to work. Defaults denoising strength to 0.75 if not specified. Only valid in txt2img. |
Highres Scale |
Decimal | 2, 2.5, ..., 16 |
How much to scale by for HR fix. |
Highres Steps |
Integer | 20, 50, ... |
Secondary steps for HR fix. |
Highres Upscaler |
Named | None, Latent, ... |
Upscaler mode to use prior to running Highres Fix. |
Highres Resize Width |
Integer | 512, 768, ... |
Resolution to target as final output size for Highres Fix, overrides Highres Scale. |
Highres Resize Height |
Integer | 512, 768, ... |
See Highres Resize Width above. |
Highres Upscale To Width |
Integer | 512, 768, ... |
Resolution to upscale to prior to running Highres Fix. |
Highres Upscale To Height |
Integer | 512, 768, ... |
See Highres Upscale To Height above. |
Image CFG Scale |
Decimal | 5, 7.5, 12, ... |
Image CFG Scale, for Instruct pix2pix usage. |
Use Result Index |
Integer | 0, 1, ... |
Special trick to get a non-zero result image index, eg for ControlNet secondary output image. |
- All setting names are case insensitive and spacing insensitive. That means
CFG scale,cfgscale,CFGSCALE, etc. are all read as the same.- Inputs where possible also similarly insensitive, including model names.
- Inputs have error checking at the start, to avoid the risk of it working fine until 3 hours into a very big grid run.
- Note that it will be processed from bottom to top
- so if you have first
samplersDDIM and Euler, thensteps20 and 10, thenseeds1 and 2, it will go in this order:- Sampler=DDIM, Steps=20, Seed=1
- Sampler=DDIM, Steps=20, Seed=2
- Sampler=DDIM, Steps=10, Seed=1
- Sampler=DDIM, Steps=10, Seed=2
- Sampler=Euler, Steps=20, Seed=1
- Sampler=Euler, Steps=20, Seed=2
- Sampler=Euler, Steps=10, Seed=1
- Sampler=Euler, Steps=10, Seed=2
- So, things that take time to load, like
Model, should be put near the top, so they don't have to be loaded repeatedly.
- so if you have first
Extension docs: https://github.com/mcmonkeyprojects/sd-dynamic-thresholding
| Name | Type | Example | Notes |
|---|---|---|---|
DynamicThreshold Enable |
Boolean | true, false |
|
DynamicThreshold Mimic Scale |
Decimal | 5, 7.5, 12, ... |
|
DynamicThreshold Threshold Percentile |
Decimal | 0, 0.5, ..., 1.0 |
|
DynamicThreshold Mimic Mode |
Named | Constant, Linear Down, Cosine Down, Half Cosine Down, Linear Up, Cosine Up, Half Cosine Up, Power Up |
|
DynamicThreshold CFG Mode |
Named | Constant, Linear Down, Cosine Down, Half Cosine Down, Linear Up, Cosine Up, Half Cosine Up, Power Up |
|
DynamicThreshold Mimic Scale Minimum |
Decimal | 5, 7.5, 12, ... |
|
DynamicThreshold CFG Scale Minimum |
Decimal | 5, 7.5, 12, ... |
|
DynamicThreshold Power Value |
Decimal | 2, 4, ... |
For Power Up mode only. |
DynamicThreshold Scaling Startpoint |
Named | ZERO, MEAN |
|
DynamicThreshold Variability Measure |
Named | STD, AD |
|
DynamicThreshold Interpolate Phi |
Decimal | 0, 0.5, ..., 1.0 |
|
DynamicThreshold Separate Feature Channels |
Boolean | true, false |
Extension docs: https://github.com/Mikubill/sd-webui-controlnet
Note: must enable Allow other script to control this extension in Settings -> ControlNet
| Name | Type | Example | Notes |
|---|---|---|---|
ControlNet Enable |
Boolean | true, false |
|
ControlNet Preprocessor |
Named | none, canny, depth, hed, mlsd, normal_map, openpose, openpose_hand, pidinet, scribble, fake_scribble, segmentation |
|
ControlNet Model |
Named | diff_control_sd15_canny_fp16, ... |
|
ControlNet Weight |
Decimal | 0.0, 0.5, ..., 2.0 |
|
ControlNet Guidance Strength |
Decimal | 0.0, 0.5, ..., 1.0 |
|
ControlNet Annotator Resolution |
Integer | 64, 512, ..., 2048 |
|
ControlNet Threshold A |
Integer | 64, 512, ..., 256 |
|
ControlNet Threshold B |
Integer | 64, 512, ..., 256 |
|
ControlNet Image |
Text | pose.png, otherpose.jpg, ... |
Put image files in (EXTENSION FOLDER)/assets/images/, as png, jpg, or webp. Subfolders allowed. |
- Any extension has the ability to add its own modes with the following code:
# Verify grid extension is present
import importlib
if importlib.util.find_spec("gridgencore") is not None:
    import gridgencore
    from gridgencore import GridSettingMode
    # p is the SD processing object, v is the value
    def apply(p, v):
        p.some_setting_here = v
    # dry: bool, type: str, apply: callable, min: float = None, max: float = None, clean: callable = None
    gridgencore.registerMode("mySettingNameHere", GridSettingMode(True, "text", apply))
    # for apply if the param is a 'p' field, you can use gridgencore.apply_field("fieldname")
- Open the WebUI
- Go to the
txt2imgorimg2imgtab - At the bottom of the page, find the
Scriptselection box, and selectGenerate Infinite-Axis Grid - Select options at will. You can hover your mouse over each option for extra usage information.
- Select your grid definition file from earlier.
- If it's not there, you might just need to hit the Refresh button on the right side.
- If it's still not, there double check that your file is in the
assets/folder of the extension, and that it has a proper.ymlextension.
- Hit your
Generatebutton (the usual big orange one at the top), and wait. - The output folder will be named based on your
.ymlfile's name.

- Find the
index.htmlfile- It's normally in
(your grid output directory)/(filename)/index.html- The example file might output to
outputs/grids/short_example/index.html
- The example file might output to
- It's normally in
- Open the HTML file in a browser. Enjoy.
- If you want to share the content, just copy/paste the whole folder into a webserver somewhere.
- Or upload to github and make GitHub.io pages host it for you. See example here
- You have a few different clickable options:
Show descriptions of axes and values: if you used descriptions, you can uncheck this box to hide them. Helps save space for direct viewing.Auto-scale images to viewport width: this is handy for a few different scenarios- A: if your images are small and your screen is big, checking this option makes them bigger
- B: if your images are so big they're going off the edge, checking this option makes them smaller
- C: if checked, you can zoom in/out of the page using your browser zoom (CTRL + Mouse Wheel) to change the UI size without affecting the image size
- if unchecked, you can zoom in/out to change the size of the images.
Sticky navigation: when checked, the navigation will stick to the top of the screen as you scroll down. Helps you quickly change axes while scrolling around without losing your place.Advanced Settings: when clicked, it will open a dropdown with more advanced settings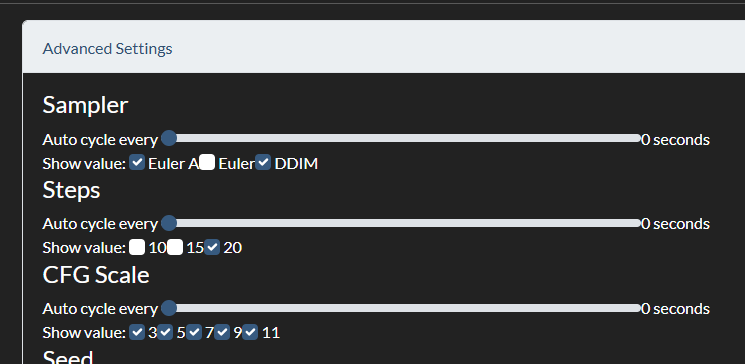
Auto cycle every (x) seconds: you can set these to non-zero values to the grid automatically change settings over time. For example, if you set your "Seed" option to "3 seconds", then every 3 seconds the seed will change (cycling between the options you have in order). This was suggested by itswhateverman in issue #2.Show value: you can uncheck any box to hide a value from the grid. Helps if you want to ignore some of the values and get a clean grid of just the ones you care about. This was suggested by piyarsquare in issue #4.
- You can also click on any image to view it fullscreen and see its metadata (if included in output). While in this mode, you can use arrow keys to quick navigate between images, or press Escape to close (This suggested by itswhateverman in issue #5 and issue #17).
- You can also set the
X Super-axisandY Super-axisto unique axes to get a grid-of-grids! - You can also quicksave preview images of the grid, or even generate GIFs that autoscroll through an axis, all with a few easy buttons on the viewer page!


If you want to add more content to a grid you already made, you can do that:
- Use the same
ymlfile. - You can add new values to an axis freely.
- If you remove values, they will be excluded from the output but pre-existing generated images won't be removed.
- You can add axes, but you'll have to regenerate all images if so.
- Probably save as a new filename in that case.
- If you're just adding a new value, make sure to leave
overwriting existing imagesoff.
- This design was partially inspired by the "XYZ Plot" script by "xrypgame" (not to be confused with the "XYZ Plot" script in Auto WebUI which is actually just the "X/Y Plot" script but they added a "Z" lol)
- Sections of code are referenced from the WebUI itself, and its default "X/Y Plot" script (since renamed to labeled "XYZ Plot").
- Some sections of code were referenced from various other relevant sources, for example the Dreambooth extension by d8ahazard was referenced for a JavaScript code trick (titles override).
- Some sections of code were referenced from, well, random StackOverflow answers and a variety of other googled up documentation and answer sites. I haven't kept track of them, but I'm glad to live in a world where so many developers are happy and eager to help each other learn and grow. So, thank you to all members of the FOSS community!
- Thanks to the authors of all merged PRs.
- Thanks to the authors of all issues labeled as Completed.
- Thanks to StabilityAI, RunwayML, CompVis for Stable Diffusion, and the researchers whose work was incorporated.
- Thanks to AUTOMATIC1111 and the long list of contributors for the WebUI.
  File "stable-diffusion-webui\modules\images.py", line 508, in _atomically_save_image
    image_format = Image.registered_extensions()[extension]
KeyError: '.jpg'
If you have this error, just hit generate again. I'm not sure why it happens, it just does at random sometimes on the first time the WebUI starts up. It seems to happen when you use OutWidth/OutHeight settings and is prevented by running any generation without a custom out-resolution. Might be some required initialization is getting skipped when an image is rescaled?
This is an open source project, provided entirely freely, for everyone to use and contribute to.
If you make any changes that could benefit the community as a whole, please contribute upstream.
You can do basically whatever you want, except you may not hold any developer liable for what you do with the software.
The MIT License (MIT)
Copyright (c) 2022-2023 Alex "mcmonkey" Goodwin
Permission is hereby granted, free of charge, to any person obtaining a copy of this software and associated documentation files (the "Software"), to deal in the Software without restriction, including without limitation the rights to use, copy, modify, merge, publish, distribute, sublicense, and/or sell copies of the Software, and to permit persons to whom the Software is furnished to do so, subject to the following conditions:
The above copyright notice and this permission notice shall be included in all copies or substantial portions of the Software.
THE SOFTWARE IS PROVIDED "AS IS", WITHOUT WARRANTY OF ANY KIND, EXPRESS OR IMPLIED, INCLUDING BUT NOT LIMITED TO THE WARRANTIES OF MERCHANTABILITY, FITNESS FOR A PARTICULAR PURPOSE AND NONINFRINGEMENT. IN NO EVENT SHALL THE AUTHORS OR COPYRIGHT HOLDERS BE LIABLE FOR ANY CLAIM, DAMAGES OR OTHER LIABILITY, WHETHER IN AN ACTION OF CONTRACT, TORT OR OTHERWISE, ARISING FROM, OUT OF OR IN CONNECTION WITH THE SOFTWARE OR THE USE OR OTHER DEALINGS IN THE SOFTWARE.