State-of-the-art machine learning models often learn spurious correlations embedded in the training data. This poses risks when deploying these models for high-stake decision-making, such as in medical applications like skin cancer detection.
To tackle this problem, we propose Reveal to Revise (R2R), a framework entailing the entire eXplainable Artificial Intelligence (XAI) life cycle, enabling practitioners to iteratively identify, mitigate, and (re-)evaluate spurious model behavior with a minimal amount of human interaction.
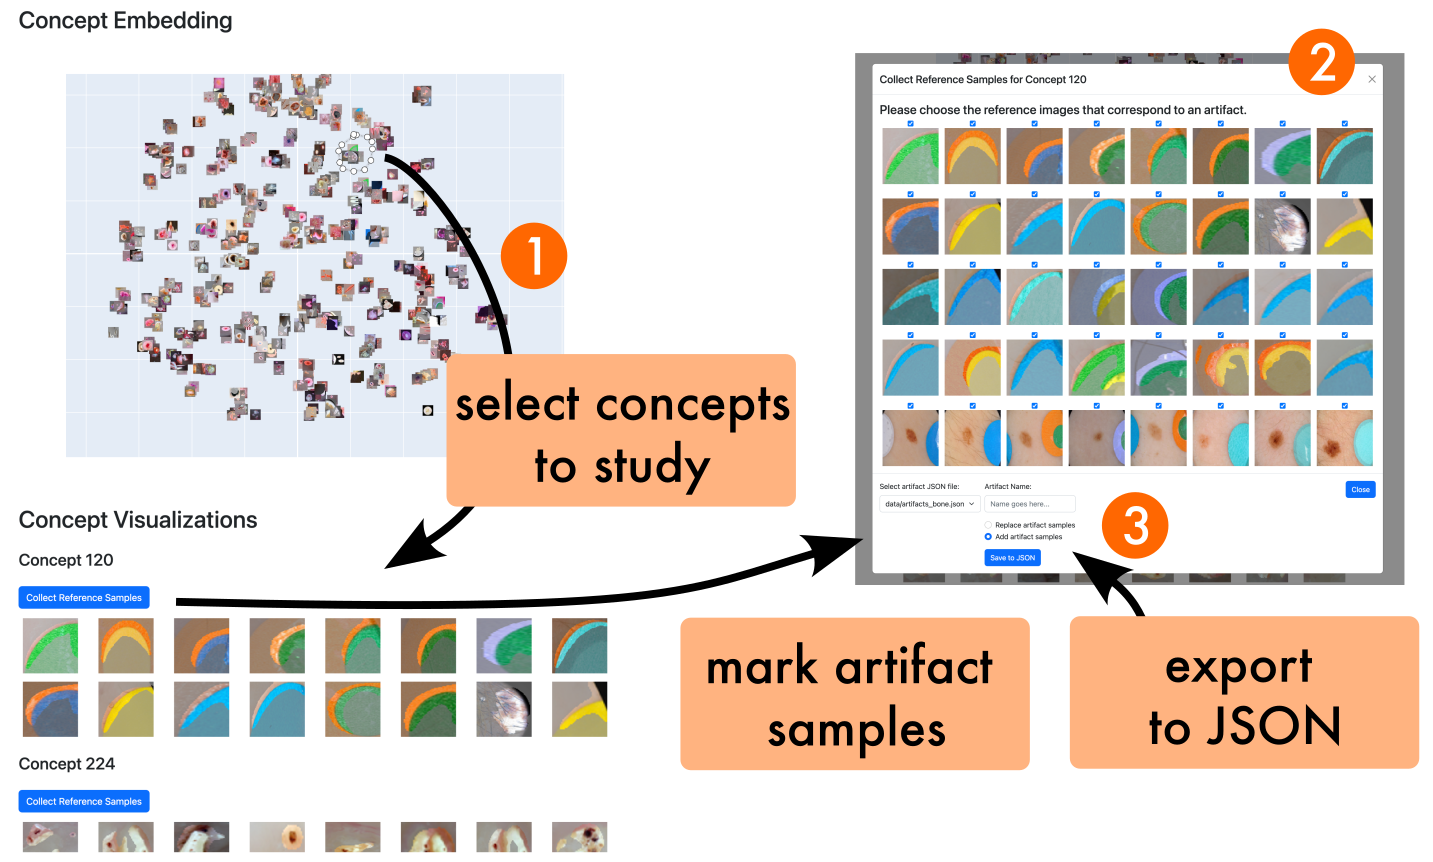
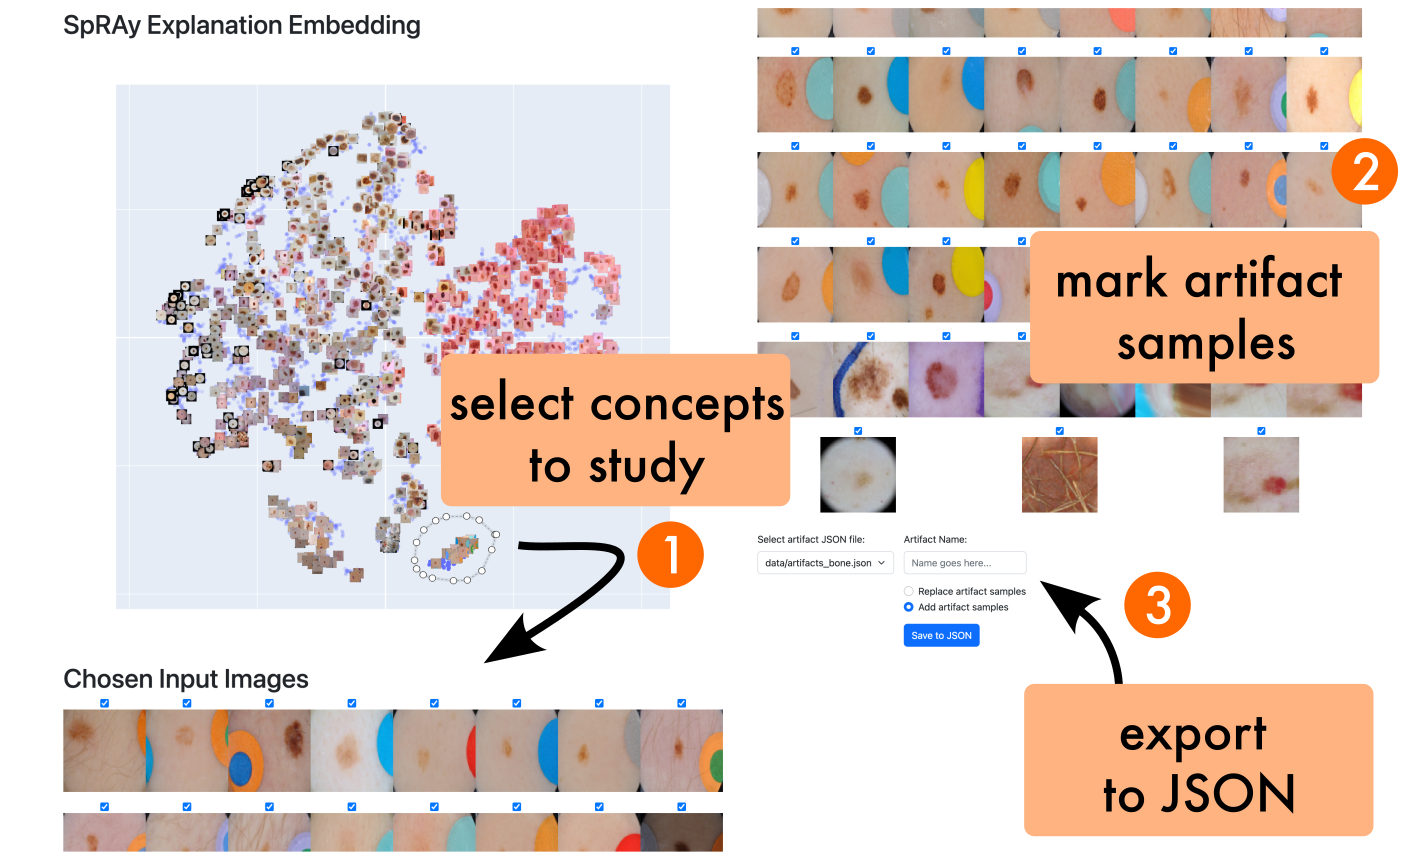
In the first step (1), R2R reveals model weaknesses by finding outliers in attributions or through inspection of latent concepts learned by the model. Secondly (2), the responsible artifacts are detected and spatially localized in the input data, which is then leveraged to (3) revise the model behavior. Concretely, we apply the methods of RRR, CDEP and ClArC for model correction, and (4) (re-)evaluate the model’s performance and remaining sensitivity towards the artifact.
Using two medical benchmark datasets for Melanoma detection and bone age estimation, we apply our R2R framework to VGG, ResNet and EfficientNet architectures and thereby reveal and correct real dataset-intrinsic artifacts, as well as synthetic variants in a controlled setting.
Please feel free to cite our work, if used in your research:
@inproceedings{pahde2023reveal,
  author       = {Frederik Pahde and
                  Maximilian Dreyer and
                  Wojciech Samek and
                  Sebastian Lapuschkin},
  editor       = {Hayit Greenspan and
                  Anant Madabhushi and
                  Parvin Mousavi and
                  Septimiu Salcudean and
                  James Duncan and
                  Tanveer F. Syeda{-}Mahmood and
                  Russell H. Taylor},
  title        = {Reveal to Revise: An Explainable {AI} Life Cycle for Iterative Bias
                  Correction of Deep Models},
  booktitle    = {Medical Image Computing and Computer Assisted Intervention - {MICCAI}
                  2023 - 26th International Conference, Proceedings, Part {II}},
  series       = {Lecture Notes in Computer Science},
  volume       = {14221},
  pages        = {596--606},
  publisher    = {Springer},
  year         = {2023},
  url          = {https://doi.org/10.1007/978-3-031-43895-0\_56},
  doi          = {10.1007/978-3-031-43895-0\_56},
}
}We use Python 3.8.10. To install the required packages, run:
pip install -r requirements.txtSecondly, the datasets need to be downloaded. To do so, download and extract the ISIC 2019 dataset using the following:
mkdir datasets
cd datasets
wget https://isic-challenge-data.s3.amazonaws.com/2019/ISIC_2019_Training_Input.zip
wget https://isic-challenge-data.s3.amazonaws.com/2019/ISIC_2019_Training_GroundTruth.csv
unzip ISIC_2019_Training_Input.zip
Then, we need to download the Bone Age Estimation dataset. To do so, run:
wget https://s3.amazonaws.com/east1.public.rsna.org/AI/2017/Bone+Age+Training+Set.zip
wget https://s3.amazonaws.com/east1.public.rsna.org/AI/2017/Bone+Age+Training+Set+Annotations.zip
unzip Bone+Age+Training+Set.zip
unzip Bone+Age+Training+Set+Annotations.zip
cd ..Having installed the required packages and datasets, we can begin with training the models. To do so convieniently, we use config files to specify the model, dataset and training parameters.
We can generate config files using the config file generator.
To do so,
specify the config file generator parameters in config_files/config_generator_training.py and run:
cd config_files
python config_generator_training.py
cd ..
Note: We suggest to use wandb to track the training progress and results.
Using the previously generated config files, we can train the models. To do so, run:
python -m model_training.start_training --config_file "config_files/training/your_config_file.yaml"NOTE: We provide model checkpoints! All checkpoints can be found in the download scripts in the scripts folder.
An example for the ISIC models can be found here:
echo "Download VGG"
wget https://datacloud.hhi.fraunhofer.de/s/Tq2fGgtEZ2mMFQ4/download/checkpoint_vgg16_isic_last.pth

echo "Download ResNet18"
wget https://datacloud.hhi.fraunhofer.de/s/pijw3KFNdcZNi2e/download/checkpoint_resnet18_isic_last.pth

echo "Download EfficientNet B0"
wget https://datacloud.hhi.fraunhofer.de/s/3WoL9Ge38jJ93xN/download/checkpoint_efficientnet_b0_isic_last.pthTo reveal spurious behavior, we propose the following steps:
Create new config files for the model correction experiments, which are also used for revealing model bias.
To do so,
specify the config file generator parameters in config_files/config_generator_correcting_isic.py and run:
cd config_files
python config_generator_correcting_isic.py
cd ..
In the following, you can choose between using CRP concept visualizations to find bias concepts, or SpRAy to find input samples with outlier explanations.
python -m experiments.reveal_artifacts.crp_run --config_file "config_files/correction/your_config_file.yaml"QUICKSTART: To get started with CRP right away, we provide the CRP analysis
file here for the VGG-16 model
trained on the ISIC dataset, which needs to be extracted in the crp_files directory.
Note, that the concept_layer represents the name of the layer in which the CRP concepts are investigated,
e.g. features.28 for
VGG-16.
python -m experiments.reveal_artifacts.crp_plot_concept_embedding_plotly  --config_file "config_files/correction/your_config_file.yaml" \
                                                                          --layer_name "concept_layer"
This will start an interactive plot based on Dash, allowing you to investigate the learned concepts and find spurious ones. Having found spurious concepts, you are able to export the corresponding reference samples in the tool.
QUICKSTART: Simply run python -m experiments.reveal_artifacts.crp_plot_concept_embedding_plotly to investigate the
concepts in layer features.28 of the VGG-16 model trained on the ISIC dataset.
consisting of two steps: (1) collect relevances and activations, and (2) compute SpRAy embedding.
$config_path="config_files/correction/your_config_file.yaml"
$analyze_corrected_model=False

for class_id in {0,1,...}; do
  python3 -m experiments.preprocessing.global_collect_relevances_and_activations  --config_file $config_path \
                                                                                  --class_id $class_id \
                                                                                  --use_corrected_ckpt $analyze_corrected_model \
done

python -m experiments.reveal_artifacts.run_spray  --config_file $config_path \
                                                  --layer_name "concept_layer" \
                                                  --analysis-file "results/spray/analysis.hdf5" \
--corrected_model $analyze_corrected_model \QUICKSTART: To get started with SpRAy right away, we provide the analysis
file here for the VGG-16
model
trained on the ISIC dataset, which needs to be extracted in the results/spray directory.
python -m experiments.reveal_artifacts.plot_spray_embedding_plotly --config_file "config_files/correction/your_config_file.yaml"QUICKSTART: Simply run python -m experiments.reveal_artifacts.plot_spray_embedding_plotly to investigate the
VGG-16 model trained on the ISIC dataset.
Please note, that we already provide the artifact sample ids for the ISIC and Bone Age datasets.
Having found the artifact samples, we can localize them in the input data by running:
python -m experiments.reveal_artifacts.localize_artifacts --config_file "config_files/correction/your_config_file.yaml"This effectively saves the artifact heatmaps in the data/localized_artifacts folder.
Please note,
that we already provide the artifact heatmaps for the ISIC and Bone Age datasets.
Now, we can correct the model bias by running:
python -m model_training.start_model_correction--config_file "config_files/correcting_isic/your_config_file.yaml"Finally, we can evaluate the corrected model by running:
python -m experiments.evaluation.artifact_relevance --config_file "config_files/correction/your_config_file.yaml"

for artifact in {band_aid,ruler,skin_marker}; do
  python -m experiments.evaluation.accuracy_attacked_auto --config_file "config_files/correction/your_config_file.yaml" --artifact $artifact
done

python -m experiments.evaluation.evaluate_by_subset --config_file "config_files/correction/your_config_file.yaml"
where this is an example for the ISIC data-intrinsic artifacts (band_aid,ruler,skin_marker).


