
This application allows to wirelessly download media from Olympus cameras to your PC.
More than 4000 downloads (gh/bb)!!!
It has been successfully tested on the following cameras:
- Olympus TG-860 (thanks Lee!)
- Olympus TG-4 (thanks Alain!)
- Olympus TG-5 (thanks Jim!)
- Olympus TG-6 (thanks Ivan!)
- Olympus OMD E-M1 (thanks Jean Pierre!)
- Olympus OMD E-M5 Mark II (thanks David!)
- Olympus PEN Lite E-PL7 (thanks Dmitri!)
- Olympus OMD E-M10 (thanks Mauricio!)
- Olympus OMD E-M10 Mark II (thanks @HelgenX!)
- Olympus OMD E-M10 MK3 (thanks Alex!)
Also it should work out-of-the-box with other similar Olympus cameras.
This application has been successfully tested on the following operating systems:
- Linux (thanks Mauricio!)
- Windows (thanks Mauricio!)
- Mac OS (thanks Ola!)
Contact me via mauriciojostx@gmail.com if you have any issues.
If you're planning to use Java 11 or higher, download olympus-photosync v1.1.0 or greater.
For older versions of Java (8, 9 or 10) download olympus-photosync v1.0.0 (or lower).
The remaining installation procedure depends on your operating system. See below all releases:
Once Java is installed, download the latest release for Windows from the above link, .zip extension is recommended.
No installation needed. Decompress the release in C:\olympus\ (you will need to create the directory).
The executables will be under the unzipped directory, in the bin subdirectory: you will use olympus-photosync.bat.
For Linux both .deb and .rpm packages are provided. With Java installed, download the latest release for your own distribution (see above releases link).
You can install such packages using dpkg and rpm tools.
For instance, the .deb package can be installed in Ubuntu typing:
sudo apt-get install openjdk-8-jre
sudo dpkg -i photosync_x.x_all.deb
The tool olympus-photosync will be added to the PATH so that you can use it anywhere.
With Java installed, download the latest release from the above releases link. Extension .tgz is recommended.
These packages are provided so that the application can be used without installation. Download the release and decompress it somewhere (for example in /home/user/opt/olympus). Then the executables will be under the unzipped directory, under the bin subdirectory.
The tool bin/olympus-photosync is the one to be used.
You may need to execute the following command to make the binary executable:
cd <uncompression-directory>
chmod +x bin/olympus-photosync
To transfer media from your camera to your PC follow these steps:
-
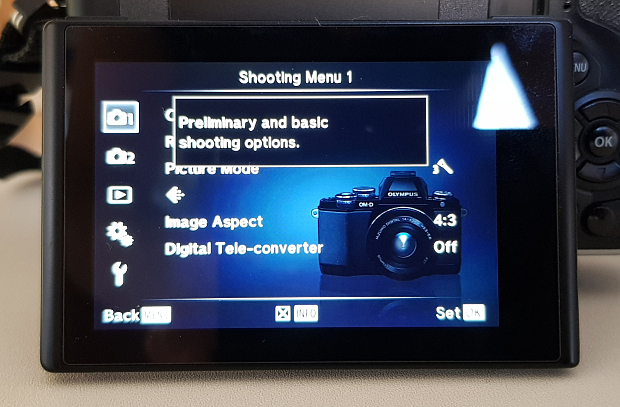
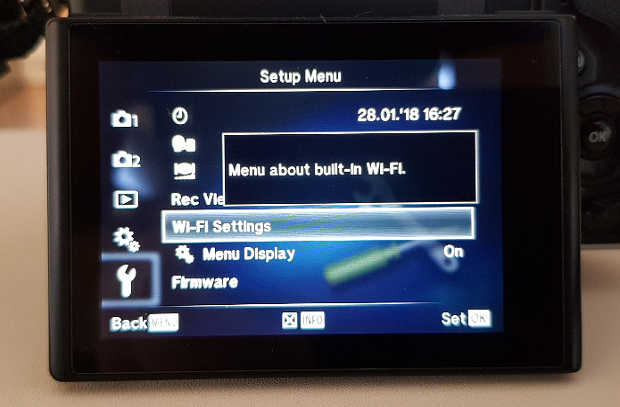
Switch on your camera and go to the Setup Menu.
-
Set up the WIFI service of your camera as Private.
This step needs to be done only once as your camera will remember this setting.
Go to the WIFI Settings:
And select Private mode:
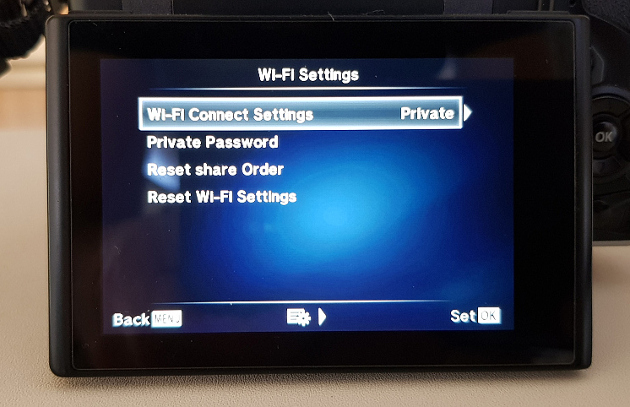
This step is very important. If not set up correctly the camera won't let this application download media files.
-
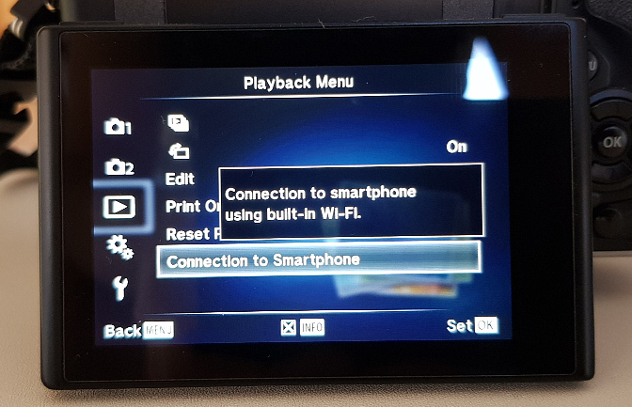
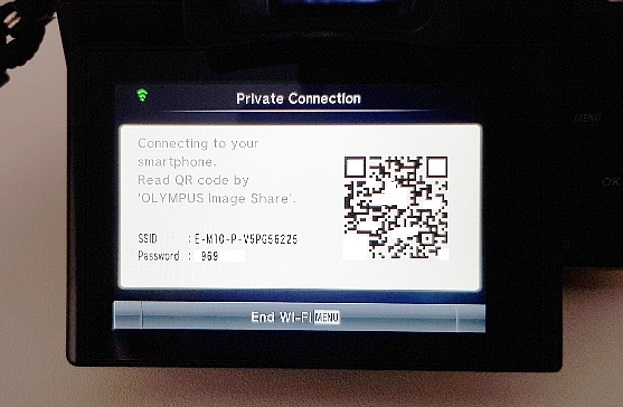
Launch the WIFI service from your camera.
You should see something like this:
-
Connect your PC to the WIFI provided by the camera.
In the example above, the WIFI network (SSID) was
E-M10-P-V5PG56225. You will need to find your own camera SSID.Then you need to connect to that WIFI network from your PC.
Once done, you can verify that the connection is correct opening any of the two following URLs: link1 or link2 .
If any of them show black screen as the one below, then you're correctly connected.
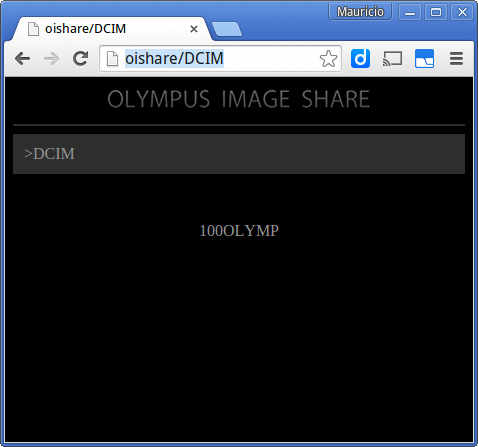
You can close that browser and continue with the steps below.
-
Now you are ready to execute the application.
Execute the application. This step depends on the Operating System (Windows, Linux, etc.) you have.
- If Windows: go to
C:\olympus\<uncompression-folder>, then tobinsubfolder, and double clickolympus-photosync.bat - If Linux standalone or MacOS: go to
/home/user/opt/olympus, then tobinsubfolder, and execute./olympus-photosync - If Debian or Red Hat: simply execute
olympus-photosync
The application will start copying files from your camera to a local directory (as configured).
By default, the application synchronizes media one way (remote to local). If remote files are already copied locally the application will skip them. This means it is safe to run it multiple times to finish synchronization in case of network connectivity issues.
More customized behaviours can be achieved via configuration. For such, see sections below.
- If Windows: go to


The application should work out-of-the-box for the cameras listed above. However you may want to customize its execution, for instance to download photos to a non-default directory.
For such cases, the application uses several parameters that can be set either through command line arguments, or by modifying the configuration file.
Command line arguments take precedence over the configuration file.
There are several parameters to be set. To list these parameters you can execute:
# In Linux
olympus-photosync --help
For instance, to synchronize files and download them to local directory /home/john/output do:
# In Linux
olympus-photosync --output-directory /home/john/output

# On Windows
olympus-photosync --output-directory C:\output
To synchronize files of SEP2017 do:
olympus-photosync --from 2017-09-01 --until 2017-09-30
To synchronize only AVI or ORF files:
olympus-photosync --file-patterns *.AVI,*.ORF
You can launch the GUI for Linux/MacOS (as in Windows GUI is launched automatically):
olympus-photosync --gui
In Windows such command line arguments can be passed by modifying the
file bin\photosync.bat:
set _APP_ARGS=
For instance if you want to synchronize only *.AVI you can do:
set _APP_ARGS=--file-patterns *.AVI
If you want your configuration to keep being the same along multiple executions of the application, you can store it in a configuration file and reuse it.
You can generate a template configuration file using:
olympus-photosync --init-config
Then you can customize as you wish. After that you can launch the application using such configuration file (and its settings). See the output of the command above for more information.
This is a relatively recent feature, so be cool! I am very open to feedback.

In Linux/MacOS launch with:
olympus-photosync --gui
In Windows the GUI is launched automatically.
Feel free to give your opinion or create issues here!
The main repository is in GitHub. A secondary repository is in BitBucket.
This application is written in Scala and uses SBT.
The build status:

If you aim to contribute fork the master branch, clone your fork, and create a dedicated branch.
Find below some useful commands for basic actions.
sbt compile  # To compile the application
sbt test     # To test it
sbt run      # To launch it
If building with openjdk, you will need to install the Linux
package openjfx. Also xvfb tool needs to be started prior to tests
so that the GUI tests can launch even without display (if running from a display-less
CI server like Jenkins).
You can also use the provided docker image to use Jenkinsfile.
The project uses sbt-native-packager so you can build packages for many operating systems / distributions.
sbt universal:packageBin         # To build the multi-platform .zip package
sbt universal:packageZipTarball  # To build the multi-platform tarball
sbt debian:packageBin            # To build a Debian package (.deb)
sbt rpm:packageBin               # To build an RPM package (.rpm) (must have rpm tool installed if in Debian OS)
sbt windows:packageBin           # To build a Windows installer (from Windows)
sbt docker:publishLocal          # To build a docker image
You cal also build your own docker image to launch the project in different architectures, such as ARM. See here for more details.
This project is open source so you can help make it better!
- Found issues? Then please file an issue here or send me by mail the logs.
- Own an OMD E-MX camera not supported? Then please contact me by e-mail too.
- Want to code-contribute? You can create a PR versus master branch in the main repository at GitHub. Keep in mind that there is a mirror repository at BitBucket that will be probably marked as deprecated in the future.
- Need more information? Send me an e-mail to mauriciojostx@gmail.com.
- Liked the project? Then please give it a star on Github!
- Want it to be maintained? Then please give it a star on Github!
This project was mentioned in different sites: