Matthew Robbins - Creator Of MFractor
This repository is the accompanying source code for the Xamarin University guest lecture, Building Xamarin Studio Addins.
Learn how to take an Addin from concept to deployment using the Addin Maker, Xamarin Studio and mdtool.
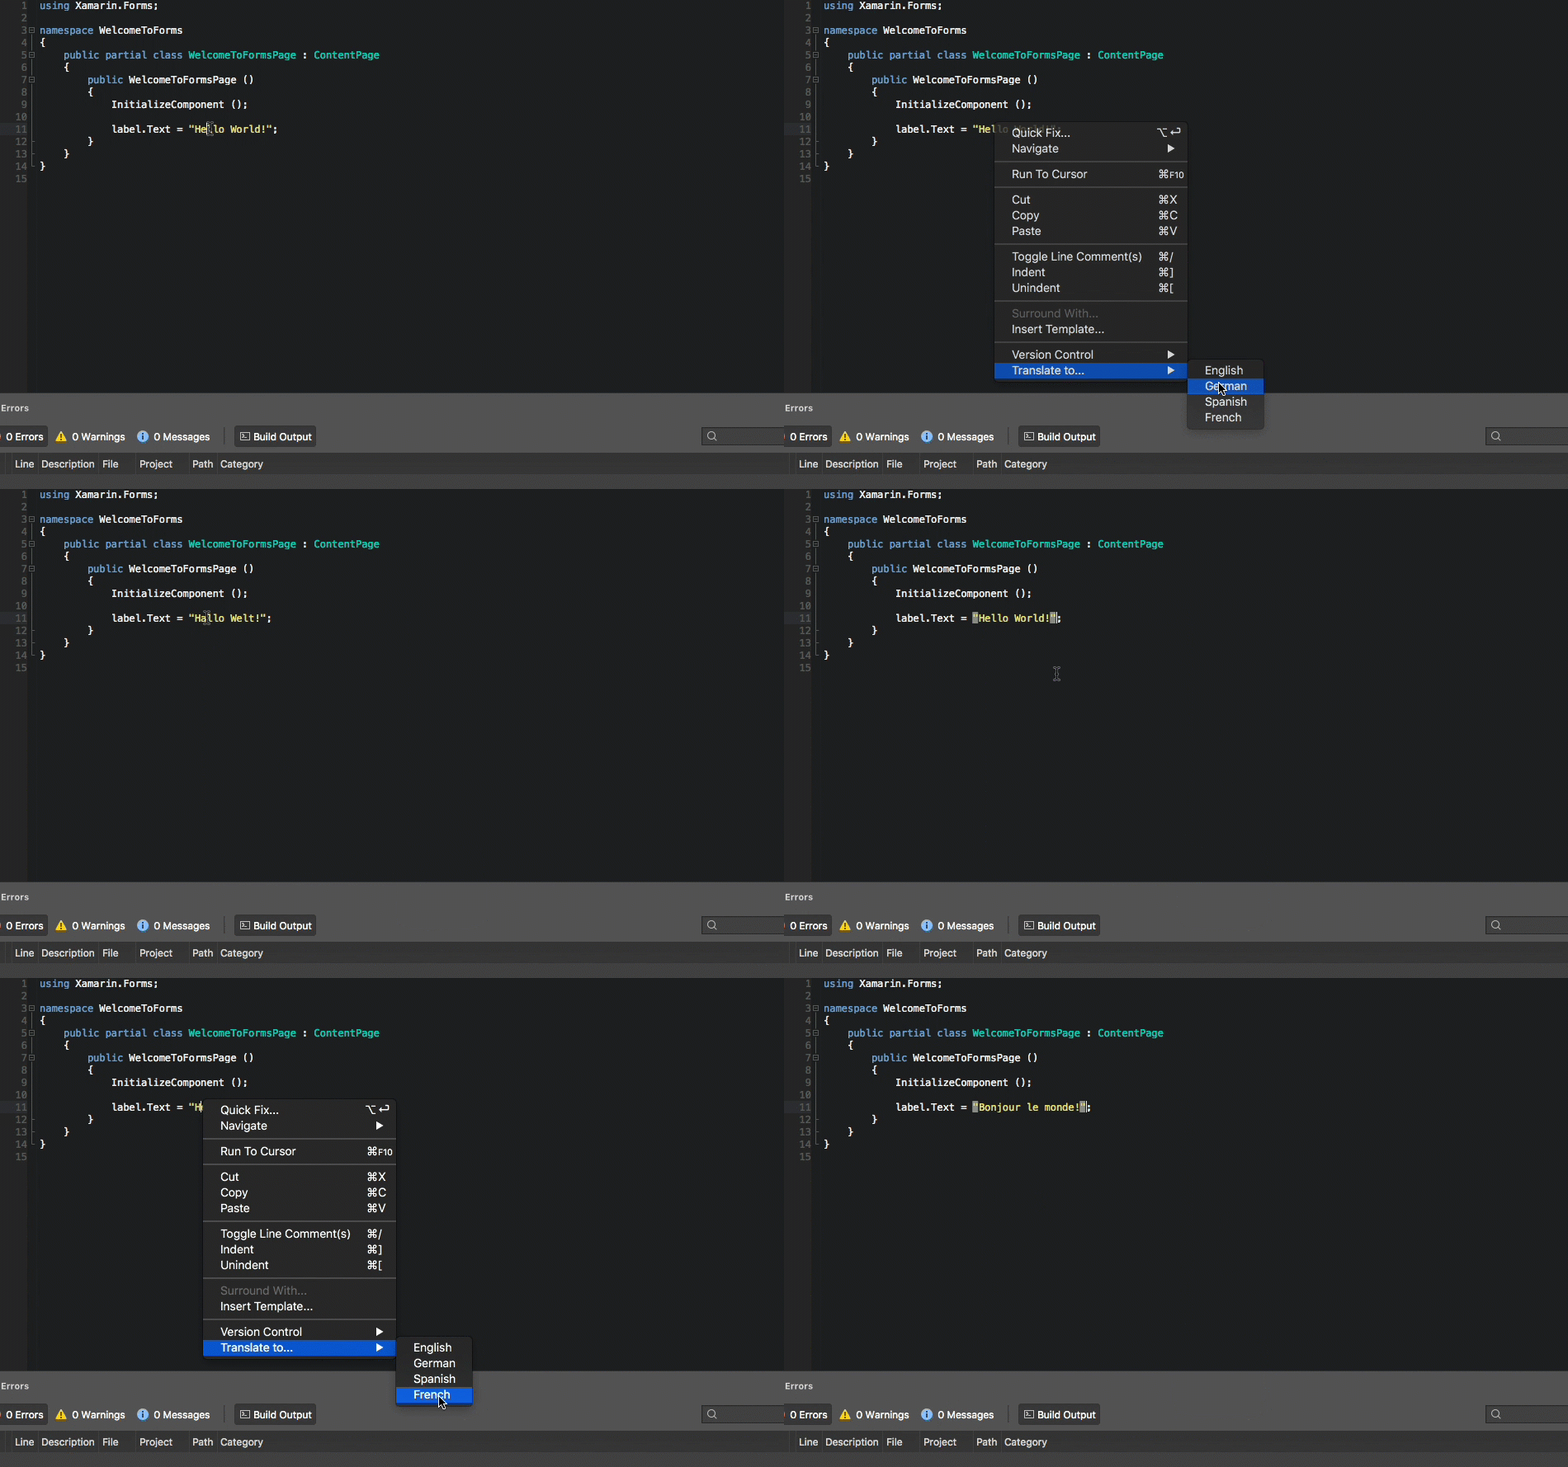
This source code contains a Translate String Addin; users can right click on a C# string literal and translate it to another language!
- The MonoDevelop Extension Model
- Installing the Addin Maker
- Creating Your First Addin
- An Addin Project Structure
- Some Essential APIs
- The Translation Addin
- Testing and Debugging
- Packaging Your Addin
- Publishing Your Addin
- Resources and Docs
- Summary
Before we get coding, it's very important to cover some theory.
MonoDevelop is built upon an extensible architecture known as an Extension Model. This architecture uses Extension Path to allow third party libraries to extend behavior within the main application. An extension path is syntactically formatted as a root canonical path that refers to the application, library and behavior being extended.
For example, the source editor addin in Xamarin Studio exposes the Extension Path /MonoDevelop/SourceEditor2/ContextMenu/Editor that let's third parties inject commands into the right click context menu. In our manifest (discussed later) we can declare new extension paths for third parties and/or inject new behaviour into other extension paths.
An in-depth discussion on the extension model is beyond the scope of this tutorial; for in-depth information please read the Mono Extension Model documentation.
Let's get started by installing the Addin Maker into Xamarin Studio.
The Addin Maker is an open source, freely available addin developed by Mikayla Hutchinson that enables development and debugging of Xamarin Studio addins within Xamarin Studio itself.
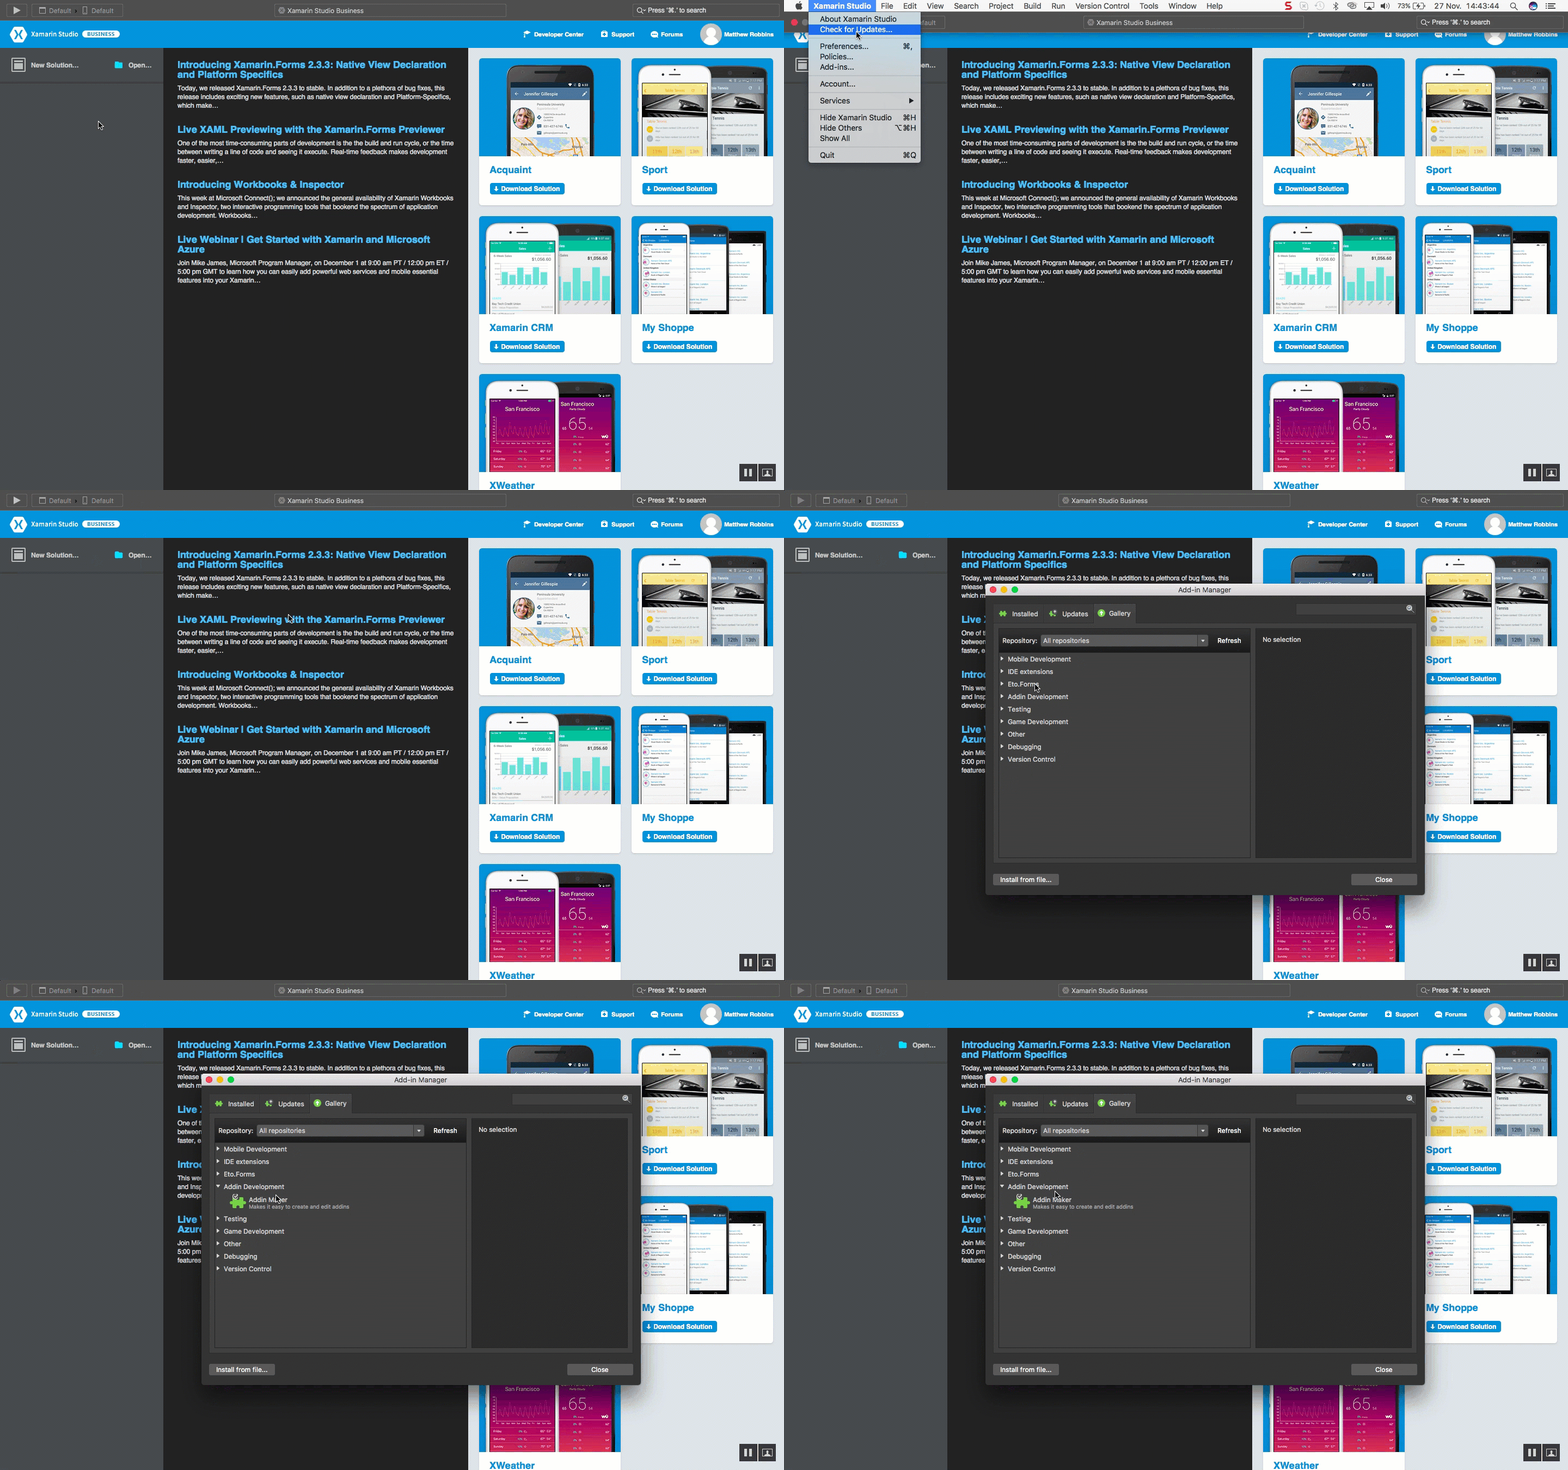
We can install the Addin Maker through Xamarin Studios Addin Manager; click on the Xamarin Studio main menu then Addins... to open the Addin Manager.
Browse to Gallery, select the Addin Development and then Addin Maker:
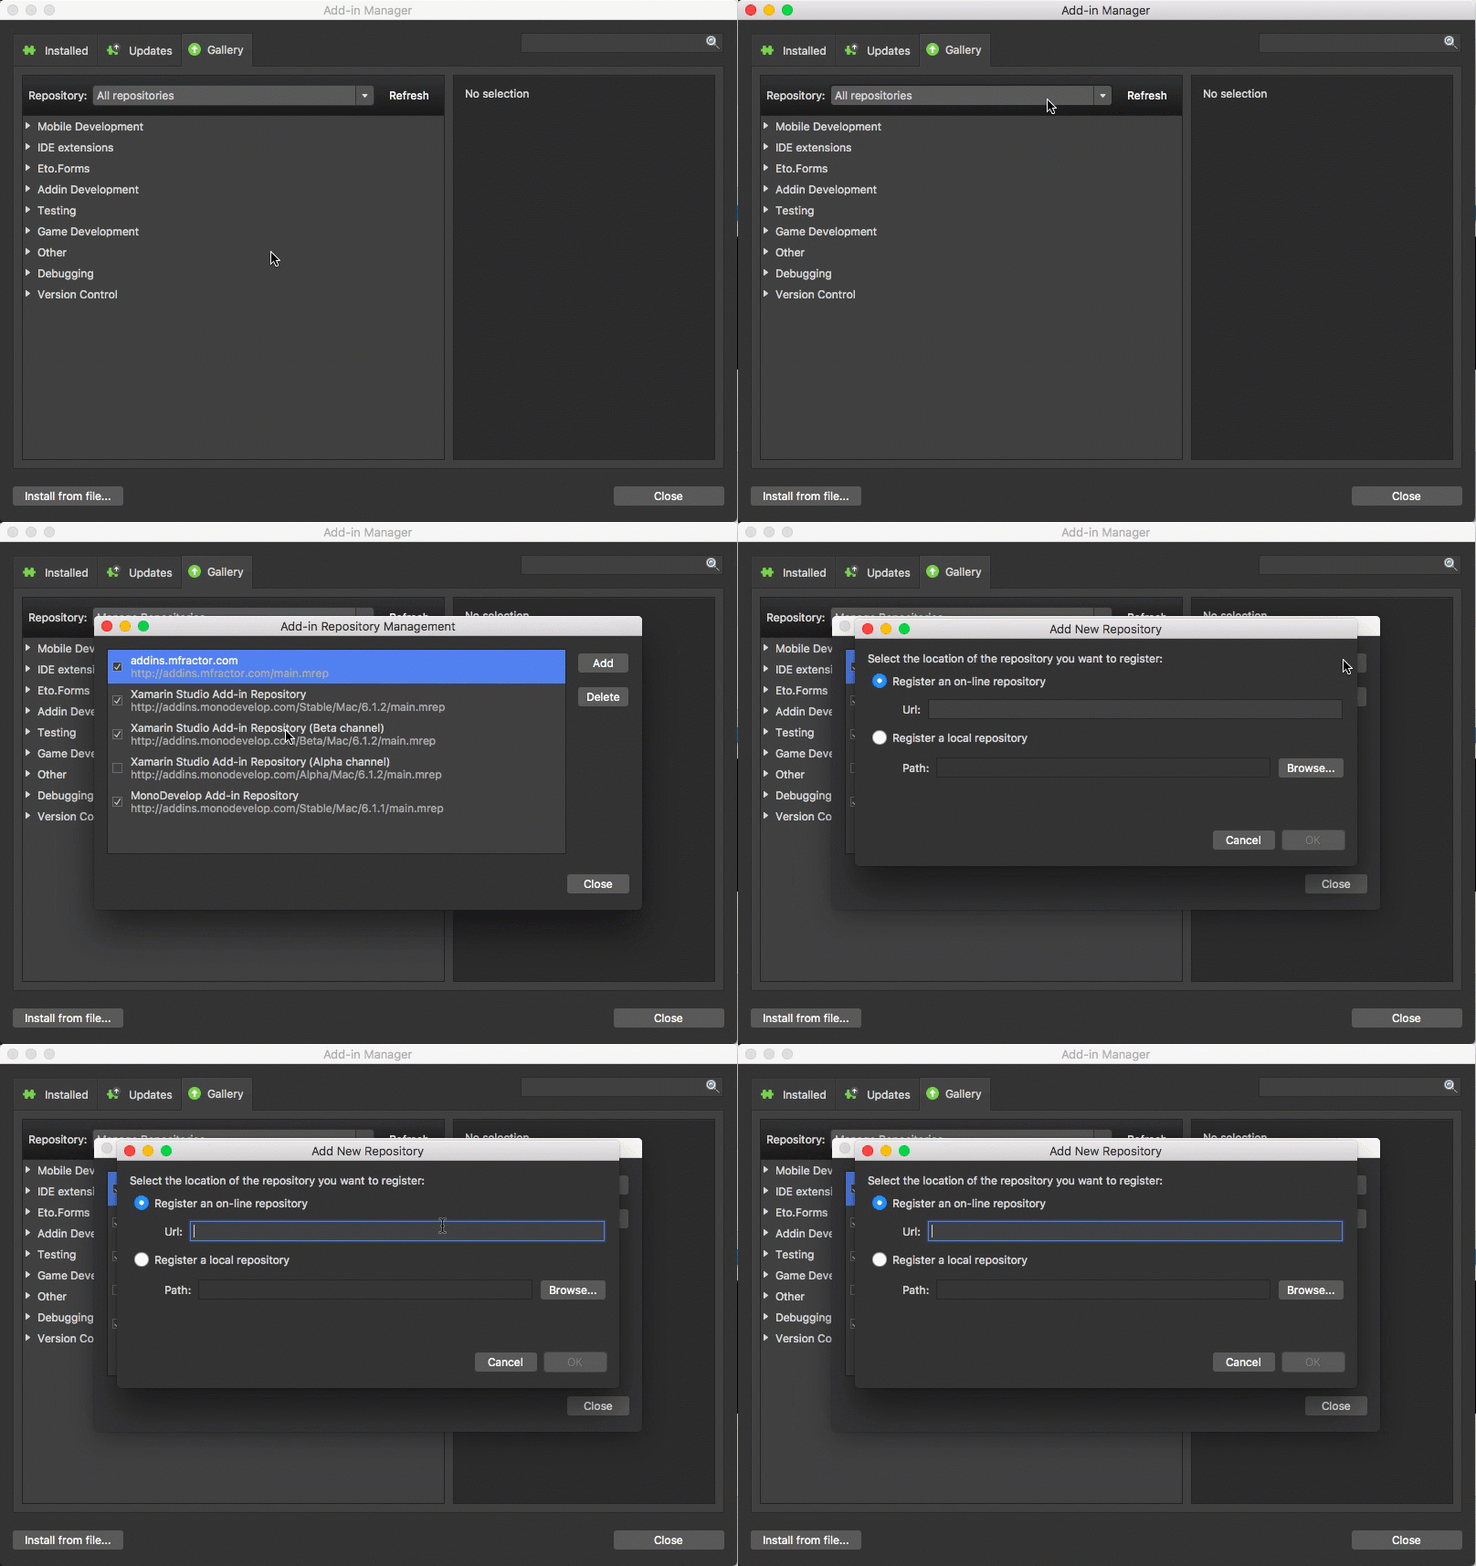
If the Addin Manager's Gallery is empty (this can happen when you upgrade then downgrade Xamarin Studio), then manually add a reference to the MonoDevelop addin repository using the following URL:
http://addins.monodevelop.com/Stable/Mac/6.1.1/main.mrep
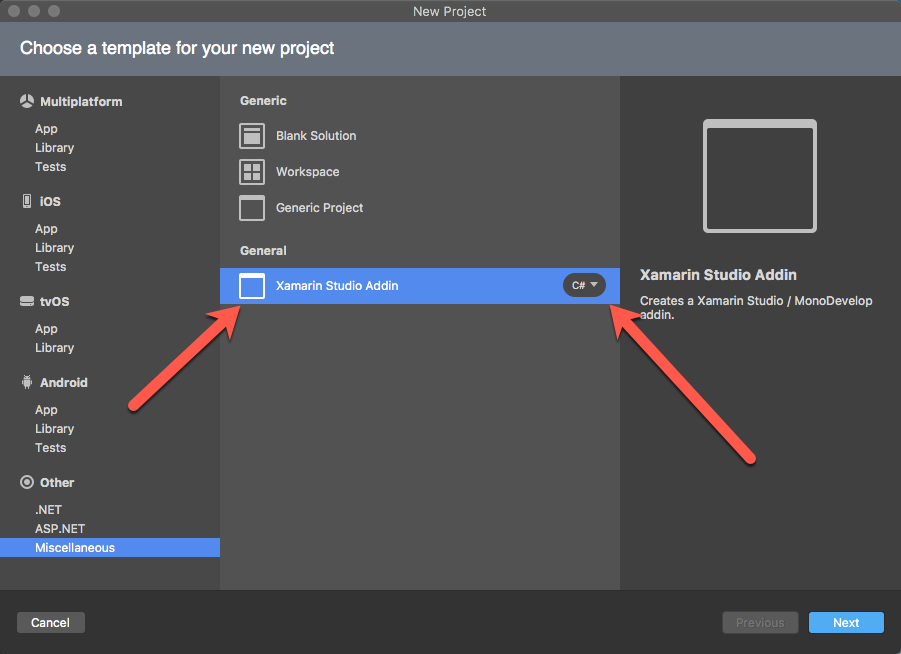
After installing the Addin Maker, a new project type will be available within the project creation dialog.
Select the File main menu item and then New Solution. Under Miscellaneous an option named Xamarin Studio Addin will now be present.
Go ahead and create your first addin!
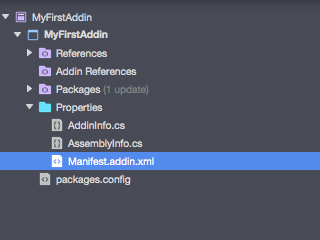
We now have a blank project with a few files under the projects Properties folder:
The addin manifest defines what we are extending within Xamarin Studio; without this file our .NET library would be just a plain old assembly to Xamarin Studio! This file must be named Manifest.addin.xml and be including into the .NET assembly as an EmbeddedResource.
Our addin manifest file declares to MonoDevelop / Xamarin Studio what our addin extends in the IDE; when Xamarin Studio loads our addin assembly, it inspects for the Manifest.addin.xml embedded resource and loads in our defined behavior.
Take a look at slimmed version of the manifest code for the translation addin included in this repository:
<?xml version="1.0" encoding="UTF-8"?>
<ExtensionModel>

	<Extension path = "/MonoDevelop/SourceEditor2/ContextMenu/Editor">
		<CommandItem id = "BuildingXamarinStudioAddins.Commands.TranslateString"/>
	</Extension>

    <Extension path = "/MonoDevelop/Ide/Commands">
        <Command id = "BuildingXamarinStudioAddins.Commands.TranslateString"
             _label = "Translate to..."
             shortcut = "Alt|T"
			       type="array"
             _description = "Translates a C# string from english to a user selected other language"
         	   defaultHandler = "BuildingXamarinStudioAddins.TranslateStringCommand"/>
    </Extension>
</ExtensionModel>
Let's review what this does:
- ExtensionModel is alway the root node and defines that we are building a Xamarin Studio addin.
- The first Extension node tells Xamarin Studio to inject behavior into the
/MonoDevelop/SourceEditor2/ContextMenu/Editorextenstion path. Here thepathattribute defines the path we are extending.- CommandItem references a command by id to be inserted into the extension path. The
idattribute references aCommandHandlerthat we've declared using that id.
- CommandItem references a command by id to be inserted into the extension path. The
- The following Extension node
- The Command node declares an implementation of
MonoDevelop.Ide.CommandHandlerto insert into the Ide.- Required The
idattribute defines the identifier that's used to refer to the command within the addin manifest. - Optional - Recommended The
_labelattribute specifies the text to display in UI's such as menu items. - Optional The
shortcutattribute allows us to define a keyboard shortcut the user can press to trigger our command. When pressed, the IDE will invoke theUpdate(CommandInfo)and parameterlessRunmethods of the command handler. - Optional The
typeattribute allows the command handler to present multiple user options when set toarray. When we set this toarray, theUpdate(CommandArrayInfoSet)andRun(object)callbacks will be invoked when the user uses this command. - Optional - Recommended The
_descriptionattribute specifies a verbose description of what the command does to display in UI's such as tooltips. - Required The
defaultHandlerattribute references the .NET class to instantiate when the command is inserted into the parent extension point. This must be include the full namespace as well as the class name.
- Required The
- The Command node declares an implementation of
This is a non-exhaustive list of what can be used within the Manifest.addin.xml file. Use the Addin Makers Xml IntelliSense to further explore what is available.
Our projects addin info file contains the assembly level attributes that specifies the version, id, name, descriptoin and much more to the IDE when our addin is installed.
These are the assembly attributes that our translation addin uses.
using Mono.Addins;
using Mono.Addins.Description;

[assembly: Addin(
	"BuildingXamarinStudioAddins",
	Namespace = "BuildingXamarinStudioAddins",
	Version = "1.0"
)]

[assembly: AddinName("Translate .NET String")]
[assembly: AddinCategory("IDE extensions")]
[assembly: AddinDescription("This addin adds a right click menu item in a C# source code file that translates a given string literal to another langauge.\n\nThis is the accompanying addin to the Xamarin University guest lecture 'Building Xamarin Studio Addins' by Matthew Robbins.")]
[assembly: AddinAuthor("matthewrobbins")]
[assembly: AddinUrl("https://github.com/matthewrdev/building-addins-for-xamarin-studio")]
Let's review what these do:
- The
Addinassembly attribute specifies Id, namespace and version of your addin. - The
AddinNameassembly attribute specifies the Name of your addin. The value that you provide here be the name that appears in the Addin Manager. - The
AddinCategoryassembly attribute specifies the addin category of your addin. This is the cateogory name in the Addin Manager that your addin will appear under. - The
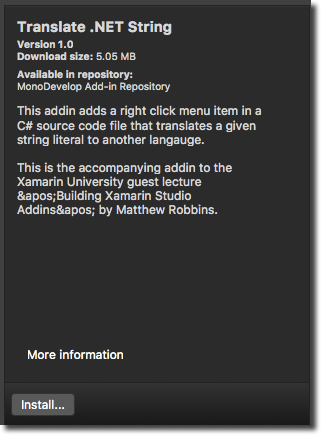
AddinDescriptionassembly attribute should clearly describe what your addin does. This is the value that appears under the name in the right-hand pane inside the addin manager when a user has selected your addin. - The
AddinAuthorassembly attribute states the author/owner of the addin - The
AddinUrlassembly attribute provides a link the user can click on to get more information about your addin. This is the url that will open when the user clicks the "More Information" button in the Addin Manager.
When the addin is installed into Xamarin Studio, the above attributes control how it is presented in the Addin Manager detail pane:
In addition to the standard References and Packages project references, an addin also has the concept of Addin References.
An addin reference declares to Xamarin Studio that are addin depends on another addin; this means we extend that addins behaviour using one of the extension paths exposed by that adddin.
For example, say we wanted to inject custom behavior into the right click context menu for the source editor; we'd declare a new extension within our manifest and target the /MonoDevelop/SourceEditor2/ContextMenu/Editor extension path like so:
<Extension path = "/MonoDevelop/SourceEditor2/ContextMenu/Editor">
  <CommandItem id = "BuildingXamarinStudioAddins.Commands.TranslateString"/>
</Extension>
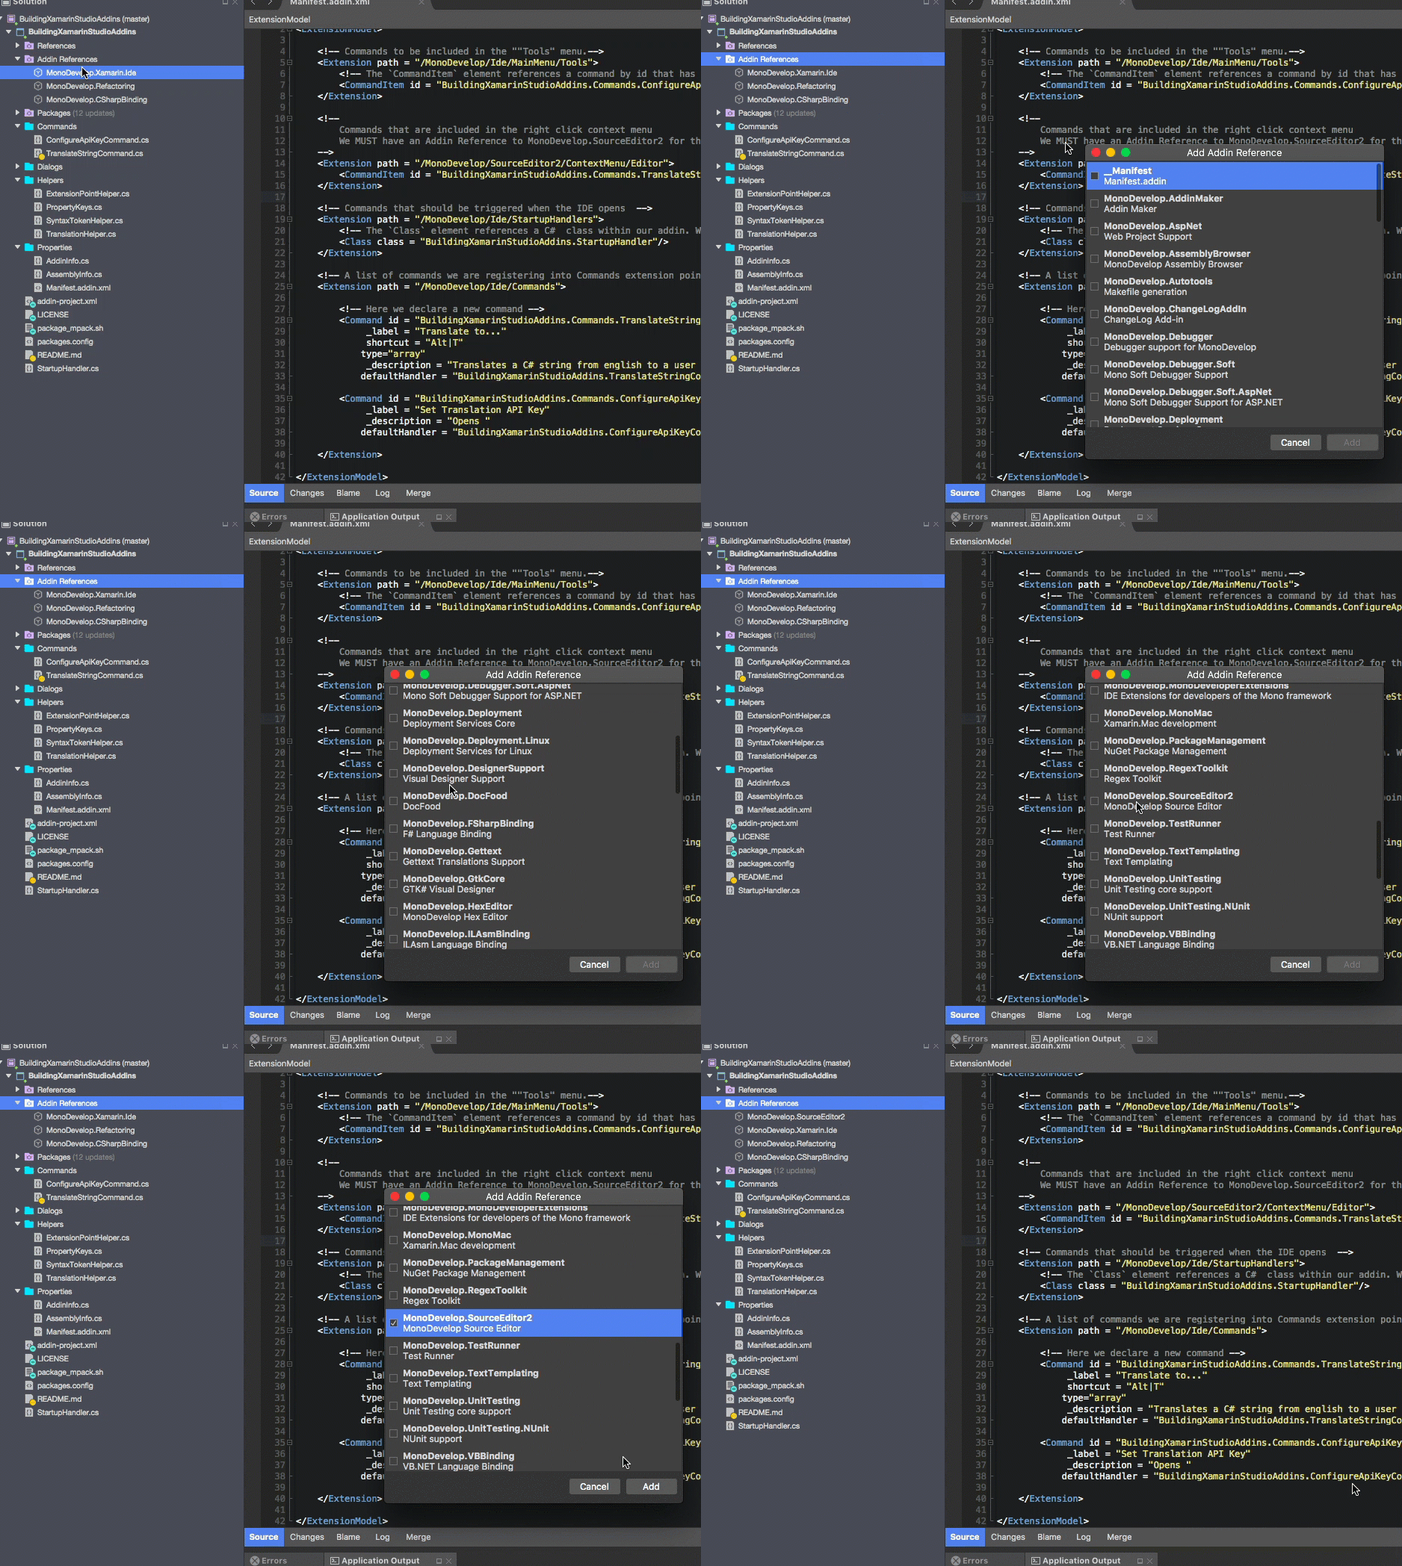
When doing this, even though IntelliSense and the .NET apis for the source code editor may be available in Xamarin Studio we must reference the MonoDevelop.SourceEditor2 addin like so:
If we do not do this, our addin might silently fail to load and you'll spend the next hour in frustration before finally finding an obscure log message happily informing you are missing an addin reference. Save yourself the stress and always include addin references as you are using them!
Before we review the translation addin, let's dig through some of the essential APIs that are used in this addin:
One of the most common objects we'll create when building a Xamarin Studio addin are implementations of CommandHandler's.
A CommandHandler is an action that can be executed within a certain context within Xamarin Studio; we register a command handler into the \MonoDevelop\Ide\Commands extension path, use Update to decide if it can execute and finally use Run to perform an action.
The MonoDevelop.Ide.IdeApp static class is your entry point into most of Xamarin Studio. It exposes the Workbench, the Workspace, various services and life cycle methods such as when the IDE is exiting.
Typically the IdeApp class is used to access the Workbench and Workspace.
The Workbench is used to access the documents that a developer is currently working with. We can load, create, reparse and close documents, access editor pads, access the root ide window and much much more.
One of the most commonly used properties is ActiveDocument. This property retrieves the current document that a user is working with. From there, we can grab the C# syntax tree, a users project or solution and then analyse or make changes to their source code.
The Workspace is used to access the general state of the Ide during a user session.
We can open new projects and documents, detect file open, close and editing events and much, much more.
The workspace is most commonly used to detect changes to a users project and documents and then update a state within our addins.
When developing an Addin, we'll often want to make changes to a users source code and have undo-redo history recorded.
The RefactoringService allows us to apply changes to a users document and have undo-redo history automatically recorded.
When applying a change, we provide the RefactoringService instances of the MonoDevelop.Refactoring.Change object that the service should apply.
Some common changes we can perform:
TextReplaceChange: Replaces a section of text within a document with new content.SaveProjectChange: Saves a targetted project.CreateFileChange: Creates a new file with the provided content.
The Change object is abstract so we can implement our own custom refactoring changes if we'd like.
The static class MonoDevelop.Core.PropertyService is used to store user configurations for the Ide installation.
The PropertyService is commonly used to store configuration settings that are specific to your addin. For instance, we can store a variable that denotes if it was the addins first run using the code below:
if (!PropertyService.HasValue("my_addin.is_first_run")
   || PropertyService.Get("my_addin.is_first_run", true))
{
  PropertyService.Set("my_addin.is_first_run", false);
  PropertyService.SaveProperties();
}
Here we:
- Use
HasValueto determine if a value is stored within the users properties. - Use
Getto retrive a value from thePropertyService; note that we can provide a default value to return when there property does exist. - Use
Setto store a new property. - Use
SavePropertiesto commit our changes to the properties. You must do this to ensure your properties are persisted between Ide sessions.
Let's go over the files within our sample addin and explore what they do:
The startup handler will detect when the Ide is first opened and perform any startup initialisation logic. It implements MonoDevelop.Ide.CommandHandler and is is injected into the extension path /MonoDevelop/Ide/StartupHandlers within the manifest.
When the Ide starts up, it will collect all commands in that extension point and invoke the Run method.
In this addin, we check to see if the user has a translation api key set and show our configuration dialog if they haven't.
Commands/TranslateStringCommand.cs
The translate string command is injected into the right click context menu using the /MonoDevelop/SourceEditor2/ContextMenu/Editor extension path. It will expose 4 translation options for the user to select when they right click on a C# string literal.
Commands/ConfigureApiKeyCommand.cs
The configure api key command is injected into the Tools menu using the /MonoDevelop/Ide/MainMenu/Tools extension path and will display the API key configuration dialog when selected.
Dialogs/ConfigureApiKeyDialog.cs
The configure api key dialog show how to implement a custom GUI using Gtk. It accepts a string input to set the API key for our translation service.
The syntax token helper class is used to inspect the C# syntax tree and retrieve a string literal syntax node that is beneath the users cursor.
Importantly, this class demonstrates:
- Retrieving the Roslyn analysis document from a MonoDevelop gui document.
- Inspecting the Abstract Syntax Tree and locating the
SyntaxNodeat a specified location. - Inspecting a
SyntaxNodetype and checking if it is a string literal.
This class offers a tiny peek into what can be accomplished using Roslyn.
The translation helper wraps a REST query to Google Translation Services to take a string from the users source code and translate it to another language.
Helpers/ExtensionPointHelper.cs
Given an extension point path such as "/MonoDevelop/Ide/Commands", this helper method retrieves all nodes within that extension and then renders the ids that can be referenced within the Manifest.addin.xml document.
This helper is extremely useful when diagnosing why an addin's command isn't functioning as expected. Frequently another command consumes an event BEFORE your addin; this method let's you insepect an extension path and find the id's of the nodes so you can inject your command before it using the insertbefore or insertafter attributes.
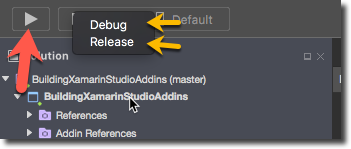
When we are ready to test and debug our addin, we can simply press the Play button in Xamarin Studio. This will startup our addin within a new Xamarin Studio instance and allow us to debug it as we would any other Xamarin Studio application:
You can also select your build profile (such as Debug or Release) as well as adding custom configuration.
Once your done debugging your addin and before we send out our addin into the big, wide world it's best practice to verify everything works as a final app package.
Xamarin Studio addins are distributed in the .mpack format; this is a zip archive that contains all your Addin assemblies and resources in a convenient bundle.
We use mdtool to take an Addin assembly and bundle it into an mpack. On a typical OSX installation, mdtool will be location at /Applications/Xamarin Studio.app/Contents/MacOS/mdtool.
If mdtool is not present at that location, you can find it using the following shell script:
find / -name mdtool
To package an addin, we use provide the path to our addin assembly to mdtools setup pack command along with an output directory using the -d: flag like so:
/Applications/Xamarin\ Studio.app/Contents/MacOS/mdtool setup pack ./MyAddin/bin/Release/MyAddin.dll -d:./builds
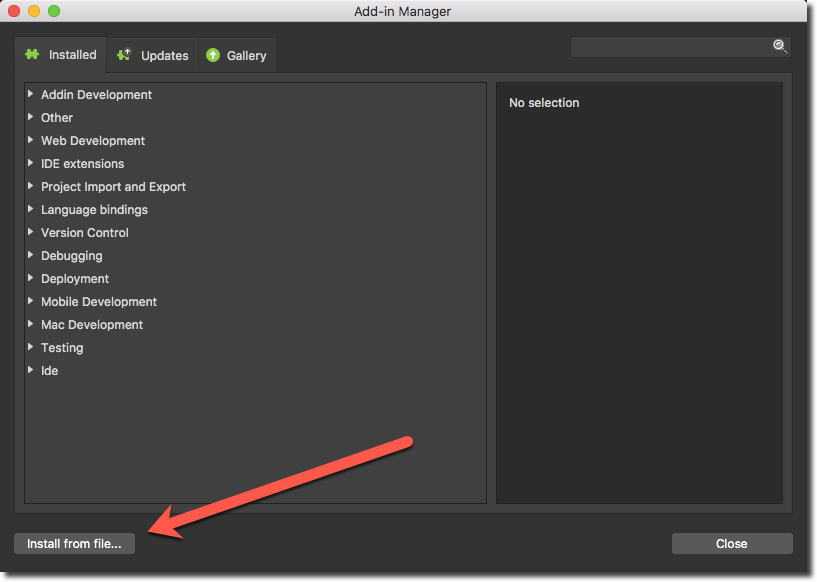
This command will generate a *.mpack file that bundles your addin. You can then install this addin via the Addin Manager using Install from file:
For a convenient packaging script, see the package_mpack.sh included in this repository.
We are almost there!
The last thing we want to do is to include our Addin into the MonoDevelop Addin Repository; this online repository will build, package and host our addin and then make it available within the Addin Manager within Xamarin Studio.
Firstly, we need to provide an addin-project.xml file that tells the addin repository how to build and then package our addin:
<AddinProject appVersion="6.0">
    <Project platforms="Mac Win32">
        <AddinFile>BuildingXamarinStudioAddins/bin/Release/BuildingXamarinStudioAddins.dll</AddinFile>
        <BuildFile>BuildingXamarinStudioAddins.sln</BuildFile>
        <BuildConfiguration>Release</BuildConfiguration>
    </Project>
</AddinProject>
Let's go through this line by line:
- AddinProject: This must be the root element and it specifies the app version our addin targets at a minimum. 6.0 means that our addin will not be installable on versions of Xamarin Studio lower than 6.0.
- Project: Specify the platforms we are building for.
- AddinFile: Informs the build server where the final assembly it should package will be found relative to the root of our repository.
- BuildFile: The file that the addin server should build.
- BuildConfiguration: The configuration that the addin should be built under.
After we've added this, visit the Addin Repository website and create an account. In the right side of the site click Create a new project.
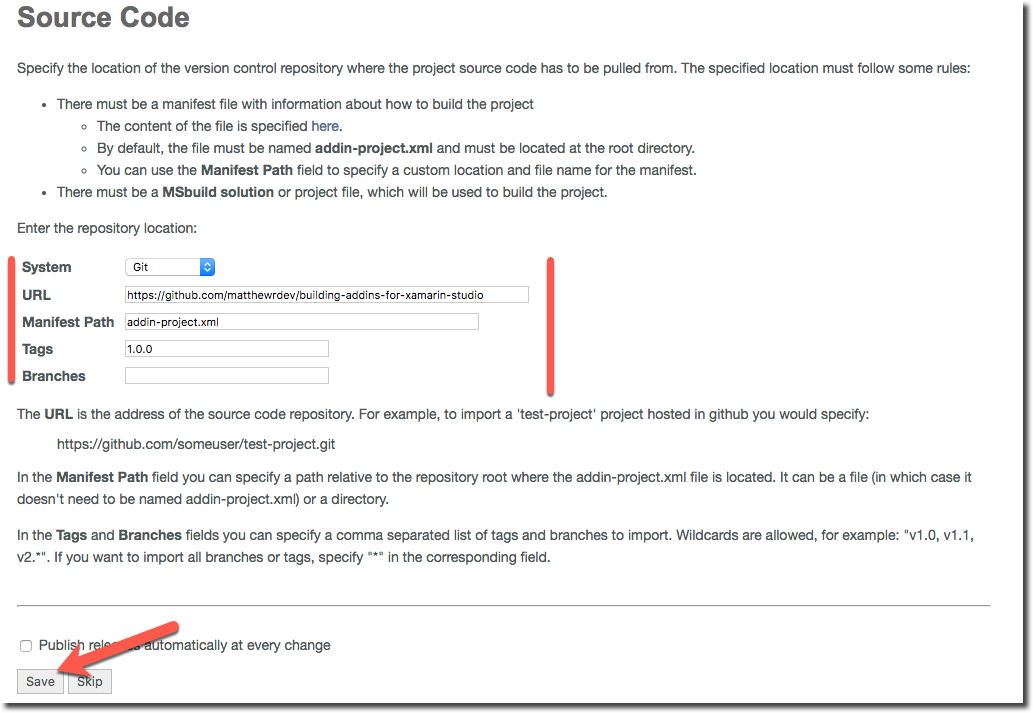
Here we configure the build server and tell where our addin's source code lives, the version control type, where the build configuration may be found and how to handle releases:
For this addin I've chosen to only release the tagged 1.0.0; this is completely optional. You could have the addin server build and publish each time the repository changes if you so choose to.
Click Save and now wait for your addin to build...
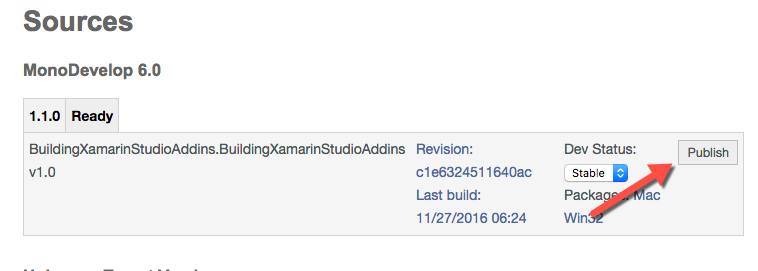
After you're addin has been built it will appear under the Sources title:
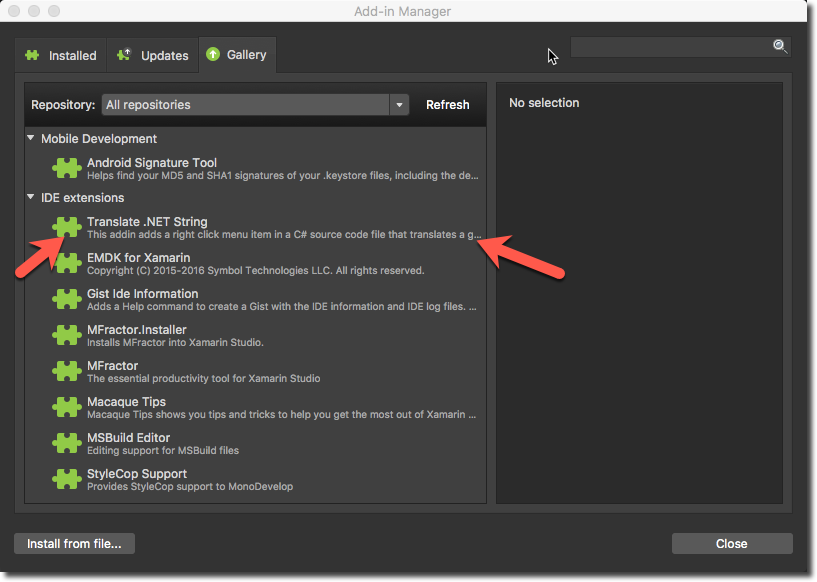
Simply click Publish and voila, your addin will appear inside the Gallery section of the Addin Manager in Xamarin Studio:
While you're building your shiny addin, you'll often need to consult documentation to figure out how to build what you want...
The bad news here is that most of the APIs are undocumented; you'll frequently need to consult the MonoDevelop source code to figure out how to implement things. The source code for MonoDevelop can be found here.
Apart from the MonoDevelop source code, here is a list of resource I have found useful when developing MFractor:
- Introduction to Mono Addins: An overview of the Mono extension model.
- Extending Xamarin Studio with Add-Ins: A introductory tutorial on building Xamarin Studio addins.
- Extension Tree Reference: An in-depth guide to the available extension points within MonoDevelop.
In addition to the existing documentation, here is a non-exhaustive list of some existing addins that can be used as reference material:
- ServiceStack: Exposes service stack into Xamarin Studio.
- Addin Maker: The addin maker for Xamarin Studio.
- MonoDevelop Addin Packager: (deprecated) Helper utility to package the current Xamarin Studio addin project.
- Xamarin.Android Open Layout Declaration: (deprecated) Shows how to use NRefactory (a deprecated syntax tree) to open an android axml layout.
- MFractor.Installer: An instal;er addin that downloads and injects MFractor into Xamarin Studio.
- Xamarin.Android String Extractor: (deprecated) Shows how to use NRefactory (a deprecated syntax tree) to resolve string literal and then extract it into an android string resource file.
Please note that several of my addins have been deprecated and have moved into MFractor itself. These repositories may not even work anymore and have remained open source for reference only
I strongly encourage joining the Xamarin Studio Addins Slack channel on the Xamarin Slack. I (Matthew Robbins) am generally available to answer questions and help investigate how to implement ideas.
Another option is to reach out directly to me via Twitter; send a tweet to @matthewrdev and I'll do my best to help.
In this tutorial we've learnt how to install the Addin Maker, built our very first addin, packaged it and then deployed it to the MonoDevelop addin repository.
Good luck and have fun building your own Xamarin Studio addins 🤘
Matthew Robbins - Creator Of MFractor
