Fork and clone this repo, run npm i and npm run dev to get everything working.
Checkout to branch
completedfor finished version.
Mini project
Afternoon Project
- Students can perform unit tests using Jest.
- Become familiar with the common matchers Link
- toBe
- toEqual
- not
- toContain (arrays)
- toHaveLength
- Become familiar with the common matchers Link
- Students can test React components.
- Students can test both regular and async components
- Students can use spyOn and act to control when assertions are run
Testing refers to the process of writing tests for our code based on what we expect to happen and then running our code against those tests. Our code will be considered successful if it passes the tests that we write for it. The idea is that we determine from the start what we expect a function or a component to do, write tests to reflect these expectations, and then put our components up against these tests. If they behave the way we expect, then we can move on. Otherwise, we need to refactor our code to pass the tests. There are several common kinds of testing in the development world:
- Unit Testing: Used to test a single function.
- Endpoint Testing: Used to test an endpoint. Postman tests would be an example of this.
- Component Testing/Mocking Components: Testing a component in a simulated environment
- End to End Testing: Simulates a user interacting with the website.
Traditionally, testing is handled by QA engineers but there is a trend emerging of test driven development:
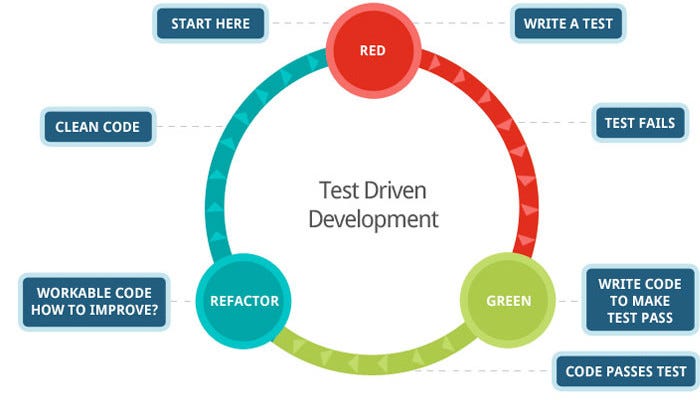
There is a huge need for developers who know how to test their code and the more familiar you become with it, the more valuable you will be to a future employer. There are many companies that are now shifting to an entirely test driven development cycle.
Benefits of testing:
- You know exactly what you expect to happen right from the start. This reduces debugging time as it allows you to develop in a more isolated environment
- It created automatic documentation for your project
- Allows you to think through your logic beforehand and find any holes you may not have intended.
- Jest is a unit testing library which allows us to perform unit tests.
- The docs will be helpful for understanding its capabilities link
- We will just be scratching the surface on Jest but it will be worth your time to read through the docs.
- Jest comes out of the box with create-react-app.
- When bootstrapping a project with create-react-app, all of our tests must be included in the src directory and will not be compiled on build.
Let's write our first unit test:
- Create a
__tests__folder and afunctions.jsfile in the src folder.The functions file is for showing off jest functionality. These functions can come from anywhere
- Create a
functions.test.jsfile in the__tests__folder. This file will be used to test our functions infunctions.js. - Let's look at what goes into writing a unit test using Jest:
const { sum, sayHello } = require('../functions')
//Import our functions to be tested

//We set up a unit test using the following syntax:
test('adds 1 + 2 to equal 3', () => {
  //The test function is provided to us by Jest and is available globally
  //We provide it with two arguments: a description of our test and a callback function.  This callback function is our test.

  expect(sum(1, 2)).toBe(3)
  //In this case we are testing if our sum function is able to add 1 and 2 together.
  //We use the expect keyword to expect a certain value and the toBe matcher to determine what we expect the value to be.
  //In this case, we expect the invocation of sum with 1 and 2 passed as arguments to be 3.
})
Run npm run test to run our tests. You will see in the console whether your tests pass or not. Let's write another test in the same file:
test('sayHello says hello', () => {
  expect(sayHello()).toBe('hello')
})
Let's look at some other matchers available to us through Jest. Include the following tests in our functions.test.js file:
// Checking the value of an object
test('object assignment', () => {
  const data = { one: 1 }
  data['two'] = 2
  expect(data).toEqual({ one: 1, two: 2 })
  //toEqual is for more complex values, can check objects
})

test('Expect true to be truthy', () => {
  expect(true).toBeTruthy()
})

//Checking an array contains an items
let names = ['John', 'Ariel', 'Zach']
// let names = [{id: 1, name: 'John'}]

test('Names contains Ariel', () => {
  expect(names).toContain('Ariel')
})
One of the most important matchers in Jest is the not matcher. This allows you to flip any matcher. Let's look at some examples:
test('Add 1 and 2 to equal 3', () => {
  expect(sum(1, 2)).toBe(3)
  expect(sum(1, 2)).not.toBeNaN()
  //You can append not before any matcher to flip what it checks for
})

test('Names contains Becca', () => {
  expect(names).toContain('Becca')
  expect(names).not.toContain('Preston')
})
There are a ton of matchers available in Jest you can see them here
Above you will see that we grouped two tests together. This is not the correct way to do things because each test should exist in isolation. Each test should not be dependent on any other test passing or failing. If we need to group tests together, there is a better way to do it, a describe block. This functions like a test block but holds related tests. Even though they are grouped together, they exist independently of each other.
Create a new file called bankAccount.test.js in your __tests__ directory. We will be using the object provided in bankAccount.js to run multiple tests together.
import bankAccount from '../bankAccount'

//The describe block is provided by Jest and allows us to group tests together while allowing them to pass or fail independently of each other.
describe('Bank account methods and properties', () => {
  //Describe takes a description and a callback function which will contain the tests we want to run.
  beforeEach(() => {
    //Inside of a describe block, we have access to test setup and teardown.
    //Here this function will run before each test in our describe block but we can also use: beforeAll, afterAll, afterEach
    bankAccount.balance = 1000
  })

  //Try to walk yourself through what each of the below tests is doing.
  test('Initial balance is 1000', () => {
    expect(bankAccount.balance).toBe(1000)
  })
  test('depositMoney should correctly alter balance', () => {
    bankAccount.depositMoney(2000)
    expect(bankAccount.balance).toBe(3000)
  })
  test('withDraw should correctly alter balance', () => {
    bankAccount.withdrawMoney(2000)
    expect(bankAccount.balance).toBe(-1000)
  })
})You can also test entire React components, also called mocking components. We will use a couple of simple examples to make sure that our components are displaying what we want them to. To do this we will use Facebook's native React testing library. This is also provided by create-react-app. THis library will allow us to mount our components in a virtual environment and test them.
In Header.js we don't want our dropdown to be open by default so we'll test if this is the case
Create a file called Header.test.js in our __tests__ directory.
import React from 'react'
import { render, fireEvent } from '@testing-library/react'
//render and fireEvent are provided to us by the React testing library.  The functionality of these will become clear further down.
import Header from '../components/Header'
//We need to import the component that we want to test

it('Does not show dropdown when mounted', () => {
  //Instead of a test block, we will use an it block but this functions very similarly to our test blocks above.  We provide the same arguments.

  const { queryByTestId } = render(<Header />)
  //render will render our component onto the dom and allow us to test it.  It will return an object with a number of properties, one of these is a function queryByTestId.  This behaves similarly to the vanillaJs functions querySelector or getElementById
  //To query an element by test id we have to give it a test id in this format : data-testid.  Check Header.js for this

  const dropdown = queryByTestId('dropdown')

  expect(dropdown).not.toBeTruthy()
  //We expect the dropdown to not be rendered so it should not be truthy.
})

//Now let's test that our menu shows when the hamburger is clicked.

it('Shows dropdown when hamburger is clicked', () => {
  const { container, getByTestId } = render(<Header />)
  //Container has information about the html element.  getByTestId is similar to queryByTestId but will return an error if no match is found

  const hamburger = getByTestId('hamburger-button')

  fireEvent.click(hamburger)
  //This will click on the hamburger

  expect(container.textContent).toContain('Dropdown menu')
  //Because we have clicked on our hamburger, we expect our html element to contain the text Dropdown menu
})Often we need to test components that have async logic like network calls. We are able to use a combination of Jest and the React testing library to make this happen.
Create a file called Todos.test.js in our __tests__ directory.
import React from 'react'
import { render, act } from '@testing-library/react'
//act is provided by the React testing library will assure that all 'units' of interaction inside of your component (like data fetching, user events, rendering) are completed before you run any assertions.
import axios from 'axios'
import Todos from '../Components/Todos'

it('Renders todos', async () => {
  //Because we need to test async logic, our test function has to be asynchronous.
  let component
  //Initializes a variable for us to test later.

  jest
    .spyOn(axios, 'get')
    //spyOn is provided by Jest and watches the axios object and tracks any calls to the get method
    .mockImplementation(() =>
      //mockImplementation intercepts those calls and replaces the functionality with what we give it.
      Promise.resolve({ data: [{ id: 1, title: 'test title' }] })
    )
  //So what this is saying is that inside of this test, any get request that is made will resolve to be our test post rather than the actual result from our network call.  This gives us more control over our testing environment.

  await act(async () => {
    //By awaiting act we make sure that any network calls resolve before making our assertions
    const { container } = render(<Todos />)
    component = container
    //Grabs the dom container from the Todos component and reassigns it to the component variable
  })

  expect(component.textContent).toContain('test title')
  //This will verify
})- Jest has several guides and examples here in its official docs.
- A video tutorial of jest basics that covers the content of this lecture.
- An in-depth tutorial and discussion of using jest in a React app.
- A discussion of why jest and the react-testing-library are effective.
- A cheat sheet for jest syntax.
- The list of matchers referenced in the Student Learning Objectives section.
- React Testing Library official docs.
- Walk-through explanation for writing a component test.