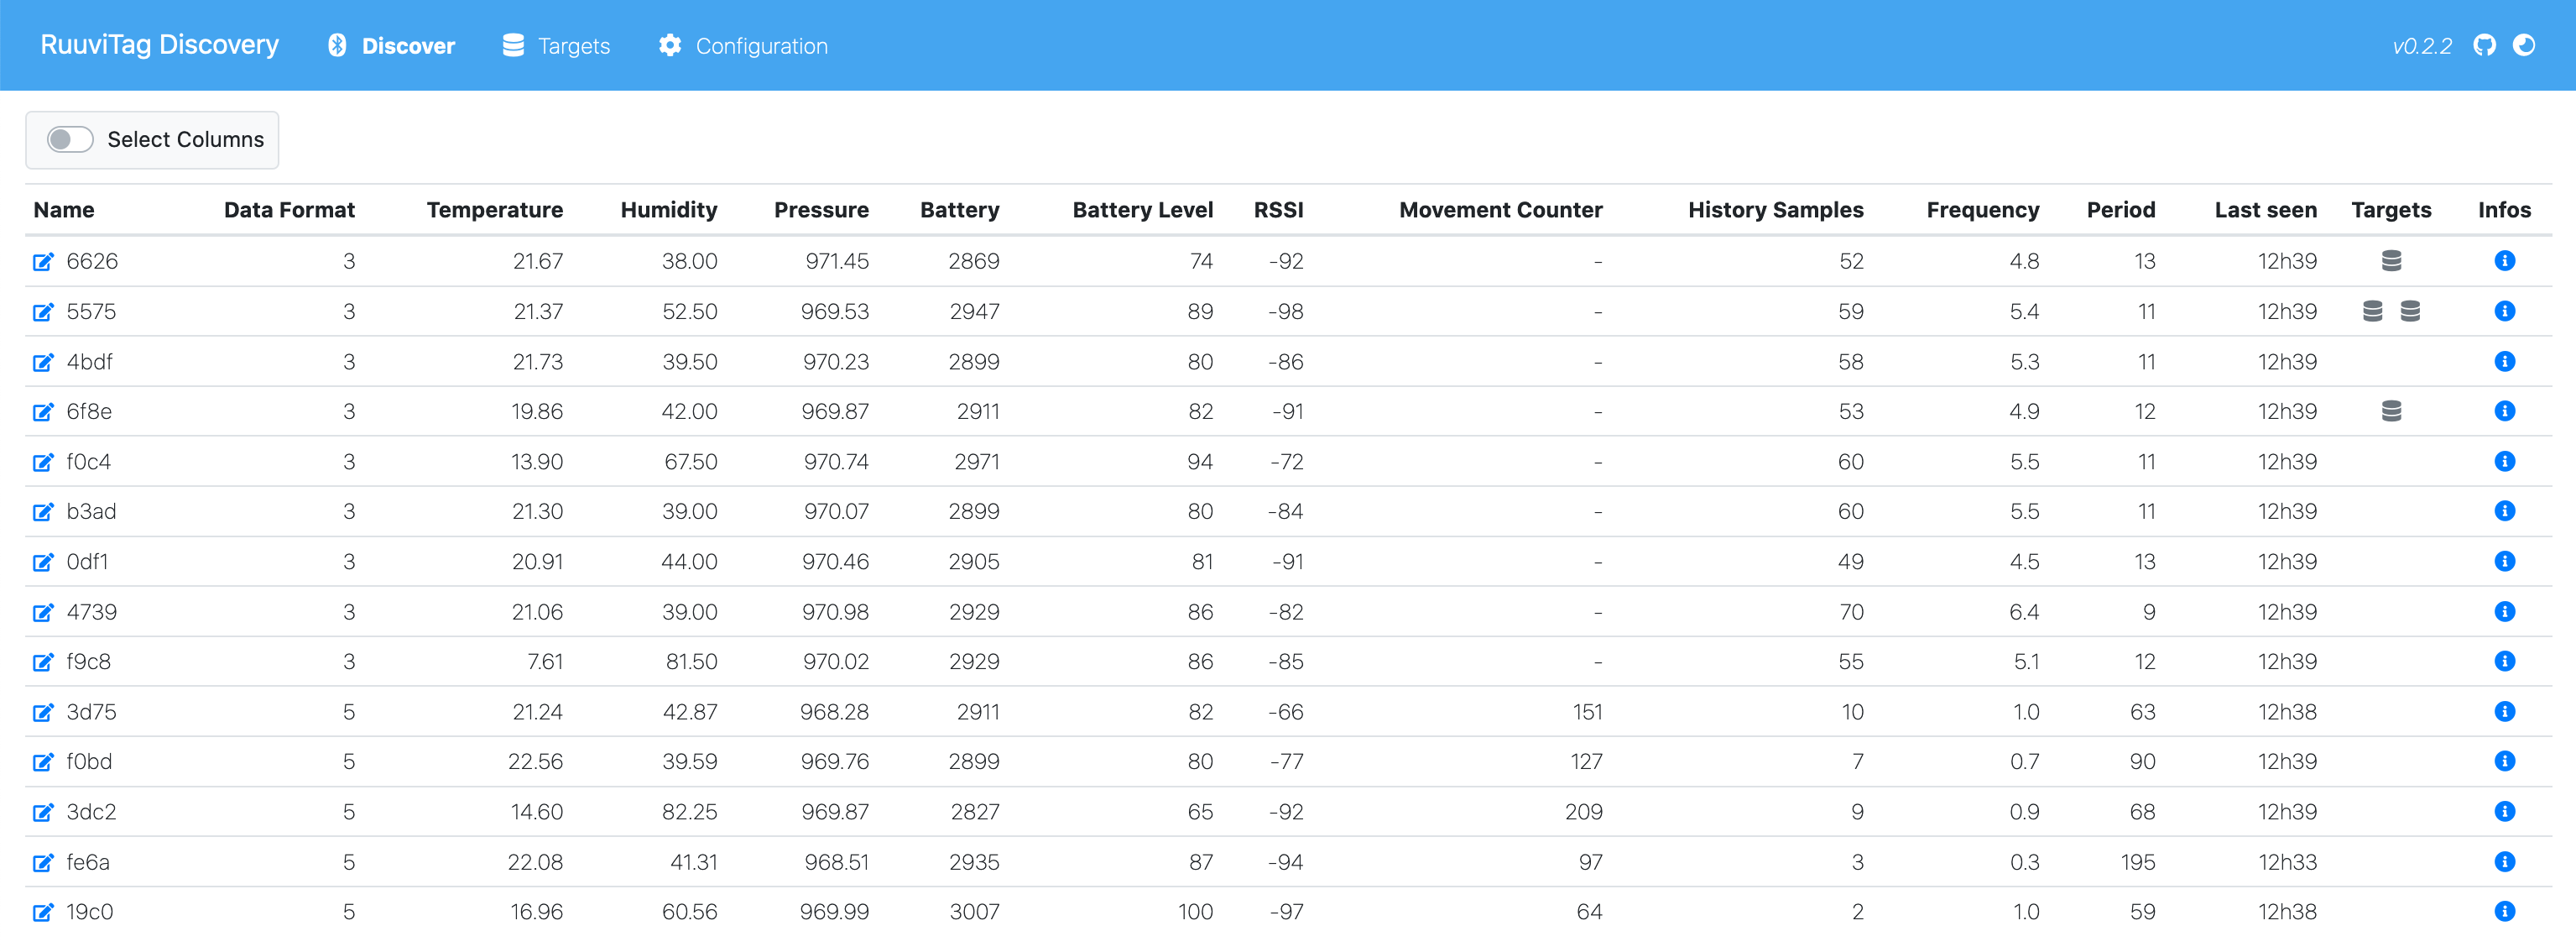
Discover RuuviTag Environmental Sensors using a web interface (all measures in one page, in real time).
Save measures to multiple targets:
- MQTT
- InfluxDB
- Graphite
- Home Assistant (using MQTT discovery integration or API)
Other Features:
- RuuviTag measurements displayed in real time
- Select and configure measures sent to each target
- Additional measures: absolute humidity, acceleration, air density, battery level, dew point, equilibrium vapor pressure, vapor pressure deficit, reception frequency and reception period
- Sampling configuration (median measures)
- Broadcast live or sampled measures
- Home Assistant add-on
You can download pre-built installer for your platform or see instructions for your favorite package manager (developpers should install Node.js with a Node version manager).
Download and unzip the code or use git (prefered method)
git clone https://github.com/balda/ruuvitag-discoverycd ruuvitag-discovery/
npm installTo start the application, run the command
npm startIn a browser, go to http://localhost:8099/ url to see the web interface.
By default, server port is 8099. It can be changed using SERVER_PORT environment variable
SERVER_PORT=8100 npm startDefault HCI device used can be changed, using NOBLE_HCI_DEVICE_ID environment variable (leave it empty to use the default). See noble documentation for more information.
NOBLE_HCI_DEVICE_ID=1 npm startTo stop the application, use ^c.
Configuration is saved in /data/ directory (created on first run).
Install Home Assistant add-on
See Home Assistant Documentation
All the configuration is done in the web interface and saved in /data/config.json file.
Default configuration retain 100 measures max per RuuviTag (history config). History is used to calculate frequency (number of measures read per minute) and period (time in seconds between measures read). samples additional measure count measures in tag history.
Default sampling is every 10 seconds (interval config). Setting interval = O disable sampling (last measures are always sent).
If sampling is enable, median measures are sent to non live targets (see targets below)
Battery level is between 1% and 100%, for respectivly 2500mV (min config) and 3000mV (max config).
See battery FAQ in RuuviTag firmware repository.
Log options can be enable or disable in real time.
- Prefix logs with timestamp (enabled by default)
- Display error logs (enabled by default)
- Display info logs (enabled by default)
- Display measures received by tags
- Display measures sent to targets
- Display debug logs
- Display web socket logs
See Ruuvi sensor protocols to view available measures. Data format 3 and 5 are supported. Data format 1, 2 and 4 are not tested.
- Temperature
- Pressure
- Humidity
- RSSI
- Battery voltage
- Acceleration X
- Acceleration Y
- Acceleration Z
- Tx power (data format 5)
- Movement counter (data format 5)
- Measurement sequence number (data format 5)
- Data format
Calculated using default measures
- Absolute humidity
- Acceleration
- Air density
- Battery level
- Dew point
- Equilibrium vapor pressure
- Vapor pressure deficit
New measure can be created, using a math expression like (temperature * 9/5) + 32 for Fahrenheit.
Each custom measure has a label, a field name (must be uniq in all the measures), an optional unit, an accuracy (number of decimals displayed and sent to targets) and a math expression.
Custom measures can be used to:
- Convert units (temperature Celcius in Kelvin or Fahrenheit)
- Scale measure (pressure hPa in Pa or Bar)
- Change measure accuracy (round temperature)
- Offset a value or add/remove gain
- Cap a measure
- Calculate conditional values
- Make a crazy formula
There are some examples on the "New Custom Measure" panel.
See mathjs.org for more documentation about math expressions syntax.
Measures can be sent in live to a target by setting interval = 0. Otherwise, every interval seconds, median measures are sent (or last measures if sampling is disabled).
All targets have a name and can be enabled or disabled.
Some targets have a measurement option:
Tag: all measures are sent (using RuuviTagfield)Measure: each measure is sent to the target (using measurefield)Both: both behaviour (TagandMeasure)
Target have also specific configuration:
host: broker hostport: broker portusername: broker usernamepassword: broker passwordtopic: topic prefix
For now, only mqtt: protocol is supported.
MQTT target use measurement option:
Measureoption send each measure value to[topic]/[ruuvitag.field]/[measure.field]topic.Tagoption send to[topic]/[ruuvitag.field]topic a json payload:
{
    "id": "RuuviTag.id",
    "name": "RuuviTag.name",
    "field": "RuuviTag.field",
    "measures": [
        {
            "label": "measure.label",
            "field": "measure.field",
            "value": "measure.value"
        },
        {...}
    ]
}host: server hostport: server portusername: server usernamepassword: server passworddatabase: server database
For now, only http: protocol is supported.
InfluxDB target use measurement option:
Measureoption write value (as InfluxDB fieldvalue) in[measure.field]measurement field with[ruuvitag.id]as tag.Tagoption write all values (as InfluxDB fields[measure.field]) in[ruuvitag.field]measurement with[ruuvitag.id]as tag.
host: server hostport: server portprefix: path prefix
For now, only http: protocol is supported.
Measures are written in [prefix].[ruuvitag.field].[measure.field] series.
host: broker hostport: broker portusername: broker usernamepassword: broker passwordtopic: Home Assistantdiscovery_prefix
For now, only mqtt: protocol is supported.
MQTT discovery must be enable on Home Assistant and component discovery_prefix must match with target topic config.
Enabled RuuviTags will be present in the Devices list and their measures in Entities (one sensor per measure). All measures will be listed in the MQTT Integration. So RuuviTags can be placed in an Area.
Device name is the one defined in the web interface.
Entity is defined with some attributes:
- Name: device name followed by measure name
- RuuviTag: id of the tag
- Measure: name of the measure
- Unit: displayed if measure has an unit
- Icon is automatically set
Remove entity (sensor measure)
Entities are automatically removed. They can always appear in Home Assistant. After a reboot (or maybe after they disappearing from history), you can "remove" them using Home Assistant interface.
Remove device
Home Assistant does not provide an easy way to remove devices. For now, there's only two "solutions":
- Remove MQTT integration.
- Remove all device entities (see "remove entity"), then edit manually
/config/.storage/core.device_registryjson file, remove RuuviTag reference in thedata.devicesarray and reboot.
For now, Home Assistant (API) target only works as an Home Assistant addon (no remote: API Token is auto discovered by the addon).
The measure label will be used as the Entity name (with some attributes: RuuviTag name, RuuviTag ID, Measure and Unit).
Entity ID is built with the fields of RuuviTags and measures: sensor.[ruuvitag.field]_[measure.field].
API integration is limited compared to MQTT discovery integration:
- Each tag measure is an Entity without Device in Home Assistant.
- Entities created with the Home Assistant API can't be placed in an Area (use MQTT discovery for that).
- Friendly name can't be changed in Home Assistant (but can be done in RuuviTag Discovery interface).
{
    "sampling": {
        "history": "100",
        "interval": "10000"
    },
    "battery": {
        "min": "2500",
        "max": "3000"
    },
    "ruuvitags": {},
    "targets": [
        {
            "type": "[mqtt|influxdb|graphite]",
            "id": "[ID]",
            "enable": "[1|0]",
            "name": "[TARGET_NAME]",
            "interval": "[broadcast interval (seconds)]",
            "tags": {
                "[TAGID]": {
                    "id": "[TAGID]",
                    "measures": {
                        "[MEASURE]": {
                            "label": "[MEASURE_LABEL]",
                            "field": "[MEASURE_FIELD]"
                        }
                    },
                    "name": "[RUUVITAG_NAME]",
                    "field": "[RUUVITAG_FIELD]"
                },
                "...": {
                    ...
                }
            }
        },
        ...
    ],
    "columns": {
        "name": true,
        "dataFormat": true,
        "rssi": true,
        "temperature": true,
        "humidity": true,
        "pressure": true,
        "battery": true,
        "battery_level": true,
        "txPower": true,
        "movementCounter": true,
        "measurementSequenceNumber": true,
        "samples": true,
        "frequency": true,
        "period": true,
        "ts": true
    }
}