Setting up the Pesky Products ICS-43434 MEMS microphone breakout on the Raspberry Pi
Hardware Setup
The following documentation used the ICS43434 MEMs microphone with a breakout board on an RPi 2. Microphone documentation can be found here. Header pins were soldered to the breakout board. The connection uses Pulse Code Modulation which requires four GPIO pins from the RPi. The PCM setup can be found here. The connection is as follows:
Mic - RPi
---------
VCC - 3.3v
Gnd - Gnd
L/R - Gnd (this is used for channel selection. Connect to 3.3 or GND)
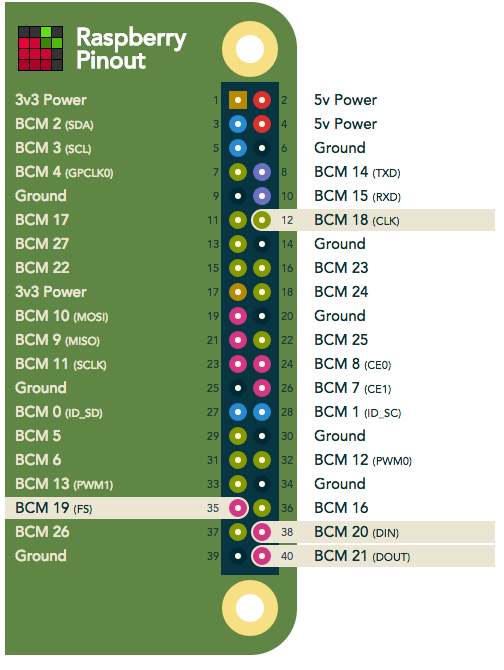
SCK - BCM 18 (pin 12)
WS - BCM 19 (pin 35)
SD - BCM 20 (pin 38)
Buy your Pesky Products ICS-43434 breakout board here

Software Setup
Firstly, get an updated kernel & matching kernel header files:sudo apt-get update
sudo apt-get dist-upgrade
sudo apt-get install raspberrypi-kernel-headers
sudo nano /boot/config.txtand uncomment this line by removing the # in front of it.
#dtparam=i2s=onor add it if it ain't there. Next do a reboot.
sudo reboot
Get the source & create a simple Makefile:
mkdir ics43432
cd ics43432
wget https://raw.githubusercontent.com/raspberrypi/linux/rpi-4.4.y/sound/soc/codecs/ics43432.c
nano MakefileThose indentations are a single tab character - use spaces & it won't work.obj-m := ics43432.o
all: make -C /lib/modules/$(shell uname -r)/build M=$(PWD) modules
clean: make -C /lib/modules/$(shell uname -r)/build M=$(PWD) clean
install: sudo cp ics43432.ko /lib/modules/$(shell uname -r) sudo depmod -a
Build:
make all installNext, we create a new device tree overlay. Create a file i2s-soundcard-overlay.dts with this content:
/dts-v1/; /plugin/;/ { compatible = "brcm,bcm2708";
fragment@0 { target = <&i2s>; overlay { status = "okay"; }; };
fragment@1 { target-path = "/"; overlay { card_codec: card-codec { #sound-dai-cells = <0>; compatible = "invensense,ics43432"; status = "okay"; }; }; };
fragment@2 { target = <&sound>; master_overlay: dormant { compatible = "simple-audio-card"; simple-audio-card,format = "i2s"; simple-audio-card,name = "soundcard"; simple-audio-card,bitclock-master = <&dailink0_master>; simple-audio-card,frame-master = <&dailink0_master>; status = "okay"; simple-audio-card,cpu { sound-dai = <&i2s>; }; dailink0_master: simple-audio-card,codec { sound-dai = <&card_codec>; }; }; };
fragment@3 { target = <&sound>; slave_overlay: overlay { compatible = "simple-audio-card"; simple-audio-card,format = "i2s"; simple-audio-card,name = "soundcard"; status = "okay"; simple-audio-card,cpu { sound-dai = <&i2s>; }; dailink0_slave: simple-audio-card,codec { sound-dai = <&card_codec>; }; }; };
overrides { alsaname = <&master_overlay>,"simple-audio-card,name", <&slave_overlay>,"simple-audio-card,name"; compatible = <&card_codec>,"compatible"; master = <0>,"=2!3"; }; };
Compile & install the overlay:
dtc -@ -I dts -O dtb -o i2s-soundcard.dtbo i2s-soundcard-overlay.dts
sudo cp i2s-soundcard.dtbo /boot/overlays
Finally, invoke usage by adding this to /boot/config.txt:
dtoverlay=i2s-soundcard,alsaname=mems-micReboot and you'll have a microphone recording device
pi@raspberrypi:~arecord -l
**** List of CAPTURE Hardware Devices ****
card 1: memsmic [mems-mic], device 0: bcm2835-i2s-ics43432-hifi ics43432-hifi-0 []
Subdevices: 1/1
Subdevice #0: subdevice #0
Make a 10 second long recording with:
arecord -Dhw:1 -c2 -r48000 -fS32_LE -twav -d10 -Vstereo test.wavaplay test.wavThe volume level is low, and with just one module attached is in one channnel only, silence in the other. Both those issues can be addressed by modifying .asoundrc, see below.
The overlay is flexible enough to use other codecs by way of the compatible= override. If your preferred codec, a simple ADC or DAC, has a .compatible string defined, use that "manufacturer,chipset" string in the override. There's a switch "master" too if your codec is capable of working as clock master instead of the default slave (untested).
To create the soft mixer for volume control I used plugh's work, extending it so that we produce true mono/single channel output. Note that I've configured my mic as left - if yours is right you'll have to edit the mic_mono multi section. If you have a stereo pair, you may omit the last section where mic_mono is defined. Edit the alsa config:
cd ~
nano .asoundrcpcm.mic_hw{ type hw card memsmic channels 2 format S32_LE }
pcm.mic_sv{ type softvol slave.pcm mic_hw control { name "Boost Capture Volume" card memsmic } min_dB -3.0 max_dB 50.0 }
To activate the mixer, we must first make a recording using the newly configured mic_sv pcm:
arecord -Dmic_sv -c2 -r48000 -fS32_LE -twav -d10 -Vstereo test.wavA mixer is also in the desktop's Audio Device Settings.
Now you can record again, but with the new volume settings:
arecord -Dmic_sv -c2 -r48000 -fS32_LE -twav -d10 -Vstereo test.wavTo play the recorded wave-file:
aplay test.wavMost of this info came from: https://www.raspberrypi.org/forums/viewtopic.php?t=173640