Using this command,
sudo apt-get install build-essential autoconf libtool pkg-config python-opengl python-imaging python-pyrex python-pyside.qtopengl idle-python2.7 qt4-dev-tools qt4-designer libqtgui4 libqtcore4 libqt4-xml libqt4-test libqt4-script libqt4-network libqt4-dbus python-qt4 python-qt4-gl libgle3 python-dev virtualenv libjpeg-dev libxml2-dev libxslt1-dev


sudo easy_install greenlet

sudo easy_install geventOpen a cmd or terminal and enter the following command
git clone -b spider_only https://github.com/manashmndl/NewsCrawler.gitAfter a successful clone this will be shown
Cloning into 'NewsCrawler'...
remote: Counting objects: 711, done.
remote: Compressing objects: 100% (7/7), done.
remote: Total 711 (delta 1), reused 0 (delta 0), pack-reused 704
Receiving objects: 100% (711/711), 2.03 MiB | 78.00 KiB/s, done.
Resolving deltas: 100% (376/376), done.
Checking connectivity... done.
- Enter the directory using
cdcommand,
cd NewsCrawler- Create a virtual environment
[I'm using Python 2.7, not anaconda]
virtualenv -p /usr/bin/python2.7 venvSuccessful prompt,
Running virtualenv with interpreter /usr/bin/python2.7
New python executable in /home/<username>/Downloads/project/NewsCrawler/venv/bin/python2.7
Also creating executable in /home/<username>/Downloads/project/NewsCrawler/venv/bin/python
Installing setuptools, pip, wheel...done.- Activate the environment
source venv/bin/activateOn successful execution, the environment will be visible
(venv) rubel@rubel-rig ~/Downloads/project/NewsCrawler $ After activating the virtual environment, enter the following command to install all dependencies,
pip install -r requirements.txtRun python from the virtual environment and do the following:
import nltk
nltk.download()
Then from the menu download all the corpus used in the book
Enter the following command,
scrapy listIf it echoes these two spiders then the spiders are ready to crawl! Turn on the MongoDB, Elasticsearch & Kibana Server and start crawling.
dailystar
prothomaloAt credentials_and_configs/keys.py file, change the API key. You can create an account here and get your own API Key.
Example,
INDICOIO_API_KEY = '8ee6432e7dc137740c40c0af8d7XXXXXX' # Replace the value with your own API Key
At credentials_and_configs/stanford_ner_path.py file, change the paths according to the downloaded NER and CLASSIFIER paths.
Example,
STANFORD_NER_PATH = 'C:\StanfordParser\stanford-ner-2015-12-09\stanford-ner.jar' #Insert your path here
STANFORD_CLASSIFIER_PATH = 'C:\StanfordParser\stanford-ner-2015-12-09\classifiers\english.all.3class.distsim.crf.ser.gz' # Insert your path here
Open a command window / terminal at the root of the folder. Run the following commands to start scraping.
- The Daily Star ->
dailystar - Prothom Alo ->
prothomalo - Dhaka Tribune ->
dhakatribune
For Daily Star
scrapy crawl dailystar
For Prothom Alo
scrapy crawl prothomalo
For Dhaka Tribune
scrapy crawl dhakatribune
If I want to scrape all of the news between 1st January 2016 and 1st February 2016 my command will look like this,
Daily Star
scrapy crawl dailystar -a start_date="01-01-2016" -a end_date="01-02-2016"
Prothom Alo
scrapy crawl prothomalo -a start_date="01-01-2016" -a end_date="01-02-2016"
Dhaka Tribune
scrapy crawl dhakatribune -a start_page=0 -a end_page=10
If you want to collect all crawled data in a csv or a json file you can run this command.
Daily Star [csv output]
scrapy crawl dailystar -a start_date="01-01-2016" -a end_date="01-02-2016" -o output_file_name.csv
Daily Star [json output]
scrapy crawl dailystar -a start_date="01-01-2016" -a end_date="01-02-2016" -o output_file_name.json
Dhaka Tribune [csv output]
scrapy crawl dhakatribune -a start_page=0 -a end_page=10 -o output_file_name.csv
Dhaka Tribune [json output]
scrapy crawl dhakatribune -a start_page=0 -a end_page=10 -o output_file_name.json
Prothom Alo [csv output]
scrapy crawl prothomalo -a start_date="01-01-2016" -a end_date="01-02-2016" -o output_file_name.csv
Prothom Alo [json output]
scrapy crawl prothomalo -a start_date="01-01-2016" -a end_date="01-02-2016" -o output_file_name.json
- Download and extract Kibana and Elasticsearch
- Open CMD/Terminal then type the following command
mongod
It should give the following output
2016-12-03T03:00:38.986+0600 I CONTROL  [initandlisten] MongoDB starting : pid=7204 port=27017 dbpath=C:\data\db\ 64-bit host=DESKTOP-4PR51E6
2016-12-03T03:00:38.986+0600 I CONTROL  [initandlisten] targetMinOS: Windows 7/Windows Server 2008 R2
2016-12-03T03:00:38.987+0600 I CONTROL  [initandlisten] db version v3.2.7
.............
.............
2016-12-03T03:00:39.543+0600 I NETWORK  [HostnameCanonicalizationWorker] Starting hostname canonicalization worker
2016-12-03T03:00:39.543+0600 I FTDC     [initandlisten] Initializing full-time diagnostic data capture with directory 'C:/data/db/diagnostic.data'
2016-12-03T03:00:39.558+0600 I NETWORK  [initandlisten] waiting for connections on port 27017
Now you're all set to use the MongoDB service!
- Couldn't find the path
Add the MongoDB\Server\3.2\bin folder to your system path and then try again.
Data directory C:\data\db\ not found., terminating
Quite simple, all you need to do is to create a db folder there and you're good to go.
Go to elasticsearch-5.0.0\bin folder then run the program elasticsearch.bat on windows.
Go to kibana-5.0.0-windows-x86\bin folder and run the program kibana.bat on windows.
All of your local server and services should be working properly. Start crawling using the scrapy crawl command and the data will be automatically inserted to
mongo database,elasticsearch, and you can get the output as eithercsvorjsonformat. You must startelasticsearchbeforekibana
Kibana server will listen to localhost:5601 by default. So open the url in your browser.
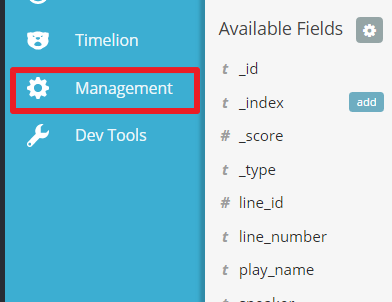
- Go to
Management
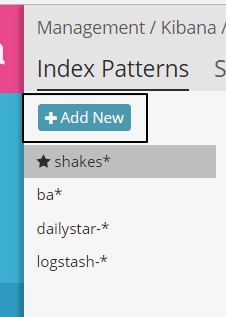
- Click on
Index Patternsand thenAdd New
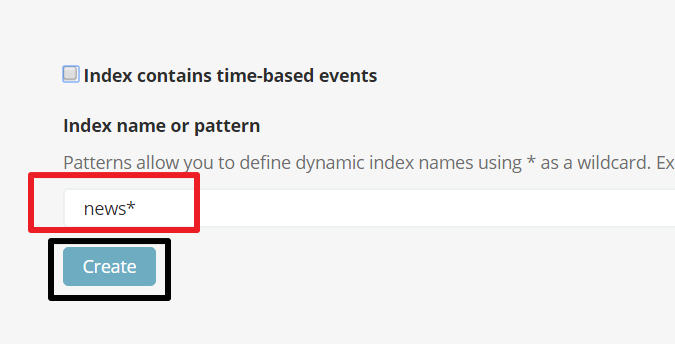
- Remove tick from
Index contains time-based eventsand writenews*on the Index name or pattern text input. Then clickCreate
- Then go to
Discoverand selectnews*index