Hands on with Jenkins, Terraform, AWS and React
For this playground, we will be building an automated CI/CD pipeline that deploys a scalable React web application to AWS. Here's an overview of what we'll cover:
- Write a Jenkins DSL script. This allows us to define our pipeline configuration as code (Pipeline as Code).
- Trigger a build of this script which will create a new, empty pipeline that is configured with all the settings we need.
- Write another script for the newly created pipeline which will define the various stages our application needs to go through before being deployed to AWS. These include:
- Building the application.
- Testing it.
- Deploying it to an AWS autoscaling group using terraform (Infrastructure as Code).
Still with me? Ok, lets get to it...
Initial setup
GitHub
If you don't already have a GitHub account then please sign up here.
We will be using one repository for this playground:
- The react-app-devops-playground repository. This is the repository you're currently in, and it contains all the application code and scripts that we will need to actually deploy the web app to AWS.
You will also have a Jenkins server that the playground team have spun up for you this evening...
Terminal and VS Code
If you are using our provided workstations tonight, visit this site and type your Meetup username into the form. Then press submit and you should see
- Username
- Password
- Terminal: this is terminal we have spun up for you to run commands
- IDE: a workstation with VS Code installed to edit files
- Jenkins: the Jenkins instance you'll be using tonight

IMPORTANT: You'll need a unique animal identifier for tonight. You can find this prefixed on your Terminal and IDE urls. For example in the example above, my animal name would be bengal
Keep this animal safe somewhere on your machine.
Once you have logged into your remote terminal (the one we have provided), you will need to change into the WorkDir directory by running:
cd WorkDir
Anything in this directory will show up on your VS Code workstation.
Section 1 - the first script: build the Pipeline as Code script.
First and foremost, you all need your own forked repository so you all have your own individual repos you can commit to.
1. Fork the repository
Go to the react-app-devops-playground and click fork

You can copy the url of the repository from the GitHub user interface like so:

Pull down your forked react-app-devops-playground repository and cd into it. In your terminal, run:
git clone <FORKED_REPOSITORY>
cd <FORKED_REPOSITORY>
Replace <FORKED_REPOSITORY> with your forked repository url
Navigate to the forked repository and click in the jobs folder. You should see an empty file called DeployReactApp.groovy
2. Copy and paste the code below into the file
For this tutorial I will be using the command line and VS Code, but if you feel more comfortable using the GitHub user interface then feel free to use that.
IMPORTANT: Make sure you change the ANIMAL_IDENTIFIERs
defaultValue, "changeme", to whatever your animal identifier is.
pipelineJob("Deploy-React-App"){
    description("Deploys a React web application to AWS")
    logRotator {
        daysToKeep(5)
        numToKeep(20)
    }
    concurrentBuild(allowConcurrentBuild = false)
    triggers {
        scm("* * * * *"){
            ignorePostCommitHooks(ignorePostCommitHooks = false)
        }
    }
    parameters {
      stringParam("UNIQUE_ANIMAL_IDENTIFIER", defaultValue = "changeme", description = "Your unique animal identifier for this playground!")
    }
    definition {
    cpsScm {
      scm {
        git {
          branch("master")
          remote {
            credentials("${GIT_USER}")
            url("${GIT_URL}")
          }
        }
      }
      scriptPath('Jenkinsfile')
    }
  }
}
Whats happening here?
a. pipelineJob("Deploy-React-App"){}
The pipelineJob(){} block specifies that we want our CI/CD pipeline to be of type "pipeline". There are many types of Jenkins pipelines to choose from, such as:
- Freestyle project
- Pipeline (the one we'll be using)
- Maven project
- Multi-configuration project
- Multibranch pipeline
which would all require different syntax.
b. description("Deploys a React web application to AWS")
This is purely for clarity so people who use this pipeline actually know what it does.
c. logRotator {daysToKeep(5)numToKeep(20)}
When a build is triggered, it creates an instance of that pipeline, or a "job". These jobs have logs which are necessary for debugging and other purposes.
The logRotator{} block specifies how many job logs you want to keep, and for how many days they should be kept. The numbers will vary depending on the requirements, so we'll just leave it at 5 and 20.
d. concurrentBuild(allowConcurrentBuild = false)
There are many instances when you would want to allow concurrent builds, such as if multiple engineers were using the same pipeline to deploy to different components in different environments at the same time, but that won't be necessary for this pipeline so we'll disallow it.
e. triggers {}
With the triggers {} block we can automate the jobs by specifying when we want it to be built. The * * * * * inside the scm() function tells Jenkins to check the application repository every minute. If there has been a code change to the master branch in that minute, it will trigger a build.
Say something about ignorePostCommitHooks()
f. parameters {}
the parameters {} block allows us to define any parameters we want our pipeline to accept. You have all been given a UNIQUE_ANIMAL_IDENTIFIER for this playground, and we'll be using it so you all have a unique domain name and can therefore visit your deployed website with no duplicates.
g. definition {}
Here we are using the definition {} block to specify the Git repository. You will notice two variables that we will be passing into the seed job when we build it:
GIT_USER: this will be the credentials to your personal GitHub account so Jenkins can clone the repo (don't worry, we haven't configured this yet).GIT_URL: this is the url of your forked react-app-devops-playground repository.
The scriptPath('') function defines the file path to the pipeline script that will be used to deploy our application. We'll come back onto this in Section 3
How to commit and push to master?
- If you haven't already done so, clone down your forked react-app-devops-playground repository and cd into it.
note: remember to cd into
WorkDirfirst if you are using the terminal we provided for you
Now run:
git clone <FORKED_REPOSITORY>
cd <FORKED_REPOSITORY>
-
Open the repository in your text editor (I'm using VS Code) and click on the
DeployReactApp.groovyscript.
-
Copy the entire script and paste it into the file. Make sure the
defaultValueofUNIQUE_ANIMAL_IDENTIFIERhas been changed.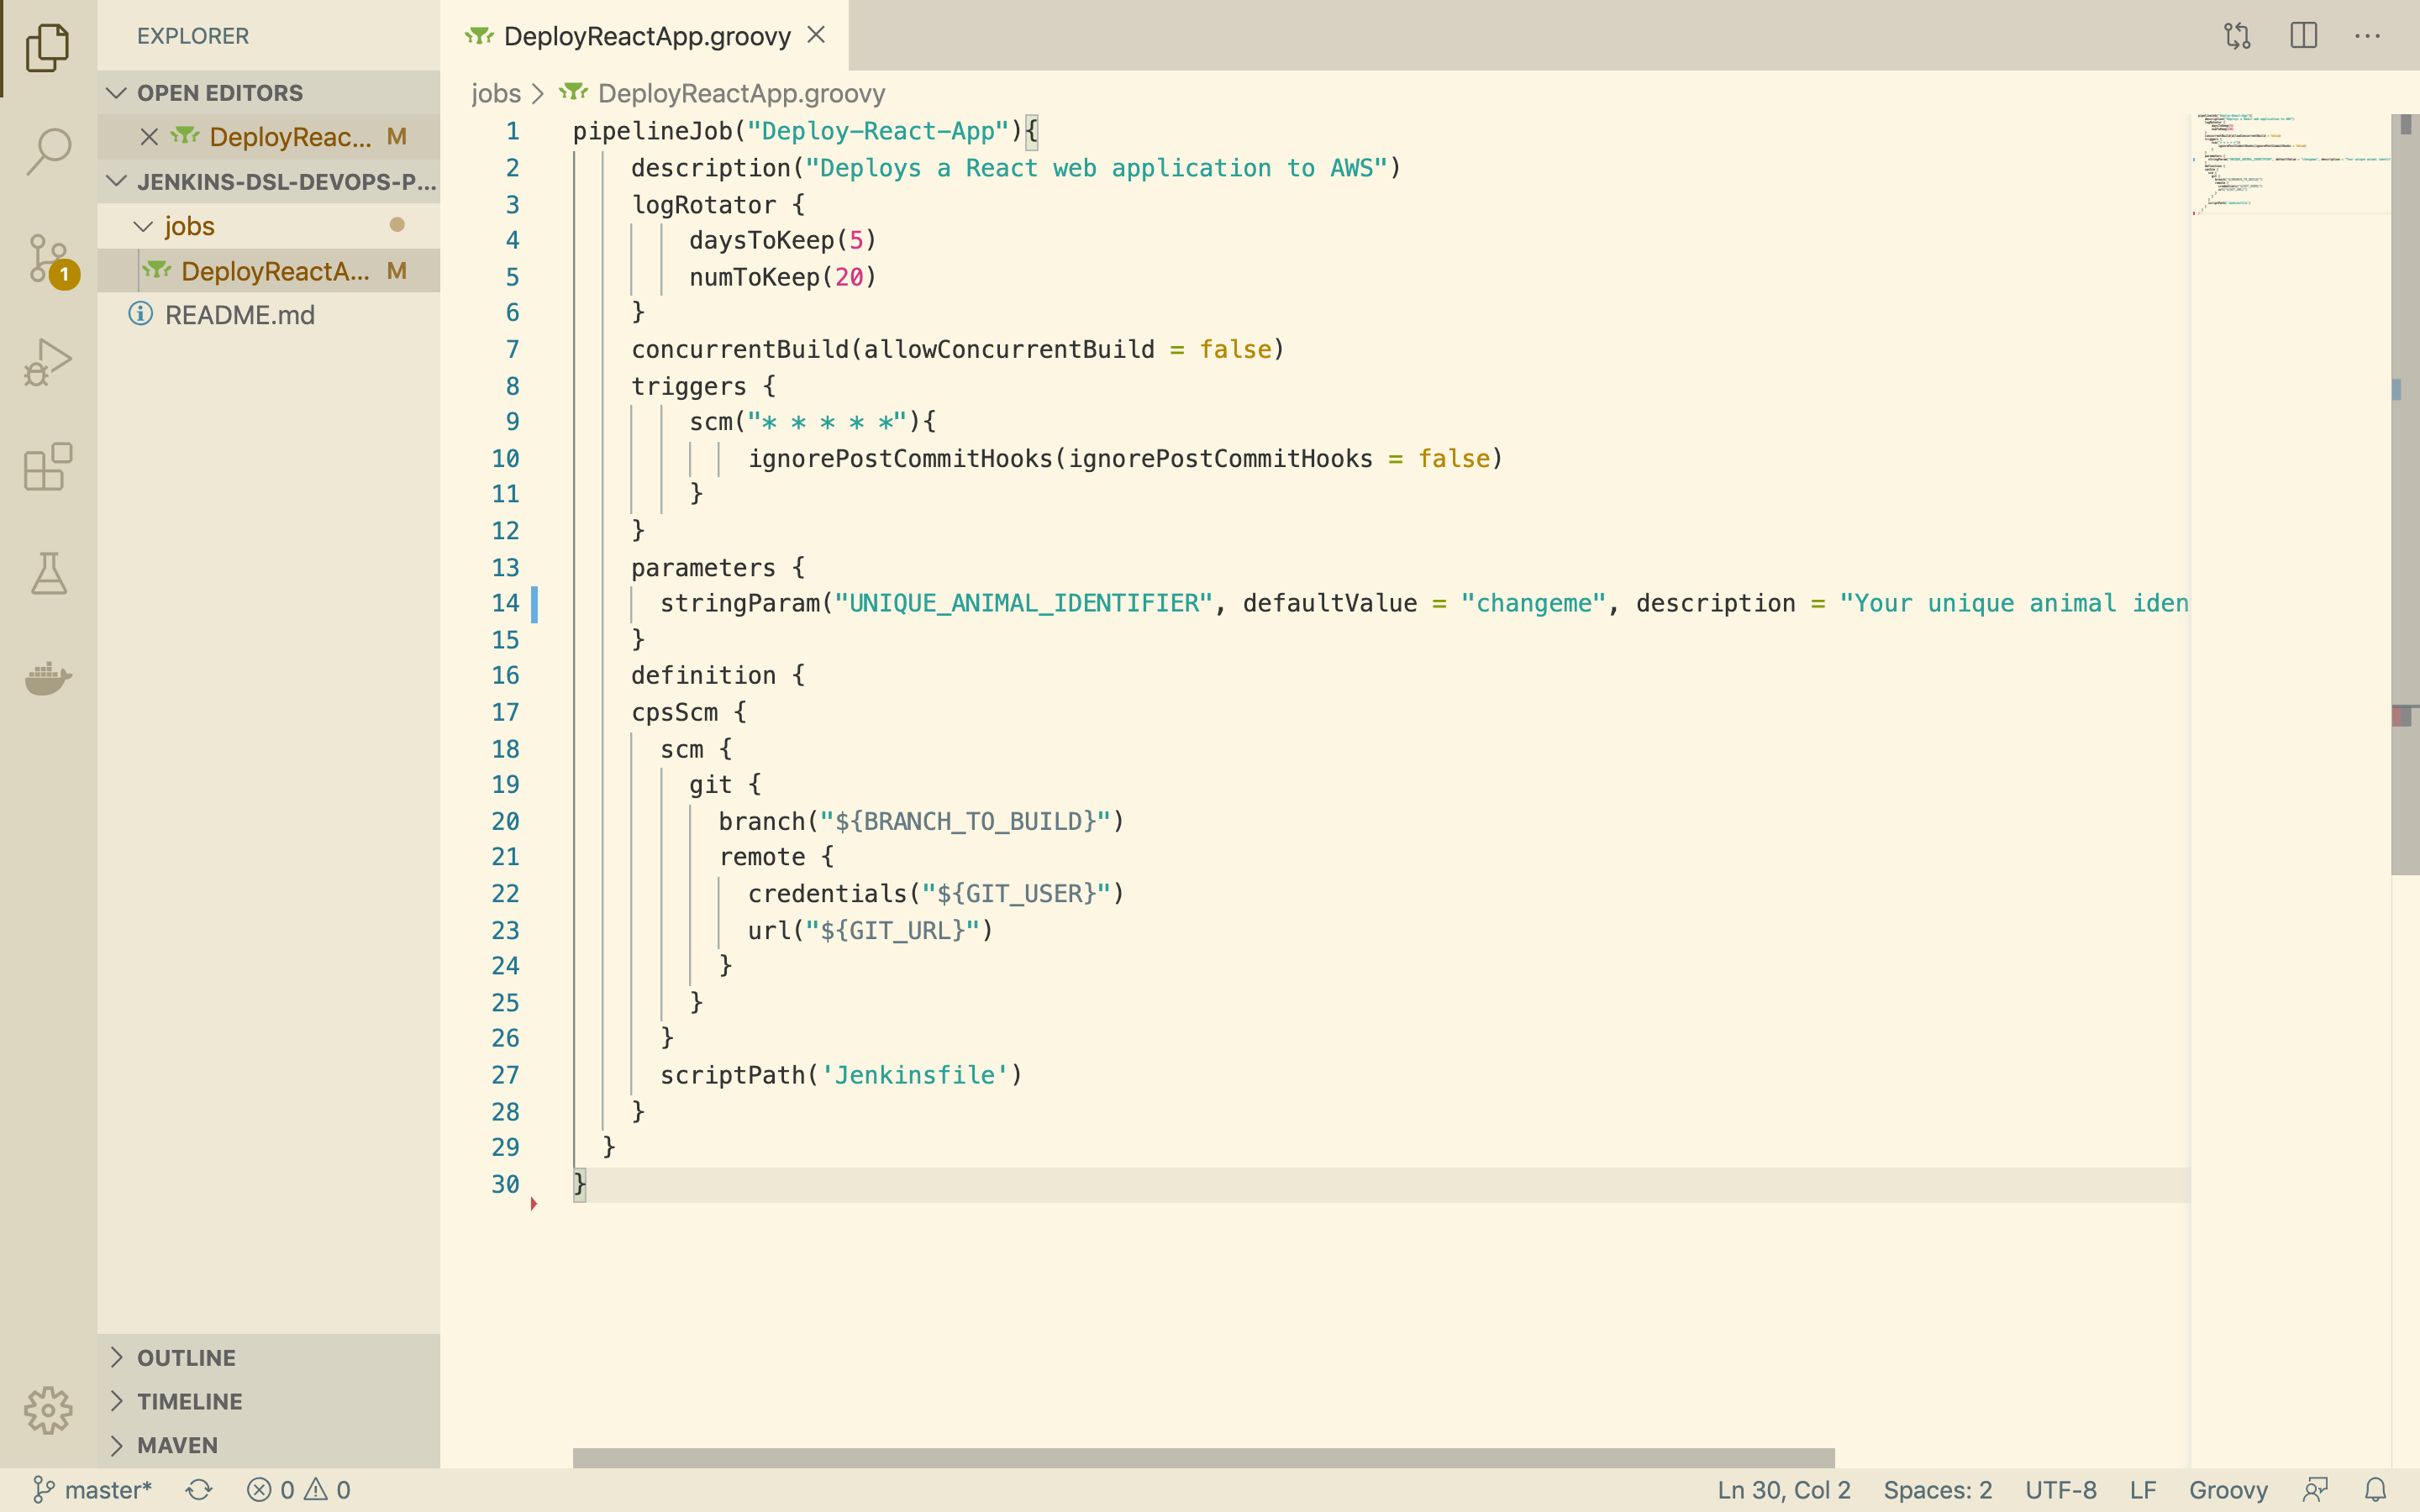
-
Before we commit, we just need to do some git configuration:


If you are using provided workstations you will need to configure git by typing:
git config --global user.name "Your Name"
git config --global user.email "youremail@domain.com"
Note: You do not need to provide your real name or email
If you are using provided workstations you will need to authenticate to push. We advise you to use GitHub access token.
When the command line prompts you for your password, you can just paste your access token instead of your password and it will authenticate you:

How to generate an access token from GitHub
-
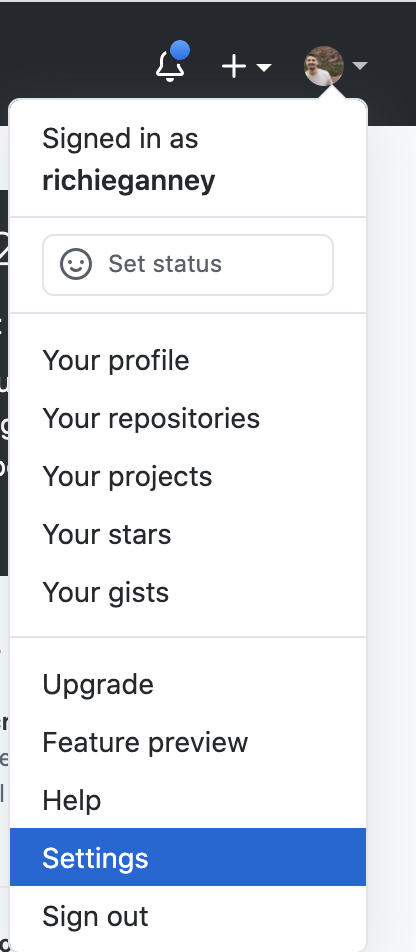
Go over to your GitHub and click the dropdown arrow next to your profile picture at the top right. Then click Settings
-
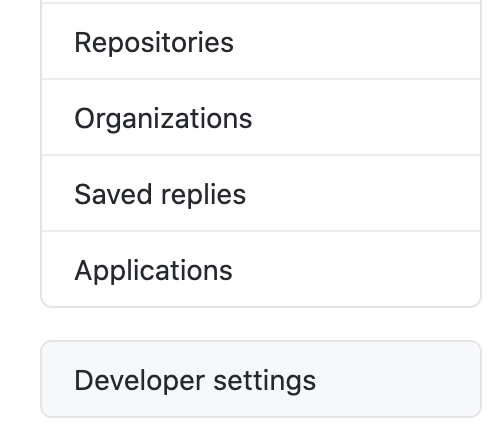
Scroll down and click Developer settings on the left
-
Click Personal access tokens. then click Generate new token
-
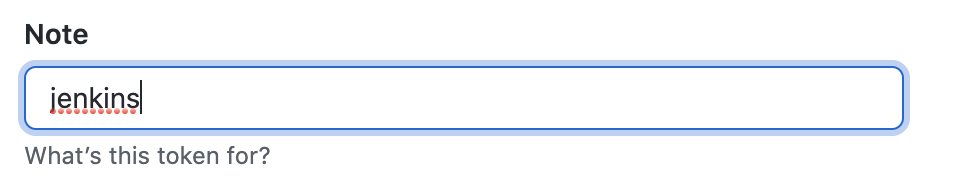
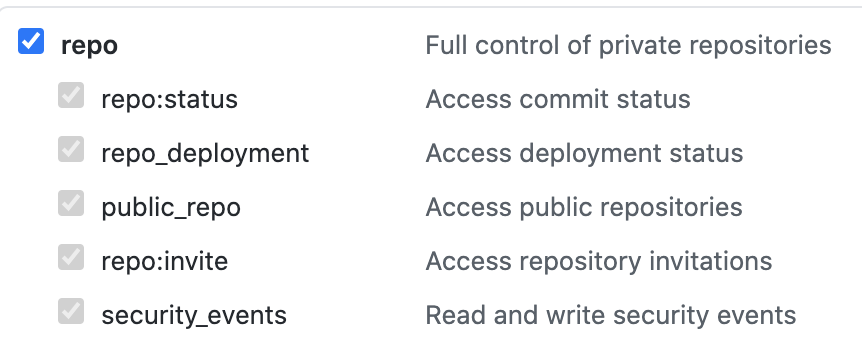
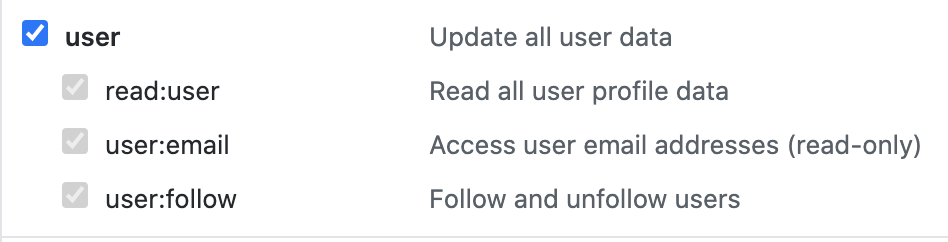
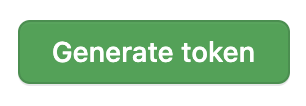
This will take you to a page where you'll need to define the name and permissions of your token. Call the token "jenkins" and give full repo and user permissions. Then click Generate token:
-
This will take you to a page where your token will be displayed.


IMPORTANT: you will only be shown your token once, so copy it by clicking that little clipboard to the right of the token and save it on your machine somewhere. We'll not only need it for the command line authentication, but also for the next section.

Now run the following commands to push up to your master branch.
git add .
git commit -m "Populating the Jenkins seed job script"
git push -u origin master
And as mentioned before, you can paste your access token straight into the command line when it prompts you for your password.
Now let's move onto section 2...
Section 2: Configure Jenkins and then build the seed job.
In this section we will:
- Add our GitHub credentials to Jenkins globally so that it can interact with our repositories.
- Configure Jenkins to use NodeJS so it can build and test our React application.
- Configure Jenkins with Terraform so it can run
terraformcommands. - Configure Jenkins with AWS so it can deploy our application.
Let's dive straight in...
1. Configure GitHub access token gloablly
Once logged into Jenkins, click...
- Manage Jenkins > Manage Credentials
- Click Jenkins under Stores scoped to Jenkins
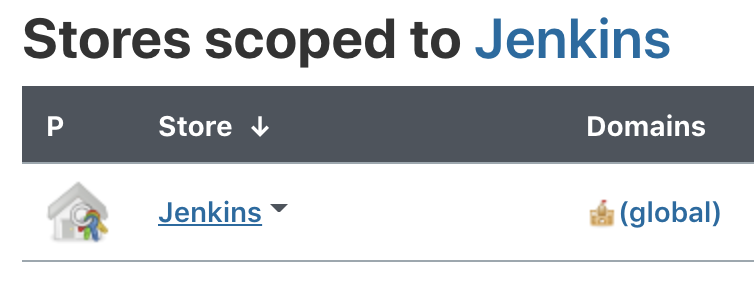
- Click Global credentials
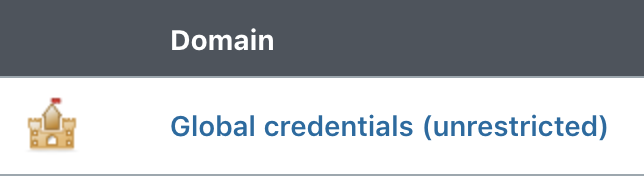
- Click Add Credentials on the left


- Leave the scopt as Global and fill in the fields like so:
- Username: your GitHub username
- Password: the access token we just generated in GitHub
- ID: your GitHub username
- Description: "git credentials"
IMPORTANT: make sure you put your username in the ID section.

2. Configure Jenkins to use NodeJS so that our application pipeline can use npm commands.
All of the plugins for this playground have been pre-installed on your Jenkins server, we just need to tell Jenkins to use them now.
-
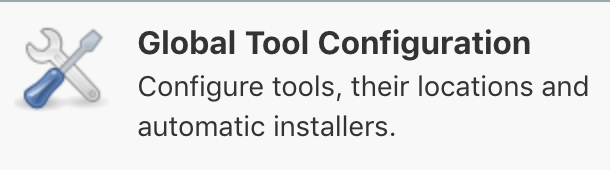
Go to the Jenkins homepage and navigate to Jenkins > Manage Jenkins > Global Tool Configuration
-
Scroll down and select NodeJS installations...
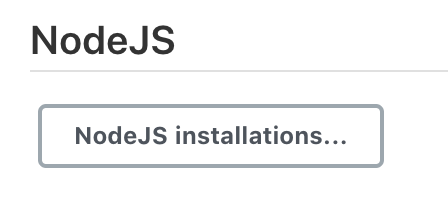
-
Select Add NodeJS and fill in the fields with the following details:
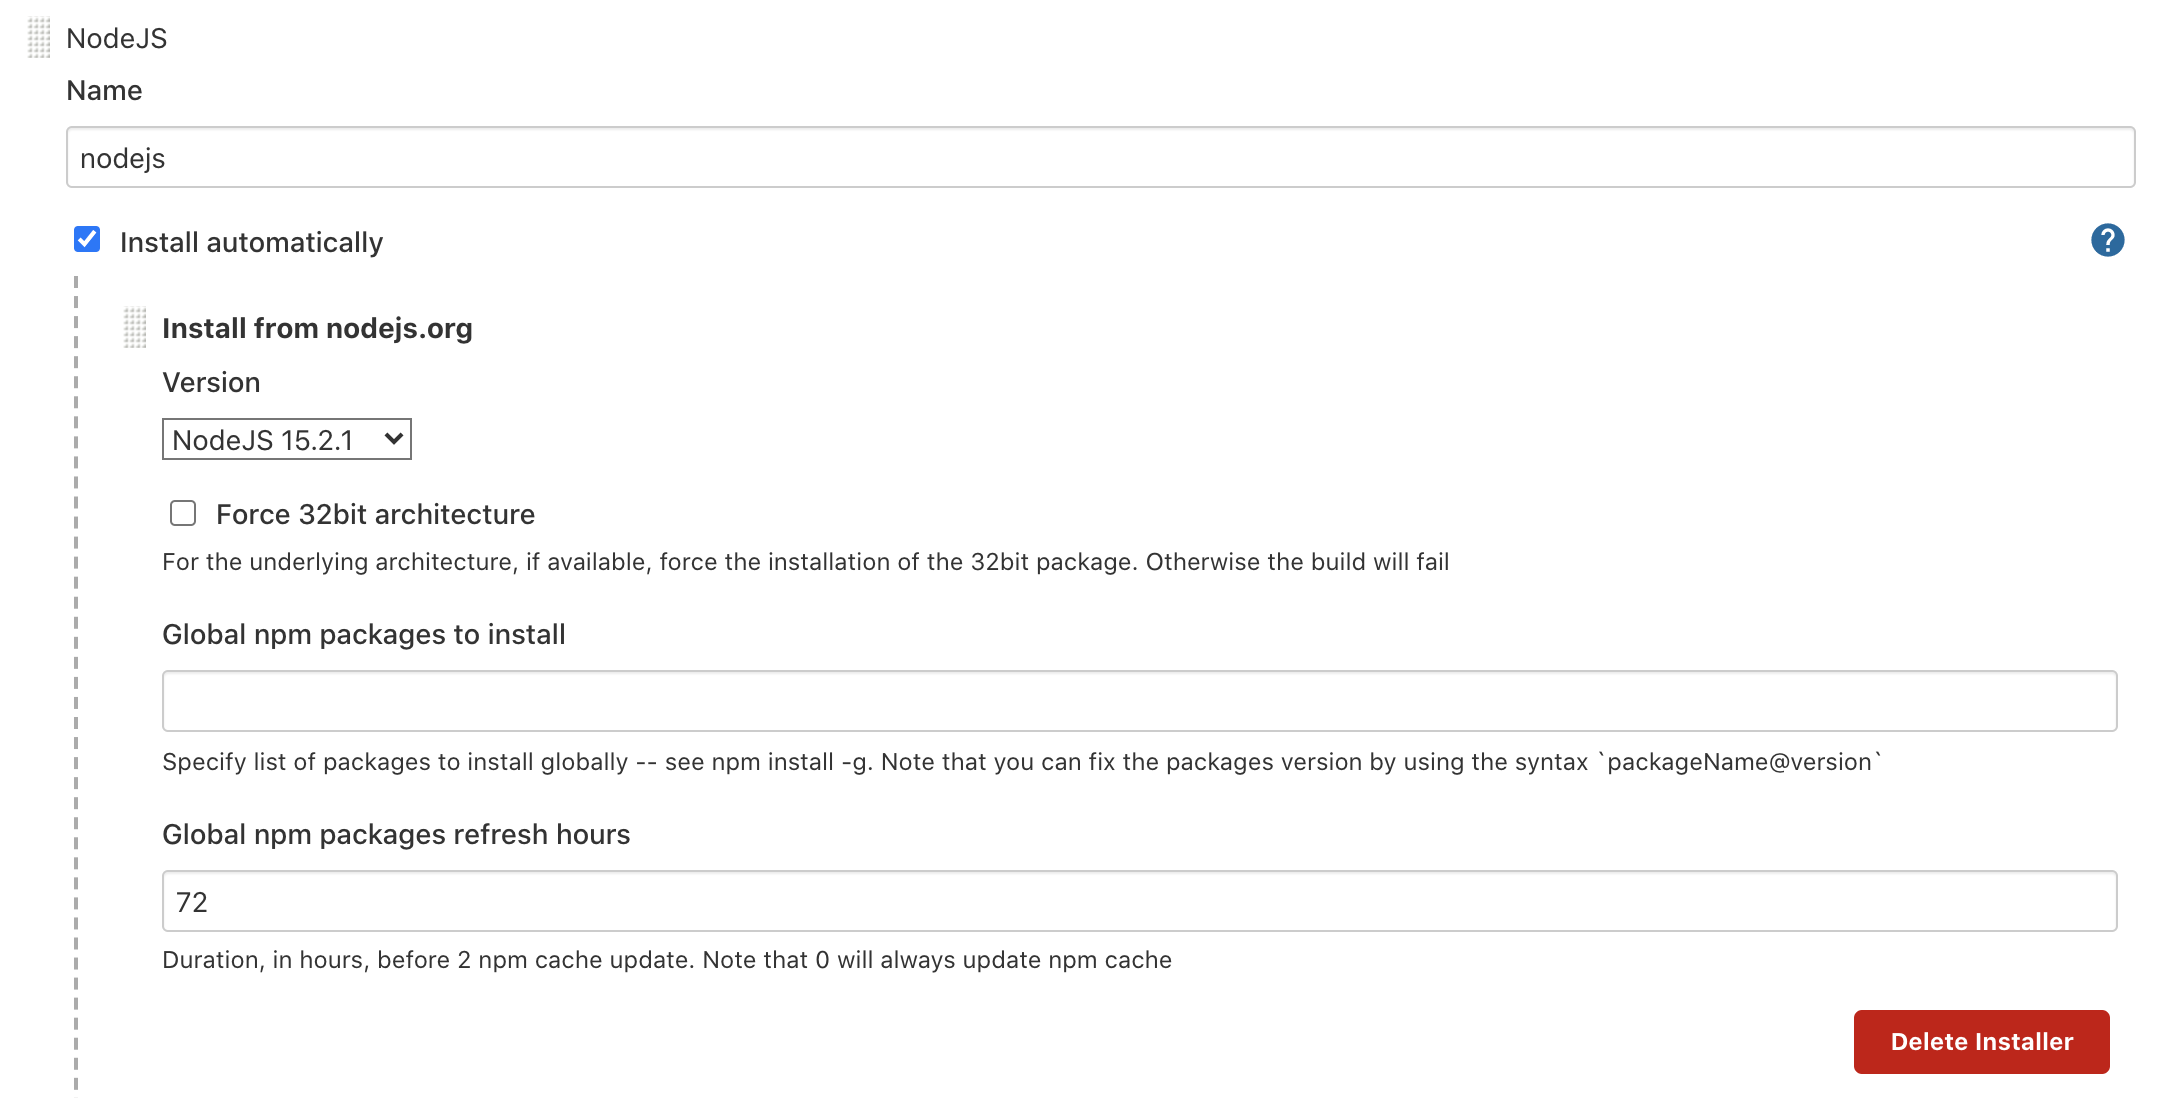
- Name: nodejs
- Install automatically: (box checked)
- Version: (leave as default)
- Global npm packages to install: leave it blank
- Global npm packages refresh hours: 72
-
Click Apply


3. Configure Jenkins to use Terraform so that our application can use terraform commands.
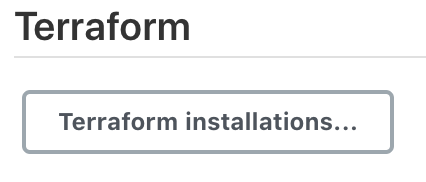
- While we are still in the Global Tool Configuration part of Jenkins, scroll down past the NodeJS installations and click Terraform installations
- Select Add Terraform and fill in the fields with the following details:
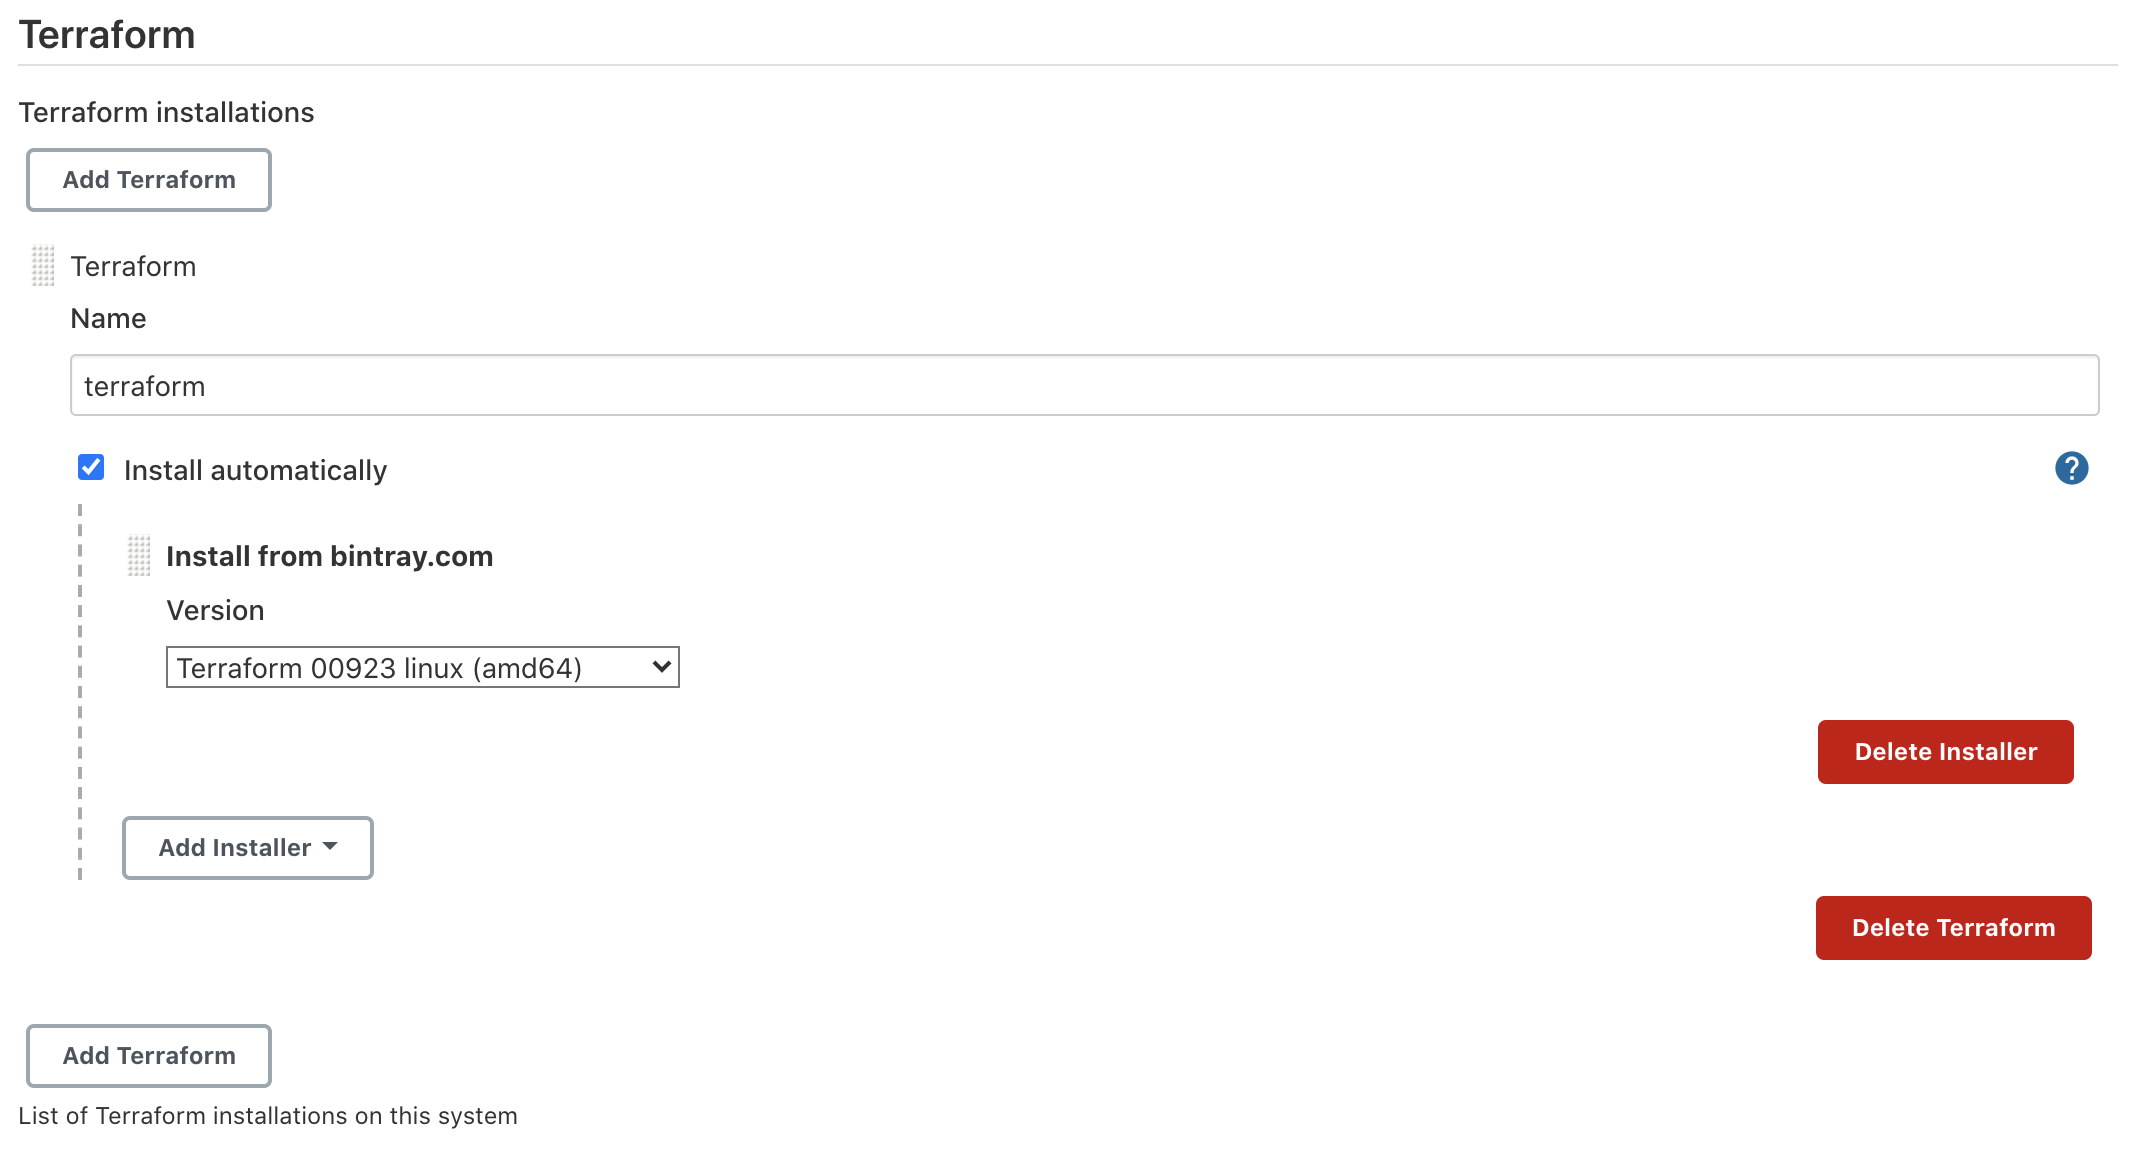
- Name: terraform
- Install Automatically: (box checked)
- Version: Terraform 00923 linux (amd64)
- Click Save which will take you back to the homepage.


4. Configure Jenkins with an AWS region so it knows where to deploy it to. Navigate to:
-
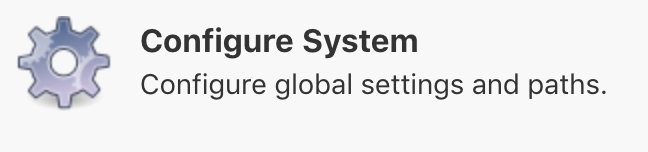
Manage Jenkins > Configure System
-
Scroll down to where is says Global properties and check the box that says Environment variables

-
Fill in the fields with the following information:
- Name: AWS_DEFAULT_REGION
- Value: eu-west-2


- Click save and we are done with the Jenkins configuration!
Now we have added NodeJS, Terraform and AWS to our Jenkins, let's go ahead and actually create the seed job...
5. Create a new item
This will hold the Groovy code that will build our CI/CD pipeline.
- Click New Item located at the top left of the window.
- Name the item seed-job and select Freestyle project as the option. Hit OK.
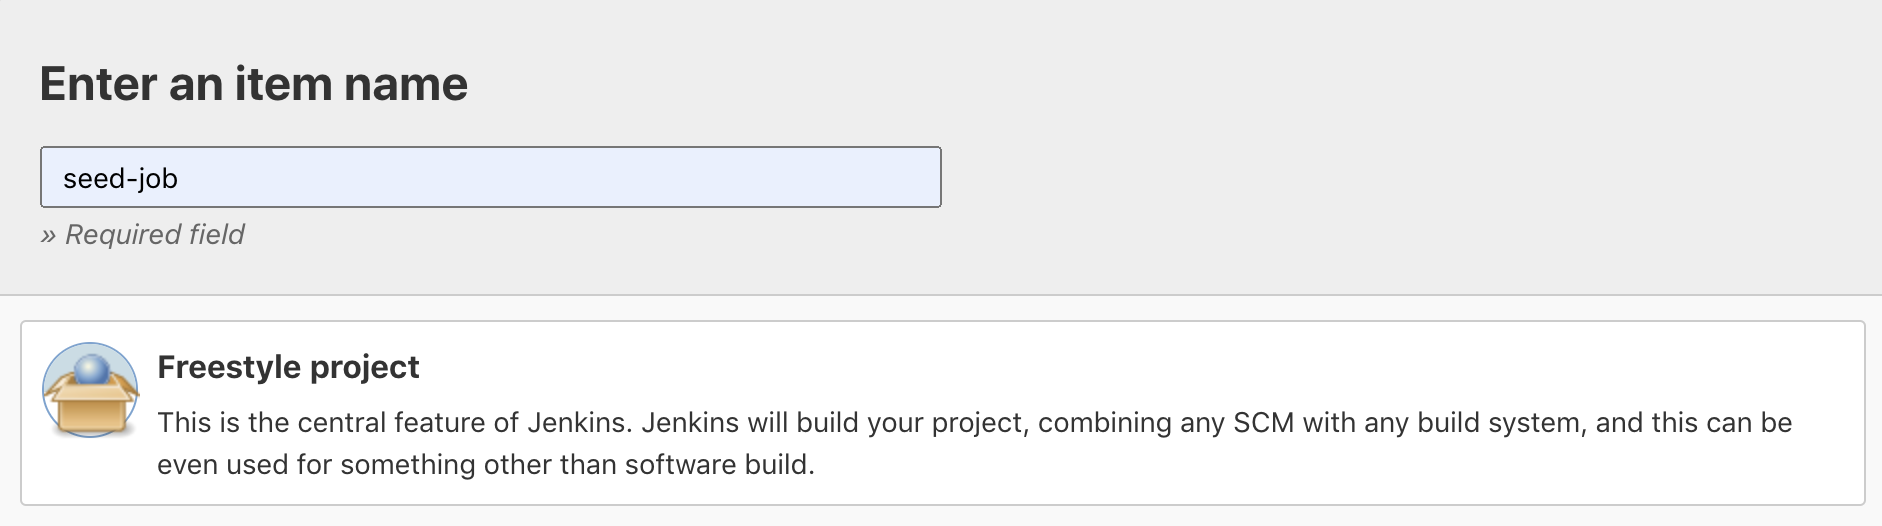
- Now we need to configure this pipeline:
- Select This project is parameterized and add TWO string paramters by clicking Add Parameter > String Parameter
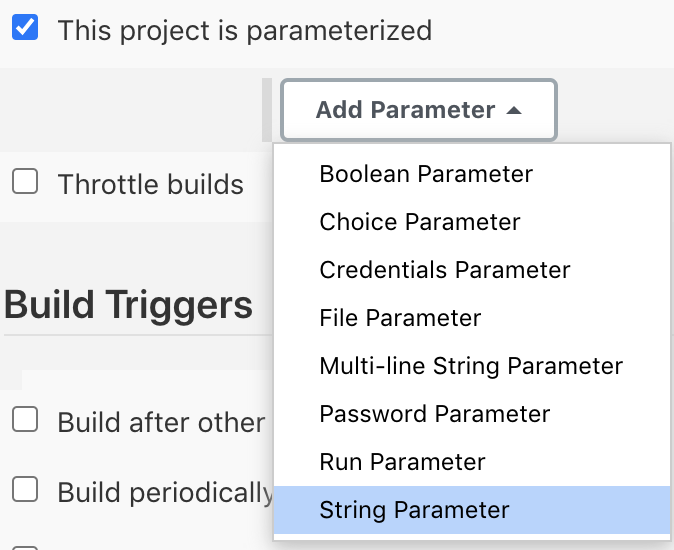
- Add the two variables we saw in Section 1, which were
GIT_USERandGIT_URL. Leave Default Value and Description blank. - In the Source Code Management section, select the Git radio button. Fill in Repository URL with your forked react-app-devops-playground repository and Credentials with your credentials that we configured earlier.
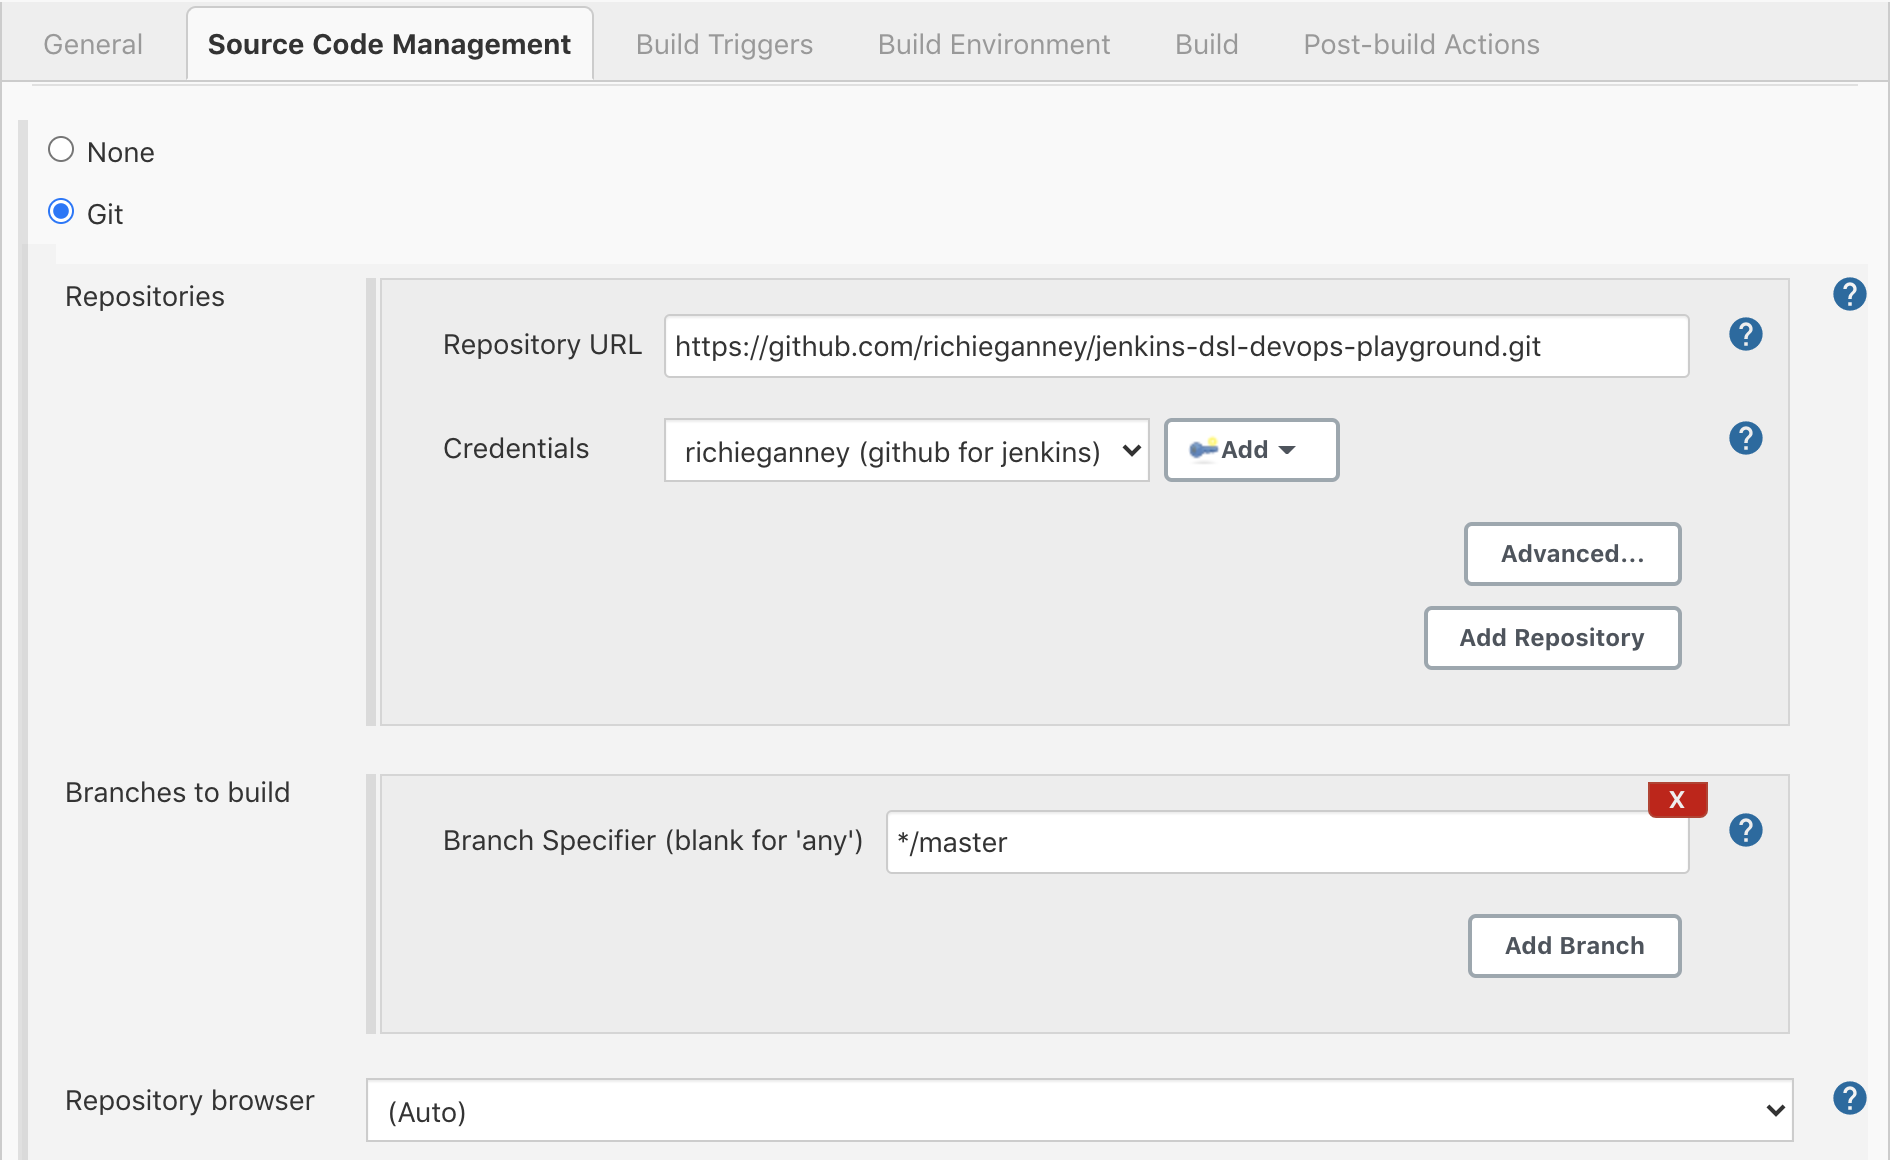 . Leave the branch as master.
 - Lastly, we need to add a build step. In the Build section, select Add build step > Process Job DSLs. Fill in the DSL Scripts section with the file path to our DSL script. The path is
jobs/DeployReactApp.groovyand it will look like this: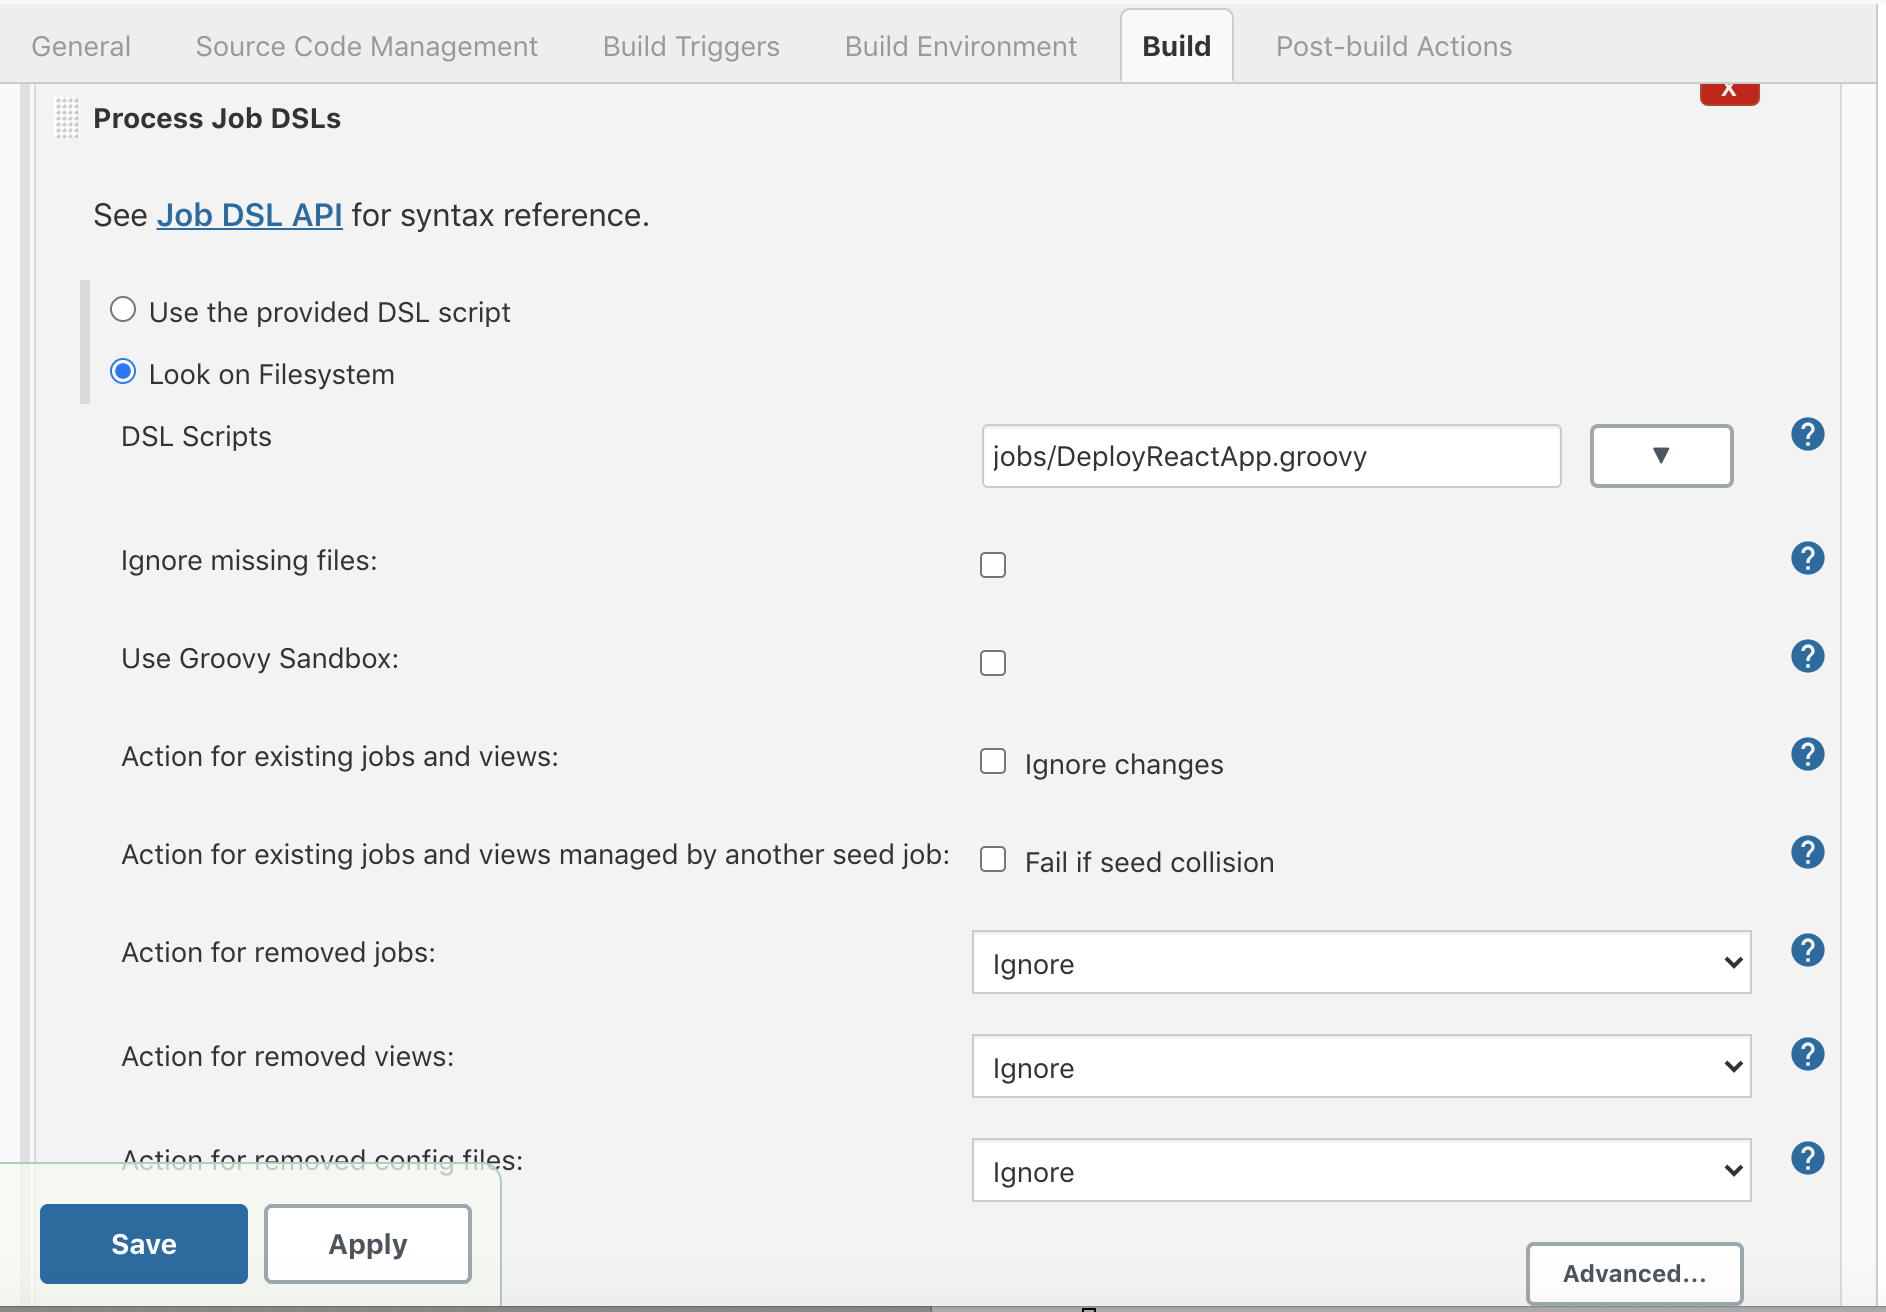 Click Save and the configuration is done!
- Select This project is parameterized and add TWO string paramters by clicking Add Parameter > String Parameter


Before we move onto part three of this section, we need to fork the react-app-devops-playground repository, which is the one that holds the application code we need to deploy.
So in the same way we forked the Jenkins DSL repository earlier, follow the link above and fork it to your personal GitHub. We will need the URL of this forked repository in just a moment...
6. Build the seed job with parameters
Now go back to Jenkins so we can trigger a build to create our CI pipeline.
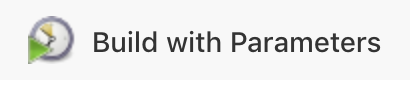
- Click the seed-job we just created, then select Build with Parameters on the left.
- Fill in the fields like so:
GIT_USER: the username to your personal GitHubGIT_URL: the url of the forked react-app-devops-playground repository. The image below shows how you can copy the url to your clipboard from the GitHub interface.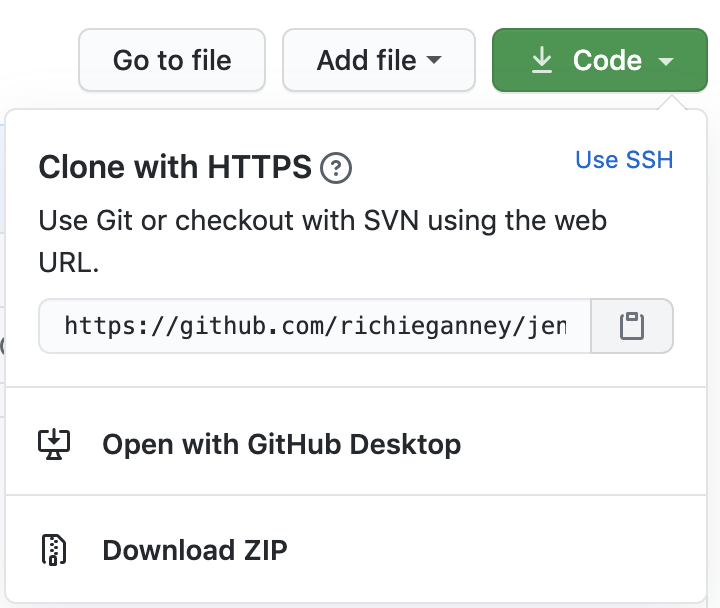
- Select Build

We should have a successful build. The most recent ball under Build History should be blue. If you click that ball you'll see the following message in the logs.
Existing items:
    GeneratedJob{name='Deploy-React-App'}
Finished: SUCCESS
If you go the Jenkins homepage (you can always do this by clicking the large Jenkins icon at the top left of the user interface) you'll see our new pipeline Deploy-React-App which will have all the configuration we need.
Now all we need to do is populate the Jenkinsfile and the variables.tf file in the forked react-app-devops-playground repository, commit the code, and watch it deploy our application.
Onto Section 3...
Section 3: populate the Jenkinsfile and the variables.tf file.
- Similar to how we populated the Jenkins DSL script, copy the code below paste it into the
Jenkinsfilelocated in the root of this directory.
pipeline {
    agent any
    tools {
        nodejs "nodejs"
        terraform "terraform"
    }
    stages {
        stage("Build") {
            steps {
                script {
                    sh """
                    npm install
                    npm run build
                    """
                }
            }
        }
        stage("Test") {
            steps {
                script {
                    sh script: "npm test", returnStatus: true
                }
            }
        }
        stage("Deploy") {
            steps {
                script {
                    sh """
                    zip -r $UNIQUE_ANIMAL_IDENTIFIER-build-artifacts.zip build/
                    aws s3 cp $UNIQUE_ANIMAL_IDENTIFIER-build-artifacts.zip s3://dpg-november-artifact-bucket
                    cd terraform
                    terraform init -backend-config="key=${UNIQUE_ANIMAL_IDENTIFIER}.tfstate"
                    terraform apply --auto-approve
                    """
                }
            }
        }
        stage("Show Domain") {
            steps {
                script {
                    sh script: "bash ${WORKSPACE}/scripts/display-dns.sh ${UNIQUE_ANIMAL_IDENTIFIER}", returnStatus: true
                }
            }
        }
    }
    post {
        cleanup {
            deleteDir()
        }
    }
}
What's happening here?
a. pipeline {}
All valid declarative pipelines must be enclosed within a pipeline {} block
b. agent any
The agent section specifies where the entire Pipeline, or a specific stage, will execute in the Jenkins environment depending on where the agent section is placed. The section must be defined at the top-level inside the pipeline block, but stage-level usage is optional.
By writing "any" in the agent section we are telling Jenkins to run on any of the available nodes.
c. tools {}
For this particular project, we'll need to use npm (node package manager) to build and test the application. This means we need to use a NodeJS installation in order to execute the npm command.
We also need to add the terraform into this block so that the pipeline can use terraform commands.
The "nodejs" and "terraform" strings are the installations that we configured on the Jenkins server in the previous section.
d. stage {}
The stages section is where the bulk of the "work" described by a Pipeline will be located. At a minimum, it is recommended that stages contain at least one stage directive for each discrete part of the continuous delivery process, such as Build, Test, and Deploy.
For the "Build" and "Test" stages, we simply execute an npm command that will run in the workspace directory.
However for the "Deploy" stage we execute some terraform commands which do the following:
zip -r $UNIQUE_ANIMAL_IDENTIFIER-build-artifacts.zip build/: compresses the build package and gets it ready to ship to the artifacts S3 bucket.aws s3 cp $UNIQUE_ANIMAL_IDENTIFIER-build-artifacts.zip s3://dpg-november-artifact-bucket: copies the zipped up build package and sends it to the artifact bucket. Terraform will be able to then pull this down and unzip it for the deploymentterraform init -backend-config="key=${UNIQUE_ANIMAL_IDENTIFIER}.tfstate: this initializes terraform and tells terraform that we want to hold the state in your uniqe state file.terraform apply --auto-approve: this will apply the infrastructure that we have defined in theterraform/directory of this repository.
The "Show Domain" stage runs a script that you can have a look at in the scripts/ directory of this repo. It passes your unique animal identifier to the script as an argument (the one we defined in the Jenkins DSL section) and runs an AWS CLI command to find your domain based on your animal value. At the end of the build you will see the domain at the bottom of the logs.
e. post {}
The post section defines one or more additional steps that are run upon the completion of a Pipelines or stages run.
The cleanup runs after every other post condition has been evaluated, regardless of the Pipeline or stages status.
deleteDir() is a function built by jenkins that recursively deletes the current directory and its contents. This will help keep our workspace clean.
That is all we need to for the pipeline script. Let's go ahead and add the changes to the Jenkinsfile. There are a couple of other files we need to change, so we'll do that all in the next part...
2. Make changes to Jenkinsfile and the variables.tf file.
-
Copy the entire script from this section and paste it into the
Jenkinsfile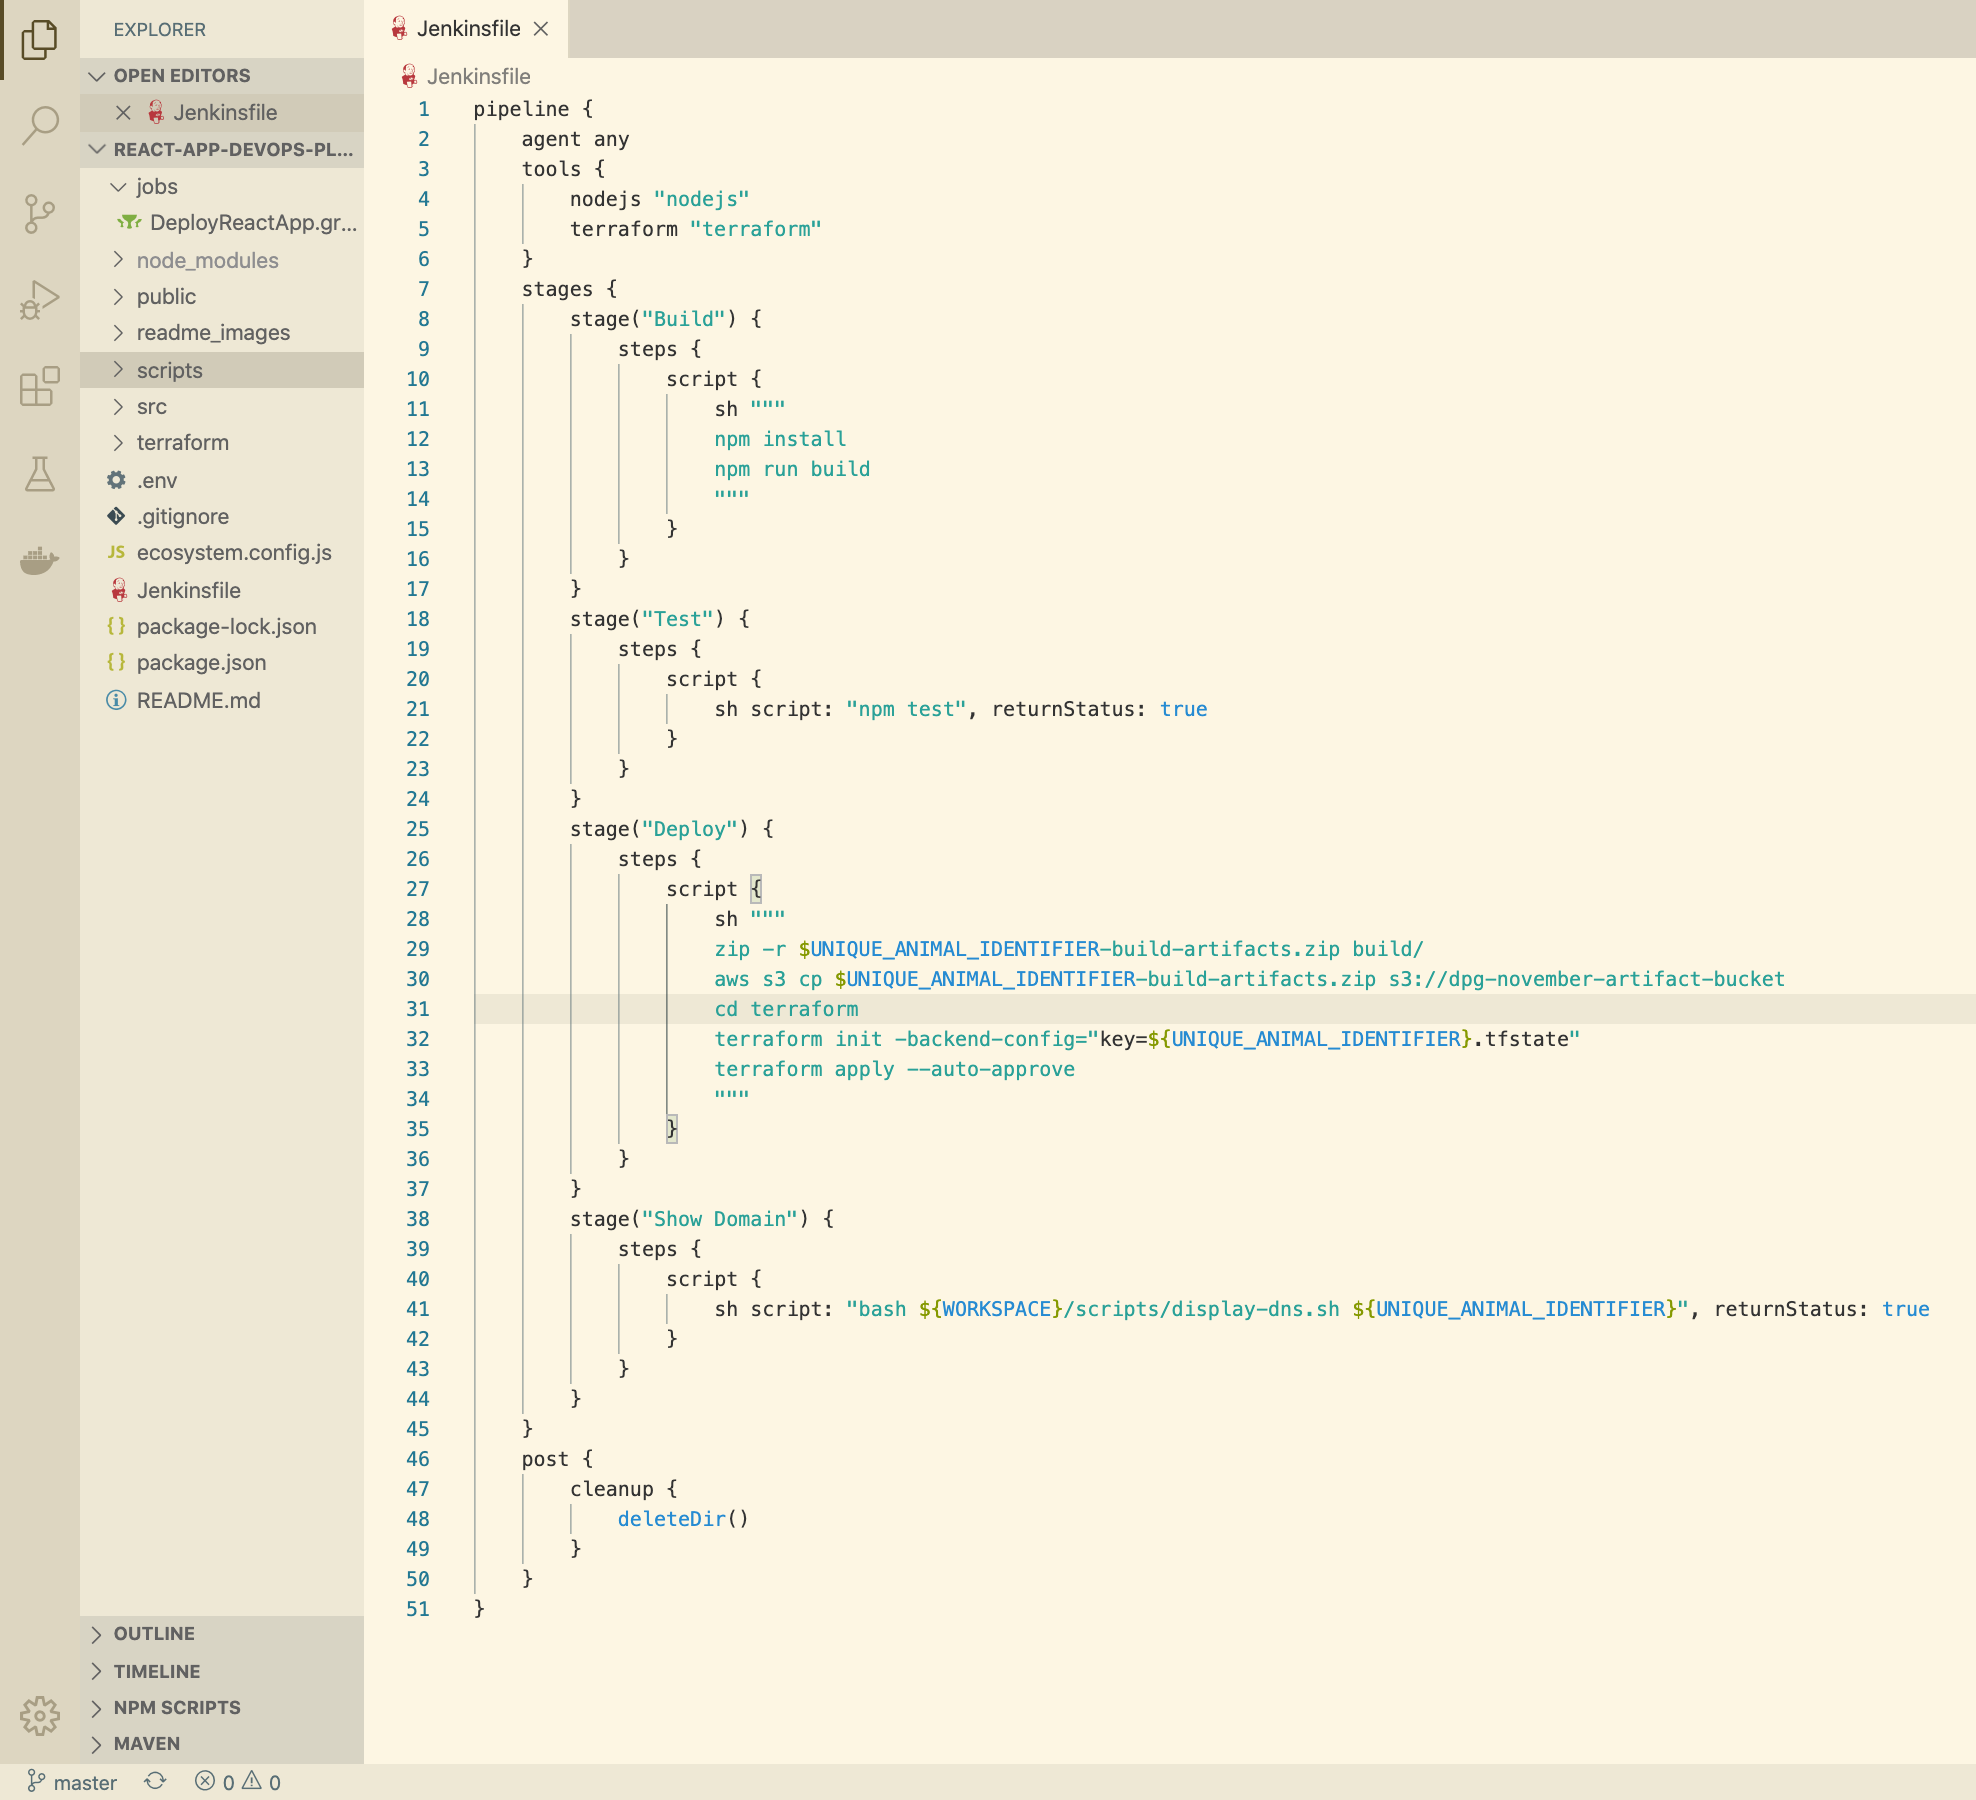
-
Now navigate to the
terraform/directory located in the root directory of this repo and open thevariables.tffile. Change the default value of the following variable- UNIQUE_ANIMAL_IDENTIFIER: your animal for this playground.


By changing this variable here we don't have to edit multiple files. Terraform will pass this value to the necessary files.
3. Commit the code and push to the master branch.
We should now have made changes to the following files:
Jenkinsfileterraform/variables.tf
Also, feel free to have a look at the files where the two variables you changed are being used... `
terraform/main.tfterraform/modules/autoscaling_group/iam.tfterraform/modules/autoscaling_group/main.tfterraform/modules/elastic_load_balancer/main.tfterraform/scripts/deploy-react-application.tfscripts/display-dns.sh
Now commit the code and push to master by running the following commands in the root directory:
git add .
git commit -m "Populating the Jenkinsfile script and the terraform variables"
git push -u origin master
Section 4: check deployed logs and visit website.
Now that we have pushed the changes, let's go back to Jenkins to see if the Deploy-React-App pipeline has a build running.
1. In Jenkins, click on the Deploy-React-App pipeline.
2. Under Build History you should see a build that has just been triggered.
Note: It may or may not be running/complete just yet so just wait a moment for the most recent logs to appear.
3. Once your build has completed, click on the blue ball icon to go straight to the build logs.

You should see the output of all the various stages of our deployment.
While we wait..
It should be a couple of minutes until the website is live. While we wait, lets go through whats happening from an end to end perspective.
End to end
- A build folder is created which packages up our application.
- We zip up that folder and send it off to Amazon S3.
- Terraform is initialised and provisions a load balancer and an autoscaling group into a virtual private cloud (VPC)
- When the infrastructure is provisioned, the deployed servers will pull down that build zip file and unzip it.
- The build package is then ultimately served on port 80 (http://), which allows the public to visit and use the website.
Our infrastructure
- load balancer: this will distribute traffic across our servers depending on the health and utilisation of those servers. If one is in poor health, it will redirect traffic to a healthy one.
- autoscaling group: this will automatically scale our application up/down depending on how we configure it. If we have an unexpected surge in traffic, it will provision more servers to make the application more available
4. At the bottom of the logs, you'll see the following message:
Application successfully deployed! Please visit http://<ELB_DOMAIN_NAME> in your browser to view it.
Click the link to see the deployed website!
Note: it will take a couple of minutes for the application to deploy, so don't be alarmed if the link isn't working just yet. It will!
AWS lets you utilise resources such as Amazon Route 53 to set up domains to your websites. Check out the link above for the documentation.
Thats all for tonight! Thanks for joining, I hope you enjoyed it!