The Power of the Cloud and Unsupervised Learning
Background
It is time to take what you have learned about unsupervised learning and the AWS services and apply it to new situations. For this assignment, you will need to complete one of two (not both) challenges. Which challenge you take on is your choice. Just be sure to give it your all -- as the skills you hone will become powerful tools in your FinTech tool belt.
Before You Begin
-
Create a new repository for this project called
unit13-challenge. Do not add this homework to an existing repository. -
Clone the new repository to your computer.
-
Inside your local git repository, create a directory for the challenge assignment you choose. Use folder names corresponding to the challenges: RoboAdvisor or ClusteringCrypto.
-
Add your solution files to this folder.
-
Push the above changes to GitHub or GitLab.
Option 1: Robo Advisor for Retirement Plans

Photo by Alex Knight from Pexels | Free License
Background
You were hired as a digital transformation consultant by one of the most prominent retirement plan providers in the country; they want to increase their client portfolio, especially by engaging young people. Since machine learning and NLP are disrupting finance to improve customer experience, you decide to create a robo advisor that could be used by customers or potential new customers to get investment portfolio recommendations for retirement.
In this homework assignment, you will combine your new Amazon Web Services skills with your already mastered Python superpowers, to create a bot that will recommend an investment portfolio for a retirement plan.
You are asked to accomplish the following main tasks:
-
Initial Robo Advisor Configuration: Define an Amazon Lex bot with a single intent that establishes a conversation about the requirements to suggest an investment portfolio for retirement.
-
Build and Test the Robo Advisor: Make sure that your bot is working and responding accurately along with the conversation with the user, by building and testing it.
-
Enhance the Robo Advisor with an Amazon Lambda Function: Create an Amazon Lambda function that validates the user's input and returns the investment portfolio recommendation. This task includes testing the Amazon Lambda function and making the integration with the bot.
Files
- lambda_function.py
- correct_dialog.txt
- age_error.txt
- incorrect_amount_error.txt
- negative_age_error.txt
Instructions
Initial Robo Advisor Configuration
In this section, you will create the RoboAdvisor bot and add an intent with its corresponding slots.
Sign in into your AWS Management Console and create a new custom Amazon Lex bot. Use the following parameters:
- Bot name: RoboAdvisor
- Output voice: Salli
- Session timeout: 5 minutes
- Sentiment analysis: No
- COPPA: No
- Advanced options: No
- Leave default values for all other options.
Create the RecommendPortfolio intent, and configure some sample utterances as follows (you can add more utterances as you wish):
- I want to save money for my retirement
- I'm
{age}and I would like to invest for my retirement - I'm
{age}and I want to invest for my retirement - I want the best option to invest for my retirement
- I'm worried about my retirement
- I want to invest for my retirement
- I would like to invest for my retirement
This bot will use four slots, three using built-in types and one custom slot named riskLevel. Define the three initial slots as follows:
| Name | Slot Type | Prompt |
|---|---|---|
| firstName | AMAZON.US_FIRST_NAME | Thank you for trusting me to help, could you please give me your name? |
| age | AMAZON.NUMBER | How old are you? |
| investmentAmount | AMAZON.NUMBER | How much do you want to invest? |
The riskLevel custom slot will be used to retrieve the risk level the user is willing to take on the investment portfolio. Create this custom slot as follows:
- Select the
+icon next to 'Slot Types' in the 'Editor' on the left side of the screen. - Choose
create custom slotfrom the resulting display window. - For Slot type name, type: riskLevel
- Select the radial dial button next to Restrict to Slot values and synonyms, then fill in the appropriate values and synonums. Example: Low, Minimal; High, Maximum.
- Click
Add slot to intentwhen finished.
To format the response cards for the intent, click on the gear icon next to the intent as seen in the image below:
![]()
Next, input the following data in the resulting display window:
- Prompt: What level of investment risk would you like to take?
- Maximum number of retries: 2
- Prompt response cards: 4
Configure the response cards for the riskLevel slot as is shown bellow:
| Card 1 | Card 2 |
|---|---|
 |
 |
| Card 3 | Card 4 |
|---|---|
 |
 |
Note: You can download free icons from this website or you can use the icons provided in the Icons directory.
Move to the Confirmation Prompt section, and set the following messages:
- Confirm: Thanks, now I will look for the best investment portfolio for you.
- Cancel: I will be pleased to assist you in the future.
Leave the error handling configuration for the RecommendPortfolio bot with the default values.

Build and Test the Robo Advisor
In this section, you will test your Robo Advisor. To build your bot, click on the Build button in the upper right hand corner. Once the build is complete, test it in the chatbot window. You should see a conversation like the one below.

Enhance the Robo Advisor with an Amazon Lambda Function
In this section, you will create an Amazon Lambda function that will validate the data provided by the user on the Robo Advisor. Start by creating a new lambda function from scratch and name it recommendPortfolio. Select Python 3.7 as runtime.
In the Lambda function, start by deleting the AWS generated default lines of code, then paste in the starter code provided in lambda_function.py and complete the recommend_portfolio() function by following these guidelines:
User Input Validation
- The
ageshould be greater than zero and less than 65. - the
investment_amountshould be equal to or greater than 5000.
Investment Portfolio Recommendation
Once the intent is fulfilled, the bot should response with an investment recommendation based on the selected risk level as follows:
- none: "100% bonds (AGG), 0% equities (SPY)"
- very low: "80% bonds (AGG), 20% equities (SPY)"
- low: "60% bonds (AGG), 40% equities (SPY)"
- medium: "40% bonds (AGG), 60% equities (SPY)"
- high: "20% bonds (AGG), 80% equities (SPY)"
- very high: "0% bonds (AGG), 100% equities (SPY)"
Be creative while coding your solution, you can have all the code on the recommend_portfolio() function, or you can split the functionality across different functions, put your Python coding skills in action!
Once you finish coding your lambda function, test it using the sample test cases provided for this homework.
After successfully testing your code, open the Amazon Lex Console and navigate to the RecommendPortfolio bot configuration, integrate your new lambda function by selecting it in the Lambda initialization and validation and Fulfillment sections. Build your bot, and you should have a conversation as follows.

Submission
You should create a brand new repository in GitHub and upload the following files to your repo.
-
A python script with your final lambda function.
-
From the Amazon Lex Console, export your bot, intent, and slot using
Amazon Lexas the target platform, and upload the ZIP files to your repo. -
Create a short video or animated GIF showing a demo of your Robo Advisor in action from the test window. Upload the video or animated GIF file to your repo.
Once you have uploaded all the files into the repo, post a link to your homework's repository in BootCamp Spot.
Hints
- Make sure your intent and slot names are named correctly in your Lambda code. The names in Lex should match the names in Lambda exactly:


-
You may have to refresh the Lex intent page after creating the custom slot and the lambda function in order to see them in the options.
-
If you are using a Mac, you can create a screen-recording using the built-in QuickTime player. Follow this link to learn more.
-
If you are using Windows 10, you can create a screen-recording using the built-in Xbox Game Bar. Follow this link to learn more.
Option 2: Clustering Crypto
 Cryptocurrencies coins by Worldspectrum | Free License
Background
You are a Senior Manager at the Advisory Services team on a Big Four firm. One of your most important clients, a prominent investment bank, is interested in offering a new cryptocurrencies investment portfolio for its customers, however, they are lost in the immense universe of cryptocurrencies. They ask you to help them make sense of it all by generating a report of what cryptocurrencies are available on the trading market and how they can be grouped using classification.
In this homework assignment, you will put your new unsupervivsed learning and Amazon SageMaker skills into action by clustering cryptocurrencies and creating plots to present your results.
You are asked to accomplish the following main tasks:
-
Data Preprocessing: Prepare data for dimension reduction with PCA and clustering using K-Means.
-
Reducing Data Dimensions Using PCA: Reduce data dimension using the
PCAalgorithm fromsklearn. -
Clustering Cryptocurrencies Using K-Means: Predict clusters using the cryptocurrencies data using the
KMeansalgorithm fromsklearn. -
Visualizing Results: Create some plots and data tables to present your results.
-
Optional Challenge: Deploy your notebook to Amazon SageMaker.
Files
Instructions
Data Preprocessing
In this section, you will load the information about cryptocurrencies and perform data preprocessing tasks. You can choose one of the following methods to load the data:
-
Using the provided
CSVfile, create aPathobject and read the file data directly into a DataFrame namedcrypto_dfusingpd.read_csv(). -
Using the following
requestslibrary, retreive the necessary data from the following API endpoint from CryptoCompare -https://min-api.cryptocompare.com/data/all/coinlist. HINT: You will need to use the 'Data' key from the json response, then transpose the DataFrame. Name your DataFramecrypto_df.
With the data loaded into a Pandas DataFrame, continue with the following data preprocessing tasks.
-
Keep only the necessary columns: 'CoinName','Algorithm','IsTrading','ProofType','TotalCoinsMined','TotalCoinSupply'
-
Keep only the cryptocurrencies that are trading.
-
Keep only the cryptocurrencies with a working algorithm.
-
Remove the
IsTradingcolumn. -
Remove all cryptocurrencies with at least one null value.
-
Remove all cryptocurrencies that have no coins mined.
-
Drop all rows where there are 'N/A' text values.
-
Store the names of all cryptocurrencies in a DataFrame named
coins_name, use thecrypto_df.indexas the index for this new DataFrame. -
Remove the
CoinNamecolumn. -
Create dummy variables for all the text features, and store the resulting data in a DataFrame named
X. -
Use the
StandardScalerfromsklearnto standardize all the data of theXDataFrame. Remember, this is important prior to using PCA and K-Means algorithms.
Reducing Data Dimensions Using PCA
Use the PCA algorithm from sklearn to reduce the dimensions of the X DataFrame down to three principal components.
Once you have reduced the data dimensions, create a DataFrame named pcs_df using as columns names "PC 1", "PC 2" and "PC 3"; use the crypto_df.index as the index for this new DataFrame.
You should have a DataFrame like the following:

Clustering Cryptocurrencies Using K-Means
In this section, you will use the KMeans algorithm from sklearn to cluster the cryptocurrencies using the PCA data.
Perform the following tasks:
-
Create an Elbow Curve to find the best value for
kusing thepcs_dfDataFrame. -
Once you define the best value for
k, run theKmeansalgorithm to predict thekclusters for the cryptocurrencies data. Use thepcs_dfto run theKMeansalgorithm. -
Create a new DataFrame named
clustered_df, that includes the following columns"Algorithm", "ProofType", "TotalCoinsMined", "TotalCoinSupply", "PC 1", "PC 2", "PC 3", "CoinName", "Class". You should maintain the index of thecrypto_dfDataFrames as is shown bellow.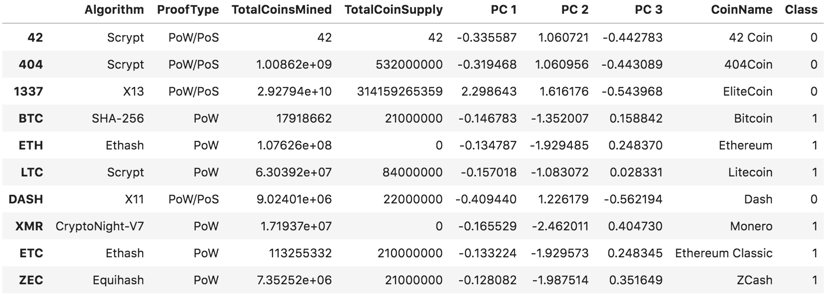

Visualizing Results
In this section, you will create some data visualization to present the final results. Perform the following tasks:
-
Create a 3D-Scatter using Plotly Express to plot the clusters using the
clustered_dfDataFrame. You should include the following parameters on the plot:hover_name="CoinName"andhover_data=["Algorithm"]to show this additional info on each data point. -
Use
hvplot.tableto create a data table with all the current tradable cryptocurrencies. The table should have the following columns:"CoinName", "Algorithm", "ProofType", "TotalCoinSupply", "TotalCoinsMined", "Class" -
Create a scatter plot using
hvplot.scatter, to present the clustered data about cryptocurrencies havingx="TotalCoinsMined"andy="TotalCoinSupply"to contrast the number of available coins versus the total number of mined coins. Use thehover_cols=["CoinName"]parameter to include the cryptocurrency name on each data point.
Optional Challenge
For the challenge section, you have to upload your Jupyter notebook to Amazon SageMaker and deploy it.
The hvplot and Plotly Express libraries are not included in the built-in anaconda environments, so for this challenge section, you should use the altair library instead.
Perform the following tasks:
-
Upload your Jupyter notebook and rename it as
crypto_clustering_sm.ipynb -
Select the
conda_python3environment. -
Install the
altairlibrary by running the following code before the initial imports.
!pip install -U altair-
Use the
altairscatter plot to create the Elbow Curve. -
Use the
altairscatter plot, instead of the 3D-Scatter from Plotly Express, to visualize the clusters. Since this is a 2D-Scatter, usex="PC 1"andy="PC 2"for the axes, and add the following columns as tool tips:"CoinName", "Algorithm", "TotalCoinsMined", "TotalCoinSupply". -
Use the
altairscatter plot to visualize the tradable cryptocurrencies usingx="TotalCoinsMined"andy="TotalCoinSupply"for the axes. -
Show the table of current tradable cryptocurrencies using the
display()command. -
Remove all
hvplotand Plotly Express references from your code.
Complementary Resources
Submission
-
Code your solution using the provided starter Jupyter notebook.
-
For the Challenge section, create a new Jupyter notebook named
crypto_clustering_sm.ipynband include the necessary code to import the additional required library. -
Create and upload a repository with the above files to GitHub and post a link in BootCamp Spot.
© 2019 Trilogy Education Services, a 2U, Inc. brand. All Rights Reserved.