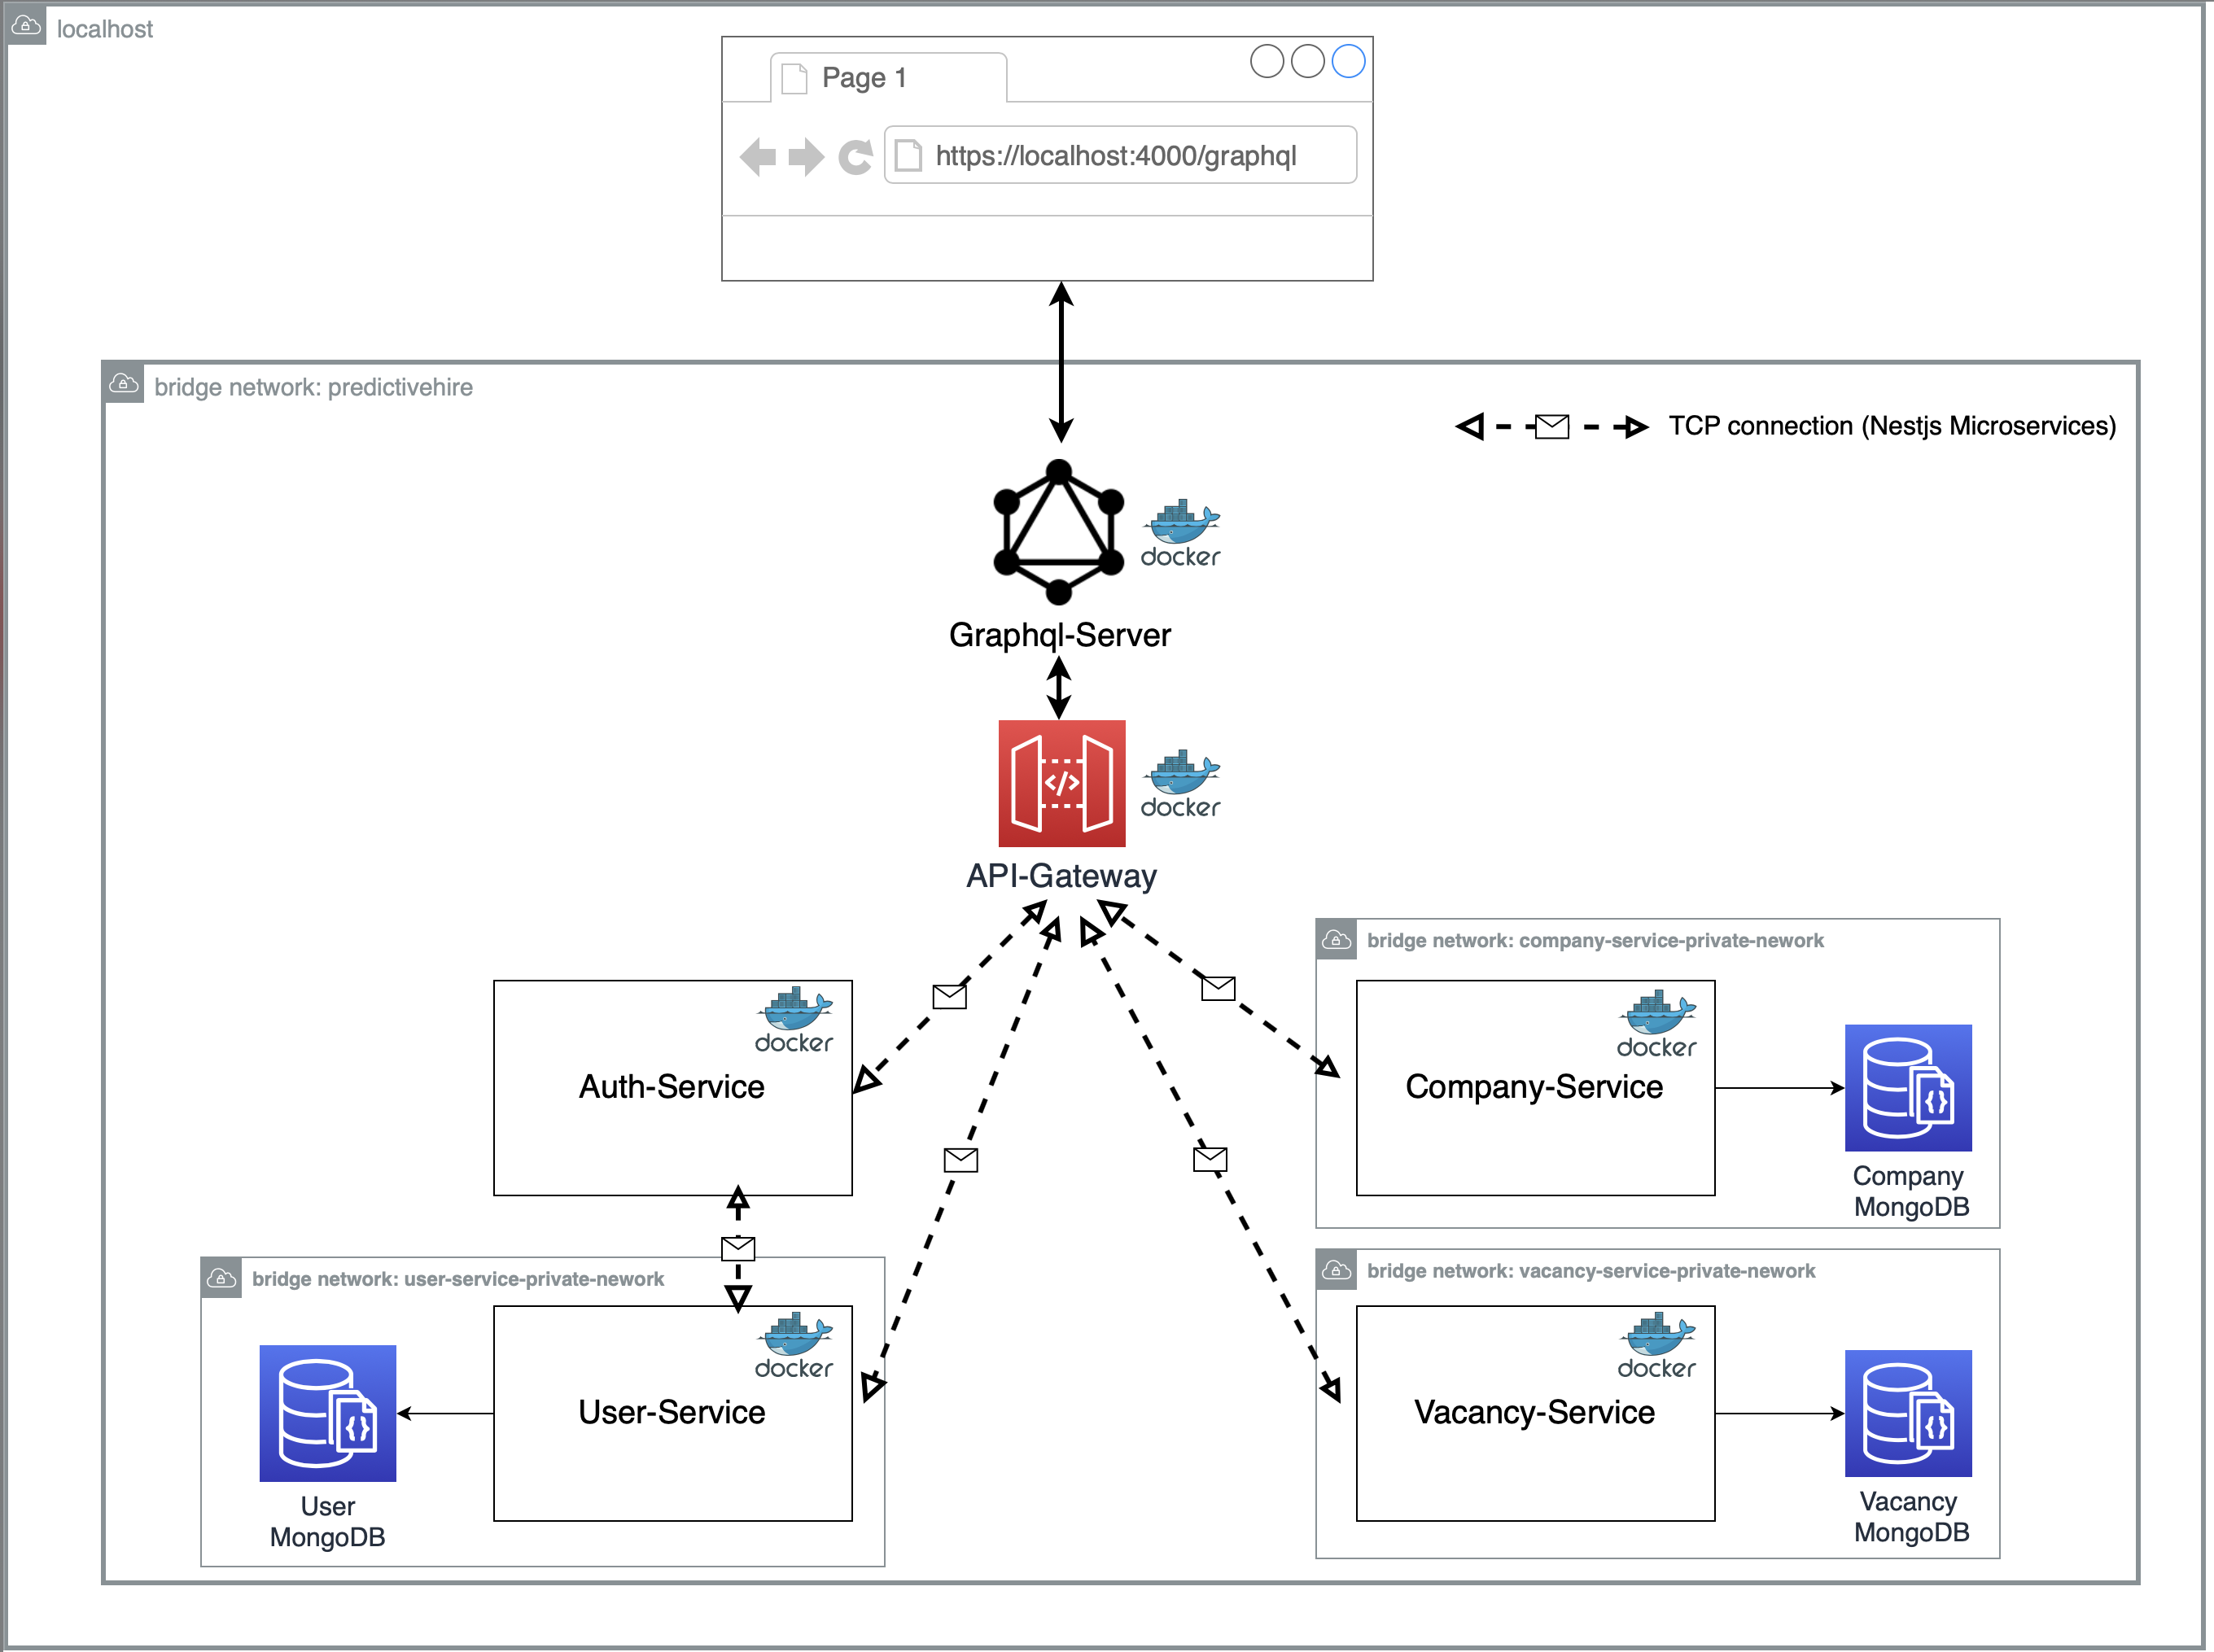
This demo project is containing a GraphQL Server + REST API gateway with back-end microservices all written using the NestJS Framework and TypeScript
The GraphQL server receives the requests from client side and fetch data by calling RESTful API, ultimately it will return aggregated data to client side.
The REST API acts as a gateway/proxy for the different microservices it exposes.
The controllers of the REST API make calls to the servers/microservices in the back-end through TCP.
The Nestjs microservices then handles the request to connect to databases or any other service it needs to serve requests.
All the components(GraphQL, API Gateway, microservies) are dockerized and for simplicity purpose, these containers are all in bridge network, so that they are visible to outside through its service name.
A diagram of the architecture is shown below.
Deployment is done with containers in mind. A Docker Compose file along with Dockerfiles for each project are given to run the whole thing on any machine. For production, it's always recommended to use Kubernetes for these kinds of microservices architecture to deploy in production.
The service folder is named by [service name]-[service default port]. E.g. api-gateway-3000
| Method | API | Payload | Return | Authorization | GraphQL |
|---|---|---|---|---|---|
| POST | /login |
                    { "username": String,
                     "password": String!,
                     }
|
                    { username: String
                        userId: String
                        companyId: String
                        role: String
                        accessToken: String
                     }
|
false | mutation{ login(username:"leo", password:"123") { accessToken } } |
| Method | API | Payload | Return | Authorization | GraphQL |
|---|---|---|---|---|---|
| POST | /company |
                    { "name": String,
                     "address": String,
                     }
|
            {
            _id: string;
              name: string;
              address: string;
              __v: number;
            }
|
false | mutation { createCompany(input:{name:"predictivehire", address:"ascot st"}) { _id } } |
| GET | /company/{id} |
                        {
                        _id: string;
                          name: string;
                          address: string;
                          __v: number;
                        }
|
false | query{ company(id:"5fcf02c2b494590029b333a6") { name } } |
| Method | API | Payload | Return | Authorization | GraphQL |
|---|---|---|---|---|---|
| POST | /register |
                    { "name": String,
                     "username": String
                     "password": String
                     "role": String
                     "companyId": String
                     }
|
            {
             _id: string;
              name: string;
              username: string;
              role: string;
              __v: number;
            }
|
false | mutation{ register(input:{name:"Bob Markle", username:"bob", password:"bob", role:"user", companyId:""}){ _id } } |
| Method | API | Payload | Return | Authorization | GraphQL |
|---|---|---|---|---|---|
| GET | /vacancy/{vacancyId}?company_id={companyId} |
|
{id: String
                    title: String
                    description: String
expireAt: String} |
true |
                query{
                  vacancy(companyId:"", vacancyId:""){
                    title
                  }
                }
|
| POST | /vacancy?company_id={companyId} |
                      { "title": String
                       "description": String
                       "expireAt": ISOTimeString,
                       }
|
{id: String
                    title: String
                    description: String
expireAt: String} |
true & Admin |
                 mutation{
                   createVacancy(input:{title:"", description:"", expireAt:"", companyId:""}){
                 		title
                   }
                 }
|
| PUT | /vacancy/{vacanyId}?company_id={companyId} |
                      { "title": String
                       "description": String
                       "expireAt": ISOTimeString,
                       }
|
{id: String
                    title: String
                    description: String
expireAt: String} |
true & Admin |
                mutation{
                	updateVacancy(input:{title:"", description:"", expireAt:""}, companyId:"", vacancyId:""){
                		title
                  }
                }
|
| DELETE | /vacancy/{vacanyId}?company_id={id} |
|
{id: String
                    title: String
                    description: String
expireAt: String} |
true & Admin | mutation{ deleteVacancy(companyId:"", vacancyId:""){ title } } |
System Requirements - Linux/Mac should be better, I did not test Windows yet
- Node.js - v12 Required (You can run
nvm useto install the desired node version which already been defined in .nvmrc) - Docker - latest
- Docker Compose - latest
Please check the .env.prod first to see which port you would like to use
-
On the Terminal, go into the project's root folder (
cd /project/root/folder) and executedocker-compose -f docker-compose.yml --env-file .env.prod build. The docker will start building the image and it may take a while. After the images are build, executedocker-compose -f docker-compose.yml --env-file .env.prod upto run the docker containers. -
Once all the containers are on, the GraphQL server will listen on
http://localhost:4000by default
Please check the .env.dev first to see which port you would like to use
-
On the Terminal, go into the project's root folder (
cd /project/root/folder) and executeyarn, then executedocker-compose -f docker-compose.dev.yml --env-file .env.dev build. The docker will start building the image and it may take a while. After the images are build, executedocker-compose -f docker-compose.dev.yml --env-file .env.dev upto run the docker containers. -
Once all the containers are on, the GraphQL server will listen on
http://localhost:4000by default, and all the services are running in development --watch mode. So you can debug the code, and the services will be hot-reloaded.
- On the Terminal, go into the project's root folder (
cd /project/root/folder) and executeyarn test
- On the Terminal, go into the project's root folder (
cd /project/root/folder) and executeyarn test:e2e
Once the GraphQL server is on, you can use the playground to Query / Mutate some data.
In this app, I didn't save any default data in the mongoDB, so before starting playing, please execute the following script to insert ONE company and TWO users.
mutation {
  createCompany(input:{name:"Predictivehire", address:"15 Newto St"}) {
    _id
  }
}
please remember the _id, that's the companyId for user.
mutation{
  register(input:{name:"Bob Markle", username:"bob", password:"bob", role:"user", companyId:"<companyId>"}){
    _id
  }
}

mutation{
  register(input:{name:"Mark Smith", username:"mark", password:"mark", role:"admin", companyId:"<companyId>"}){
    _id
  }
}
Once abvoe steps are done, you can play with the app according to the RESTful API Desgin instruction.
Due to time limit and simplicity purpose, here are some highlights I didn't do but have in mind:
.env.devand.env.prodshouldn't be committed, the env variable value should be injected dynamically.- I only implement unit test and e2e test for a small partial of the code, but hopefully they can assist you to have a taste on how I coded
- All the microservices connected through TCP in this demo, but in mose cases, the services will be distributed in different host / region, so using RabbitMQ or Kafka can help decouple the services and improve the system performance.
- No load balance yet.
- No service registry center yet.
- No cache yet.
