Easily send Discord webhooks with Python (also has async support)
Install via pip:
pip install discord-webhook
- Basic Webhook
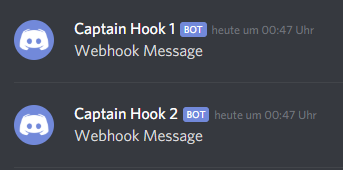
- Create Multiple Instances / Use multiple URLs
- Get Webhook by ID
- Send Webhook to a thread
- Manage Being Rate Limited
- Embedded Content
- Edit Webhook Message
- Delete Webhook Message
- Send Files
- Remove Embeds and Files
- Allowed Mentions
- Use Message Flags
- Use Proxies
- Timeout
- Async Support
from discord_webhook import DiscordWebhook

webhook = DiscordWebhook(url="your webhook url", content="Webhook Message")
response = webhook.execute()If you want to use multiple URLs you need to create multiple instances.
from discord_webhook import DiscordWebhook

# you can provide any kwargs except url
webhook1, webhook2 = DiscordWebhook.create_batch(urls=["first url", "second url"], content="Webhook Message")
response1 = webhook1.execute()
response2 = webhook2.execute()You can access a webhook that has already been sent by providing the ID.
from discord_webhook import DiscordWebhook

webhook = DiscordWebhook(url="your webhook url", id="your webhook message id")
# now you could delete or edit the webhook
# ...You can send a message to an existing thread by setting thread_id or create a new thread in a forum channel by using a thread_name.
from discord_webhook import DiscordWebhook

# send to an existing thread
webhook = DiscordWebhook(url="your webhook url", thread_id="the thread id")
webhook.execute()

# create a new thread in a forum channel
webhook = DiscordWebhook(url="your webhook url", thread_name="some-thread-name")
webhook.execute()from discord_webhook import DiscordWebhook
# if rate_limit_retry is True then in the event that you are being rate
# limited by Discord your webhook will automatically be sent once the
# rate limit has been lifted
webhook = DiscordWebhook(url="your webhook url", rate_limit_retry=True, content="Webhook Message")
response = webhook.execute()from discord_webhook import DiscordWebhook, DiscordEmbed
webhook = DiscordWebhook(url="your webhook url")
# create embed object for webhook
# you can set the color as a decimal (color=242424) or hex (color="03b2f8") number
embed = DiscordEmbed(title="Your Title", description="Lorem ipsum dolor sit", color="03b2f8")
# add embed object to webhook
webhook.add_embed(embed)
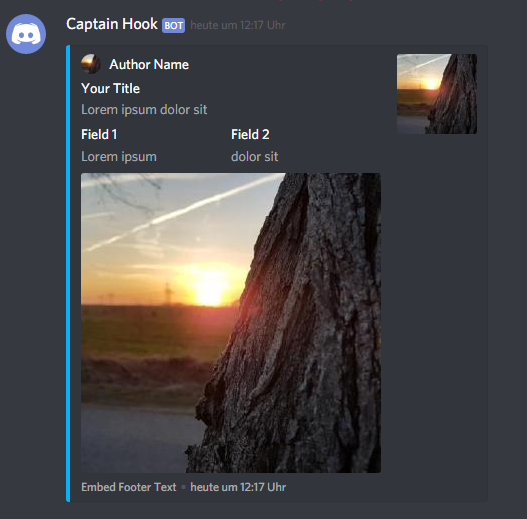
response = webhook.execute()from discord_webhook import DiscordWebhook, DiscordEmbed
webhook = DiscordWebhook(url="your webhook url")
# create embed object for webhook
embed = DiscordEmbed(title="Your Title", description="Lorem ipsum dolor sit", color="03b2f8")
# set author
embed.set_author(name="Author Name", url="author url", icon_url="author icon url")
# set image
embed.set_image(url="your image url")
# set thumbnail
embed.set_thumbnail(url="your thumbnail url")
# set footer
embed.set_footer(text="Embed Footer Text", icon_url="URL of icon")
# set timestamp (default is now) accepted types are int, float and datetime
embed.set_timestamp()
# add fields to embed
embed.add_embed_field(name="Field 1", value="Lorem ipsum")
embed.add_embed_field(name="Field 2", value="dolor sit")
# add embed object to webhook
webhook.add_embed(embed)
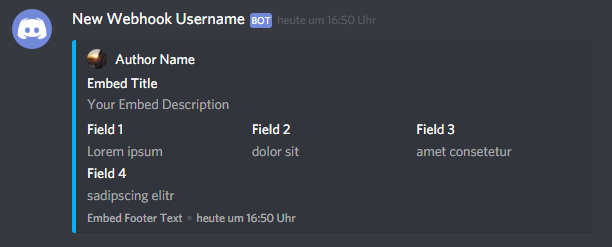
response = webhook.execute()This is another example with embedded content
from discord_webhook import DiscordWebhook, DiscordEmbed

webhook = DiscordWebhook(url="your webhook url", username="New Webhook Username")

embed = DiscordEmbed(title="Embed Title", description="Your Embed Description", color="03b2f8")
embed.set_author(name="Author Name", url="https://github.com/lovvskillz", icon_url="https://avatars0.githubusercontent.com/u/14542790")
embed.set_footer(text="Embed Footer Text")
embed.set_timestamp()
embed.add_embed_field(name="Field 1", value="Lorem ipsum")
embed.add_embed_field(name="Field 2", value="dolor sit")
embed.add_embed_field(name="Field 3", value="amet consetetur")
embed.add_embed_field(name="Field 4", value="sadipscing elitr")

webhook.add_embed(embed)
response = webhook.execute()
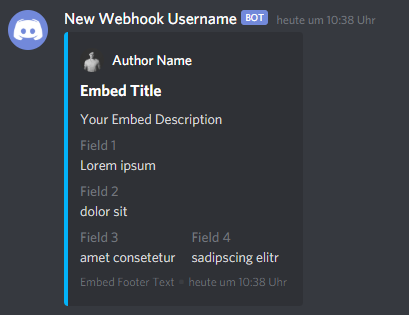
By Default, the Embed fields are placed side by side. We can arrange them in a new line by setting inline=False as follows:
from discord_webhook import DiscordWebhook, DiscordEmbed

webhook = DiscordWebhook(url="your webhook url", username="New Webhook Username")

embed = DiscordEmbed(
    title="Embed Title", description="Your Embed Description", color="03b2f8"
)
embed.set_author(
    name="Author Name",
    url="https://github.com/lovvskillz",
    icon_url="https://avatars0.githubusercontent.com/u/14542790",
)
embed.set_footer(text="Embed Footer Text")
embed.set_timestamp()
# Set `inline=False` for the embed field to occupy the whole line
embed.add_embed_field(name="Field 1", value="Lorem ipsum", inline=False)
embed.add_embed_field(name="Field 2", value="dolor sit", inline=False)
embed.add_embed_field(name="Field 3", value="amet consetetur")
embed.add_embed_field(name="Field 4", value="sadipscing elitr")

webhook.add_embed(embed)
response = webhook.execute()from discord_webhook import DiscordWebhook
from time import sleep
webhook = DiscordWebhook(url="your webhook url", content="Webhook content before edit")
webhook.execute()
webhook.content = "After Edit"
sleep(10)
webhook.edit()from discord_webhook import DiscordWebhook
from time import sleep
webhook = DiscordWebhook(url="your webhook url", content="Webhook Content")
webhook.execute()
sleep(10)
webhook.delete()from discord_webhook import DiscordWebhook
webhook = DiscordWebhook(url="your webhook url", username="Webhook with files")
# send two images
with open("path/to/first/image.jpg", "rb") as f:
webhook.add_file(file=f.read(), filename="example.jpg")
with open("path/to/second/image.jpg", "rb") as f:
webhook.add_file(file=f.read(), filename="example2.jpg")
response = webhook.execute()You can use uploaded attachments in Embeds:
from discord_webhook import DiscordWebhook, DiscordEmbed

webhook = DiscordWebhook(url="your webhook url")

with open("path/to/image.jpg", "rb") as f:
    webhook.add_file(file=f.read(), filename="example.jpg")

embed = DiscordEmbed(title="Embed Title", description="Your Embed Description", color="03b2f8")
embed.set_thumbnail(url="attachment://example.jpg")

webhook.add_embed(embed)
response = webhook.execute()from discord_webhook import DiscordWebhook, DiscordEmbed
webhook = DiscordWebhook(url="your webhook url")
with open("path/to/image.jpg", "rb") as f:
webhook.add_file(file=f.read(), filename="example.jpg")
embed = DiscordEmbed(title="Embed Title", description="Your Embed Description", color="03b2f8")
embed.set_thumbnail(url="attachment://example.jpg")
webhook.add_embed(embed)
response = webhook.execute(remove_embeds=True)
# webhook.embeds will be empty after webhook is executed
# You could also manually call the function webhook.remove_embeds().remove_file() removes the given file
from discord_webhook import DiscordWebhook

webhook = DiscordWebhook(url="your webhook url", username="Webhook with files")

# send two images
with open("path/to/first/image.jpg", "rb") as f:
    webhook.add_file(file=f.read(), filename="example.jpg")
with open("path/to/second/image.jpg", "rb") as f:
    webhook.add_file(file=f.read(), filename="example2.jpg")
# remove "example.jpg"
webhook.remove_file("example.jpg")
# only "example2.jpg" is sent to the webhook
response = webhook.execute()Look into the Discord Docs for examples and for more explanation.
This example would only ping user 123 and 124 but not everyone else.
from discord_webhook import DiscordWebhook

content = "@everyone say hello to our new friends <@123> and <@124>"
allowed_mentions = {
    "parse": ["everyone"],
    "users": ["123", "124"]
}

webhook = DiscordWebhook(url="your webhook url", content=content, allowed_mentions=allowed_mentions)
response = webhook.execute()Flags can also be set for messages. Only two are currently supported.
from discord_webhook import DiscordEmbed, DiscordWebhook
from discord_webhook.constants import MessageFlags

content = "Hi."

# this message will not trigger push and desktop notifications
webhook = DiscordWebhook(url="your webhook url", content=content, flags=MessageFlags.SUPPRESS_NOTIFICATIONS.value)
response = webhook.execute()

# do not include any embeds when serializing this message
webhook = DiscordWebhook(url="your webhook url", content=content, flags=MessageFlags.SUPPRESS_EMBEDS.value)
embed = DiscordEmbed(title="Your Title", description="Lorem ipsum dolor sit", color="03b2f8")
webhook.add_embed(embed)
# even if an embed has been added, it will not appear in the message.
response = webhook.execute()from discord_webhook import DiscordWebhook
proxies = {
"http": "http://10.10.1.10:3128",
"https": "http://10.10.1.10:1080",
}
webhook = DiscordWebhook(url="your webhook url", content="Webhook Message", proxies=proxies)
response = webhook.execute()or
from discord_webhook import DiscordWebhook

proxies = {
  "http": "http://10.10.1.10:3128",
  "https": "http://10.10.1.10:1080",
}
webhook = DiscordWebhook(url="your webhook url", content="Webhook Message")
webhook.set_proxies(proxies)
response = webhook.execute()from requests.exceptions import Timeout
from discord_webhook import DiscordWebhook, DiscordEmbed
# We will set ridiculously low timeout threshold for testing purposes
webhook = DiscordWebhook(url="your webhook url", timeout=0.1)
# You can also set timeout later using
# webhook.timeout = 0.1
embed = DiscordEmbed(title="Embed Title", description="Your Embed Description", color="03b2f8")
webhook.add_embed(embed)
# Handle timeout exception
try:
response = webhook.execute()
except Timeout as err:
print(f"Oops! Connection to Discord timed out: {err}")In order to use the async version, you need to install the package using:
pip install discord-webhook[async]
Example usage:
import asyncio
from discord_webhook import AsyncDiscordWebhook


async def send_webhook(message):
    webhook = AsyncDiscordWebhook(url="your webhook url", content=message)
    await webhook.execute()


async def main():
    await asyncio.gather(
        send_webhook("Async webhook message 1"),
        send_webhook("Async webhook message 2"),
    )  # sends both messages asynchronously


asyncio.run(main())usage: discord_webhook [-h] -u URL [URL ...] -c CONTENT [--username USERNAME]
[--avatar_url AVATAR_URL]
Trigger discord webhook(s).
optional arguments:
-h, --help show this help message and exit
-u URL [URL ...], --url URL [URL ...]
Webhook(s) url(s)
-c CONTENT, --content CONTENT
Message content
--username USERNAME override the default username of the webhook
--avatar_url AVATAR_URL
override the default avatar of the webhook
This project uses Poetry for dependency management and packaging.
Install Poetry and add Poetry to Path.
Debian / Ubuntu / Mac
curl -sSL https://install.python-poetry.org | python3 -
Windows
open powershell and run: (Invoke-WebRequest -Uri https://install.python-poetry.org -UseBasicParsing).Content | py -
Install dependencies: poetry install
Install the defined pre-commit hooks: poetry run pre-commit install
Activate the virtualenv: poetry shell


