| Key | Value |
|---|---|
| Environment |   |
| Services | S3, DynamoDB, Elastic Container Service, API Gateway, Cognito, IAM |
| Integrations | Terraform, CloudFormation, AWS CLI |
| Categories | Serverless; Containers; Security, Identity, and Compliance |
| Level | Intermediate |
| GitHub | Repository link |
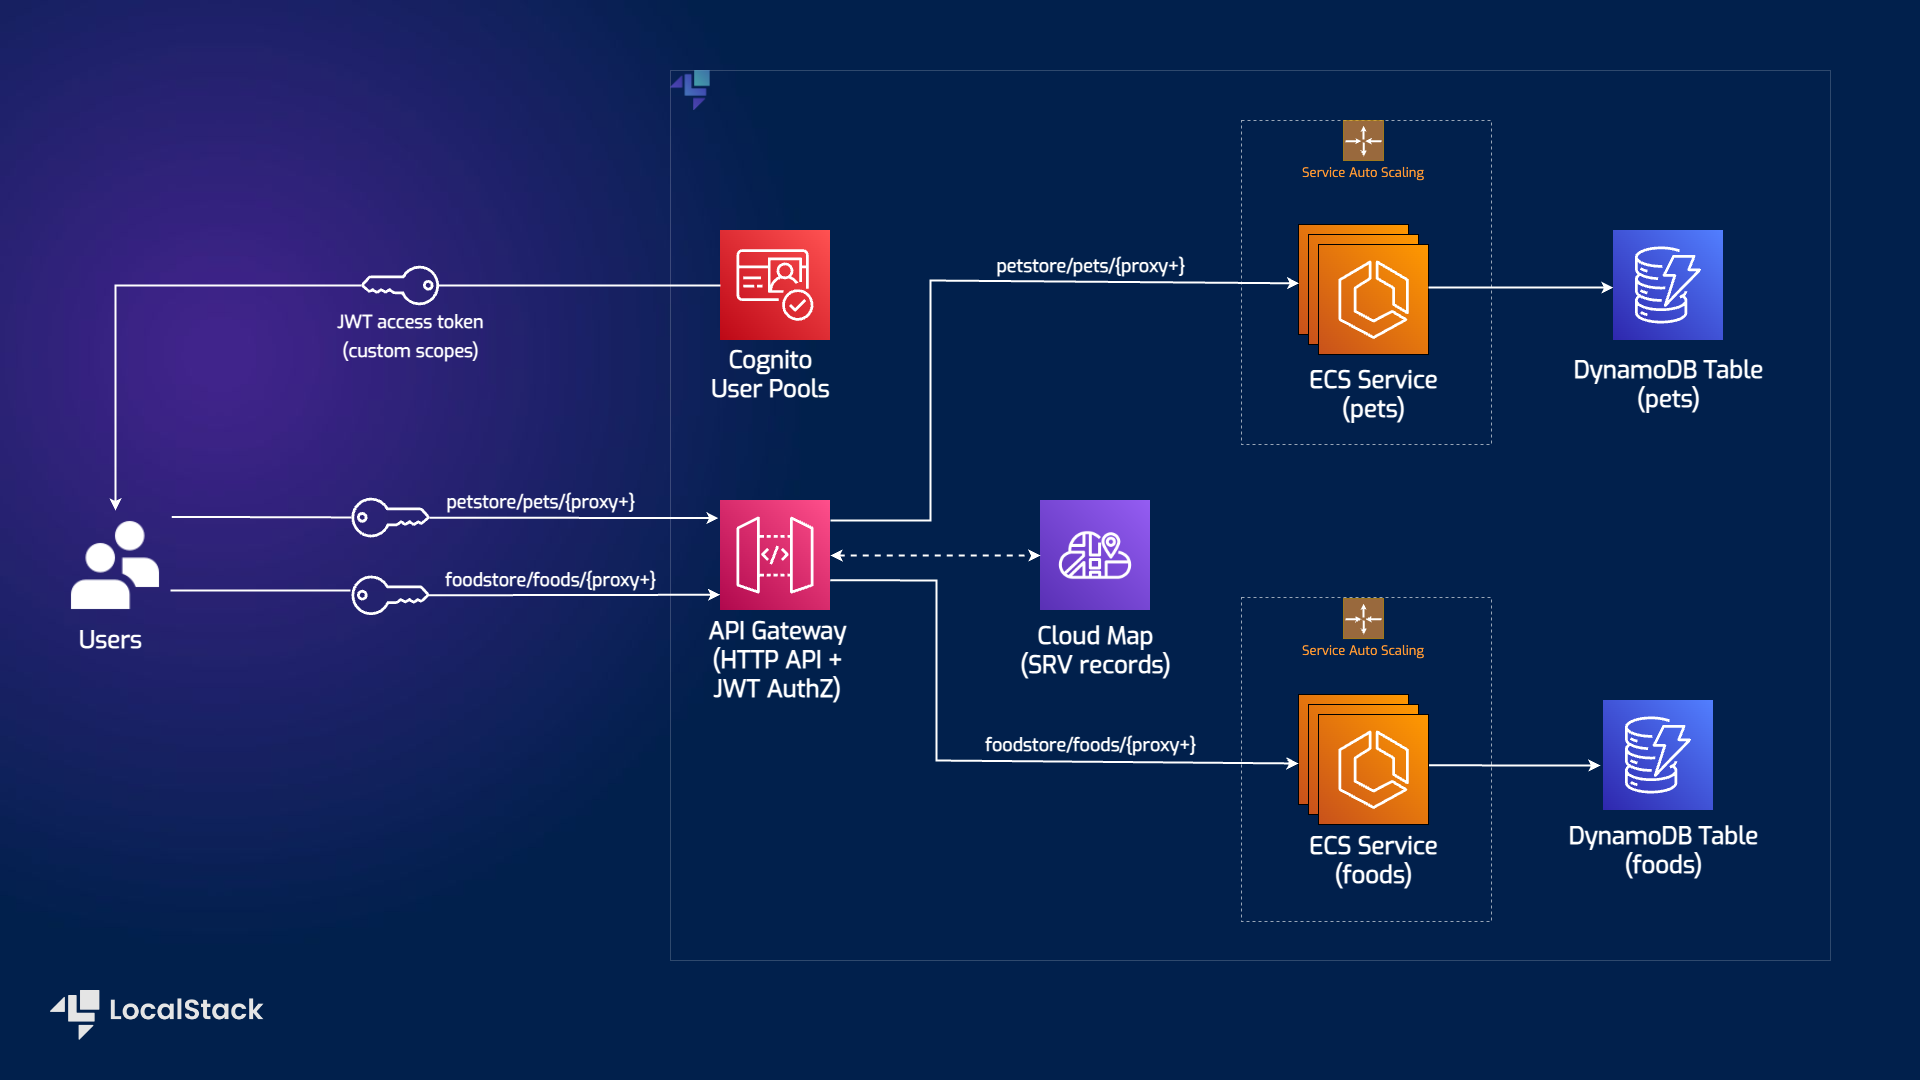
The Serverless Container-based APIs with Amazon ECS and Amazon API Gateway application sample demonstrate how you can launch and test a sample container-based API. This application sample implements an example API with two services — “Food store” to PUT & GET foods, and “Pet store” to PUT & GET pets. The application client is implemented using ReactJS, which allows unauthenticated users to use only GET requests, while authenticated users can utilize GET and PUT requests. Users can deploy this application sample on AWS & LocalStack using CloudFormation & Terraform with minimal changes. To test this application sample, we will demonstrate how you use LocalStack to deploy the infrastructure on your developer machine and your CI environment.
The following diagram shows the architecture that this sample application builds and deploys:
We are using the following AWS services and their features to build our infrastructure:
- Elastic Container Service to create and deploy our containerized application.
- DynamoDB as a key-value and document database to persist our data.
- API Gateway to expose the containerized services to the user through HTTP APIs.
- Cognito User Pools for user authentication and authorizing requests to container APIs.
- Amplify to create the user client with ReactJS to send requests to container APIs.
- S3 to deploy the Amplify application to make the web application available to users.
- IAM to create policies to specify roles and permissions for various AWS services.
- LocalStack Pro with the
localstackCLI. - AWS CLI with the
awslocalwrapper. - Terraform with the
tflocalwrapper. - Node.js with
npmpackage manager.
Start LocalStack Pro with the appropriate configuration to enable the S3 website to send requests to the container APIs:
export LOCALSTACK_AUTH_TOKEN=<your-auth-token>
EXTRA_CORS_ALLOWED_ORIGINS=http://sample-app.s3.localhost.localstack.cloud:4566 DISABLE_CUSTOM_CORS_APIGATEWAY=1 DEBUG=1 localstack start
The DISABLE_CUSTOM_CORS_APIGATEWAY configuration variable disables CORS override by API Gateway. The EXTRA_CORS_ALLOWED_ORIGINS configuration variable allows our website to send requests to the container APIs.
We specified DEBUG=1 to get the printed LocalStack logs directly in the terminal (it helps later, when we need to get the Cognito confirmation code).
If you prefer running LocalStack in detached mode, you can add the -d flag to the localstack start command, and use Docker Desktop to view the logs.
You can build and deploy the sample application on LocalStack by running our Makefile commands. Run make terraform-setup or make cloudformation-setup to create the infrastructure on LocalStack.
Run make run to deploy the S3 Website and get a URL to access the application. Run make stop to delete the infrastructure by stopping LocalStack.
Alternatively, here are instructions to deploy it manually step-by-step.
To create the AWS infrastructure locally, you can either use Terraform or CloudFormation.
To create the infrastructure using Terraform, run the following commands:
cd terraform
tflocal init
tflocal apply --auto-approve
We are using the tflocal wrapper to configure the local service endpoints, and send the API requests to LocalStack, instead of AWS. You can use the same Terraform configuration to deploy the infrastructure on AWS as well.
Currently, the Terraform configuration is tested & validated against
localstack/localstack:3.2.0image. You can use theIMAGE_NAMEenvironment variable to specify the LocalStack image version to ensure that the Terraform configuration works as expected.
To create the infrastructure using CloudFormation, run the following commands:
cd cloudformation
export STACK="stack1"
awslocal cloudformation create-stack --stack-name $STACK --template-body file://ecsapi-demo-cloudformation.yaml
Wait for a few seconds for the infrastructure to be created. You can check the status of the stack using the following command:
awslocal cloudformation describe-stacks --stack-name $STACK | grep StackStatusIf the StackStatus is CREATE_COMPLETE, you can proceed to the next step.
To build the web application, navigate to the root directory of the sample application and run the following commands:
cd client-application-react
yarn
NODE_OPTIONS=--openssl-legacy-provider yarn build
Ensure a build directory is created in the client-application-react directory.
To deploy the web application, we will make an S3 bucket and sync the build directory to the S3 bucket. Run the following commands from the client-application-react directory:
awslocal s3 mb s3://sample-app
awslocal s3 sync build s3://sample-app
To access the web application, you can run the following commands:
export API_ID=$(awslocal apigatewayv2 get-apis | jq -r '.Items[] | select(.Name=="ecsapi-demo") | .ApiId')
export POOL_ID=$(awslocal cognito-idp list-user-pools --max-results 1 | jq -r '.UserPools[0].Id')
export CLIENT_ID=$(awslocal cognito-idp list-user-pool-clients --user-pool-id $POOL_ID | jq -r '.UserPoolClients[0].ClientId')
export URL="http://sample-app.s3.localhost.localstack.cloud:4566/index.html?stackregion=us-east-1&stackhttpapi=$API_ID&stackuserpool=$POOL_ID&stackuserpoolclient=$CLIENT_ID"
echo $URLTo test the web application, follow these steps:
- Open your application URL in your browser if it is displayed in the terminal.
- Create a user by clicking the Go to Sign In! button and navigating to the Create Account page.
- Follow the prompts to fill in your details, and click the Create account button.
- You will be prompted to enter a confirmation code displayed in the terminal, in the LocalStack logs. Use this code to confirm your Account.
Once you have confirmed your Account, skip the email recovery step, as that endpoint is not yet implemented. The application endpoints can now add and retrieve information on your pets and food. You will find a few entries in the resources folder to get you started and explore the application.
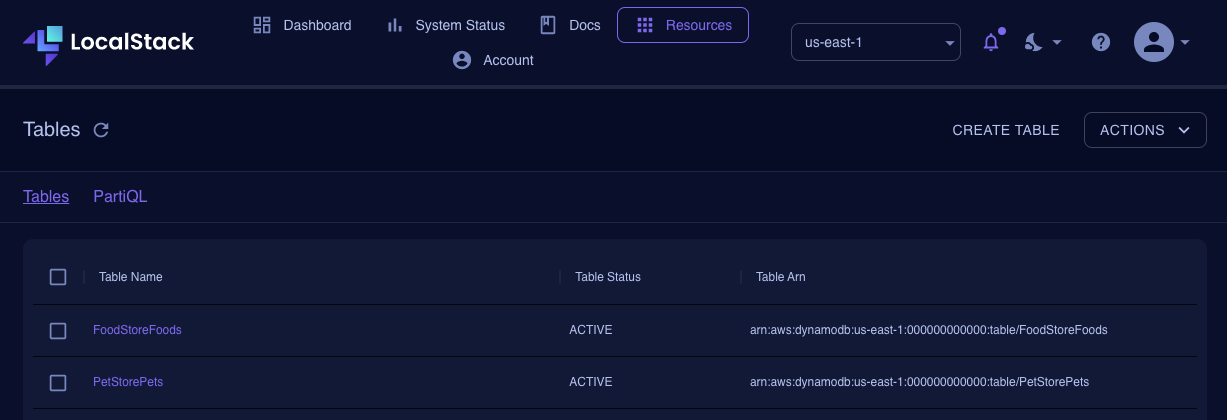
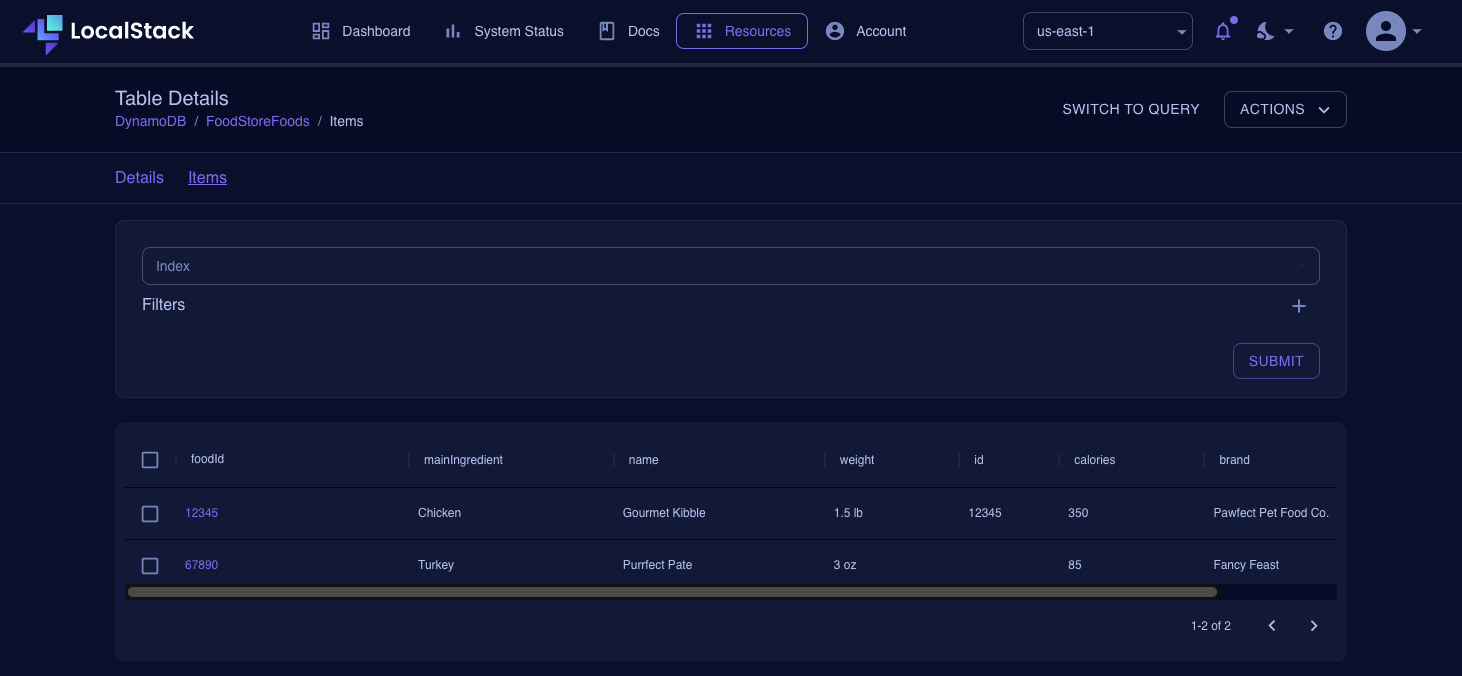
Navigate to app.localstack.cloud and go to Resources -> DynamoDB. You can now see the tables created, as well as the data stored in them:
Alternatively, you can use the AWS CLI to query the table data. For example, to query the FoodStoreFoods table, run the following command:
awslocal dynamodb scan --table-name FoodStoreFoodsThe Export/Import State feature enables you to export the state of your LocalStack instance into a file and import it into another LocalStack instance. This feature is useful when you want to save your LocalStack instance’s state for later use.
To save your local AWS infrastructure state, you can use the export command with a desired name for your state file as the first argument:
localstack state export serverless-api-ecs-apigateway-stateThe above command will create a file named serverless-api-ecs-apigateway-state to the specified location on the disk.
You can import the state file we created previously using the import command with the file name as the first argument:
localstack state import serverless-api-ecs-apigateway-stateTo ensure everything is set in place now, follow the previous steps of setting the configuration variables and query the application URL. The state will be restored, and you should be able to see the same data as before.
This application sample hosts an example GitHub Action workflow that starts up LocalStack, deploys the infrastructure, and checks the created resources using awslocal. You can find the workflow in the .github/workflows/main.yml file. To run the workflow, you can fork this repository and push a commit to the main branch.
Users can adapt this example workflow to run in their own CI environment. LocalStack supports various CI environments, including GitHub Actions, CircleCI, Jenkins, Travis CI, and more. You can find more information about the CI integration in the LocalStack documentation.
The sample application is based on a public AWS sample app that deploys ECS containers with API Gateway to connect to. See this AWS blog post for more details: Field Notes: Serverless Container-based APIs with Amazon ECS and Amazon API Gateway.
We appreciate your interest in contributing to our project and are always looking for new ways to improve the developer experience. We welcome feedback, bug reports, and even feature ideas from the community. Please refer to the contributing file for more details on how to get started.


