本人正在做的项目,本人想修改其架构,并付诸实现,但最后被否定,不想因为修改架构的努力付诸东流,遂写本文。
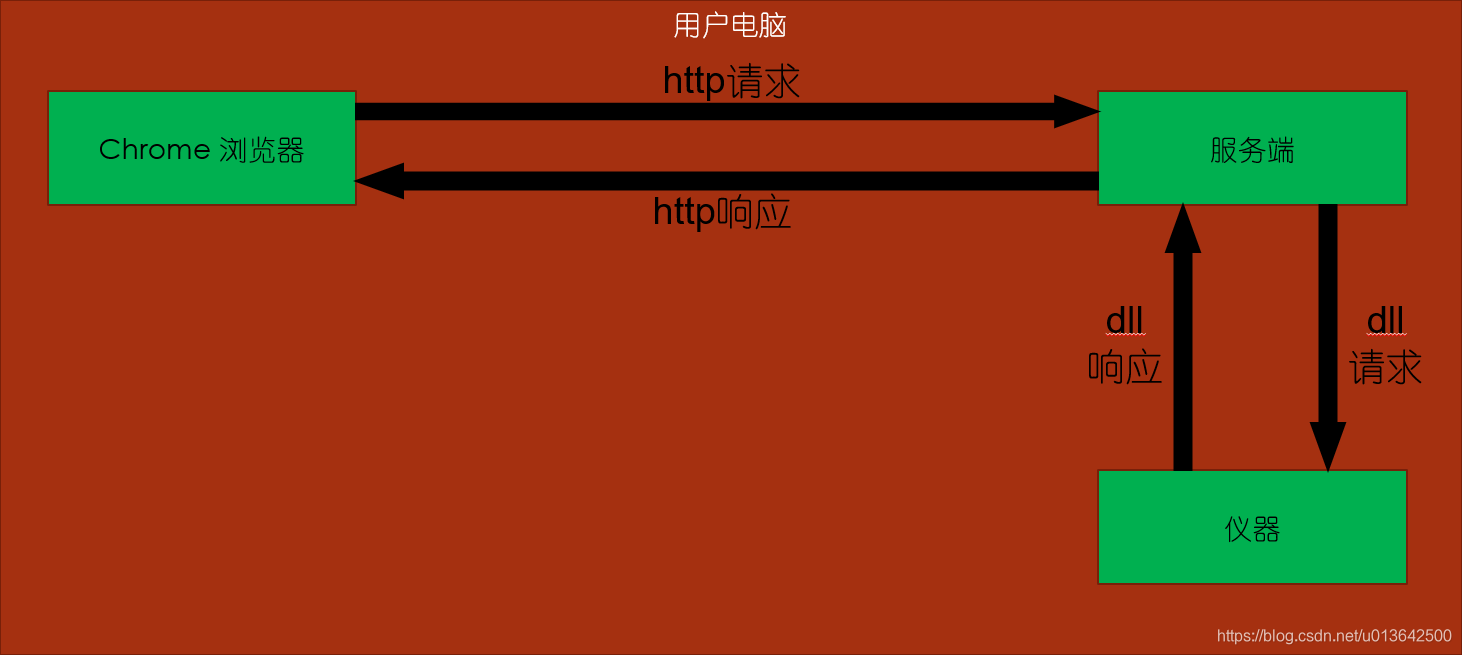
- 为一个仪器开发可视化操控软件,仪器方提供 C# 语言编写的 dll,通过仪器方提供的接口进行操控。
- 本项目在最初设计架构时,本人并没有参与,本人介入该项目时,已确定采用 B/S 架构。
- Server 端用 Tomcat 做后台,用 java 做开发语言。
- 通过 jni4net 对仪器方提供的 dll 进行二次封装,进而得到后台可以使用的 jar 包,进而操控仪器。
- 后台使用的是 SpringMVC 框架。
服务器电脑安装 jdk、Tomcat,服务器电脑安装 Chrome 使用该软件

用户电脑安装 jdk、Tomcat、chrome 使用该软件
软件一阶段测试时,提供给甲方一套文件,包括 32 位和 64 位的 jdk、Tomcat、Chrome,大约 600 MB 左右大小。我这边领导居然要求提供一个 一键安装 的那种文件,最后写了两个 .bat 文件,用一些 xcopy、setx 等方法。
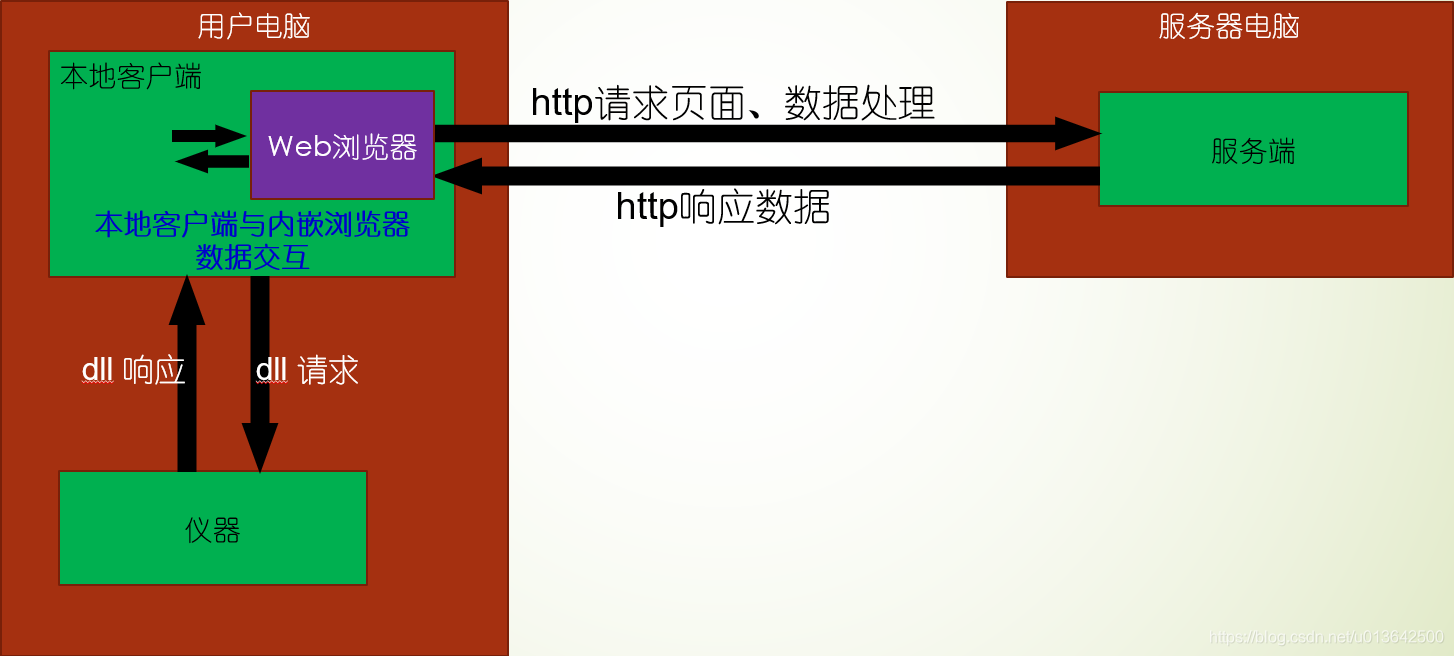
这就导致了我认为仪器需要和用户电脑相连,而操控仪器这种数据交互就要通过 Tomcat,走 http 协议。这样不但作为开发者调用相关接口会很麻烦,对于用户,安装一堆软件也很麻烦,且仪器必须和服务端在一起,而不能独立出来。采用 B/S 架构,
主体架构还是 B/S 架构,但是开发一个 Client,内嵌 Chromium 内核浏览器,由本地和仪器进行交互。
被告知,项目最初采用 B/S 架构的目的就是为了 仪器和服务端相连,从而达到可以 远程登录控制仪器,而 不必用户电脑和仪器相连,进而可以使 仪器在北京连着服务端,而用户可以在广州访问北京服务器操控仪器。
本人对此表示:呵呵,放广域网上安全么?
- 项目 B/S 架构的 Browser 部分以 Chrome 的 Webkit 内核做定制开发,采用了 ES6、ES2016、ES2017、ES2018 相关语法,使用了一些 Webkit/Blink 内核才支持的一些语法、方法等,所以开发的客户端必须
内置 Chromium 内核。 - 由于调用 dll 已用 jni4net 生成相关 jar 包,且制作的客户端要求可移植,那么
使用 java 开发客户端是再好不过的了。 - 经过前期探索发现 Java 应用程序用户界面的开发工具包 Swing 好像不自带 Browser 组件。
参考链接:Swing 简单的WEB浏览器
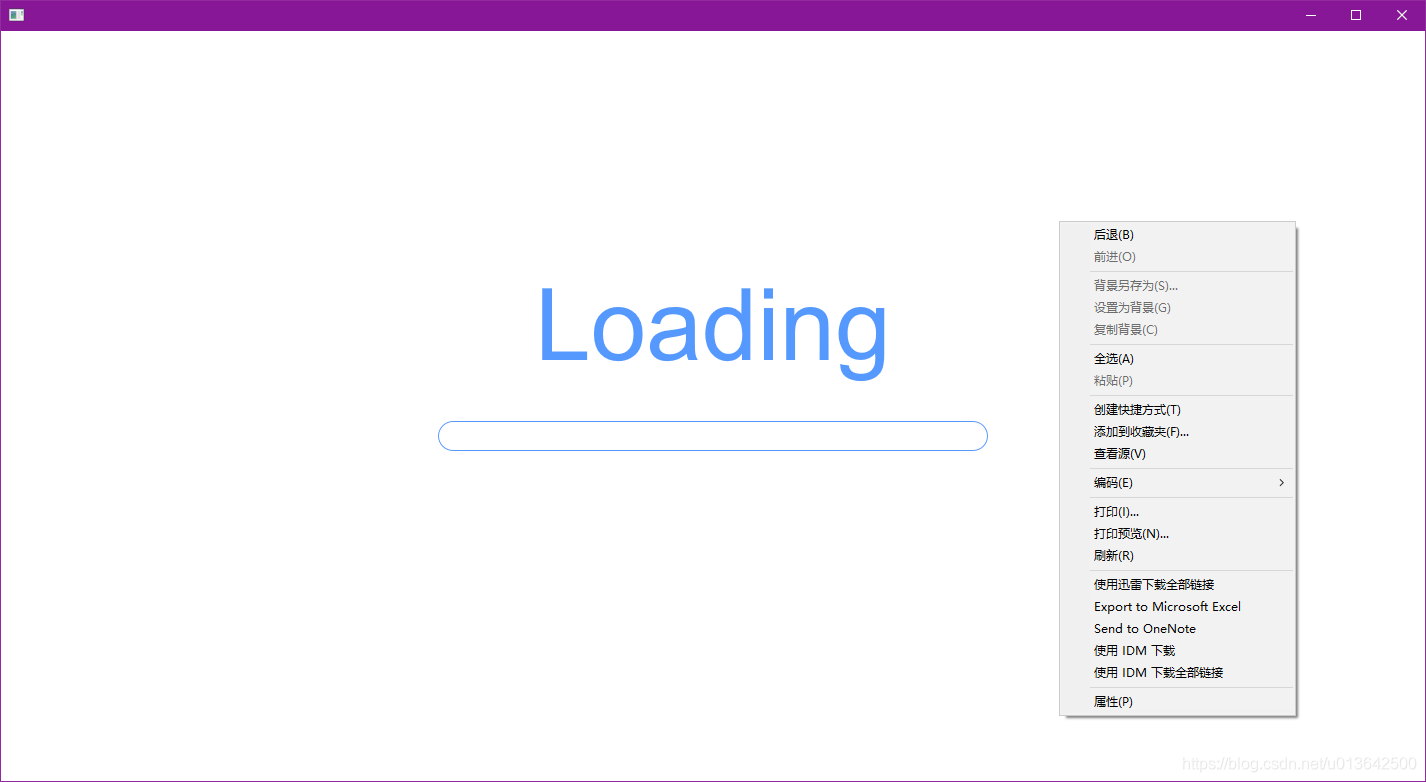
不具体操作讲解了,代码很简单,将其网址改为 https://www.baidu.com/,并启动程序,我整个人都傻了。

最大化窗口后,尝试搜索点什么东西,点击“百度一下”。 ???空白页了?

SWT.jar 包下载步骤,请参考
【java】(org.eclipse.swt)SWT.jar 的下载步骤
- 新建项目,导入 jar 包,Add as Library,新建个 Main 方法。

- 直接分享源代码,此处参考链接:
java SWT Browser实现浏览器功能并运行JavaScript代码
package swt.browser;

import org.eclipse.swt.*;
import org.eclipse.swt.browser.*;
import org.eclipse.swt.layout.*;
import org.eclipse.swt.widgets.*;

public class Main {
    public static void main(String[] args) {

        Display display = new Display();
        final Shell shell = new Shell(display);
        shell.setLayout(new FillLayout());

        final Browser browser;
        try {
            browser = new Browser(shell, SWT.NONE);
        } catch (SWTError e) {
            System.out.println("Could not instantiate Browser: " + e.getMessage());
            display.dispose();
            return;
        }

        browser.setUrl("www.baidu.com"); //百度

        shell.open();
        while (!shell.isDisposed()) {
            if (!display.readAndDispatch()) display.sleep();
        }
        display.dispose();
    }
}- 运行之后,右键单击弹出菜单,感觉像是 IE 内核
(哈哈,凭借这个右键菜单来判断显然是不现实的),我们的项目直接崩掉了。
- 其实是在实例化 Browser 对象时的入参控制了使用的内核。
Browser browser = new Browser(shell, SWT.NONE);	// 这应该是 IE 内核。
Browser browser = new Browser(shell, SWT.MOZILLA);	// 这应该是 MOZILLA 内核。
Browser browser = new Browser(shell, SWT.WEBKIT); // 这应该是 WEBKIT 内核。- 使用 MOZILLA 内核启动程序的时候,控制台会提示
Unsupported Browser Type: SWT.MOZILLA style is deprecated.It'll be removed from the user specified style. Browser will be created with the modified style and if no other style bit is specified, browser with SWT.NONE style will be created。

- 使用 WEBKIT 内核启动程序的时候,哈哈,控制台提示
Could not instantiate Browser: No more handles [Safari must be installed to use a SWT.WEBKIT-style Browser]。要求 必须安装 Safari 浏览器,安装 Chrome 是没有用的,因为 webkit 内核可以从 Safari 浏览器中剥离出来,从 Chrome 中剥离不出来。还有一点是 Windows 上的 Safari 浏览器好像是好久没有更新了,其 Webkit 内核版本也很低。

此部分参考链接:
java使用swing实现内嵌浏览器DJNativeSwing 项目官网:Native SwingDJNativeSwing 项目开发者日志:News LogDJNativeSwing 项目下载地址:The DJ ProjectDJNativeSwing 相关 jar 包下载地址:DJNativeSwing-SWT-1-0-3-20140708.zip
- 主要使用这两个 jar 包。

- 新建项目,导入 jar 包,Add as Library,新建个 Main 方法。
- 新建一个 package 叫做 browser,在里面新建一个 class 叫做
MyBrowser,直接分享源代码,此处参考链接:java使用swing实现内嵌浏览器

package dj.nativeSwing.browser;

import chrriis.dj.nativeswing.swtimpl.components.JWebBrowser;

import javax.swing.*;
import java.awt.*;

public class MyBrowser extends JPanel {

    public MyBrowser(String url) {
        super(new BorderLayout());
        JPanel webBrowserPanel = new JPanel(new BorderLayout());
        JWebBrowser webBrowser = new JWebBrowser();
        webBrowser.navigate(url);
        webBrowser.setButtonBarVisible(false);
        webBrowser.setMenuBarVisible(false);
        webBrowser.setBarsVisible(false);
        webBrowser.setStatusBarVisible(false);
        webBrowserPanel.add(webBrowser, BorderLayout.CENTER);
        add(webBrowserPanel, BorderLayout.CENTER);
        //执行Js代码
        webBrowser.executeJavascript("alert('hello swing')");
    }
}- 在 Main 类中新增方法
openForm,直接分享源代码,此处参考链接:java使用swing实现内嵌浏览器

package dj.nativeSwing;

import chrriis.common.UIUtils;
import chrriis.dj.nativeswing.swtimpl.NativeInterface;
import dj.nativeSwing.browser.MyBrowser;

import javax.swing.*;
import java.awt.*;

public class Main {
    public static void main(String[] args) {
        String url = "http://www.baidu.com";
        String title = "hello swing";
        openForm(url, title);
    }

    /**
     * 在swing里内嵌浏览器
     *
     * @param url   要访问的url
     * @param title 窗体的标题
     */
    private static void openForm(String url, String title) {
        UIUtils.setPreferredLookAndFeel();
        NativeInterface.open();
        SwingUtilities.invokeLater(new Runnable() {
            public void run() {
                JFrame frame = new JFrame(title);
                //设置窗体关闭的时候不关闭应用程序
                frame.setDefaultCloseOperation(JFrame.DISPOSE_ON_CLOSE);
                frame.getContentPane().add(new MyBrowser(url), BorderLayout.CENTER);
                frame.setExtendedState(JFrame.MAXIMIZED_BOTH);
                frame.setLocationByPlatform(true);
                //让窗体可见
                frame.setVisible(true);
                //重置窗体大小
                frame.setResizable(true);
                // 设置窗体的宽度、高度
                frame.setSize(1400, 700);
                // 设置窗体居中显示
                frame.setLocationRelativeTo(frame.getOwner());
            }
        });
        NativeInterface.runEventPump();
    }
}- 进入到 JWebBrowser 的构造方法中,可以发现,其中第二行
WebBrowserRuntime runtime = WebBrowserRuntime.DEFAULT;规定了默认的内核,如果无参构造对象,则使用默认的内核,应该就是 IE 内核。 - 和 SWT 一样,是在实例化 JWebBrowser 对象时的入参控制了使用的内核。
JWebBrowser webBrowser = new JWebBrowser();	// 这应该是 IE 内核。
JWebBrowser webBrowser = new JWebBrowser(JWebBrowser.useXULRunnerRuntime());	// 这应该是 MOZILLA 内核。
JWebBrowser webBrowser = new JWebBrowser(JWebBrowser.useWebkitRuntime()); // 这应该是 WEBKIT 内核。- 使用 MOZILLA 内核启动程序的时候,哈哈,这底层用的不还是 SWT 的么,控制台提示
Unsupported Browser Type: SWT.MOZILLA style is deprecated.It'll be removed from the user specified style. Browser will be created with the modified style and if no other style bit is specified, browser with SWT.NONE style will be created。

- 使用 WEBKIT 内核启动程序的时候,哈哈,实锤底层用的是 SWT ,注意看控制台提示
No more handles [Safari must be installed to use a SWT.WEBKIT-style Browser]。要求 必须安装 Safari 浏览器,安装 Chrome 是没有用的,原因在上面说过了。

能支撑我到现在还没有放弃的原因是我在网上搜索到了,jdk1.8 自带 javaFX ,而 javaFX 自带浏览器组件,而且使用的是 WebKit HTML 技术的Web组件(请参考
JavaFX WebView概述,很强大,内置了类似Electron的功能),且搜索到了很多关于 javafx 的很多文章和观点,全都在 diss Swing,拥护 javaFX。


- 新建项目,新建个 Main 方法,继承自 Application。

- 直接分享源代码,此处参考链接:
用javafx webview 打造自己的浏览器
package javafx;

import javafx.application.Application;
import javafx.beans.value.ChangeListener;
import javafx.beans.value.ObservableValue;
import javafx.concurrent.Worker;
import javafx.concurrent.Worker.State;
import javafx.scene.Group;
import javafx.scene.Scene;
import javafx.scene.control.ScrollPane;
import javafx.scene.web.WebEngine;
import javafx.scene.web.WebView;
import javafx.stage.Stage;

public class Main extends Application {

    public static void main(String[] args) {
        launch(args);
    }

    @Override
    public void start(Stage stage) throws Exception {
        stage.setWidth(400);
        stage.setHeight(500);
        Scene scene = new Scene(new Group());

        final WebView browser = new WebView();
        final WebEngine webEngine = browser.getEngine();

        ScrollPane scrollPane = new ScrollPane();
        scrollPane.setContent(browser);

        webEngine.getLoadWorker().stateProperty()
                .addListener(new ChangeListener<State>() {
                    @Override
                    public void changed(ObservableValue ov, State oldState, State newState) {
                        if (newState == Worker.State.SUCCEEDED) {
                            stage.setTitle(webEngine.getLocation());
                        }
                    }
                });
        webEngine.load("http://www.baidu.com");

        scene.setRoot(scrollPane);

        stage.setScene(scene);
        stage.show();
    }
}- 将网址改成我们的项目网址,哇哇哇,没崩,打开了。但是。。。 ???不大对劲啊。
正常 Chrome 这样显示:

javafx 内嵌浏览器这样显示:

- 探查差异,在程序中打印
UserAgent
System.out.println(webEngine.getUserAgent());
// 打印结果如下(应该是一行显示,以空格分隔,我给它手动换行写在这里了)
// Mozilla/5.0 (Windows NT 10.0; Win64; x64)
// AppleWebKit/606.1 (KHTML, like Gecko)
// JavaFX/8.0
// Safari/606.1
原来没用 Chrome 的 Webkit 内核,用的 Safari 的 Webkit 内核,而且版本还挺高?
我看了一下,我电脑上最新版Chrome:
Chrome 78.0.3904.70版本的UserAgent里写着Safari/537.36

然而我们的项目必须用 Chrome 的 Webkit 内核,还得是高版本的。
- 当我发现 javafx 也失败了之后,我心灰意冷,真的是太累了,网上的抄抄抄,不注明出处,没有任何原创精神,搞得我身心俱疲。
- 就在我即将放弃的时候,我发现了 CEF(忘记是怎么发现的了),于是直接百度搜索
CEF。
哎呀呵,
Google Chromium、多平台支持、有其他语言的移植版、支持Webkit & Chrome中实现的HTML5的特性,这不正是我想要的么!

- 哈哈,进一步找到了 CEF 开源项目网址:https://code.google.com/archive/p/chromiumembedded/
???
google.com???这,能打开吗? 事实证明,打不开!
- 于是,我放弃了....................两天。
- 第三天,我抱着不服输的心态,又研究了两天,搜了一大堆东西,参考着网友 2017 年 4 月份写的文章(此文章在后面两篇文章中有提及),生产出了两篇文章:
非常详细的获取 JCEF 相关 jar 包的教程、比较简单的获取 JCEF 相关 jar 包的教程
本节接上节末提到的两篇文章后开始
在这里说明一下,jcef 是基于 Swing 的,不过本文不需要多么懂 Swing,因为我就不是很懂。
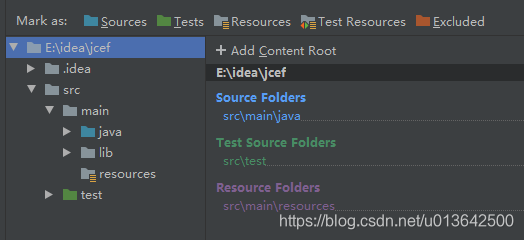
- 新建个项目,目录结构为
- src
- main
- java
- lib
- jcef
- resources
- test
- main

- 在 Project Structure 中设置文件夹类型。
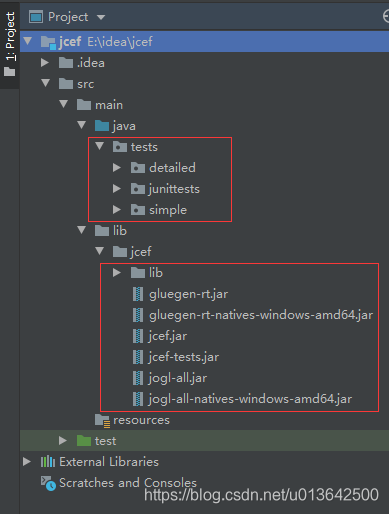
- 将 E:\java-cef\src\binary_distrib\win64\bin 中的 test 文件夹,拷贝到项目的 java 文件夹中。
- 将 E:\java-cef\src\binary_distrib\win64\bin 中除了 test 文件夹之外的所有文件及文件夹,拷贝到项目的 lib\jcef 文件夹中。(
junittests需要 junit 相关依赖,这里不介绍此部分相关内容,因此这个文件夹(包)删掉,后面不再提及)
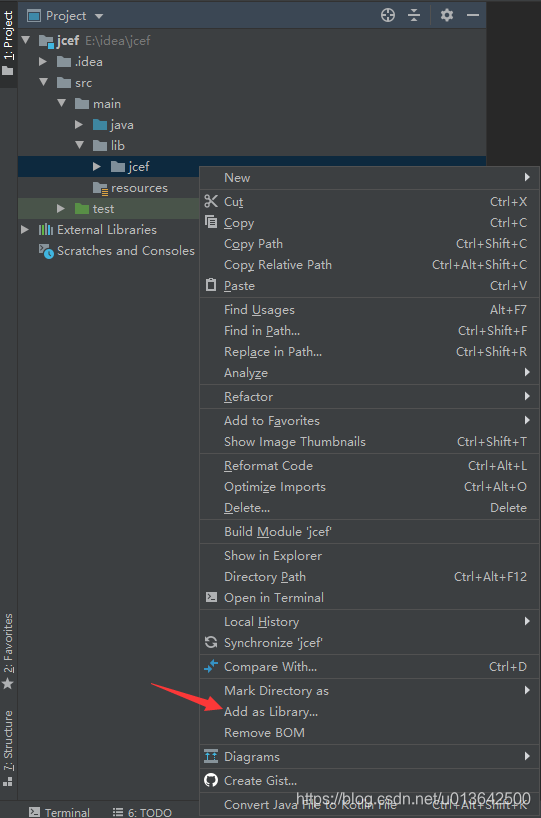
- 右键单击 jcef 文件夹,点击 Add as library,弹出确认框,默认即可。
- 打开 Project Structure,点击 Library,或在 Modules 中的这个项目的 Dependencies中,点击
加号,找到lib\jcef\lib\win64文件夹。
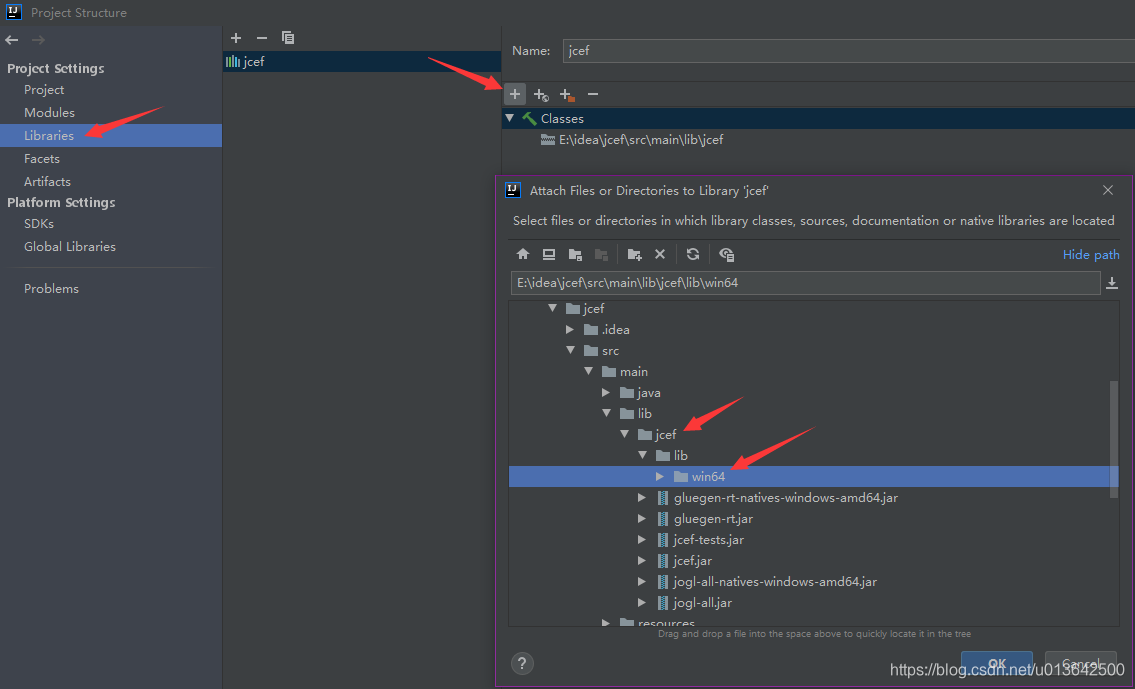
- 添加完之后,应该是这样子的。
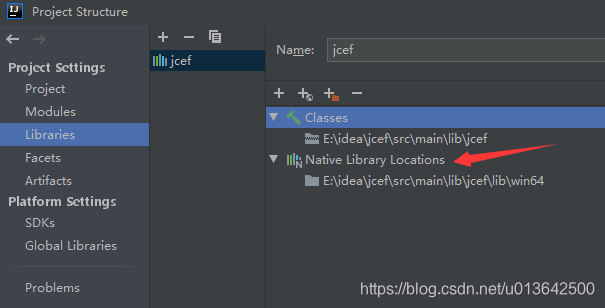
-
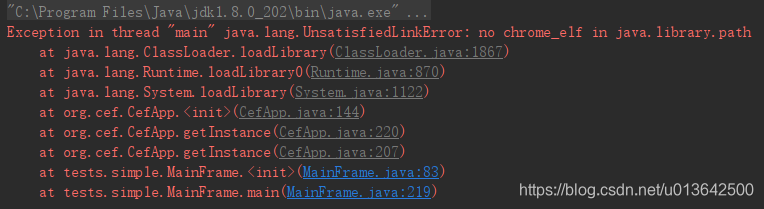
上述内容,如果第 5 步之后不做,则根本无法启动程序,因为 jar 包都没有添加依赖嘛。
-
上述内容,如果第 6 步之后不做,则启动程序失败,因为会报错:
Exception in thread "main" java.lang.UnsatisfiedLinkError: no chrome_elf in java.library.path
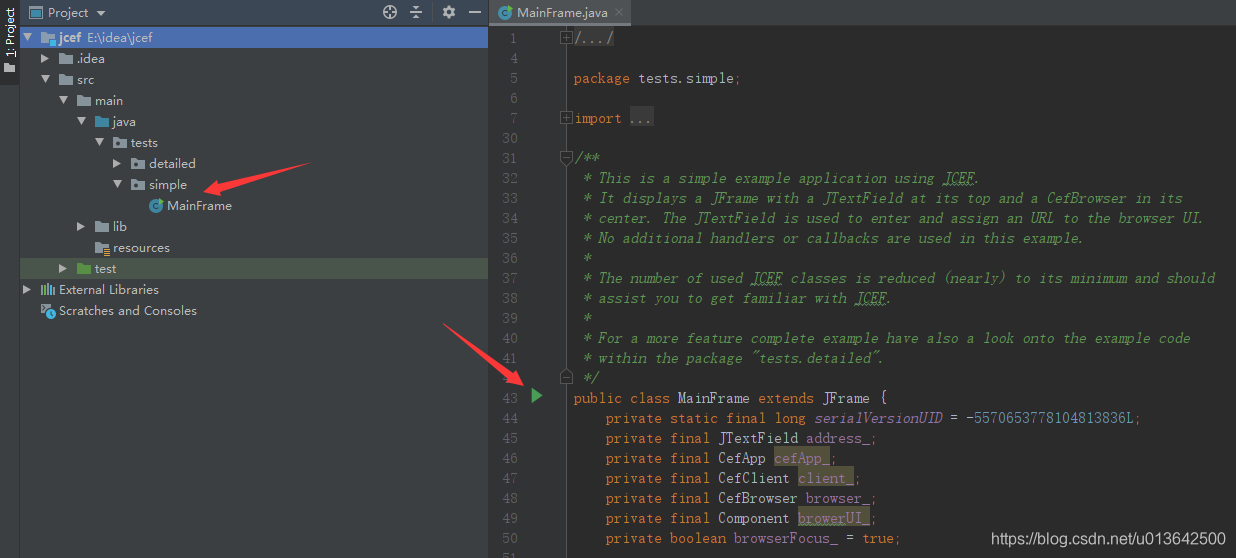
- 打开刚刚拷贝到 java 文件夹中的 simple\MainFrame。
- 修改文件最后面的一个语句:
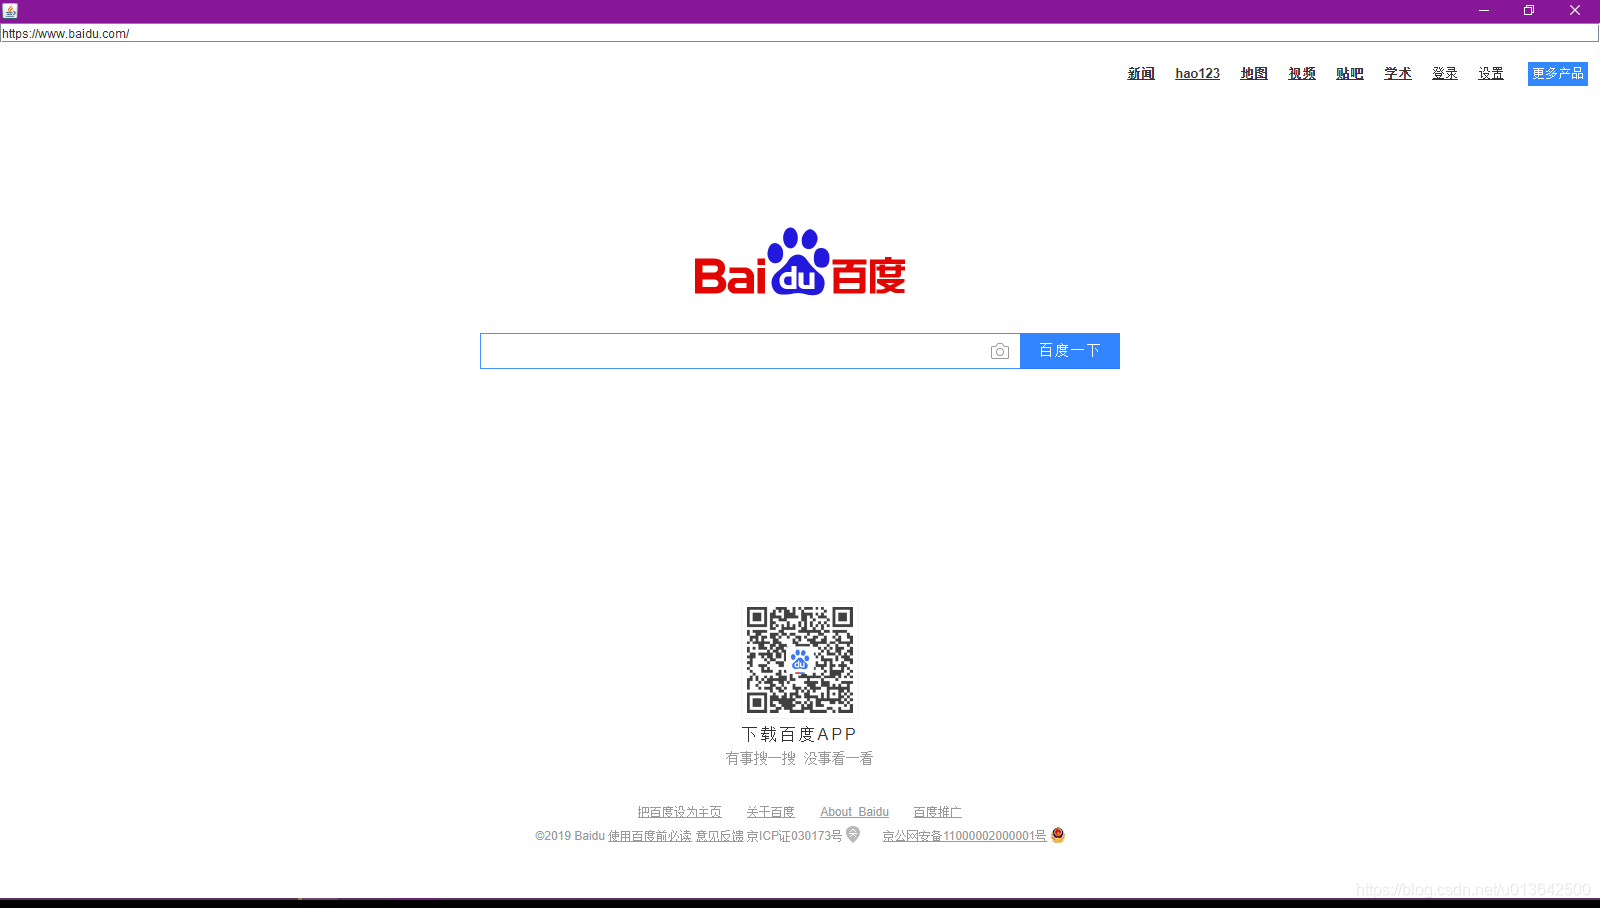
new MainFrame("http://www.google.com", useOsr, false);变成new MainFrame("https://www.baidu.com", useOsr, false); - 启动。
- 哇,真棒。测试我自己的项目,全部都没问题,哈哈哈。
虽然用的百度翻译,但好歹是中文,,,有需要的可以直接拿走。
// Copyright (c) 2014 The Chromium Embedded Framework Authors. All rights
// reserved. Use of this source code is governed by a BSD-style license that
// can be found in the LICENSE file.

package tests.simple;

import java.awt.BorderLayout;
import java.awt.Component;
import java.awt.KeyboardFocusManager;
import java.awt.event.ActionEvent;
import java.awt.event.ActionListener;
import java.awt.event.FocusAdapter;
import java.awt.event.FocusEvent;
import java.awt.event.WindowAdapter;
import java.awt.event.WindowEvent;

import javax.swing.JFrame;
import javax.swing.JTextField;

import org.cef.CefApp;
import org.cef.CefApp.CefAppState;
import org.cef.CefClient;
import org.cef.CefSettings;
import org.cef.OS;
import org.cef.browser.CefBrowser;
import org.cef.browser.CefFrame;
import org.cef.handler.CefAppHandlerAdapter;
import org.cef.handler.CefDisplayHandlerAdapter;
import org.cef.handler.CefFocusHandlerAdapter;

/**
 * This is a simple example application using JCEF.
 * It displays a JFrame with a JTextField at its top and a CefBrowser in its
 * center. The JTextField is used to enter and assign an URL to the browser UI.
 * No additional handlers or callbacks are used in this example.
 *
 * The number of used JCEF classes is reduced (nearly) to its minimum and should
 * assist you to get familiar with JCEF.
 *
 * For a more feature complete example have also a look onto the example code
 * within the package "tests.detailed".
 */
public class MainFrame extends JFrame {
    private static final long serialVersionUID = -5570653778104813836L;
    private final JTextField address_;
    private final CefApp cefApp_;
    private final CefClient client_;
    private final CefBrowser browser_;
    private final Component browerUI_;
    private boolean browserFocus_ = true;

    /**
     * To display a simple browser window, it suffices completely to create an
     * instance of the class CefBrowser and to assign its UI component to your
     * application (e.g. to your content pane).
     * 要显示一个简单的浏览器窗口,只需创建一个类 CefBrowser 的实例并将其 UI 组件
     * 分配给应用程序(例如,分配给内容窗格)就足够了。
     * <p>
     * But to be more verbose, this CTOR keeps an instance of each object on the
     * way to the browser UI.
     * 但是,为了更详细,这个 CTOR 将每个对象的一个实例保存在通往浏览器 UI 的路上。
     */
    private MainFrame(String startURL, boolean useOSR, boolean isTransparent) {
        // (1) The entry point to JCEF is always the class CefApp. There is only one
        //     instance per application and therefore you have to call the method
        //     "getInstance()" instead of a CTOR.
        //     JCEF 的入口点总是类 CefApp。每个应用程序只有一个实例,因此必须调用
        //     方法"getInstance()"而不是一个 CTOR。

        //     CefApp is responsible for the global CEF context. It loads all
        //     required native libraries, initializes CEF accordingly, starts a
        //     background task to handle CEF's message loop and takes care of
        //     shutting down CEF after disposing it.
        //     CefApp 负责全局 CEF 上下文。它加载所有必需的本地库,相应地初始化 CEF,
        //     启动后台任务来处理 CEF 的消息循环,并在处理完后关闭 CEF。
        CefApp.addAppHandler(new CefAppHandlerAdapter(null) {
            @Override
            public void stateHasChanged(org.cef.CefApp.CefAppState state) {
                // Shutdown the app if the native CEF part is terminated
                // 如果本机 CEF 部分终止,则关闭应用程序
                if (state == CefAppState.TERMINATED) System.exit(0);
            }
        });
        CefSettings settings = new CefSettings();
        settings.windowless_rendering_enabled = useOSR;
        cefApp_ = CefApp.getInstance(settings);

        // (2) JCEF can handle one to many browser instances simultaneous. These
        //     browser instances are logically grouped together by an instance of
        //     the class CefClient. In your application you can create one to many
        //     instances of CefClient with one to many CefBrowser instances per
        //     client. To get an instance of CefClient you have to use the method
        //     "createClient()" of your CefApp instance. Calling an CTOR of
        //     CefClient is not supported.
        //     JCEF 可以同时处理一到多个浏览器实例。这些浏览器实例按类 CefClient 的实例在逻辑上分组在一起。
        //     在您的应用程序中,您可以创建一到多个 CefClient 实例,每个客户端有一到多个 CefBrowser 实例。
        //     要获取 CefClient 的实例,必须使用 CefApp 实例的方法"createClient()"。不支持调用 CefClient 的 CTOR。
        //
        //     CefClient is a connector to all possible events which come from the
        //     CefBrowser instances. Those events could be simple things like the
        //     change of the browser title or more complex ones like context menu
        //     events. By assigning handlers to CefClient you can control the
        //     behavior of the browser. See tests.detailed.MainFrame for an example
        //     of how to use these handlers.
        //     CefClient 是连接来自 CefBrowser 实例的所有可能事件的连接器。
        //     这些事件可以是诸如更改浏览器标题之类的简单事件,也可以是诸如上下文菜单事件之类的更复杂事件。
        //     通过将处理程序分配给 CefClient,您可以控制浏览器的行为。有关如何使用这些处理程序的示例,请参见 tests.detailed.MainFrame。
        client_ = cefApp_.createClient();

        // (3) One CefBrowser instance is responsible to control what you'll see on
        //     the UI component of the instance. It can be displayed off-screen
        //     rendered or windowed rendered. To get an instance of CefBrowser you
        //     have to call the method "createBrowser()" of your CefClient
        //     instances.
        //     一个 CefBrowser 实例负责控制在该实例的 UI 组件上看到的内容。
        //     它可以显示屏幕外渲染或窗口渲染。要获取 CefBrowser 实例,必须调用 CefClient 实例的方法"createBrowser()"。
        //
        //     CefBrowser has methods like "goBack()", "goForward()", "loadURL()",
        //     and many more which are used to control the behavior of the displayed
        //     content. The UI is held within a UI-Compontent which can be accessed
        //     by calling the method "getUIComponent()" on the instance of CefBrowser.
        //     The UI component is inherited from a java.awt.Component and therefore
        //     it can be embedded into any AWT UI.
        //     CefBrowser 有"goBack()"、"goForward()"、"loadURL()"等方法,这些方法用于控制显示内容的行为。
        //     该 UI 保存在 UI 组件中,可以通过调用 CefBrowser 实例上的方法"getUIComponent()"来访问该 UI 组件。
        //     UI 组件继承自java.awt.Component,因此可以嵌入到任何 AWT UI 中。
        browser_ = client_.createBrowser(startURL, useOSR, isTransparent);
        browerUI_ = browser_.getUIComponent();

        // (4) For this minimal browser, we need only a text field to enter an URL
        //     we want to navigate to and a CefBrowser window to display the content
        //     of the URL. To respond to the input of the user, we're registering an
        //     anonymous ActionListener. This listener is performed each time the
        //     user presses the "ENTER" key within the address field.
        //     If this happens, the entered value is passed to the CefBrowser
        //     instance to be loaded as URL.
        //     对于这个最小的浏览器,我们只需要一个文本字段来输入我们要导航到的 url,以及一个 CefBrowser 窗口来显示 url 的内容。
        //     为了响应用户的输入,我们注册了一个匿名 ActionListener。每当用户在地址字段中按“回车”键时,就会执行此侦听器。
        //     如果发生这种情况,则将输入的值传递给要作为 url 加载的 CefBrowser 实例。
        address_ = new JTextField(startURL, 100);
        address_.addActionListener(new ActionListener() {
            @Override
            public void actionPerformed(ActionEvent e) {
                browser_.loadURL(address_.getText());
            }
        });

        // Update the address field when the browser URL changes.
        // 当浏览器 URL 更改时更新地址字段。
        client_.addDisplayHandler(new CefDisplayHandlerAdapter() {
            @Override
            public void onAddressChange(CefBrowser browser, CefFrame frame, String url) {
                address_.setText(url);
            }
        });

        // Clear focus from the browser when the address field gains focus.
        // 当地址字段获得焦点时,从浏览器中清除焦点。
        address_.addFocusListener(new FocusAdapter() {
            @Override
            public void focusGained(FocusEvent e) {
                if (!browserFocus_) return;
                browserFocus_ = false;
                KeyboardFocusManager.getCurrentKeyboardFocusManager().clearGlobalFocusOwner();
                address_.requestFocus();
            }
        });

        // Clear focus from the address field when the browser gains focus.
        // 当浏览器获得焦点时,从地址字段中清除焦点。
        client_.addFocusHandler(new CefFocusHandlerAdapter() {
            @Override
            public void onGotFocus(CefBrowser browser) {
                if (browserFocus_) return;
                browserFocus_ = true;
                KeyboardFocusManager.getCurrentKeyboardFocusManager().clearGlobalFocusOwner();
                browser.setFocus(true);
            }

            @Override
            public void onTakeFocus(CefBrowser browser, boolean next) {
                browserFocus_ = false;
            }
        });

        // (5) All UI components are assigned to the default content pane of this
        //     JFrame and afterwards the frame is made visible to the user.
        //     所有 UI 组件都被分配给这个 JFrame 的默认内容窗格,然后这个框架对用户可见。
        getContentPane().add(address_, BorderLayout.NORTH);
        getContentPane().add(browerUI_, BorderLayout.CENTER);
        pack();
        setSize(800, 600);
        setVisible(true);

        // (6) To take care of shutting down CEF accordingly, it's important to call
        //     the method "dispose()" of the CefApp instance if the Java
        //     application will be closed. Otherwise you'll get asserts from CEF.
        //     要相应地关闭 CEF,如果 Java 应用程序将被关闭,那么调用 CefApp 实例的方法"dispose()"非常重要。否则你会得到 CEF 的指控。
        addWindowListener(new WindowAdapter() {
            @Override
            public void windowClosing(WindowEvent e) {
                CefApp.getInstance().dispose();
                dispose();
            }
        });
    }

    public static void main(String[] args) {
        // Perform startup initialization on platforms that require it.
        // 在需要的平台上执行启动初始化。
        if (!CefApp.startup()) {
            System.out.println("Startup initialization failed!");

            return;
        }

        // The simple example application is created as anonymous class and points
        // to Google as the very first loaded page. Windowed rendering mode is used by
        // default. If you want to test OSR mode set |useOsr| to true and recompile.
        // 这个简单的示例应用程序被创建为匿名类,并指向 Google 作为第一个加载的页面。默认情况下使用窗口渲染模式。如果要测试OSR模式,请将 |useOsr| 设置为 true 并重新编译。
        boolean useOsr = false;
        new MainFrame("http://www.google.com", useOsr, false);
    }
}很简单,就是把源代码中的 address_ 变量相关语句全部删掉,以及 Focus 相关的代码也删掉。这里直接分享源代码(为节省篇幅,我将注释全部删除了):
package tests.simple;

import java.awt.BorderLayout;
import java.awt.Component;
import java.awt.KeyboardFocusManager;
import java.awt.event.ActionEvent;
import java.awt.event.ActionListener;
import java.awt.event.FocusAdapter;
import java.awt.event.FocusEvent;
import java.awt.event.WindowAdapter;
import java.awt.event.WindowEvent;

import javax.swing.JFrame;
import javax.swing.JTextField;

import org.cef.CefApp;
import org.cef.CefApp.CefAppState;
import org.cef.CefClient;
import org.cef.CefSettings;
import org.cef.browser.CefBrowser;
import org.cef.browser.CefFrame;
import org.cef.handler.CefAppHandlerAdapter;
import org.cef.handler.CefDisplayHandlerAdapter;
import org.cef.handler.CefFocusHandlerAdapter;

public class MainFrame extends JFrame {
    private static final long serialVersionUID = -5570653778104813836L;
    private final CefApp cefApp_;
    private final CefClient client_;
    private final CefBrowser browser_;
    private final Component browerUI_;
    private boolean browserFocus_ = true;

    private MainFrame(String startURL, boolean useOSR, boolean isTransparent) {
        CefApp.addAppHandler(new CefAppHandlerAdapter(null) {
            @Override
            public void stateHasChanged(org.cef.CefApp.CefAppState state) {
                if (state == CefAppState.TERMINATED) System.exit(0);
            }
        });
        CefSettings settings = new CefSettings();
        settings.windowless_rendering_enabled = useOSR;
        cefApp_ = CefApp.getInstance(settings);

        client_ = cefApp_.createClient();

        browser_ = client_.createBrowser(startURL, useOSR, isTransparent);
        browerUI_ = browser_.getUIComponent();

        getContentPane().add(browerUI_, BorderLayout.CENTER);
        pack();
        setSize(800, 600);
        setVisible(true);

        addWindowListener(new WindowAdapter() {
            @Override
            public void windowClosing(WindowEvent e) {
                CefApp.getInstance().dispose();
                dispose();
            }
        });
    }

    public static void main(String[] args) {
        if (!CefApp.startup()) {
            System.out.println("Startup initialization failed!");
            return;
        }

        boolean useOsr = false;
        new MainFrame("https://www.baidu.com", useOsr, false);
    }
}- 删除两条语句
pack();
setSize(800, 600);- 新增两条语句
setMinimumSize(new Dimension(1366, 738));    // 设置最小窗口大小
setExtendedState(JFrame.MAXIMIZED_BOTH); // 默认窗口全屏很简单,就一条语句
setTitle("MyBrowser");- 现在 resources 中创建文件夹 images,然后放进去图标文件(直接放进去也行)。

- 还是很简单,一条语句
setIconImage(Toolkit.getDefaultToolkit().getImage(getClass().getResource("/images/icon.png")));- 如果报空指针错误之类的,可以先 Rebuild Project 一下,再重新启动。
- 将 main 方法中的
System.out.println("Startup initialization failed!");替换成如下代码(以下代码用到了一个图片文件,请自行放置,或删除相关代码)
JFrame jFrame = new JFrame("MyBrowser");
jFrame.setMinimumSize(new Dimension(1366, 738)); // 设置最小窗口大小
jFrame.setExtendedState(JFrame.MAXIMIZED_BOTH); // 默认窗口全屏
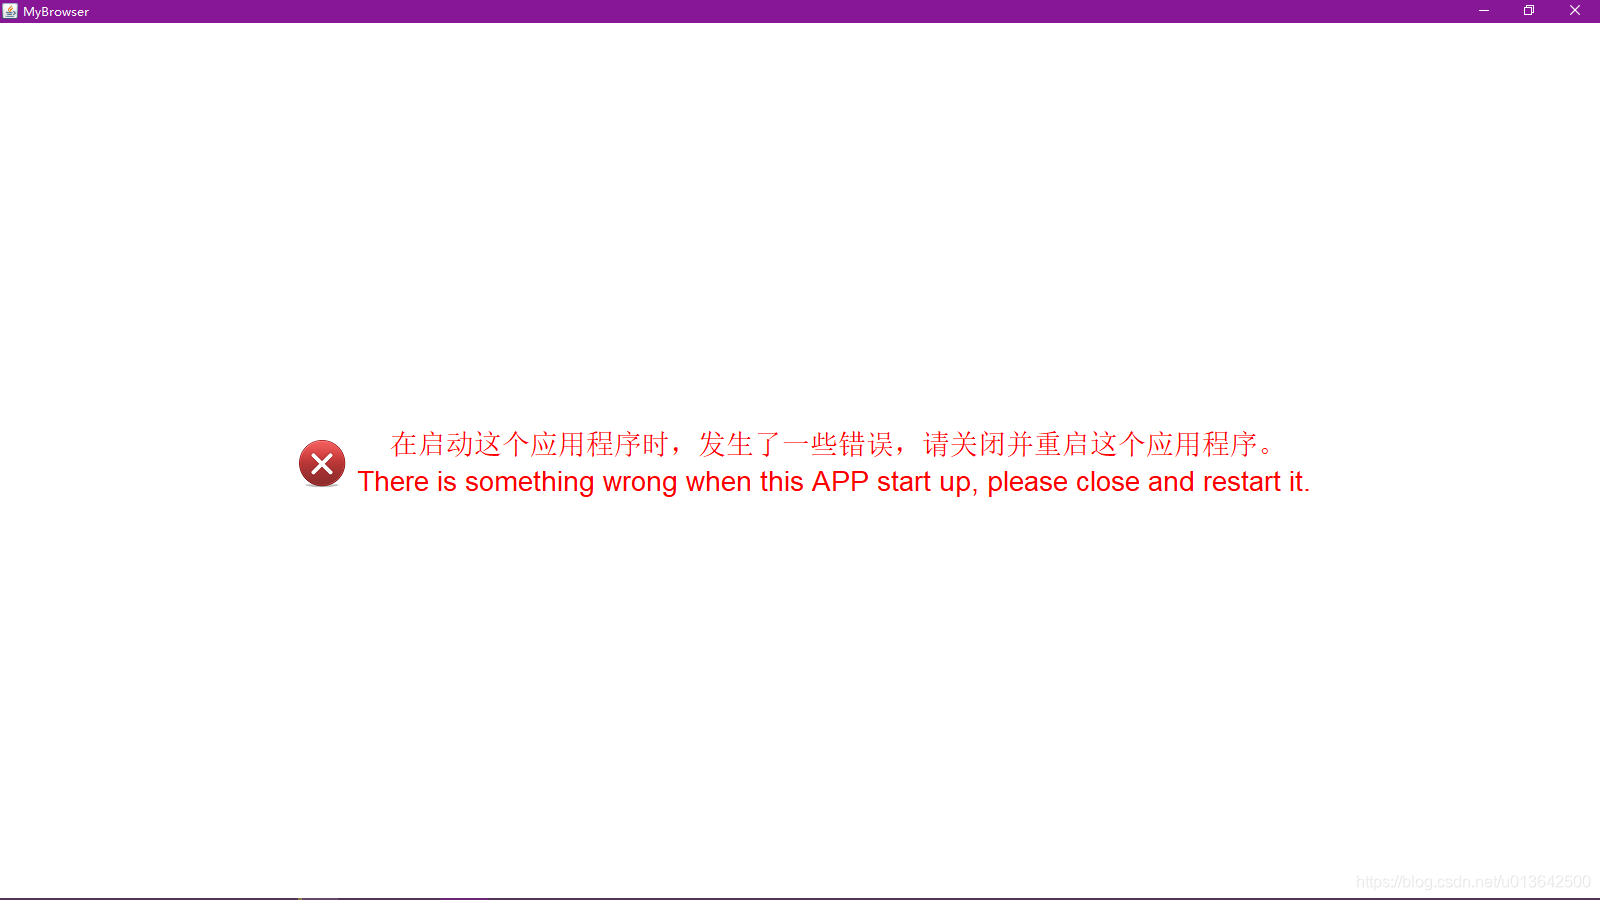
JLabel error = new JLabel("<html><body> 在启动这个应用程序时,发生了一些错误,请关闭并重启这个应用程序。<br>There is something wrong when this APP start up, please close and restart it.</body></html>");
error.setFont(new Font("宋体/Arial", Font.PLAIN, 28));
error.setIcon(new ImageIcon(jFrame.getClass().getResource("/images/error.png")));
error.setForeground(Color.red);
error.setHorizontalAlignment(SwingConstants.CENTER);
jFrame.getContentPane().setBackground(Color.white);
jFrame.getContentPane().add(error, BorderLayout.CENTER);
jFrame.setVisible(true);- 让我们来瞧一瞧效果,感觉还不错。(Chinese English)
- 修改
addWindowListener方法的入参中的windowClosing方法:
addWindowListener(new WindowAdapter() {
    @Override
    public void windowClosing(WindowEvent e) {
        int i;
        String language = "en-us";
        if (language.equals("en-us"))
            i = JOptionPane.showOptionDialog(null, "Do you really want to quit this software?", "Exit", JOptionPane.YES_NO_OPTION, JOptionPane.QUESTION_MESSAGE, null, new String[]{"Yes", "No"}, "Yes");
        else if (language.equals("zh-cn"))
            i = JOptionPane.showOptionDialog(null, "你真的想退出这个软件吗?", "Exit", JOptionPane.YES_NO_OPTION, JOptionPane.QUESTION_MESSAGE, null, new String[]{"是的", "不"}, "是的");
        else
            i = JOptionPane.showOptionDialog(null, "你真的想退出这个软件吗?\nDo you really want to quit this software?", "Exit", JOptionPane.YES_NO_OPTION, JOptionPane.QUESTION_MESSAGE, null, new String[]{"是的(Yes)", "不(No)"}, "是的(Yes)");
        if (i == JOptionPane.YES_OPTION) {
            CefApp.getInstance().dispose();
            dispose();
            System.exit(0);
        }
    }
});- 让我们来瞧一瞧效果,感觉还不错。

上一部分是直接在 simple/MainFrame 上面改的,本部分重新建包,从头干起。(之前的文件可以不必删,删了也行,建议看完本文再删。。。)
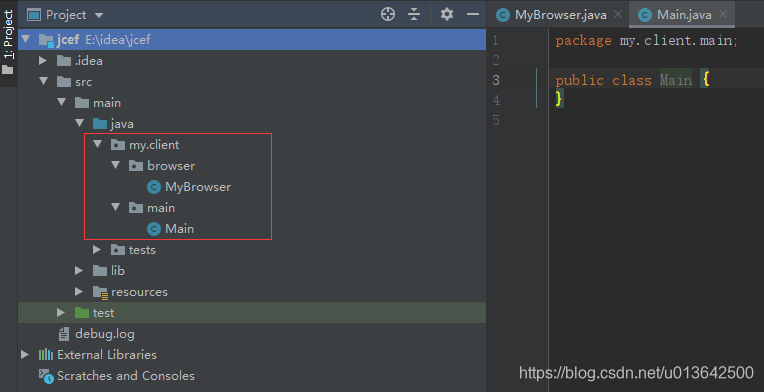
- 在 java 文件夹中新建 package:
my.client.browser和my.client.main,并新建两个 class 叫做MyBrowser和Main。
- 将 simple/MainFrame 中构造方法与 jcef 相关的代码 copy 到 MyBrowser 的构造方法中,并提供 getter 返回相关对象,这里直接分享源代码:
package my.client.browser;

import org.cef.CefApp;
import org.cef.CefClient;
import org.cef.CefSettings;
import org.cef.browser.CefBrowser;
import org.cef.handler.CefAppHandlerAdapter;

import java.awt.*;

public class MyBrowser {
    private final CefApp cefApp_;
    private final CefClient client_;
    private final CefBrowser browser_;
    private final Component browserUI_;

    public MyBrowser(String startURL, boolean useOSR, boolean isTransparent) {
        CefApp.addAppHandler(new CefAppHandlerAdapter(null) {
            @Override
            public void stateHasChanged(org.cef.CefApp.CefAppState state) {
                if (state == CefApp.CefAppState.TERMINATED) System.exit(0);
            }
        });
        CefSettings settings = new CefSettings();
        settings.windowless_rendering_enabled = useOSR;
        cefApp_ = CefApp.getInstance(settings);

        client_ = cefApp_.createClient();

        browser_ = client_.createBrowser(startURL, useOSR, isTransparent);
        browserUI_ = browser_.getUIComponent();
    }

    public CefApp getCefApp() {
        return cefApp_;
    }

    public CefClient getClient() {
        return client_;
    }

    public CefBrowser getBrowser() {
        return browser_;
    }

    public Component getBrowserUI() {
        return browserUI_;
    }
}- 在 Main 类中建立 main 方法,并建立私有方法 init(),在 main 方法中调用 init() 方法。(为什么“脱裤子放屁-费二遍事”创建新方法,后面会有提及)
package my.client.main;

public class Main {
    public static void main(String[] args) {
        init();
    }
    private static void init() {}
}- 在 init 方法中创建 JFrame 并从 simple/MainFrame 中 copy 过来相关代码:
EventQueue.invokeLater 的作用及其相关知识请自行了解。 这里的很多代码和上一部分中的修改是相关的
package my.client.main;
import my.client.browser.MyBrowser;
import org.cef.CefApp;
import javax.swing.*;
import java.awt.*;
import java.awt.event.WindowAdapter;
import java.awt.event.WindowEvent;
public class Main {
public static void main(String[] args) {
init();
}
private static void init() {
EventQueue.invokeLater(() -> {
JFrame jFrame = new JFrame("MyBrowser");
jFrame.setMinimumSize(new Dimension(1366, 738)); // 设置最小窗口大小
jFrame.setExtendedState(JFrame.MAXIMIZED_BOTH); // 默认窗口全屏
jFrame.setIconImage(Toolkit.getDefaultToolkit().getImage(jFrame.getClass().getResource("/images/icon.png")));
if (!CefApp.startup()) { // 初始化失败
JLabel error = new JLabel("<html><body> 在启动这个应用程序时,发生了一些错误,请关闭并重启这个应用程序。<br>There is something wrong when this APP start up, please close and restart it.</body></html>");
error.setFont(new Font("宋体/Arial", Font.PLAIN, 28));
error.setIcon(new ImageIcon(jFrame.getClass().getResource("/images/error.png")));
error.setForeground(Color.red);
error.setHorizontalAlignment(SwingConstants.CENTER);
jFrame.getContentPane().setBackground(Color.white);
jFrame.getContentPane().add(error, BorderLayout.CENTER);
jFrame.setVisible(true);
return;
}
MyBrowser myBrowser = new MyBrowser("https://www.baidu.com", false, false);
// // // // // // // // // // // // // // // // // // // // // // // // // // // //
// TODO: 后面的步骤不再 po 全部代码了,如果说“在 init() 方法中插入”,则全是插入在这里 //
// // // // // // // // // // // // // // // // // // // // // // // // // // // //
jFrame.getContentPane().add(myBrowser.getBrowserUI(), BorderLayout.CENTER);
jFrame.setVisible(true);
jFrame.addWindowListener(new WindowAdapter() {
@Override
public void windowClosing(WindowEvent e) {
int i;
String language = "en-us";
if (language.equals("en-us"))
i = JOptionPane.showOptionDialog(null, "Do you really want to quit this software?", "Exit", JOptionPane.YES_NO_OPTION, JOptionPane.QUESTION_MESSAGE, null, new String[]{"Yes", "No"}, "Yes");
else if (language.equals("zh-cn"))
i = JOptionPane.showOptionDialog(null, "你真的想退出这个软件吗?", "Exit", JOptionPane.YES_NO_OPTION, JOptionPane.QUESTION_MESSAGE, null, new String[]{"是的", "不"}, "是的");
else
i = JOptionPane.showOptionDialog(null, "你真的想退出这个软件吗?\nDo you really want to quit this software?", "Exit", JOptionPane.YES_NO_OPTION, JOptionPane.QUESTION_MESSAGE, null, new String[]{"是的(Yes)", "不(No)"}, "是的(Yes)");
if (i == JOptionPane.YES_OPTION) {
myBrowser.getCefApp().dispose();
jFrame.dispose();
System.exit(0);
}
}
});
});
}
}实例化出 MyBrowser 对象,加载完网页之后,就可以向网页上执行 js 代码了。为保证加载完网页,我们将相关代码写到一个新线程中,并 sleep 一秒。直接分享源代码:
MyBrowser myBrowser = new MyBrowser("https://www.baidu.com", false, false);
new Thread(new Runnable() {
    @Override
    public void run() {
        try {
        	// 让线程 sleep 一秒保证 executeJavaScript 方法能够执行
            Thread.sleep(1000);
        } catch (InterruptedException e) {
            e.printStackTrace();
        }
        // 第一个参数是 js 代码,第二、三个参数是控制台打印所附带的信息,并不是指向网页执行代码。
        // 第二个参数是 url,一旦报错,就会打印其相关信息,以供开发人员阅读。
        myBrowser.getBrowser().executeJavaScript("console.log(123)", "http://whatever", 123);
        // 第三个参数是行号,一旦报错,就会打印其相关信息,以供开发人员阅读。
        myBrowser.getBrowser().executeJavaScript("document.write(123456)", "http://whatever", 1);
    }
}).start();
jcef 这个东西,很多表现功能都要求自己去实现,比如下载功能,需要主动写一个类继承其特定的 Adapter,然后重写相关方法,才能完成这个功能。
- “在 init() 方法中插入”两条语句,其中的 DownloadHandler 类,由下一步创建。
CefClient client = myBrowser.getClient();
client.addContextMenuHandler(new DownloadHandler());- 在
my.client中创建一个 Package 叫做handler,创建一个DownloadHandler类,继承自CefDownloadHandlerAdapter,重写onBeforeDownload和onDownloadUpdated方法。
此处可以参考 jcef 提供的 detailed 实例,里面有相关代码。
- 主要是重写
onBeforeDownload()方法,添加很重要的一条语句:callback.Continue(fileName, true); - 这里可以将下载进度之类的信息传递给网页,或者手动实现 Swing 组件用来展示下载进度。我这边是传递给网页,这里直接分享源代码:
package my.client.handler;

import org.cef.browser.CefBrowser;
import org.cef.callback.CefBeforeDownloadCallback;
import org.cef.callback.CefDownloadItem;
import org.cef.callback.CefDownloadItemCallback;
import org.cef.handler.CefDownloadHandlerAdapter;

public class DownloadHandler extends CefDownloadHandlerAdapter {

    @Override
    public void onBeforeDownload(CefBrowser browser, CefDownloadItem item, String fileName, CefBeforeDownloadCallback callback) {
        callback.Continue(fileName, true);	// 通过此方法让下载正常进行
    }

    @Override
    public void onDownloadUpdated(CefBrowser browser, CefDownloadItem item, CefDownloadItemCallback callback) {
    	// 判断当前状态正在进行中、没有被取消、没有完成状态
        if (item.isInProgress() && !item.isCanceled() && !item.isComplete()) {
        	// 如果没有开始下载(选择下载存放路径时),item.getPercentComplete() 返回值是 -1
            int percent = item.getPercentComplete() == -1 ? 0 : item.getPercentComplete();
            StringBuilder sb = new StringBuilder();
            // 判断当前网址是“英文网址” 还是“中文网址”
            if (browser.getURL().contains("en-us"))
                sb.append("It is downloading, ").append(percent).append("% completed.");
            else
                sb.append("正在下载,完成度:").append(percent).append("%。");
	        // 下载完毕让网页的下载窗口 dom 元素出现,并修改其中的文本信息
            browser.executeJavaScript("$download.show(); pDownload.innerText='" + sb + "';", item.getURL(), 1);
        } else {
	        // 下载完毕让网页的下载窗口 dom 元素隐藏
            browser.executeJavaScript("setTimeout(() => $download.fadeOut('fast'), 1000);", item.getURL(), 2);
        }
    }
}- “在 init() 方法中插入”一条语句:
client.addContextMenuHandler(new MenuHandler());,其中的 MenuHandler 类,由下一步创建。 - 在
my.client.handler中,创建一个MenuHandler类,继承自CefContextMenuHandlerAdapter,重写onBeforeContextMenu和onContextMenuCommand方法。
此处参考 jcef 提供的 detailed 实例,里面有相关代码。
package my.client.handler;

import org.cef.browser.CefBrowser;
import org.cef.browser.CefFrame;
import org.cef.callback.CefContextMenuParams;
import org.cef.callback.CefMenuModel;
import org.cef.handler.CefContextMenuHandlerAdapter;

public class MenuHandler extends CefContextMenuHandlerAdapter {

    @Override
    public void onBeforeContextMenu(CefBrowser browser, CefFrame frame, CefContextMenuParams params, CefMenuModel model) {

    }

    @Override
    public boolean onContextMenuCommand(CefBrowser browser, CefFrame frame, CefContextMenuParams params, int commandId, int eventFlags) {

    }
}- 如果想要 删除/禁用右键菜单,很简单,就在
onBeforeContextMenu方法中写一条语句就可以了:model.clear(); - 如果要自定义菜单,那么就要写一堆代码了:
package my.client.handler;

import org.cef.browser.CefBrowser;
import org.cef.browser.CefFrame;
import org.cef.callback.CefContextMenuParams;
import org.cef.callback.CefMenuModel;
import org.cef.callback.CefMenuModel.MenuId;
import org.cef.handler.CefContextMenuHandlerAdapter;

public class MenuHandler extends CefContextMenuHandlerAdapter {
    private final static int MENU_ID_MORE = 10001;

    @Override
    public void onBeforeContextMenu(CefBrowser browser, CefFrame frame, CefContextMenuParams params, CefMenuModel model) {
        // 清除菜单项
        model.clear();
        //剪切、复制、粘贴
        model.addItem(MenuId.MENU_ID_COPY, "copy");
        model.addItem(MenuId.MENU_ID_CUT, "cut");
        model.addItem(MenuId.MENU_ID_PASTE, "paste");
        model.setEnabled(MenuId.MENU_ID_PASTE, false);
        model.addSeparator();

        CefMenuModel more = model.addSubMenu(MENU_ID_MORE, "more");
        more.addItem(MenuId.MENU_ID_PRINT,"print");
        more.addItem(MenuId.MENU_ID_VIEW_SOURCE,"view source");
        model.addSeparator();

        model.addItem(MenuId.MENU_ID_RELOAD, "reload");
    }

    @Override
    public boolean onContextMenuCommand(CefBrowser browser, CefFrame frame, CefContextMenuParams params, int commandId, int eventFlags) {
        switch (commandId) {
            case MenuId.MENU_ID_RELOAD:
                browser.reload();
                return true;
        }
        return false;
    }
}- 这里解释一下:
onBeforeContextMenu 方法:
* model.clear();    // 清除菜单项。
* MenuId.MENU_ID_COPY  // 是 MenuId 中定义好的一个值,使用特定值会触发默认的特定事件,也可以自定义,建议不要与 MenuId 类中已定义的值冲突。
* model.setEnabled(MenuId.MENU_ID_PASTE, false);  // 是将这个按钮禁用,因为每次右键单击的时候都会触发这个方法,所以可以通过一些变量控制其是否被禁用。
* model.addSeparator();  // 是在菜单栏中添加一条分割线。
* model.addSubMenu(MENU_ID_MORE, "more");	// 创建下级菜单,返回值是一个 CefMenuModel 对象,通过这个对象继续 addItem 添加下级菜单项目。

onContextMenuCommand 方法:
* switch (commandId)  // 可以通过 commandId 获取点击项目设置的 Id,然后去匹配,去实现相关功能。
* return true;  // 阻止默认事件。
* return false; // 默认事件可以触发,如 print、copy、cut、paste 等都有默认事件,见名思意即可。- 让我们来瞧一瞧效果,感觉还不错。
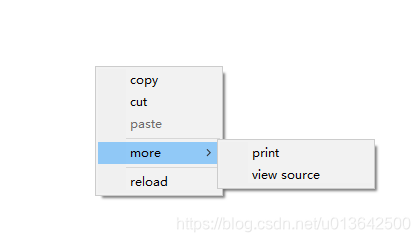
- 思路:首先应该判断右键单击处是否是个图片,然后再添加相关菜单。
- 直接分享源代码:
package my.client.handler;

import org.cef.browser.CefBrowser;
import org.cef.browser.CefFrame;
import org.cef.callback.CefContextMenuParams;
import org.cef.callback.CefMenuModel;
import org.cef.handler.CefContextMenuHandlerAdapter;

public class MenuHandler extends CefContextMenuHandlerAdapter {
    private final static int MENU_ID_SAVE_PICTURE = 10001;

    @Override
    public void onBeforeContextMenu(CefBrowser browser, CefFrame frame, CefContextMenuParams params, CefMenuModel model) {
        //清除菜单项
        model.clear();

        if (params.hasImageContents() && params.getSourceUrl() != null) {
            model.addItem(MENU_ID_SAVE_PICTURE, "图片另存为/save picture as...");
            model.addSeparator();
        }
    }

    @Override
    public boolean onContextMenuCommand(CefBrowser browser, CefFrame frame, CefContextMenuParams params, int commandId, int eventFlags) {
        switch (commandId) {
            case MENU_ID_SAVE_PICTURE:
                browser.startDownload(params.getSourceUrl());
                return true;
        }
        return false;
    }
}- 此代码仅对 img 标签这种有 Url 路径的有效,对于 canvas 这种,
params.hasImageContents()方法能够返回 true,但是params.getSourceUrl()返回的是空字符串,所以执行browser.startDownload("")时不会发生任何事情。
- 首先在
my.client中创建一个 Package 叫做dialog,创建一个DevToolsDialog类,继承自JDialog,直接分享源代码:
package my.client.dialog;

import org.cef.browser.CefBrowser;

import javax.swing.*;
import java.awt.*;
import java.awt.event.ComponentAdapter;
import java.awt.event.ComponentEvent;

public class DevToolsDialog extends JDialog {
    private final CefBrowser devTools_;

	// 一般使用这个构造方法
    public DevToolsDialog(Frame owner, String title, CefBrowser browser) {
        this(owner, title, browser, null);
    }

    public DevToolsDialog(Frame owner, String title, CefBrowser browser, Point inspectAt) {
        super(owner, title, false);

        setLayout(new BorderLayout());	// 设置布局
        Dimension screenSize = Toolkit.getDefaultToolkit().getScreenSize();	// 拿到屏幕尺寸
        setSize(screenSize.width / 2,screenSize.height / 2);	//设置大小为屏幕尺寸的一半,可以自定大小
        setLocation(owner.getLocation().x + 20, owner.getLocation().y + 20);	// 设置左上角点的位置,是指定 Frame 的左上角点的偏移 20px 位置

        devTools_ = browser.getDevTools(inspectAt);	// 获取到 browser 的 DevTools
        add(devTools_.getUIComponent());	// 将其 UIComponent 添加上去

		// 添加相关监听
        addComponentListener(new ComponentAdapter() {
            @Override
            public void componentHidden(ComponentEvent e) {
                dispose();
            }
        });
    }

    @Override
    public void dispose() {
        devTools_.close(true);	// 关闭的时候触发此方法,关闭 DevTools
        super.dispose();
    }
}- 修改 MenuHandler 类,直接分享源代码:
package my.client.handler;
import my.client.dialog.DevToolsDialog;
import org.cef.browser.CefBrowser;
import org.cef.browser.CefFrame;
import org.cef.callback.CefContextMenuParams;
import org.cef.callback.CefMenuModel;
import org.cef.callback.CefMenuModel.MenuId;
import org.cef.handler.CefContextMenuHandlerAdapter;
import java.awt.*;
public class MenuHandler extends CefContextMenuHandlerAdapter {
private final Frame owner;
public MenuHandler(Frame owner) {
this.owner = owner;
}
private final static int MENU_ID_SHOW_DEV_TOOLS = 10000;
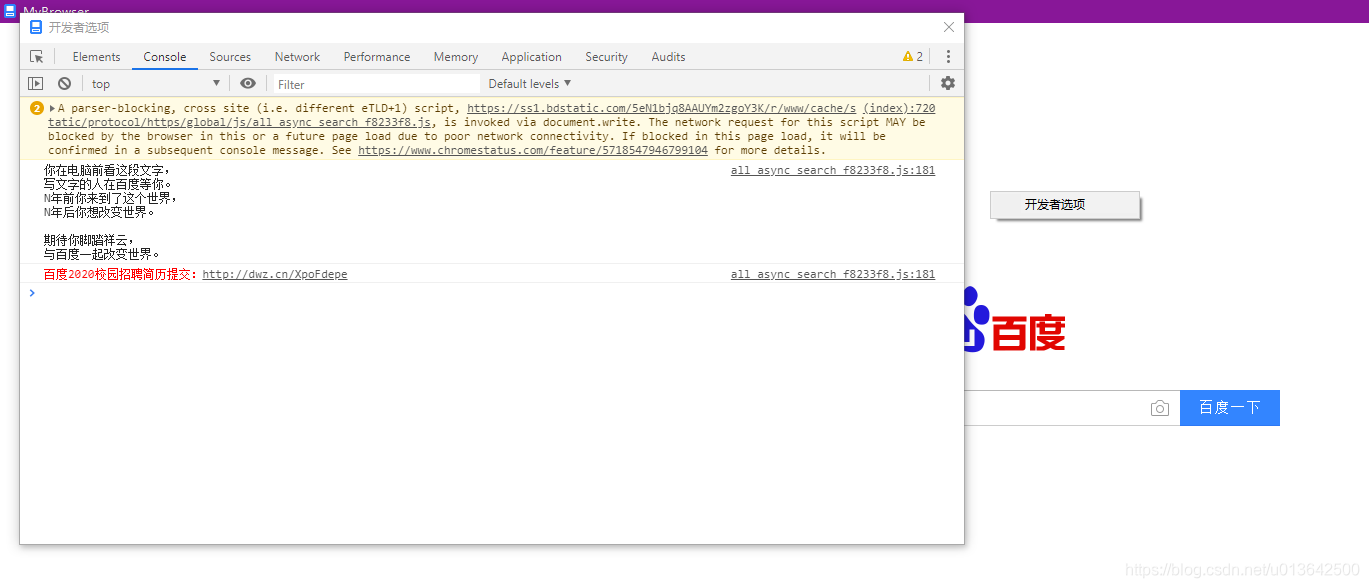
@Override
public void onBeforeContextMenu(CefBrowser browser, CefFrame frame, CefContextMenuParams params, CefMenuModel model) {
//清除菜单项
model.clear();
model.addItem(MENU_ID_SHOW_DEV_TOOLS, "开发者选项");
}
@Override
public boolean onContextMenuCommand(CefBrowser browser, CefFrame frame, CefContextMenuParams params, int commandId, int eventFlags) {
switch (commandId) {
case MENU_ID_SHOW_DEV_TOOLS:
// 打开开发者选项
DevToolsDialog devToolsDlg = new DevToolsDialog(owner, "开发者选项", browser);
devToolsDlg.setVisible(true);
return true;
}
return false;
}
}- 修改 main 方法中的 MenuHandler 实例化方法,入参加上 jFrame 对象:
client.addContextMenuHandler(new MenuHandler(jFrame)); - 让我们来瞧一瞧效果,感觉还不错。
此处参考 jcef 提供的 detailed 实例,里面有相关代码。
- 在
my.client.handler中,创建一个MessageRouterHandler类,继承自CefMessageRouterHandlerAdapter,重写onQuery。这里直接分享源代码:
package my.client.handler;

import org.cef.browser.CefBrowser;
import org.cef.browser.CefFrame;
import org.cef.callback.CefQueryCallback;
import org.cef.handler.CefMessageRouterHandlerAdapter;

public class MessageRouterHandler extends CefMessageRouterHandlerAdapter {

    @Override
    public boolean onQuery(CefBrowser browser, CefFrame frame, long query_id, String request, boolean persistent, CefQueryCallback callback) {
    	// 请求信息以 "click:" 开头
        if (request.indexOf("click:") == 0) {
            String msg = request.substring(6).trim();
            callback.success(msg + " create new message(cnm)");	// 返回对应信息到前端 success 回调函数
            return true;
        }
    	// 请求信息以 "custom:" 开头
        if (request.indexOf("custom:") == 0) {
        	// 将后面的字符串按 ,:- 切割
            String[] method = request.substring(7).trim().split("[,:\\-]");
            switch (method[0].trim()) {
                case "search":
                    callback.success("This is the result of search.");	// 返回对应信息到前端 success 回调函数
                    break;
                case "connect":
                    System.out.println(method[1].trim());
                    callback.success("This is the result of connect.");	// 返回对应信息到前端 success 回调函数
                    break;
                default:
                    callback.failure(404, "This is the result of failure.");	// 返回对应信息到前端 failure 回调函数
                    break;
            }
            return true;
        }
        // Not handled.
        return false;	// 如果返回 false 则会自动执行一个 alert 弹出框提示没有 handled
    }

    @Override
    public void onQueryCanceled(CefBrowser browser, CefFrame frame, long query_id) {
    }
}- “在 init() 方法中插入”三条语句:
// 这里的 cef 和 cefCancel 是自定义字符串,前端通过调用这两个字符串表示的方法来访问 client,
// 即对应的 onQuery 和 onQueryCanceled 方法。
CefMessageRouter cmr = CefMessageRouter.create(new CefMessageRouter.CefMessageRouterConfig("cef", "cefCancel"));
cmr.addHandler(new MessageRouterHandler(), true);
client.addMessageRouter(cmr);- 后台部分完成,开始前端页面的代码
function sendMessage() {
    // 这里的 cef 就是 client 创建 CefMessageRouter 对象的入参涉及到的字符串
    window.cef({
        request: 'click:' + document.getElementById("message").value,
        onSuccess(response) {
            console.log(response);
        },
        onFailure(error_code, error_message) {
            console.log(error_code, error_message);
        }
    });
}
function sendCustom() {
// 这里的 cef 就是 client 创建 CefMessageRouter 对象的入参涉及到的字符串
window.cef({
request: 'custom: connect-192.168.1.1',
onSuccess(response) {
console.log(response);
},
onFailure(error_code, error_message) {
console.log(error_code, error_message);
}
});
window.cef({
request: 'custom: search-' + JSON.stringify({a: 1, b: "str"}),
onSuccess(response) {
console.log(response);
},
onFailure(error_code, error_message) {
console.log(error_code, error_message);
}
});
}★ 前端用 JSON.stringify() 将对象转换成字符串传输到 client,同样,后台接收过来的 response 数据用 JSON.parse() 转换成对象。
★ 后台则使用 net.sf.json 的 JSONObject.from()、JSONArray.from()、JSONArray.from().toString() 等方法将字符串转换成对象,将对象转换成字符串。
★ 这里说一下为什么使用 Spring,是因为本项目的一个功能:“搜寻仪器”,该功能调用了 dll 的方法,此方法至少要等待 7 - 8 秒才会返回结果,而正常写的话,因为是单线程,所以会导致 client 完全卡住,但不是 GG,在卡住期间,js正常运行,且在卡完之后,会直接表现当前 js 运行的状态,给人一种时间消失的感觉。
★ 因此,是打算将“搜寻仪器”扔给异步线程去做,而 spring 的 @Async 注解则正符合需求,于是我便跳进了一个深渊巨坑。
都说 SpringBoot 多么强大,然而也没真正接触过,在正式入坑之前,还请教了前辈:“SpringBoot只能构建web项目吗?”,哈哈,还是入坑了。

具体细节不再说了,最后成功了用 SpringBoot 搭建起来项目了,但是由于原来的项目依赖相关 dll,用 SpringBoot 打包之后的发布版本,怎么也弄不进去相关 dll,搞了一天,最后我放弃了 SpringBoot。
★☆★ 最开始的想法:我们项目后台就是用 SpringMVC 啊,那么这个 client 能不能用呢。 ★☆★ 然后迅速否定,SpringMVC 就是开发 JavaWeb 的,其中的 DispatcherServlet、getServletConfigClasses 等不适用于这种本地 client 啊。 ★☆★ 然后转念一想,只用 Spring 不行么?
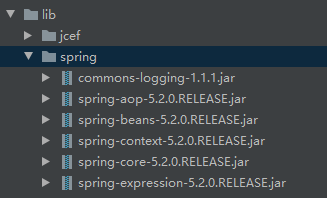
- 首先就是 Spring 的相关依赖 jar 包
下载地址:

我这边主要使用了核心包:

spring 还需要 commons-logging.jar,下载地址:
commons-logging

- 在项目中 lib 文件夹中创建 spring 文件夹,然后将 jar 包弄到里面,然后 Add as Library。
- 新建 package 叫做
my.spring.config,用来放置 spring 配置文件。 - 在
my.spring.config中创建 ApplicationContextXml.java,直接分享源代码:
package qpcr.spring.config;

import org.springframework.context.annotation.ComponentScan;
import org.springframework.context.annotation.Configuration;

@Configuration
@ComponentScan(basePackages = {"my"})
public class ApplicationContextXml {
}- 给 idea 配上 spring 框架(此步不做也行,不影响程序 Run)
- 打开 Project Structure,点击 Fact,然后点击“加号”,然后点击“spring”。

- 选择 Module,点击 OK。

- 点击右侧的“加号”。

- 选中后点击 OK。

- Apply、OK 关闭窗口即可。
- 在包
my.spring.main中创建 UI.java,然后将 Main.java 中的init()方法移动到这个 UI.java 中。让 UI.java 实现一个接口org.springframework.beans.factory.InitializingBean,并重写afterPropertiesSet()方法,执行init()。
package my.client.main;
import my.client.browser.MyBrowser;
import my.client.handler.DownloadHandler;
import my.client.handler.MenuHandler;
import my.client.handler.MessageRouterHandler;
import org.cef.CefApp;
import org.cef.CefClient;
import org.cef.browser.CefMessageRouter;
import org.springframework.beans.factory.InitializingBean;
import org.springframework.stereotype.Component;
import javax.swing.*;
import java.awt.*;
import java.awt.event.WindowAdapter;
import java.awt.event.WindowEvent;
@Component
public class UI implements InitializingBean {
private void init() {
EventQueue.invokeLater(() -> {
JFrame jFrame = new JFrame("MyBrowser");
jFrame.setMinimumSize(new Dimension(1366, 738)); // 设置最小窗口大小
jFrame.setExtendedState(JFrame.MAXIMIZED_BOTH); // 默认窗口全屏
jFrame.setIconImage(Toolkit.getDefaultToolkit().getImage(jFrame.getClass().getResource("/images/icon.png")));
if (!CefApp.startup()) { // 初始化失败
JLabel error = new JLabel("<html><body> 在启动这个应用程序时,发生了一些错误,请关闭并重启这个应用程序。<br>There is something wrong when this APP start up, please close and restart it.</body></html>");
error.setFont(new Font("宋体/Arial", Font.PLAIN, 28));
error.setIcon(new ImageIcon(jFrame.getClass().getResource("/images/error.png")));
error.setForeground(Color.red);
error.setHorizontalAlignment(SwingConstants.CENTER);
jFrame.getContentPane().setBackground(Color.white);
jFrame.getContentPane().add(error, BorderLayout.CENTER);
jFrame.setVisible(true);
return;
}
MyBrowser myBrowser = new MyBrowser("https://www.baidu.com", false, false);
CefClient client = myBrowser.getClient();
// 绑定 MessageRouter 使前端可以执行 js 到 java 中
CefMessageRouter cmr = CefMessageRouter.create(new CefMessageRouter.CefMessageRouterConfig("cef", "cefCancel"));
cmr.addHandler(new MessageRouterHandler(), true);
client.addMessageRouter(cmr);
// 绑定 ContextMenuHandler 实现右键菜单
client.addContextMenuHandler(new MenuHandler(jFrame));
// 绑定 DownloadHandler 实现下载功能
client.addDownloadHandler(new DownloadHandler());
jFrame.getContentPane().add(myBrowser.getBrowserUI(), BorderLayout.CENTER);
jFrame.setVisible(true);
jFrame.addWindowListener(new WindowAdapter() {
@Override
public void windowClosing(WindowEvent e) {
int i;
String language = "en-us";
if (language.equals("en-us"))
i = JOptionPane.showOptionDialog(null, "Do you really want to quit this software?", "Exit", JOptionPane.YES_NO_OPTION, JOptionPane.QUESTION_MESSAGE, null, new String[]{"Yes", "No"}, "Yes");
else if (language.equals("zh-cn"))
i = JOptionPane.showOptionDialog(null, "你真的想退出这个软件吗?", "Exit", JOptionPane.YES_NO_OPTION, JOptionPane.QUESTION_MESSAGE, null, new String[]{"是的", "不"}, "是的");
else
i = JOptionPane.showOptionDialog(null, "你真的想退出这个软件吗?\nDo you really want to quit this software?", "Exit", JOptionPane.YES_NO_OPTION, JOptionPane.QUESTION_MESSAGE, null, new String[]{"是的(Yes)", "不(No)"}, "是的(Yes)");
if (i == JOptionPane.YES_OPTION) {
myBrowser.getCefApp().dispose();
jFrame.dispose();
System.exit(0);
}
}
});
});
}
@Override
public void afterPropertiesSet() throws Exception {
init();
}
}- 修改 main 方法。
★ 此处才是最坑的,我这边用的全是注解开发,没有一个 xml 。 ★ 然而网上搜索怎么启动 spring,全是
ClassPathXmlApplicationContext和FileSystemXmlApplicationContext两个实例化方法,然后再 getBean() 之类的。
全注解开发的正确代码应该这么写:
package my.client.main;

import my.spring.config.ApplicationContextXml;
import org.springframework.context.annotation.AnnotationConfigApplicationContext;

public class Main {

    public static void main(String[] args) {
        new AnnotationConfigApplicationContext(ApplicationContextXml.class);
    }
}- 新建两个 package,分别是
my.client.interfaces和my.client.impl。 - 在
my.client.interfaces中新建一个 interface 叫做 MyService。
package my.client.interfaces;

public interface MyService {
    String doSomething();
}- 在
my.client.impl中新建一个 class 叫做MyServiceImpl,实现MyService接口,并加上@Service注解。
package my.client.impl;

import my.client.interfaces.MyService;
import org.springframework.stereotype.Service;

@Service
public class MyServiceImpl implements MyService {

    @Override
    public String doSomething() {
        System.out.println("This is method 'doSomething'.");
        return "doSomething";
    }
}- 给 UI.java 注入 MyService。
@Component
public class UI implements InitializingBean {
    private MyService myService;

    public UI(MyService myService) {
        this.myService = myService;
    }

    private void init() {...}

    @Override
    public void afterPropertiesSet() throws Exception {
        init();
    }
}- 将 myService 传给 MessageRouterHandler 构造函数。
// 绑定 MessageRouter 使前端可以执行 js 到 java 中
CefMessageRouter cmr = CefMessageRouter.create(new CefMessageRouter.CefMessageRouterConfig("cef", "cefCancel"));
cmr.addHandler(new MessageRouterHandler(myService), true);
client.addMessageRouter(cmr);- 修改 MessageRouterHandler 构造函数,将 MyService 对象存起来。
public class MessageRouterHandler extends CefMessageRouterHandlerAdapter {
    private MyService myService;

    public MessageRouterHandler(MyService myService) {
        this.myService = myService;
    }

    @Override
    public boolean onQuery(CefBrowser browser, CefFrame frame, long query_id, String request, boolean persistent, CefQueryCallback callback) {...}

    @Override
    public void onQueryCanceled(CefBrowser browser, CefFrame frame, long query_id) {
    }
}- 在 onQuery 方法中,使用 myService.doSomething()。
if (request.indexOf("doSomething") == 0) {
    callback.success(myService.doSomething());
    return true;
}- 在
my.spring.config中,创建一个 class 叫做TaskExecutorConfig,实现AsyncConfigurer接口。 - 配置线程池,重写
getAsyncExecutor()方法。
package my.spring.config;

import org.springframework.context.annotation.Configuration;
import org.springframework.scheduling.annotation.AsyncConfigurer;
import org.springframework.scheduling.concurrent.ThreadPoolTaskExecutor;

import java.util.concurrent.Executor;

@Configuration
public class TaskExecutorConfig implements AsyncConfigurer {

    @Override
    public Executor getAsyncExecutor() {
        ThreadPoolTaskExecutor executor = new ThreadPoolTaskExecutor();

        // Set up the ExecutorService.
        executor.initialize();

        // 线程池核心线程数,核心线程会一直存活,即使没有任务需要处理。
        // 当线程数小于核心线程数时,即使现有的线程空闲,线程池也会优先创建新线程来处理任务,而不是直接交给现有的线程处理。
        // 核心线程在allowCoreThreadTimeout被设置为true时会超时退出,默认情况下不会退出。
        // 默认是 1

        // CPU 核心数 Runtime.getRuntime().availableProcessors();
        executor.setCorePoolSize(Runtime.getRuntime().availableProcessors() + 1);

        // 当线程数大于或等于核心线程,且任务队列已满时,线程池会创建新的线程,直到线程数量达到maxPoolSize。
        // 如果线程数已等于maxPoolSize,且任务队列已满,则已超出线程池的处理能力,线程池会拒绝处理任务而抛出异常。
        // 默认时是 Integer.MAX_VALUE
        // executor.setMaxPoolSize(10);

        // 任务队列容量。从maxPoolSize的描述上可以看出,任务队列的容量会影响到线程的变化,因此任务队列的长度也需要恰当的设置。
        // 默认时是 Integer.MAX_VALUE
        executor.setQueueCapacity(1000);

        /*  keepAliveTime: 当线程空闲时间达到keepAliveTime,该线程会退出,直到线程数量等于corePoolSize。
         *  默认时是 60
         *  executor.setKeepAliveSeconds(10);
         */

        // allowCoreThreadTimeout: 是否允许核心线程空闲退出,默认值为false。
        // 如果allowCoreThreadTimeout设置为true,则所有线程均会退出直到线程数量为0。
        // executor.setAllowCoreThreadTimeOut(true);

        return executor;
    }
}- 在
my.client.interfaces中新建一个 interface 叫做 AsyncService。
package my.client.interfaces;

import java.util.concurrent.Future;

public interface AsyncService {
    Future<String> asyncMethod();
}- 在
my.client.impl中新建一个 class 叫做AsyncServiceImpl,实现AsyncService接口,并加上@Service注解。重写asyncMethod方法,写一个Thread.sleep(5000);代替耗时操作。
package my.client.impl;

import my.client.interfaces.AsyncService;
import org.springframework.scheduling.annotation.Async;
import org.springframework.scheduling.annotation.AsyncResult;
import org.springframework.stereotype.Service;

import java.util.concurrent.Future;

@Service
public class AsyncServicesImpl implements AsyncService {

    @Override
    @Async
    public Future<String> asyncMethod() {
        try {
            Thread.sleep(5000);
        } catch (InterruptedException e) {
            e.printStackTrace();
        }
        return new AsyncResult<>("I am finished.");
    }
}- 在
MyServiceImpl中注入AsyncService。
package my.client.impl;

import my.client.interfaces.AsyncService;
import my.client.interfaces.MyService;
import org.springframework.stereotype.Service;

@Service
public class MyServiceImpl implements MyService {
    private AsyncService asyncService;

    public MyServiceImpl(AsyncService asyncService) {
        this.asyncService = asyncService;
    }

    @Override
    public String doSomething() {
        System.out.println("This is method 'doSomething'.");
        return "doSomething";
    }
}- 重写
doSomething()方法,使用asyncService的asyncMethod方法。
★ 这是网上提供的异步结果的获取方法。 ★ 等等,这个异步线程不还是在主线程用一个 while 去等待结果么?这算哪门子异步啊。
@Override
public String doSomething() {
    Future<String> futureAsyncMethod= asyncService.asyncMethod();
    String result = "";
    while (!futureAsyncMethod.isDone()) {
        try {
            result = futureAsyncMethod.get();
        } catch (InterruptedException | ExecutionException e) {
            e.printStackTrace();
        }
    }
    return result;
}在 spring 章节部分开头,我说明了为什么要使用 spring。

其直接原因就是
client 内嵌浏览器向client发送请求,然后请求不响应的时候,client就会卡住。 那么解决办法就很简单了:
- 把耗时操作扔给异步线程去操作,没有 Done 则返回 “doing”,前端接收响应数据为 “doing”,则再次发请求。
- 判断是否正在进行那个耗时操作,如果在进行,则判断 isDone,没有 Done 则返回 “doing”,重复上一步操作。
- 如果 Done 了,则正常返回数据。
- 首先修改前端网页部分,如果响应数据为 “doing”,则再次发请求。(当然如果你正确返回结果就有可能是 doing 的话,那就把这个字符串换一个)
function doSomething() {
    // 这里的 cef 就是 client 创建 CefMessageRouter 对象的入参涉及到的字符串
    window.cef({
        request: 'doSomething',
        onSuccess(response) {
            if(response === "doing"){
            	setTimeout(doSomething, 0);	// 将任务加到新队列中,避免网页卡住
           	}else{
           		// 正确得到响应数据
           	}
        },
        onFailure(error_code, error_message) {
            console.log(error_code, error_message);
        }
    });
}- 由于 Spring 组件默认就是单例的,所以可以这么写,直接分享源代码:
package my.client.impl;

import my.client.interfaces.AsyncService;
import my.client.interfaces.MyService;
import org.springframework.stereotype.Service;

import java.util.concurrent.ExecutionException;
import java.util.concurrent.Future;

@Service
public class MyServiceImpl implements MyService {
    private AsyncService asyncService;

    public MyServiceImpl(AsyncService asyncService) {
        this.asyncService = asyncService;
    }

    private Future<String> futureAsyncMethod = null;

    @Override
    public String doSomething() {
        if (futureAsyncMethod == null)
            futureAsyncMethod = asyncService.asyncMethod();

        if (futureAsyncMethod.isDone()) {
            String result = "";
            try {
                result = futureAsyncMethod.get();
            } catch (InterruptedException | ExecutionException e) {
                e.printStackTrace();
            }
            futureAsyncMethod = null;
            return result;
        } else {
            return "doing";
        }
    }
}如果你和我发生了一样的事情:
- 报错:
Bean 'my.spring.config.TaskExecutorConfig' of type [XXXX] is not eligible for getting processed by all BeanPostProcessors (for example: not eligible for auto-proxying)@Async根本没生效。
- 请参考这个链接:
【小家Spring】注意BeanPostProcessor启动时对依赖Bean的“误伤”陷阱(is not eligible for getting processed by all...) - 不过我并没有从这个链接中直接找到解决办法。
- 我的解决办法是,给
TaskExecutorConfig类加上BeanPostProcessor的接口:
@Configuration
@EnableAsync
public class TaskExecutorConfig implements AsyncConfigurer, BeanPostProcessor {
    // BeanPostProcessor 接口的目的是使当前 Configuration 先加载
    // 可能是吧,不太清楚,请参考上面的链接

    @Override
    public Executor getAsyncExecutor() {...}
}- 按图所示。

- 按图所示。

- 按图所示创建文件夹 bin。

- 按图所示,在 bin 中创建文件夹 jcef 和 spring,将对应依赖移进去,在 jcef 中创建 lib 文件夹。

- 右键单击 lib,或点击上面的“加号”,选择 Directory Content。

- 选择 lib 下面 jcef 里面的 lib\win64。

- 点击 jcef.jar 之后,点击下面的 class path 后面的展开。

- 编辑完了之后,Build Artifacts。


- 打开 Artifacts Build 之后的地方:E:\idea\jcef\out\artifacts\jcef_jar。

- 我们写一个 bat 文件命令行,或用 cmd cd 到此路径,然后执行命令行:
java -Djava.library.path=.\bin\jcef\lib -jar jcef.jar。
如果不写
-Djava.library.path=.\bin\jcef\lib则会报之前提到过的错:no chrome_elf in java.library.path。
将
E:\idea\jcef\out\artifacts\jcef_jar的jcef_jar改名为app
- 下载工具:exe4j,激活过程我就不说了。
- 打开 exe4j,第一个页面:
Welcome,直接 Next 即可。

- 第二个页面:
Project type,默认选择Regular mode即可,必须选择这个,网上大部分教程全是选择"JAR in EXE" mode,导致后面步骤完全不一样,真坑,前进的道路真曲折。

- 第三个页面:
Application info,三个填空:
- 第一个为应用程序名字;
- 第二个为导出地址;
- 第三个为 exe 地址,写一个
.即可。

- 第四个页面:
Executable info,输入 exe 名字,视情况勾选Allow only a single running instance of the application,可以在Advanced Options中设置一些其他信息。(默认是32-bit,如果用64位jre,则需要到那里设置Generate 64-bit executable)

- 第五个页面:
Java invocation。
- 点击那个“加号”。

- 选择 Archive,然后选择那个 jar 包。

- 再次点击那个“加号”,然后选择 Directory,选择 jcef 和 spring 文件夹。


- 点击下面
Main class from后面的"更多":

- 点击 Advanced Options 里面的 Native libraries。

- 点击“加号”后,选择 jcef 里面的 lib 文件夹。

- 第六个页面:
JRE,可以设置 Minimum version,也可以在Advanced Options中设置一些其他信息。

- 第七个页面:
Splash screen,第八个页面:Messages,默认即可。


- 第九个页面:
Compile executable,等待自动完成。

- 第十个页面:
Finished,可以点击 Save As 将配置存起来,下次直接 open 这个配置。

- 点击
Click Here to Start the Application,可以直接启动 exe,或到指定路径下,双击打开。

本博客写了 4 天,写之前研究这些全部内容,用了两个星期。 本博客于
2019-10-31 18:38首发于CSDN博客。 累死我啦!!!