TW5 2 Github pages
We all love Github pages. They are an easy,reliable and cheap way to host static sites. TiddlyWiki is a single page web application wiki that can be hosted as a single html file. It is an awesome unique application, and I strongly recommend you to check it out at TiddlyWiki.com. The problem with it is that there is not an easy fast way to host a tiddlywiki file on github pages... until now.
This repository is both a template and a set of instructions to host a tiddlywiki on your own Github pages repository. Following this instructions you will be able to have your own wiki up and runing in less than 10 minutes without any git or Github Knowledge and without installing any software on your computer.
Using this work-flow has several advantages:
- Github pages are absolutely free and reliable
- Tiddlers are built from individual
.tidfiles - Built in changes history and diff
- Github allows you to edit and add files directly from their web interface, so you don't have to install anything in your computer.
- No
gitor Github Knowledge required
Table of Contents
Requisites
The list of pre-requisites is quite small, and you only need to fit them once
First time setup
This are the steps required for the first time setup. Once you have completed all the steps listed here for the first time it will be much faster to just add new wikis.
Github setup
- We have to create a
Personal access tokento allow our publish scripts to push to our github account. This is only needed on the first time setup. Go to Github's tokens management page - Create a new token clicking on
Generate new token - Provide a meaningful token description. This is very important because it will be the only clue you will have to identify the token usage.
- Make sure
repoandpublic_repooptions are selected - Click on
Generate token. Here is an overview of this step: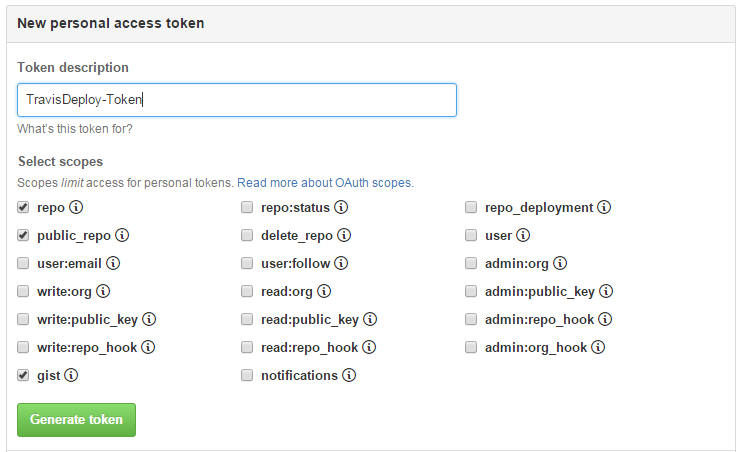
- Github will generate an unique token. Take note of it now because you will not have any other opportinity!!

Creating the first wiki
- Fork this repository. This step will be necessary on every new wiki. As I have promised you can do this directly from Github, just click the Fork button on the top righ corner of this repository page:

- Once you have forked the repository, you can rename it to fit your needs.
- Go to Travis-ci and sign in using your github account.
- If this is the first time you are using Travis just authorize the application to access your github account.
- Once you have accessed your Travis account you will be directed to your dashboard.
- On the left side of your dashboard you should have a list of the repositories under Travis management. At the first time this list should be empty.
- Click the plus sign next to
My Repositoriesto put the forked repository under Travis management:
- You will be redirected to your profile. Here you have to locate the repository you have just forked and activate the "switch" to put it under Travis management. This should be easy because Travis provides an explanatory screen shot.
- If you don't find the repository you are looking for, click the
Syncbutton to refresh the list of repositories:
- In our example we are activating this Github repository:

- Now it's time to setup the global variables required by our build scripts. To do so click on the gear icon next to the "activate" switch:

- You should be now at the Settings page of the repository. Leave the General settings as they are by default.
- On the Environment Variables section We are going to add the required variables.
- First add
GH_REF, which is the url of **your forked repository without the https prefix and with a.gitextension. For this variable you can set toontheDisplay value in build log, so you can check that it is correct on every build. Click add
- Follow the same process to add the
GH_TOKENvariable, but this time make sure thatDisplay value in build logis set to off for security reasons. Paste here the Github token we have generated previously:
- Follow the exact same process to add
GH_EMAILvariable. This should be the email you have used to register your account on github. After this process you should see something like this:
- Changes are saved automatically so at this point we are done with configuration and can switch to
currenttab.
- First add
- Switch to
currenttab to see what is going on during build process. The build process happens every time you push a change to your repository and not before. An ongoing build looks like this:
- Now you are ready to go. Edit any file or create any new file your forked repository and push the changes to trigger a build. You can do this directly from Github. For more details about this process see the
Editing tiddlerssection - Once the build has finished successfully you can just visit
<your-git-username>.github.io/your-repo-nameto see the results of your build


Creating another wiki
Once you have completed the first time setup, it is much easier to setup another wiki. Here is a summary of the required Steps:
- Fork this repository:
- Rename the repository to fit your needs.
- Go to Travis-ci and sign in using your github account.
- On the left side of your dashboard click the plus sign next to
My Repositoriesto put the forked repository under Travis management: - Locate the repository you have just forked and activate the "switch" to put it under Travis management.
- If you don't find the repository you are looking for, click the
Syncbutton to refresh the list of repositories: - Setup the global variables
- Edit/add the required tiddlers and make a push. This can be done directly on github.
Editing tiddlers
You can just edit or add new tiddlers directly on github, which is quite comfortable, or you can use a markdown editor. Tiddlywiki sintax is not exactly markdown, but it is close enough to use it as a small reference and markdown editors usually helps you completing lists and provide preview.
I recommend you to use prose, which is the tool I have used to edit this README:
Prose
- visit https://prose.io/
- You have to link it to github, so you can edit and save the files on your repository
- Click on
Authorize aplicationand authorize it on Github - Once you have authorized the application you can start creating and editing tiddlers:
- Select the repository of your wiki
- Navigate to
wiki>tiddlersdirectory - Select the tiddler you want to edit or create a new file. If you create a new file make sure you give it a
.tidextension. - Once you have your "tiddler ready" click the save icon. You can provide a commit message if you want.
Dilinger
To edit markdown files you have a better alternative which is dillinger. The drawback of dilinger is that it only recognices .md files:
- visit https://dillinger.io/
- You can link it to github, so you can edit and save the files on your repository
- To be able to save to github, you have to first import the tiddler you want to edit from there. The first time you will have to authorize the application:
- Click on
IMPORT FROM - On the drop down select
Github - Authorize the application if needed
- Select the repository you want to edit, and select the master branch
- Navigate to
wiki>tiddlersdirectory - Select the tiddler you want to edit
- Click on
- Once you have your "tiddler ready" click
SAVE TOand select github