Hackintosh-Intel-i9-10900k-Gigabyte-Z490-Vision-D

Hello folks,
I have successfully installed MacOS Catalina 10.15.4 on my i9-10900k running on a Gigabyte Z490 Vision D.
You can find my EFI folder in this repository.
Current Bootloader: OpenCore 0.6.1
YouTube Video to this build
I also made a video on how I got macOS running on my build and how I build this rig: https://youtu.be/szOofRy7uBc
Hardware
- Intel i9-10900k
- Gigabyte Z490 Vision D:
- Audio: Realtek ALC1220-VB
- 1Gbit Ethernet: Intel I219-V
- 2.5Gbit Ethernet: Intel I225-V
- Two USB-C/Thunderbolt 3 ports
- RAM: 64GB G.Skill Trident Z 3600Mhz CL18
- GPU: ASRock Phantom Gaming AMD Radeon VII
- Wifi/BT: MQUPIN fenvi T919 Wireless Card with BCM94360CD
Working
- Tested with macOS Catalina and macOS Big Sur
- Wifi and Bluetooth (via BCM94360CD using a MQUPIN fenvi T919 Wireless Card). Replacing the onboard Intel WiFi-card doesn't work. See details below.
- Audio: Realtek ALC1220-VB (AppleALC.kext, layout-id=7, device-id=0xA170, FakeID.kext, FakePCIID_Intel_HDMI_Audio.kext)
- USB, all ports except the USB 2.0 on the rear panel labeled "BIOS". Disabled this due to the 15 port limit.
- Thunderbolt 3 including Hot-plug
- 1Gbit Ethernet (Intel I219-V)
- 2.5Gbit Ethernet (Intel I225-V)
- iGPU UHD630 but no HDMI-output yet
- Sleep/Wake
- Shutdown
- Restart
Not working so far
- iGPU UHD630 HDMI-Output: You cannot use the iGPU to drive your display. So far it is only working for GPU-acceleration like Intel QuickSync technology. Your help is appreciated here :).
Benchmarks
OC: 5.2Ghz All-Core@1.31V, no Power Limit
Geekbench
My Geekbench Profile: https://browser.geekbench.com/user/218488

Cinebench
Cinebench R20 (with OC): 6857 points.
You can see my "old" Threadripper 1950x with OC to 4.0Ghz All-Core above(7916 points). The stock 1950x below (6670 points).

Details
Installation steps
-
Create an MacOS Catalina 10.15.4 USB-Installer Stick. Do this on a real Mac.
- Go into the app store and search for Catalina. Download it. It should download to your Macs application folder.
- (You can use the 10.15.5 or 10.15.6 Catalina installer equally well.)
- Plugin a plain vanilla USB-Stick with at least 16GB. My installation needed 8.24GB.
- The following assumes your USB stick is called "MyVolume".
- Check that "MyVolume" is partitioned with GUID. Technical Note: GUID Format
- Open the terminal and enter this command to create the installer (Replace "MyVolume" with your USB-sticks name. In this case Untitled:
sudo /Applications/Install\ macOS\ Catalina.app/Contents/Resources/createinstallmedia --volume /Volumes/MyVolume - Now there should be a progress bar in the terminal showing the creation process in %. Wait until it is complete.
- At the end your USB-stick should be named "Install macOS Catalina".
- Go into the app store and search for Catalina. Download it. It should download to your Macs application folder.
-
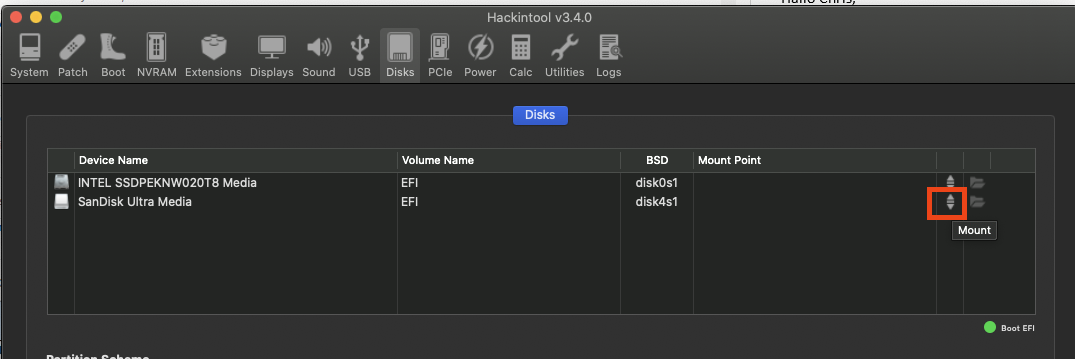
Mount the EFI-partition of the "Install macOS Catalina" disk.
- I use Hackintool for this.
- Open Hackintool and go to the "Disks" menu. There you should see your disks.
- Press the double-arrow in the 6th column on the USB disk to mount the EFI-partition of your installer disk.
-
Delete all folders and then copy my entire EFI folder to the root of the EFI-partition
-
Go to EFI/OC and open the config.plist with a plist Editor (I use "PLIST Editor" from the app store but other alternatives are XCode or ProperTree)
-
Within the config.plist navigate to PlatformInfo/Generic and paste your serials for MLB, SystemSerialNumber and SystemUUID. You can generate them with the tool CloverConfigurator. Technical Note: Serial Numbers
-
Make a backup of this altered EFI folder which includes your unique serial number changes.
-
Adjust your BIOS-Settings. See My BIOS-settings for reference.
-
Reboot from the installation media and install macOS. The installation needs Internet. So either install a supported WiFi-card or plugin Ethernet.
-
If you get an error within the installation saying something like "this installation is damaged" you can try this workaround: Delete Installinfo.plist on the installer disk:

- Open the "Install macOS Catalina" Disk
- Right Click on the package "Install macOS Catalina"
- Click on "Package Contents"
- Then navigate to Contents > SharedSupport
- Delete the Installlnfo.plist
Post Istall
Once you have installed MacOS Catalina onto your hackintosh's drive you should repeat the same steps above of installing the EFI folder onto it's EFI-partition:
- (Don't have two EFI partitions mounted at the same time since it can confuse things)
- Mount the EFI-partition of your hackintosh's drive (ie of the drive you installed Catalina onto)
- Replace the entire contents of this EFI-partition with the your specialized entire EFI folder (which includes your own unique serial numbers)
Now your hackintosh can boot without the USB install stick.
Then following the other sections below you might want to investigate a GUI boot menu, a boot chime, and other post install niceties. (See dortania post install cosmetics)
Fixing Sleep/Wake
In this section I wanna share with you, how I got my Sleep/Wake working properly.
I am using darkwake=8 as bootargument.
I have read that darkwake=8 should be obsolete since Mojave, but somehow this did the trick for me at the end. I tried other values as well: darkwake=0,2 and no darkwake. But only with darkwake=8 my PC keeps sleeping.
I also had to use SSDT-Disable-CNVW.aml to disable the m.2 slot where the onboard Intel Wifi 6 sits, because the CNVi device was constantly waking up my PC.
In addition, I set the following settings in Hackintool. You can edit them by clicking on the value, but it has a very small "clickable" area:

Energy Saver Settings

Bluetooth Settings

USB
I use USBInjectAll.kext and created my own SSDT-EC-USBX.aml and SSDT-UIAC.aml using Hackintool 3.4.0.
All ports are enabled, except for the USB 2.0 port that is labeled "BIOS" and intended to be used to flash the BIOS. I had to disable this to stay within the 15 port USB limit. And I don't need this port as much as the faster ones. BIOS flashing will work anyways, because this is done prior the Bootloader config.
Alternative Port Configurations
iGPU UHD630
I have managed to enable the iGPU UHD630 but I couldn't get the HDMI-output working. I think this is, because there is no iMac out yet with a 10th Gen Intel with UHD630 so there are no framebuffers implemented yet. But I am no expert in this iGPU because I don't really need it since I have a Radeon VII.
But the UHD630 is shown properly in MacOS and Hackintool:

When you want to use the iGPU (e.g. if you want SideCar to get an iPad working as wireless display), you need to change your SMBIOS to iMac19,1 and add the following device-properties in your config.plist.
To change the SMBIOS you have to change set your SystemProductNameto iMac19,1 (config.plist->PlatformInfo->Generic). You should also generate new serials when you change your SMBIOS.
And add the following the device-properties to your config.plist (config.plist->DeviceProperties):
<key>PciRoot(0x0)/Pci(0x2,0x0)</key>
	<dict>
		<key>AAPL,ig-platform-id</key>
		<data>BwCbPg==</data>
		<key>device-id</key>
		<data>kj4AAA==</data>
		<key>framebuffer-patch-enable</key>
		<data>AQAAAA==</data>
		<key>model</key>
		<string>Intel UHD Graphics 630 (Desktop)</string>
	</dict>
Audio
I needed this to get Audio working:
- AppleALC.kext
- FakeID.kext
- FakePCIID_Intel_HDMI_Audio.kext
- layout-id=7
- device-id=0xA170
The layout-id and the device-id is injected via the device properties.
The audio device has the PCI-Address PciRoot(0x0)/Pci(0x1F,0x3).
<key>DeviceProperties</key>
	<dict>
		<key>Add</key>
		<dict>
			<key>PciRoot(0x0)/Pci(0x1F,0x3)</key>
			<dict>
				<key>device-id</key>
				<data>cKEAAA==</data>
				<key>layout-id</key>
				<data>BwAAAA==</data>
			</dict>
		</dict>
	</dict>
1Gbit Ethernet (Intel I219-V)
Simply add the newest IntelMausiEthernet.kext (mine is v2.5.1d1).
Wifi/Bluetooth
You need natively supported Wifi and Bluetooth to use Airdrop, Unlock with Apple Watch etc.
Replacing the onboard Intel-Wifi6 card doesn't work because the m.2 slot is a CNVi slot. Which means that it only supports CNVi-cards which are made by Intel. I have tried that already, trust me. You can either Insert a PCI-Express card like the MQUPIN fenvi T919 or buy a special adapter (google for "NGFF to m.2 B+M-Key adapter") to get an Apple-support m.2 card working in one of the m.2 Slots that are meant to be used for m.2 SSDs. Then you also need an adapter cable to get USB-power onto the m.2 adapter to get Bluetooth working.
I used the MQUPIN fenvi T919 Wireless/Bluetooth Card. It has the natively supported WiFi and Bluetooth chip BCM94360CD.
No further kexts needed (no AirportBrcmFixup.kext, BrcmBluetoothInjector.kext, BrcmFirmwareData.kext, BrcmPatchRAM3.kext, BT4LEContiunityFixup.kext).
You also have to disable the onboard Intel Bluetooth.
In your USB-configuration this is the port HS14. Either add "uia_exclude=HS14" to your Boot-arguments or generate a USBPorts.kext with Hackintool and remove HS14.
If it is still not working, download Bluetooth Explorer from Apple Developer (it is inside "Additional_Tools_for_Xcode_11.4.dmg").
Then start Bluetooth Explorer App, select Tools/HCI Controller Selector. Then you should be able to see your Bluetooth adapter e.g. Apple BRCM. Select it and press "Activate". If it is marked as "Active" it is working.
Thunderbolt 3 Support
In your BIOS set the following settings. You also need the SSDT-TB3.aml in EFI/OC/ACPI to enable Thunderbolt Hotplug support.


Radeonboost.kext
The Radeonboost.kext improves the Graphics performance of AMD Radeon cards. I have a Radeon VII and it improved the OpenCL performance by 22% and in Metal by 38%. According to benchmarks with Geekbench 5.1.0.
Language
Default Keyboard Layout/Language setting was changed to EN-US in v1.5.
If you want to change this, just edit this setting in the config.plist:
- NVRAM
	- Add
		- 7C436110-AB2A-4BBB-A880-FE41995C9F82
			- prev-lang:kbd | String | en-US:0
Valid Keyboard Values see here: AppleKeyboardLayouts.txt
Overclocking Experiences:
The highest Voltage I feel comfortable with for 24/7 is 1.35V.
I unlocked the Power Limit and tried 5.2 and 5.3 Ghz All-Core.
5.3 Ghz crashed in Benchmarks. 5.2Ghz worked. So far everything is working and no further crashing with 5.2Ghz.
5.2 Ghz All-Core is working with 1.31V and is stable so far.
Temps on idle: 35°C.
Temps while running Cinebench e.g. : 75-80°C.
Cooling solution: I have Thermalgrizzly Conductonaut applied, so fluid metal. And I have a custom watercooling loop with 2x 360mm and 1x 480mm radiator. Fans are spinning on minimum RPM until the temps reach 60°C. They reach 100% at 80°C.
Credits
Thanks for your support :) Your help was crucial for my build.
- the german hackintosh-community at hackintosh-forum.de: Especially dsm2, CMMChris, brumbaer, JimSalabim
- https://github.com/daliansky/XiaoXinPro-13-hackintosh: This repository inspired my first config and gave me the CPU-FakeID. Thank you for that :)
- Dortania for this great OpenCore Desktop Guide
- headkaze for Hackintool and our productive conversations :)
- Acidanthera for too many things to mention each
- RehabMan for too many things to mention each
- OpenCore project for this great bootloader
Best, Chris aka SchmockLord