This project implements a Raspberry Pico based Xilinx Virtual Cable (XVC). It allows using Raspberry Pico as a JTAG adapter for programming Xilinx FPGAs.
It is derived from the excellent pico-dirtyJtag project.
A special shoutout goes to https://github.com/tom01h for crazily improving the performance of this project - thank you!
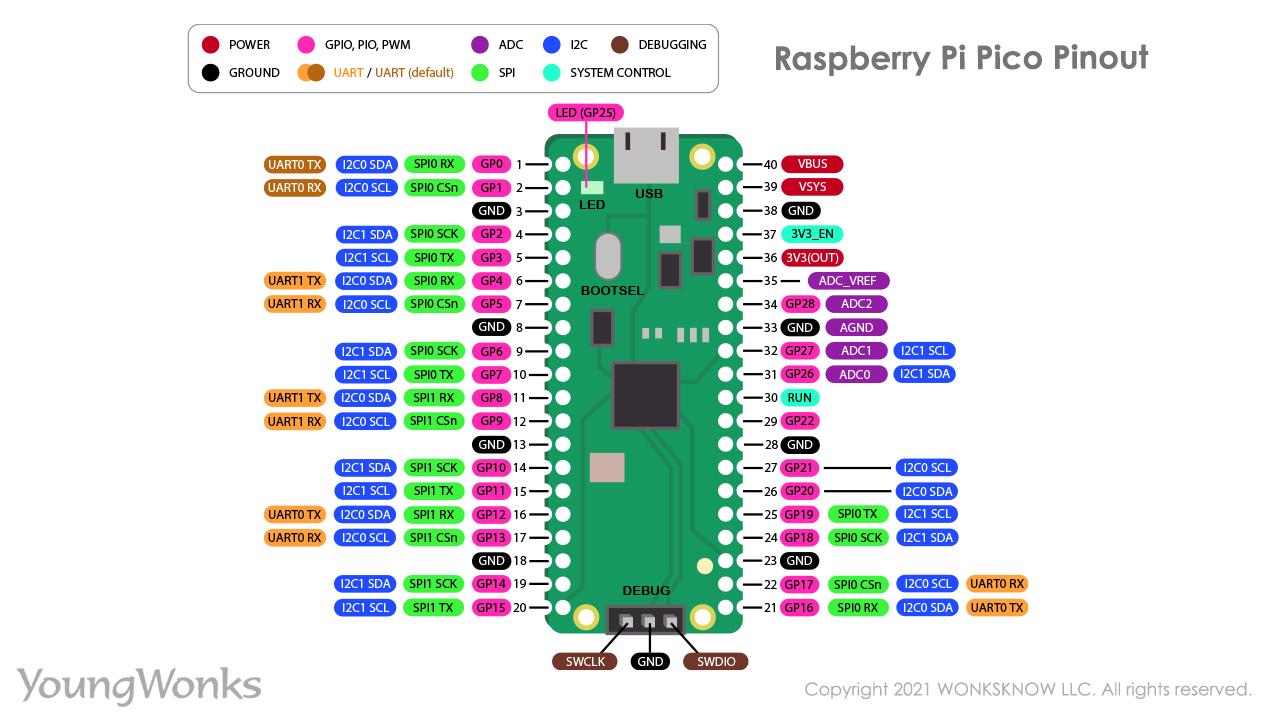
The pinout is as follows:
| Pin name | GPIO |
|---|---|
| TDI | GPIO16 |
| TDO | GPIO17 |
| TCK | GPIO18 |
| TMS | GPIO19 |
| GND | Pin 23 |
Note: The Raspberry Pico is a 3.3v device. Ensure that the target device and the Pico are electrically compatible before connecting them.
Note: This project was tested with Vivado 2021.1, Raspberry Pi Pico as the JTAG programmer (XVC server), and EBAZ4205 'Development' FPGA Board in August 2021.
Update: This project was tested with Vivado ML Standard 2023.1, Raspberry Pi
Pico as the JTAG programmer (XVC server), and EBAZ4205 'Development' FPGA Board
in May 2023.
Shortcut: Upload the pre-built xvcPico.uf2 file to the Raspberry Pico
Board. Done - skip to the next section.
Install dependencies:
sudo apt install cmake gcc-arm-none-eabi libnewlib-arm-none-eabi \
  libstdc++-arm-none-eabi-newlib git libusb-1.0-0-dev build-essential \
  make g++ gcc
mkdir ~/repos
cd ~/repos

git clone https://github.com/raspberrypi/pico-sdk.git
git clone https://github.com/kholia/xvc-pico.git
Build the host-side daemon:
cd ~/repos/xvc-pico/daemon
cmake .
make
sudo ./xvcd-pico  # run on the host computer, turn on the pico board before
Build the Raspberry Pico's firmware:
cd ~/repos/xvc-pico/firmware
export PICO_SDK_PATH=${HOME}/repos/pico-sdk
cmake .
make -j4
Grab xvcd-pico.exe from the builds folder of this repository itself.
You need to install the libusbK driver with Zadig (https://zadig.akeo.ie/)
for all three Interfaces.
Credit goes to https://github.com/benitoss/ for these instructions.
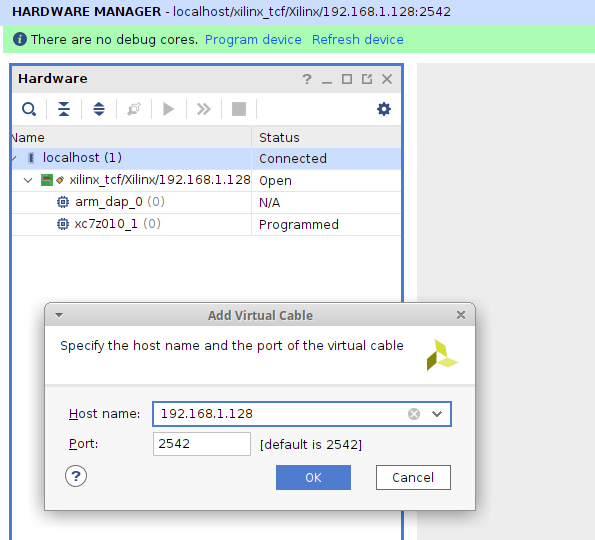
Select the Add Xilinx Virtual Cable (XVC) option in the Hardware Manager in Vivado and mention the IP address of the host computer.
If you see the End of startup status: LOW error message in Vivado, check the
FPGA power supply's voltage and current ratings.
I found Maker Pi Pico Base really helpful for debugging GPIO stuff.
This URL
says that Xilinx Virtual Cable (XVC) protocol allows (local or remote) Vivado
to connect to a target FPGA for debug leveraging standard Xilinx standard debug
cores like Integrated Logic Analyzer - ILA, Virtual Input/Output - VIO, and
others. ILA works fine over our Raspberry Pico JTAG adapter. Vitis stuff is
also supported.
If cost and ease-of-availability are the driving constraints (at the cost of
speed), then this project is 'usable' and can probably suffice. If higher
programming speed is a requirement, I recommend using xc3sprog or
openFPGALoader with an FT2232H board.
This project might be one of the cheapest, most energy-efficient Vivado-Compatible
JTAG programmers. I use this project as my "daily driver" now ;)
Writing ebaz4205_top.bit (371.6 KiB) takes only ~2.5 seconds now - thanks to
tom01h. Don't overestimate the speed of human programmers and Vivado though
;)
Writing corescore_0.bit (2 MiB) which uses ~100% FPGA LEs takes around ~9
seconds.
./openFPGALoader -c xvc-client --port 2542 --file-type bin ebaz4205_top.bin
Connect Pico's hardware UART pins to FPGA's UART.
#define UART_TX_PIN 0
#define UART_RX_PIN 1
Set UART of FPGA to 115200 baud rate.
Note: /dev/ttyACM(n) will appear when Pico's USB is connected.
- https://github.com/kholia/xvcpi
- https://github.com/kholia/xvc-esp32
- https://github.com/kholia/xvc-esp8266
- https://github.com/phdussud/pico-dirtyJtag/
- https://github.com/kholia/Colorlight-5A-75B
- https://github.com/fusesoc/blinky#ebaz4205-development-board
- https://github.com/maxnet/pico-webserver/ approach (LWIP_SOCKET is not available yet!)
- [NEXT] Do a 100% standalone port to Pico W ;)
- [TODO] Make
BUFFER_SIZEconfigurable - PRs welcome!


