你确定你对Android的布局精通了吗?如果你能立马用LinearLayout,RelativeLayout,ConstraintLayout说出如何让两个TextView左右水平居中该如何实现,那就不需要看下边的文章了,如果不能,还需要多多看官网实践,修炼自己。
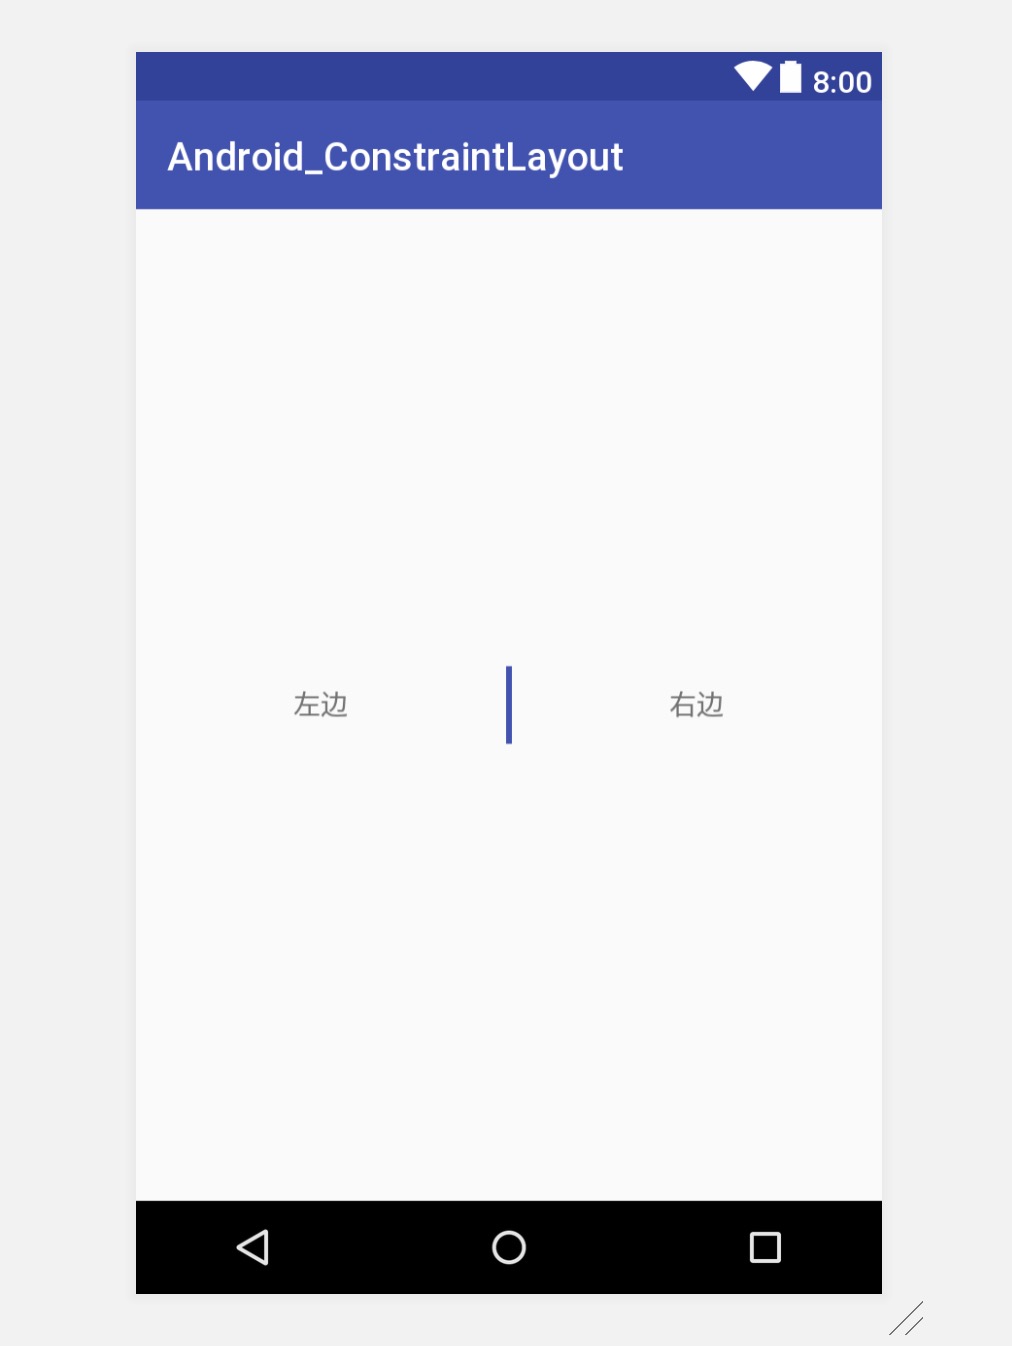
接下来我们分别用LinearLayout,RelativeLayout,ConstraintLayout分别来实现让两个TextView居中显示。为了文章的简洁性,我用LL代替LinearLayout,用RL代替RelativeLayout,用CL代替ConstraintLayout。需求效果如下:
我们来看下LL属性代表的含义。
orientation :子View是以行还是以列展示的。如果是一行使用horizontal,一列则使用vertical。
gravity:控制LL包含的所有子View是如何排列的。这个值影响着单行或单列中所有子View水平或竖直的排列,还展示了一个对象应该如何在边界,x轴或y轴上放置它的内容。例如:最外层LL的gravity属性设置为center,那么它的子View就是在中间的。
layout_weight:设置单个子View在LL中是如何分配剩余空间的。官网默认权重为0。
layoutParams:影响LL中子View的位置和大小。
根据上边的属性含义我们来实现需求。首先在LL的最外层将gravity属性设置为center,让子View居中。然后再将TextView的weight属性设置为1,中间View的weight属性默认为0,分配剩余空间,最后将TextView的gravity属性设置为center让文字居中。效果实现。代码如下:
<?xml version="1.0" encoding="utf-8"?>
<LinearLayout xmlns:android="http://schemas.android.com/apk/res/android"
    xmlns:tools="http://schemas.android.com/tools"
    android:layout_width="match_parent"
    android:layout_height="match_parent"
    android:gravity="center"
    android:orientation="horizontal"
    tools:context=".centerhorizontal.LLActivity">

    <TextView
        android:layout_width="50dp"
        android:layout_height="wrap_content"
        android:layout_weight="1"
        android:gravity="center"
        android:text="@string/left" />

    <View
        android:layout_width="2dp"
        android:layout_height="40dp"
        android:background="@color/colorPrimary" />

    <TextView
        android:layout_width="50dp"
        android:layout_height="wrap_content"
        android:layout_weight="1"
        android:gravity="center"
        android:text="@string/right" />

</LinearLayout>
LL的使用场景:如果是单层布局,最好使用LL,而不使用RL。因为RL绘制渲染速度慢,性能低。
定义:展示子View相对于父View或子View互相之间的位置。
好处:RL可以减少布局之间的嵌套。多层布局嵌套,用LL会增加布局层级,但是用RL一层即可,使应用更加扁平化。
使用场景:如果你发现自己使用了几个内部LL组,你可能想要去用一个RL去代替它。
我们来看看RL中CENTER_HORIZONTAL的属性含义:Rule that centers the child horizontally with respect to the bounds of its RelativeLayout parent。意思是规定子元素相对于父元素的边界水平居中。
根据上边的属性含义我们来实现需求。首先让View设置centerInParent属性为true,然后TextView宽度设置为match_parent,并设置centerVertical为true,根据相对位置分别放在View的左侧和右侧,最后设置gravity属性为center让文字居中,效果实现。代码如下:
<?xml version="1.0" encoding="utf-8"?>
<RelativeLayout xmlns:android="http://schemas.android.com/apk/res/android"
    xmlns:tools="http://schemas.android.com/tools"
    android:layout_width="match_parent"
    android:layout_height="match_parent"
    tools:context="com.example.ruru.android_constraintlayout.centerhorizontal.RLActivity">

    <View
        android:id="@+id/view"
        android:layout_width="3dp"
        android:layout_height="40dp"
        android:layout_centerInParent="true"
        android:background="@color/colorPrimary" />

    <TextView
        android:layout_width="match_parent"
        android:layout_height="wrap_content"
        android:layout_centerVertical="true"
        android:layout_toLeftOf="@id/view"
        android:gravity="center"
        android:text="@string/left" />

    <TextView
        android:layout_width="match_parent"
        android:layout_height="wrap_content"
        android:layout_centerVertical="true"
        android:layout_toRightOf="@id/view"
        android:gravity="center"
        android:text="@string/right" />
</RelativeLayout>
建议大家在看下边内容之前先结合ConstraintLayout官网认真实践下这个链接的文章。
ConstraintLayout,多层级布局嵌套的解药!
https://juejin.im/entry/5a53676bf265da3e3d48feba。
这篇文章讲的非常棒,将ConstraintLayout常见的用法都囊括了进来。
定义:允许你去灵活的定义和更改布局。
以下几个属性含义是我根据官网得出的,剩下自己需要自行查看官网:
relative position:相对位置。允许你去定义一个相对于另一个的布局。可以在水平和竖直方向约束布局。例如:buttonB在buttonA的右边:buttonB设置属性app:layout_constraintLeft_toRightOf。意思是告诉系统我们想要buttonB的左边界被约束到buttonA的右边。
margin:边缘空白。margin可以是确定的值或者等于0或者持有一个尺寸。
bias:偏斜。两个不可能的约束最后居中或按偏斜排列。
guideline:辅助线。约束布局对不可见的View有控制权。
优势:
布局调整更为方便,可以直接拖拽进行操作;
布局之间相对位置更好控制,CL的guideline属性对不可见的View具有控制权,View设置为GONE不影响界面效果;
动态创建布局方便,对控件的控制能力更加强大,可以实现动画效果;
CL的chains属性有三种模式,比weight属性更加强大,在权重分配比LL还多一个bias属性;
减少页面布局层级,使页面更加扁平化,渲染速度更快,性能更高。
根据上边的属性含义我们来实现需求。
第一种:用偏斜bias来实现需求,等价于LL的weight属性。TextView设置水平方向bias分别为0.25和0.75,竖直方向bias默认为0.5。View水平和竖直都默认为0.5。代码如下:
<?xml version="1.0" encoding="utf-8"?>
<android.support.constraint.ConstraintLayout xmlns:android="http://schemas.android.com/apk/res/android"
    xmlns:app="http://schemas.android.com/apk/res-auto"
    xmlns:tools="http://schemas.android.com/tools"
    android:layout_width="match_parent"
    android:layout_height="match_parent"
    tools:context=".centerhorizontal.CL1Activity">

    <TextView
        android:id="@+id/tv_left"
        android:layout_width="wrap_content"
        android:layout_height="wrap_content"
        android:text="@string/left"
        app:layout_constraintBottom_toBottomOf="parent"
        app:layout_constraintHorizontal_bias="0.25"
        app:layout_constraintLeft_toLeftOf="parent"
        app:layout_constraintRight_toRightOf="parent"
        app:layout_constraintTop_toTopOf="parent" />

    <View
        android:layout_width="3dp"
        android:layout_height="40dp"
        android:background="@color/colorPrimary"
        app:layout_constraintBottom_toBottomOf="parent"
        app:layout_constraintLeft_toRightOf="@id/tv_left"
        app:layout_constraintRight_toLeftOf="@id/tv_right"
        app:layout_constraintTop_toTopOf="parent" />

    <TextView
        android:id="@+id/tv_right"
        android:layout_width="wrap_content"
        android:layout_height="wrap_content"
        android:text="@string/right"
        app:layout_constraintBottom_toBottomOf="parent"
        app:layout_constraintHorizontal_bias="0.75"
        app:layout_constraintLeft_toLeftOf="parent"
        app:layout_constraintRight_toRightOf="parent"
        app:layout_constraintTop_toTopOf="parent" />

</android.support.constraint.ConstraintLayout>
第二种:用链条chains来实现需求。chains为水平或竖直方向控件之间形成约束关系,即形成链条。chains有三种模式,本例用spread平分空间即可,让TextView的weight属性设置为1,最后用gravity让TextView的文字居中。代码如下:
<?xml version="1.0" encoding="utf-8"?>
<android.support.constraint.ConstraintLayout xmlns:android="http://schemas.android.com/apk/res/android"
    xmlns:app="http://schemas.android.com/apk/res-auto"
    xmlns:tools="http://schemas.android.com/tools"
    android:layout_width="match_parent"
    android:layout_height="match_parent"
    tools:context=".centerhorizontal.CL2Activity">

    <TextView
        android:id="@+id/tvLeft"
        android:layout_width="0dp"
        android:layout_height="wrap_content"
        android:gravity="center"
        android:text="@string/left"
        app:layout_constraintBottom_toBottomOf="parent"
        app:layout_constraintHorizontal_chainStyle="spread"
        app:layout_constraintHorizontal_weight="1"
        app:layout_constraintLeft_toLeftOf="parent"
        app:layout_constraintRight_toLeftOf="@id/view"
        app:layout_constraintTop_toTopOf="parent" />

    <View
        android:id="@+id/view"
        android:layout_width="3dp"
        android:layout_height="40dp"
        android:background="@color/colorPrimary"
        app:layout_constraintBottom_toBottomOf="parent"
        app:layout_constraintLeft_toRightOf="@id/tvLeft"
        app:layout_constraintRight_toLeftOf="@id/tvRight"
        app:layout_constraintTop_toTopOf="parent" />

    <TextView
        android:id="@+id/tvRight"
        android:layout_width="0dp"
        android:layout_height="wrap_content"
        android:gravity="center"
        android:text="@string/right"
        app:layout_constraintBottom_toBottomOf="parent"
        app:layout_constraintHorizontal_weight="1"
        app:layout_constraintLeft_toRightOf="@id/view"
        app:layout_constraintRight_toRightOf="parent"
        app:layout_constraintTop_toTopOf="parent" />

</android.support.constraint.ConstraintLayout>
第三种:用辅助线guideline实现需求。先设置一条水平方向的辅助线,让它距离上边界为整个界面的一半,设置layout_constraintGuide_percent为50%,然后设置两个TextView和View三者之间左,上,右,下之间的约束关系。有点类似于RL中的center类属性。代码如下:
<?xml version="1.0" encoding="utf-8"?>
<android.support.constraint.ConstraintLayout xmlns:android="http://schemas.android.com/apk/res/android"
    xmlns:app="http://schemas.android.com/apk/res-auto"
    xmlns:tools="http://schemas.android.com/tools"
    android:layout_width="match_parent"
    android:layout_height="match_parent"
    tools:context=".centerhorizontal.CL3Activity">

    <android.support.constraint.Guideline
        android:layout_width="match_parent"
        android:layout_height="wrap_content"
        android:orientation="horizontal"
        app:layout_constraintGuide_percent="0.5" />

    <TextView
        android:id="@+id/tvLeft"
        android:layout_width="wrap_content"
        android:layout_height="wrap_content"
        android:text="@string/left"
        app:layout_constraintBottom_toBottomOf="parent"
        app:layout_constraintLeft_toLeftOf="parent"
        app:layout_constraintRight_toLeftOf="@id/view"
        app:layout_constraintTop_toTopOf="parent" />

    <View
        android:id="@+id/view"
        android:layout_width="3dp"
        android:layout_height="40dp"
        android:background="@color/colorPrimary"
        app:layout_constraintBottom_toBottomOf="parent"
        app:layout_constraintLeft_toRightOf="@id/tvLeft"
        app:layout_constraintRight_toLeftOf="@id/tvRight"
        app:layout_constraintTop_toTopOf="parent" />

    <TextView
        android:id="@+id/tvRight"
        android:layout_width="wrap_content"
        android:layout_height="wrap_content"
        android:text="@string/right"
        app:layout_constraintBottom_toBottomOf="parent"
        app:layout_constraintLeft_toRightOf="@id/view"
        app:layout_constraintRight_toRightOf="parent"
        app:layout_constraintTop_toTopOf="parent" />
</android.support.constraint.ConstraintLayout>
权重分配:
LL:gravity+weight(场景:分配剩余空间)
RL:相对位置gravity+center属性(场景:控件之间相互约束)
CL:偏斜bias(场景:按比例确定具体位置,等价于LL中的weight)
CL:链条chain,chainStyle+weight+gravity(场景:水平或竖直方向控件之间形成约束关系,即形成链条)
CL:辅助线guideline(场景:作为参照物进行对齐,控件之间形成约束,有点类似于RL中的center类属性)
综上来看,本例最适合采用的方法其实是偏斜bias,接下来是链条chain,因为它们都可以分配权重。
三大布局对比:
单层布局:用LL,因为用RL绘制渲染速度慢,性能低。
多层嵌套布局:用RL,因为用LL会增加页面嵌套布局层级。
CL的优点:减少页面布局层级,使页面更加扁平化,渲染速度更快,提升性能,比LL和RL更加强大。
Github传送门:https://github.com/2211785113/Android_ConstraintLayout
1.举一反三:根据上方的例子做出下列两种效果的界面。
提示:最里层TextView和ImageView不管用RL和LL都需要再加一层LL。
需求:如果整体布局左右距边界加间隔,最外层布局设置padding即可。
水平竖直方向切换:擅用orientation属性。
2.用ConstraintLayout实现SwipeRefreshLayout里包含TabLayout和ViewPager的界面。
提示:用chain的packed模式+weight。
答案:我的下一个开源项目里将包含这个布局。
请参看:https://github.com/2211785113/Android_SlidingConflictDemo。
需求:LL让子View居中除了最外层LL设置gravity属性为center还有什么办法?
提示:也可以让子View设置layout_gravity属性。
特别提示:
父View方向为vertical时,子View的layout_gravity属性设置为left/right/center_horizontal等横向属性才会生效。
父View方向为horizontal时,子View的layout_gravity属性设置为top/bottom/center_vertical等纵向属性才会生效。
子View的layout_gravity属性设置为center,只有一个方向会生效。水平居中设置center起作用。垂直居中设置center起作用。
gravity和layout_gravity的区别:
gravity:用于父组件。表示父组件的子组件在组件中的位置。
layout_gravity:用于子组件。表示子组件自身在父组件中的位置。
margin和padding的区别:
margin:指定此视图左、上、右和底部的额外空间。
padding:以这个视图的左、上、右、下部分的像素显示,以特定的像素偏移视图的内容。比如:left padding为2将使View的内容从左边缘向右移动2个像素。