| Product(PinMap) | SOC | Flash | PSRAM | Resolution | Size |
|---|---|---|---|---|---|
| T-Display-AMOLED-Lite | ESP32-S3R8 | 16MB | 8MB(OPI) | 194x368 | 1.47 Inch |
| T-Display-S3 AMOLED | ESP32-S3R8 | 16MB | 8MB(OPI) | 240x536 | 1.91 Inch |
| T4-AMOLED | ESP32-S3R8 | 16MB | 8MB(OPI) | 450x600 | 2.41 Inch |
| Current consumption | Working current | sleep current | sleep mode |
|---|---|---|---|
| T-Display-AMOLED-Lite | (240MHz) WiFi On 90~230+ mA | Aboud 1.1mA | timer wakeup |
| T-Display-S3 AMOLED | (240MHz) WiFi On 90~230+ mA | Aboud 160uA | external wakeup |
| T4-AMOLED | (240MHz) WiFi On 90~230+ mA | Aboud 160uA | external wakeup |
examples/
├── Factory                # Factory example
├── LumenMeter             # 1.47-inch AMOLED Built-in Ambient Light Sensor Example
├── PMU_ADC                # PMU Voltage detection example , only support 1.47-inch AMOLED
├── PMU_Interrupt          # PMU interrupt example , only support 1.47-inch AMOLED
├── QWIIC_GPS_Shield       # Extern GPS Shield example,use Serial communication
├── QWIIC_HP303BSensor     # Extern Temperature Pressure Sensor example,use Wire communication
├── TFT_eSPI_Sprite        # Use TFT_eSPI Sprite example
├── Touchpad               # Touchpad example
└── lvgl                   # LVGL examples
    ├── event
    ├── get_started
    ├── layouts
    │   ├── flex
    │   └── grid
    ├── scroll
    ├── style
    ├── third_party
    │   ├── ImageDecoder
    │   └── gif
    └── widgets
└── ...- Install Visual Studio Code and Python
- Search for the
PlatformIOplugin in theVisualStudioCodeextension and install it. - After the installation is complete, you need to restart
VisualStudioCode - After restarting
VisualStudioCode, selectFilein the upper left corner ofVisualStudioCode->Open Folder-> select theLilyGO AMOLED Seriesdirectory - Wait for the installation of third-party dependent libraries to complete
- Click on the
platformio.inifile, and in theplatformiocolumn - Uncomment one of the lines
src_dir = xxxxto make sure only one line works - Click the (✔) symbol in the lower left corner to compile
- Connect the board to the computer USB
- Click (→) to upload firmware
- Click (plug symbol) to monitor serial output
- If it cannot be written, or the USB device keeps flashing, please check the FAQ below
- It is recommended to use platformio without cumbersome steps
- Install Arduino IDE
- Install Arduino ESP32 2.0.5 or above , below 3.0
- Download
LilyGO AMOLED Series, move to Arduino library folder (e.g. C:\Users\YourName\Documents\Arduino\libraries) - Copy all folders in libdeps folder to Arduino library folder (e.g. C:\Users\YourName\Documents\Arduino\libraries)
- Open ArduinoIDE ,
Tools, Look at the picture to choose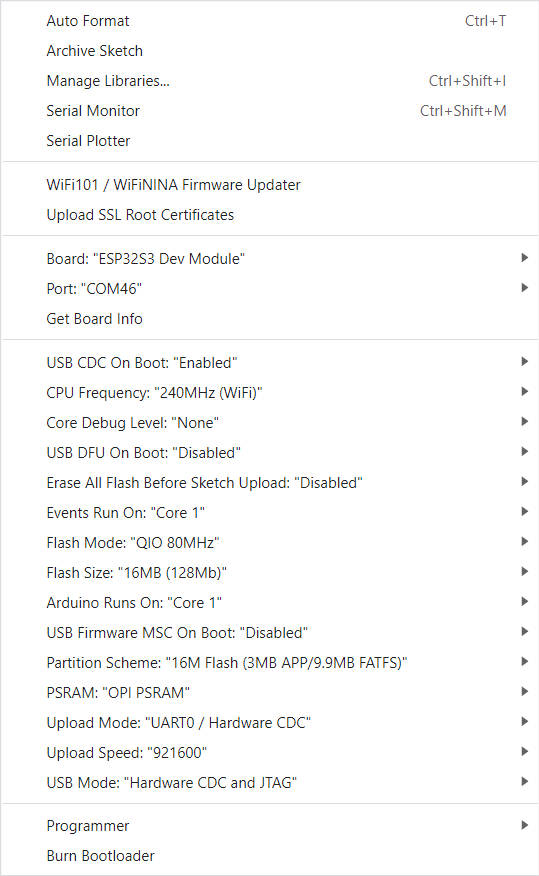
File->Examples->LilyGO AMOLED Series->Any Examples- Select
Port - Click
upload, Wait for compilation and writing to complete - If it cannot be written, or the USB device keeps flashing, please check the FAQ below

- BLE Examples
- WiFi Examples
- SPIFFS Examples
- FFat Examples
- For more examples of esp32 chip functions, please refer to arduino-esp32-libraries
-
The board uses USB as the JTAG upload port. When printing serial port information on USB_CDC_ON_BOOT configuration needs to be turned on. If the port cannot be found when uploading the program or the USB has been used for other functions, the port does not appear. Please enter the upload mode manually.
- Connect the board via the USB cable
- Press and hold the BOOT button , While still pressing the BOOT button, press RST
- Release the RST
- Release the BOOT button
- Upload sketch
-
If the above is invalid, burn the binary file to check whether the hardware is normal
-
AMOLED does not support hardware screen rotation function