- Understand the steps needed to complete an assignment
- Submit assignments in Canvas through CodeGrade
Important: depending on when you enrolled in the Software Engineering Prep course, you may already have learned how to complete assignments and submit them using CodeGrade. If so, you are free to skip this lesson.
However, if you used the learn-co gem and the learn test command to
complete labs in Prep, it is very important to work through this lesson
carefully and make sure you understand the process. Some of the information in
this lesson will be review, but there are several important differences between
the process you learned previously and the one you will learn in this lesson; we
will point out these differences as we go.
Be sure to take the time you need now to get comfortable with the process of completing and submitting assignments. You will use it for every lab you do throughout the Software Engineering curriculum!
Below is the general process you will learn:
- From the assignment's GitHub repo, create a fork of the assignment into your GitHub account.
- Clone your personal copy to your computer.
- Run the tests using the
npm testcommand, and complete the work required to get them to pass. - Push your completed code back up to your GitHub repo.
- Submit your completed work in Canvas through the CodeGrade window.
We will go through each of these steps in detail below.
As you learned in Prep, all the lessons in the curriculum have a corresponding repository (repo) in GitHub. On this page in Canvas, you should see two icons in the upper right corner. The first is the GitHub logo, also known as OctoCat.

Clicking the OctoCat icon will open the lesson's GitHub repo. The second icon is a flag, which you can use to submit an issue for the lesson (e.g., if you find a typo or other error).
To fork an assignment, click the Octocat button to open its GitHub repo. In the top right corner of the repo, you should see a button that says Fork.

Click on that, and you should get a screen that looks something like this:
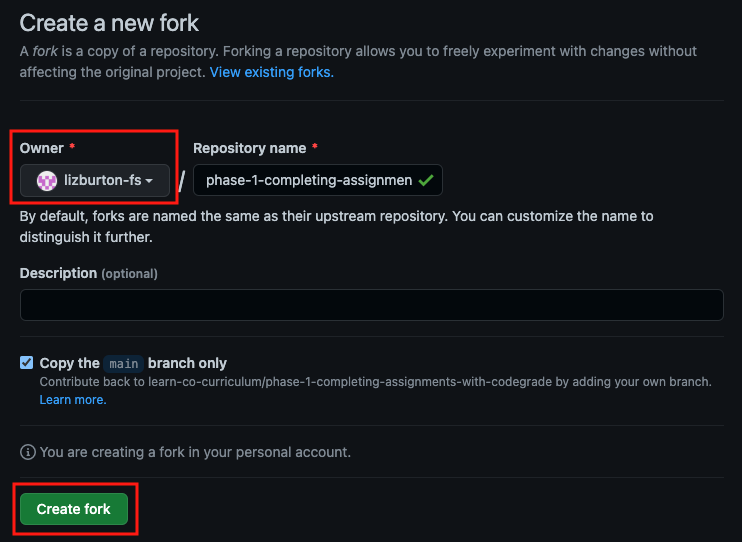
Verify that your GitHub username is showing in the Owner dropdown, then click the Create fork button.
NEW: There is no more Fork button in Canvas; instead, you'll navigate to the lab's GitHub repo and fork from there.
Forking is a process which creates an exact copy of a collection of code and files. Once you've created a fork on your own GitHub account, you will be able to edit the files in the repository and write your own code solution without interfering with the original copy.
Once your fork is ready, the next step is to download (clone) your new repository to your local machine.
Note: You should already be familiar with the steps in this section; we are including them here for completeness.
To download the repository for this lesson, first make sure you're in your personal fork on GitHub. You can check this by looking in the top left of the GitHub repository, where it shows the name.

If you see your GitHub username before the name of the repo, phase-1-completing-assignments-with-codegrade, as well as a subtitle saying "forked from ...", then you are in the right place.
Once you're in your forked version of the repo, click the Code button. A pop-up will appear which shows several options for cloning; switch to the SSH option if it isn't already selected. Next, click the copy button.

Now, open your terminal and navigate to where you'd like to download the
assignment (e.g. cd ~/Development/code/phase-1). Type git clone and a space,
then paste in the copied SSH link from GitHub. It should look something like
this:
$ git clone git@github.com:your-github-username/phase-1-completing-assignments-with-codegrade.gitPress enter, and you should see a flurry of terminal activity. Once the terminal gives you control to type again, a new folder with the GitHub name of the assignment will have been created. Change directory into this folder to access the assignment files.
$ cd phase-1-completing-assignments-with-codegradeFinally, type code . to open the lab's files in Visual Studio Code.
This assignment has two tests. The first checks to see if you've correctly cloned this assignment to your local machine. If you've followed the steps above, you've completed everything you need to do to pass the first test. Now, we need to run the tests and find out what the second one is.
First, run npm install in the terminal to install the tools necessary to run
the tests. You should again see a flurry of text as dependencies are installed.
Note: You may get a warnings or a message from the terminal saying there are vulnerabilities. These are okay to ignore - they are normal! You should not run the audit command the terminal provides you with as it will change the versions of the node dependencies for a lesson, which we do not want to do.
NEW: Run npm install to install the tests' dependencies each time you
clone down a lab.
Once the installations are complete, run npm test in the terminal. You should
see the results of your tests. By cloning this assignment down, you've already
passed one test!
This assignment
  ✓ has been correctly cloned to your local environment
  1) has a file named myfile.md

1) This assignment
      has a file named myfile.md:
    AssertionError: No file named 'myfile.md' found. Create one in the root of the assignment's directory: value: expected './myfile.md' to exist

1 passing (5ms)
1 failing
NEW: Run npm test instead of learn test to run the test suite.
Although you passed one test, there is still one test not passing. The terminal gave us a detailed "AssertionError" saying why we did not pass the test:
1) This assignment
      has a file named myfile.md:
    AssertionError: No file named 'myfile.md' found. Create one in the root of the assignment's directory: value: expected './myfile.md' to exist
We can use this error to figure out what we need to do to pass it. In this case,
we just need to create a file called myfile.md inside the assignment
directory. Go head and create the file, from either the terminal or your code
editor.
When you run npm test in the terminal again, both tests should now be passing!
  This assignment
    ✓ has been correctly cloned to your local environment
    ✓ has a file named myfile.md


  2 passing (4ms)
This is the general workflow you will follow when working on labs:
- Fork the assignment repo to your GitHub account by clicking the Octocat button on the lab's Canvas page, then the "Fork" button on the lab's repo page.
- Clone the lesson down to your machine.
- Install the tools needed for the tests by running
npm installin the terminal. - Run
npm testto see what you need to do to get the tests passing. - Work on the assignment with those tests in mind.
- As you work, run
npm testin the terminal as many times as you'd like to test your code. - Once all your tests are passing, it's time to submit your assignment — or is it?
If you go to your forked version of the assignment on GitHub, you'll see
that the myfile.md file you created is not there. This is because you only
made the change on your local clone. Changes that you make on a locally cloned
repository are not automatically synced to the repo up on GitHub. You have to
manually sync the changes. This is a good thing — it gives you more control over
what changes get "pushed" up to the GitHub repo and when.
The process requires three terminal commands:
git addgit commitgit push
Recall that you learned about these commands near the end of the SE Prep course, in the Git Basics and Pushing Code with Git lessons. You will use these commands for every lab you complete in this curriculum. You will also use them all the time when you're working as a software engineer. The process of committing and pushing to GitHub will become second nature soon enough, but if you need a refresher, it's a good idea to go back and review the two lessons mentioned above before you continue.
NEW: You will use git commands to commit and push your code up to GitHub.
These commands should be run in the terminal within the directory with changes
to push. For example with this assignment, you should be running the commands
within the phase-1-completing-assignments-with-codegrade directory.
This command lets us tell git what changes and files we want to sync within a repo. You can specify certain files to track, or you can track all files at once that have changes to sync.
To track specific files, you just need to add the file names as arguments. For example:
git add file1.md file2.mdTo track all files at once, you can use a period as an argument instead .:
git add .Let's go ahead and track our change by using the git add . shortcut.
Once you've tracked all the changes you want to save with git add, the next
step is to save all those changes at once. This is done with git commit. To
make a commit, the command is:
git commit -m "short message briefly explaining the changes saved in this commit"Any time you commit something, you should include a message with it to explain
what changes are actually in the commit. These messages should be one line and
short. The -m flag says we want to add one and should be followed by the
message in quotes.
Let's commit our tracked change. In the terminal, run:
git commit -m "created myfile.md"We've now tracked and saved our changes — but they're still not up on the
GitHub repo. We need to tell Git to back up our changes to GitHub using the
push command:
git pushRecall from the Pushing Code with Git lesson that, because you cloned this lab down from your personal fork on GitHub, git will automatically push your changes back up to that same repo. (If you need a refresher on pushing, go back and review that lesson.)
Now, finally, when you load your forked version of the assignment on GitHub, you
should see the myfile.md file! With all your work now available on GitHub, you
can submit the assignment.
Note: It is a good habit to get into to go to your repo on GitHub after you push to verify that it completed successfully.
The final step is to submit your work to Canvas by connecting your repo to CodeGrade. Before continuing with the steps below, make sure that you're logged in to your GitHub account.
NEW: To get credit for the lab in Canvas, you will submit your work using CodeGrade.
To submit your work for grading, head back to the assignment on Canvas and scroll down to the bottom of the page. There, you should see a button that says "Load Submitting Assignments with CodeGrade in a new window".

Click on that button, and a new window of the CodeGrade interface should open up. As you haven't submitted an assignment for this lab yet, click on the "Create submission" button. On the next page that opens, click on the "GitHub" button. A GitHub screen will open asking you to authorize CodeGrade. (Note: you should only have to do this step the first time you create a submission.) Once CodeGrade is authorized, as long as you're logged in to GitHub, CodeGrade should be connected to your account.
Once your GitHub account is connected, you should see a list of your repos in
the CodeGrade window. Find the repo that matches the assignment you're
submitting, in this case phase-1-completing-assignments-with-codegrade, and
click the blue "Connect" button.
When CodeGrade finishes connecting the repo, it should show you a success message with a link to view your submission. Click on that link.
On this new page, there are three different tabs: Code, Feedback Overview, and AutoTest.
The Code tab is as it sounds, all the code you submitted. The Feedback Overview is where you can see feedback on your work from instructors if they've provided any.
The AutoTest tab is what we'll focus on in this lesson. This tab is what runs the test that automatically grades your work. It will take some time, and you can see the progress in the small box on the right side of the Setup section. When it's done, it will say "Done" and your score will update in the Automatic Tests section.

If you don't pass, don't fret, you can still fix it! You can click on the
test(s) within the Automatic Tests section to see which ones failed. Then, you
can fix those errors within your local version of the repo, and go through the
process of using git add, git commit, and git push to push your changes.
CodeGrade will then automatically re-run the test when it detects changes have
been made to the GitHub repo.
To see the results of the updated submission, navigate back to CodeGrade through the button on Canvas. Instead of on "Create submission", click on the "Latest submission" button to get taken back to the AutoTest page.
Once your tests are all passing in CodeGrade, you are good to go. You can close the CodeGrade window and move on to the next lesson.
Whew, that was a lot. While it will take some time in the beginning, the more assignments you complete and submit, the easier the process should become. If you ever forget a step, that's OK. Come back to this lesson as many times as you need until it becomes second nature.
Errors and mistakes can happen, and this section will cover some common ones. If your problem is not listed here, please check with an instructor or technical coach for guidance.
If you are a Mac user and you see the following message:
xcrun: error: invalid active developer pathYou need to install the Xcode Command Line Tools. Run the following command to install them:
$ xcode-select --installAnd follow the prompts. Then try running the git clone command again. See
this Stack Overflow post for more
details. Note that you may need to re-install xcode-select any time you update
your Mac OS version.
First, check to make sure you're logged in to your GitHub account. Then start again from the assignment's Canvas page and repeat the steps in the "Submitting an Assignment on CodeGrade" section above.
If it still does not work, try again, but instead of clicking the "GitHub" button, click the "Or manually connect your Git repository" link underneath. CodeGrade will walk you through the manual setup; be sure to read and follow their instructions carefully.
-
Make sure that you've connected the correct repo to CodeGrade. You can do that by clicking on the "Code" tab in CodeGrade and verifying that the title of the lab in the README.md file matches the title in Canvas. If you've connected the wrong repo, follow the instructions in the next section.
-
Re-run the tests in your local environment to verify that they are passing.
-
Make sure that your completed code was pushed up to GitHub. To do that, navigate to your repo on GitHub and check that the latest commit is showing. If the code was not pushed to GitHub, follow the instructions in the "Pushing your Changes to GitHub" section above. Once your code is pushed up, the tests will automatically rerun in CodeGrade and the results will be updated in the AutoTest tab. To see this, navigate back to CodeGrade by clicking the button on the assignment page in Canvas, then click on the "Latest submission" button. You may also want to verify that the assignment is showing as completed in Canvas.
To reconnect your CodeGrade assignment to a different repo, you will simply go through the submission process again and select the correct repo. When you do that, you will see a message warning you that you have already connected to the repo and asking if you want to disconnect the current repo and select a new one:

Click the "Disconnect and select new repository" button. This will return you to the list of repos where you can select the new repo to connect.
Note: When you first go back through the submission process, the incorrect repo will still be under the "Latest Submissions". That is OK - it will be overridden once you submit a new repo.
The full process is:
- Return to the lab's Canvas page and, if necessary, refresh the page to reload the CodeGrade button.
- Click the button and, on the CodeGrade page that opens, click "Create Submission".
- Select the new repo to connect.
- In the page that opens, click the "Disconnect and select new repository" button.
- Select the correct repo once again.
I refreshed the CodeGrade page and it's asking me to log back in. What are my account details to log in?
If you don't remember creating a username and password for CodeGrade, that's because you did not! To access CodeGrade, you must always do so from Canvas.
To get back to the submission page for a specific assignment, return to the assignment on Canvas and click on the "Load" button at the bottom of the page again. If the button is not there due to being clicked once before, refresh the Canvas page and it should reappear.
Congratulations, you've now completed this assignment and submitted it to CodeGrade! You now know how to work on and submit assignments going forward:
- Click the OctoCat button on the Canvas assignment, then the Fork button on the repo page.
- Once the assignment is forked, clone it down to your local machine.
- Run
npm installto download the tools required to run the tests for the assignment. - Run
npm testto see what tests you have to pass. Run the command as many times as you like to check your work as you go. - Complete any required work, then run the
git add,git commit, andgit pushcommands in the terminal to push your work up to GitHub. Before continuing to the next step, be sure to load your repo on GitHub and verify that the latest commit is shown. - Submit your assignment through CodeGrade by then connecting the appropriate repo.