


These are the docs for React on Rails 12. To see the version 11 docs, click here.
October 14, 2020: RUBY ROGUES RR 474: React on Rails V12 – Don’t Shave That Yak! with Justin Gordon.
October 1, 2020: See the spec/dummy example repo for a simple configuration of webpack via the rails/webpacker gem that supports SSR.
August 2, 2020: See the example repo of React on Rails Tutorial With SSR, HMR fast refresh, and TypeScript for a new way to setup the creation of your SSR bundle with rails/webpacker.
July 8, 2020: Release v12 of React on Rails.
Major Improvements
- React Hooks Support for top level components
- Typescript bindings
- rails/webpacker "just works" with React on Rails by default.
- i18n support for generating a JSON file rather than a JS file.
Be sure to see the CHANGELOG.md and read the upgrade instructions: docs/basics/upgrading-react-on-rails.
- See Justin's RailsConf talk: Webpacker, It-Just-Works, But How?.
- Are you interested in support for React on Rails? Do you want to use Node.js to do your server-side rendering so libraries like Emotion and Loadable Components just work, as compared to rendering via Ruby embedded JS? If so check out React on Rails Pro.
- HMR is working with Loadable Components for a both amazing hot-reloading developer experience and great runtime performance. Please email me if you'd like to use Loadable Components Code Splitting to speed up your app by reducing your bundle sizes and lazily loading the code that's needed.
React on Rails integrates Rails with (server rendering of) Facebook's React front-end framework.
This project is maintained by the software consulting firm ShakaCode. We focus on Ruby on Rails applications with React front-ends, often using TypeScript or ReasonML. We also build Gatsby sites. See our recent work for examples of what we do.
Interested in optimizing your webpack setup for React on Rails including code splitting with react-router, and loadable-components with server-side rendering? We just did this for Popmenu, lowering Heroku costs 20-25% while getting a 73% decrease in average response times.
Feel free to contact Justin Gordon, justin@shakacode.com, maintainer of React on Rails, for more information.
Click to join React + Rails Slack.
To provide a high performance framework for integrating Ruby on Rails with React via the Webpacker gem especially in regards to React Server-Side Rendering for better SEO and improved performance.
Given that rails/webpacker gem already provides basic React integration, why would you use "React on Rails"?
- Easy passing of props directly from your Rails view to your React components rather than having your Rails view load and then make a separate request to your API.
- Tight integration with rails/webpacker.
- Server-Side Rendering (SSR), often used for SEO crawler indexing and UX performance, is not offered by
rails/webpacker. - Redux and React Router integration with server-side-rendering.
- Internationalization (I18n) and (localization)
- A supportive community. This web search shows how live public sites are using React on Rails.
- Reason ML Support.
See Rails/Webpacker React Integration Options for comparisons to other gems.
See the react-webpack-rails-tutorial for an example of a live implementation and code.
Requires creating a free account.
- How to use different versions of a file for client and server rendering
- How to conditionally render server side based on the device type
Consider browsing this on our website.
Ruby on Rails >=5 and rails/webpacker 4.2+.
Note, the best way to understand how to use ReactOnRails is to study a few simple examples. You can do a quick demo setup, either on your existing app or on a new Rails app.
- Do the quick tutorial.
- Add React on Rails to an existing Rails app per the instructions.
- Look at spec/dummy, a simple, no DB example.
- Look at github.com/shakacode/react-webpack-rails-tutorial; it's a full-featured example live at www.reactrails.com.
See also the instructions for installing into an existing Rails app.
-
Add the
react_on_railsgem to Gemfile:bundle add react_on_rails --strict
-
Commit this to git (or else you cannot run the generator unless you pass the option
--ignore-warnings). -
Run the generator:
rails generate react_on_rails:install
-
Start the app:
rails s
With the code from running the React on Rails generator above:
- Edit
app/views/hello_world/index.html.erband setprerendertotrue. - Refresh the page.
Below is the line where you turn server rendering on by setting prerender to true:
<%= react_component("HelloWorld", props: @hello_world_props, prerender: false) %>Note, if you got an error in your console regarding "ReferenceError: window is not defined",
then you need to edit config/webpacker.yml and set hmr: false and inline: false.
See rails/webpacker PR 2644 for a fix for this
issue.
- Configure
config/initializers/react_on_rails.rb. You can adjust some necessary settings and defaults. See file docs/basics/configuration.md for documentation of all configuration options. - Configure
config/webpacker.yml. If you used the generator and the default webpacker setup, you don't need to touch this file. If you are customizing your setup, then consult the spec/dummy/config/webpacker.yml example or the official default webpacker.yml.- Tip: set
compile: falsefor development if you know that you'll always be compiling with a watch process. Otherwise, every request will check if compilation is needed. - Your
public_output_pathmust match your custom Webpack configuration foroutputof your bundles. - Only set
cache_manifesttotruein your production env.
- Tip: set
-
React component are rendered via your Rails Views. Here's an ERB sample:
<%= react_component("HelloWorld", props: @some_props) %>
-
Server-Side Rendering: Your react component is first rendered into HTML on the server. Use the prerender option:
<%= react_component("HelloWorld", props: @some_props, prerender: true) %>
-
The
component_nameparameter is a string matching the name you used to expose your React component globally. So, in the above examples, if you had a React component named "HelloWorld", you would register it with the following lines:import ReactOnRails from 'react-on-rails'; import HelloWorld from './HelloWorld'; ReactOnRails.register({ HelloWorld });
Exposing your component in this way is how React on Rails is able to reference your component from a Rails view. You can expose as many components as you like, as long as their names do not collide. See below for the details of how you expose your components via the react_on_rails webpack configuration. You may call
ReactOnRails.registermany times. -
@some_propscan be either a hash or JSON string. This is an optional argument assuming you do not need to pass any options (if you want to pass options, such asprerender: true, but you do not want to pass any properties, simply pass an empty hash{}). This will make the data available in your component:# Rails View <%= react_component("HelloWorld", props: { name: "Stranger" }) %>
-
This is what your HelloWorld.js file might contain. The railsContext is always available for any parameters that you always want available for your React components. It has nothing to do with the concept of the React Context. See Render-Functions and the RailsContext for more details on this topic.
import React from 'react';

export default (props, railsContext) => {
  // Note wrap in a function to make this a React function component
  return () => (
    <div>
      Your locale is {railsContext.i18nLocale}.<br/>
      Hello, {props.name}!
    </div>
  );
};
See the View Helpers API for more details on react_component and its sibling function react_component_hash.
For the React on Rails view helper react_component to use your React components, you will have to register them in your JavaScript code.
Use modules just as you would when using Webpack and React without Rails. The difference is that instead of mounting React components directly to an element using React.render, you register your components to ReactOnRails and then mount them with helpers inside of your Rails views.
This is how to expose a component to the react_component view helper.
  // app/javascript/packs/hello-world-bundle.js
  import HelloWorld from '../components/HelloWorld';
  import ReactOnRails from 'react-on-rails';
ReactOnRails.register({ HelloWorld });You may want different code for your server-rendered components running server side versus client side. For example, if you have an animation that runs when a component is displayed, you might need to turn that off when server rendering. One way to handle this is conditional code like if (window) { doClientOnlyCode() }.
Another way is to use a separate webpack configuration file that can use a different server side entry file, like 'serverRegistration.js' as opposed to 'clientRegistration.js.' That would set up different code for server rendering.
For details on techniques to use different code for client and server rendering, see: How to use different versions of a file for client and server rendering. (Requires creating a free account.)
You have two ways to specify your React components. You can either register the React component (either function or class component) directly, or you can create a function that returns a React component, which we using the name of a "render-function". Creating a render-function allows:
- You to have access to the
railsContext. See documentation for the railsContext in terms of why you might need it. You need a Render-Function to access therailsContext. - You can use the passed-in props to initialize a redux store or set up react-router.
- You can return different components depending on what's in the props.
Note, the return value of a Render-Function should be either a React Function or Class Component, or an object representing server rendering results.
Do not return a React Element (JSX).
ReactOnRails will automatically detect a registered Render-Function by the fact that the function takes
more than 1 parameter. In other words, if you want the ability to provide a function that returns the
React component, then you need to specify at least a second parameter. This is the railsContext.
If you're not using this parameter, declare your function with the unused param:
const MyComponentGenerator = (props, _railsContext) => {
  if (props.print) {
    // This is a React FunctionComponent because it is wrapped in a function.
    return () => <H1>{JSON.stringify(props)}</H1>;
  }
}
Thus, there is no difference between registering a React Function Component or class Component versus a "Render-Function." Just call ReactOnRails.register.
Another reason to use a Render-Function is that sometimes in server rendering, specifically with React Router, you need to return the result of calling ReactDOMServer.renderToString(element). You can do this by returning an object with the following shape: { renderedHtml, redirectLocation, error }. Make sure you use this function with react_component_hash.
For server rendering, if you wish to return multiple HTML strings from a Render-Function, you may return an Object from your Render-Function with a single top-level property of renderedHtml. Inside this Object, place a key called componentHtml, along with any other needed keys. An example scenario of this is when you are using side effects libraries like React Helmet. Your Ruby code will get this Object as a Hash containing keys componentHtml and any other custom keys that you added:
{ renderedHtml: { componentHtml, customKey1, customKey2} }For details on using react_component_hash with react-helmet, see our react-helmet documentation.
- All errors from ReactOnRails will be of type ReactOnRails::Error.
- Prerendering (server rendering) errors get context information for HoneyBadger and Sentry for easier debugging.
React on Rails provides an option for automatic conversions of Rails *.yml locale files into *.json or `.js.
See the How to add I18n for a summary of adding I18n.
Browse the links in the Summary Table of Contents
Here are some highly recommended next articles to read:
- How React on Rails Works
- Webpack Configuration
- View Helpers API
- Caching and Performance: React on Rails Pro.
- Deployment.
Click to join React + Rails Slack.
Please click to subscribe to keep in touch with Justin Gordon and ShakaCode. I intend to send announcements of new releases of React on Rails and of our latest blog articles and tutorials.

- Slack Room: Contact us for an invite to the ShakaCode Slack room! Let us know if you want to contribute.
- forum.shakacode.com: Post your questions
- @railsonmaui on Twitter
- For a live, open source, example of this gem, see www.reactrails.com.
- See Projects using and KUDOS for React on Rails. Please submit yours! Please edit either page or email us and we'll add your info. We also love stars as it helps us attract new users and contributors.
- See NEWS.md for more notes over time.
Bug reports and pull requests are welcome. See Contributing to get started, and the list of help wanted issues.
Support React on Rails Pro development by becoming a Github sponsor and get these benefits.
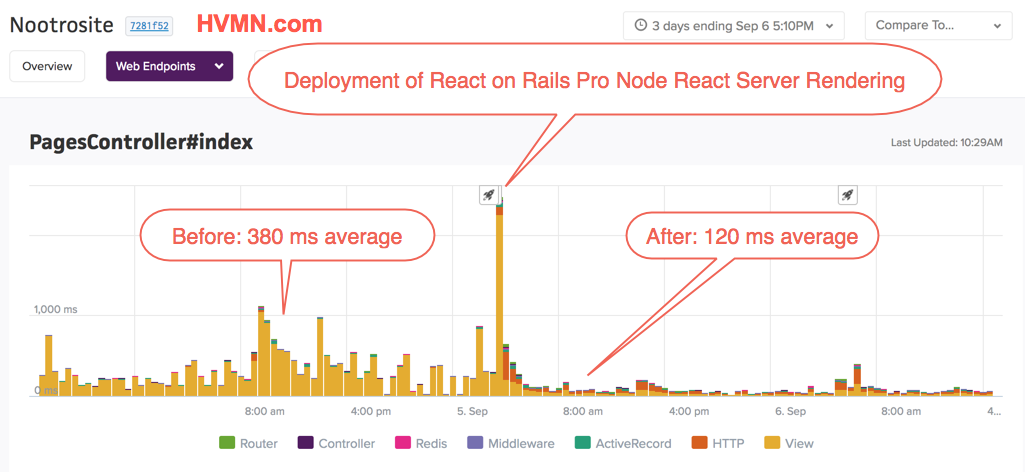
React on Rails Pro includes Node server rendering, fragment caching, code-splitting, and other performance enhancements for React on Rails. For a case study, see the article HVMN’s 90% Reduction in Server Response Time from React on Rails Pro. The Wiki contains more details.
The React on Rails Pro Support Plan can help!
- Optimizing your webpack setup to the latest Webpack for React on Rails including code splitting with loadable-components.
- Upgrading your app to use the current
rails/webpackersetup that skips the Sprockets asset pipeline. - Better performance client and server side.
- Best practices based on over 6 years of React on Rails experience on many production projects.
- Using Reason with (or without) React on Rails.
ShakaCode can also help you with your custom software development needs. We specialize in marketplace and e-commerce applications that utilize both Rails and React. Because we own HiChee.com, we can leverage that code for your app!
Please email Justin Gordon justin@shakacode.com, the maintainer of React on Rails, for more information.
Fragment caching is a React on Rails Pro feature. Fragment caching is a HUGE performance booster for your apps. Use the cached_react_component and cached_react_component_hash. The API is the same as react_component and react_component_hash, but for 2 differences:
- The
cache_keytakes the same parameters as any Railscacheview helper. - The props are passed via a block so that evaluation of the props is not done unless the cache is broken. Suppose you put your props calculation into some method called
some_slow_method_that_returns_props:
<%= cached_react_component("App", cache_key: [@user, @post], prerender: true) do
  some_slow_method_that_returns_props
end %>
Such fragment caching saves CPU work for your web server and greatly reduces the request time. It completely skips the evaluation costs of:
- Database calls to compute the props.
- Serialization the props values hash into a JSON string for evaluating JavaScript to server render.
- Costs associated with evaluating JavaScript from your Ruby code.
- Creating the HTML string containing the props and the server-rendered JavaScript code.
Note, even without server rendering (without step 3 above), fragment caching is still effective.
Default server rendering is done by ExecJS. If you want to use a Node.js server for better performing server rendering, email justin@shakacode.com. ShakaCode has built a premium Node rendering server that is part of React on Rails Pro.
HVMN Testimonial, by Paul Benigeri, October 12, 2018
The price we paid for the consultation + the React on Rails pro license has already been made back a couple of times from hosting fees alone. The entire process was super hands off, and our core team was able to focus on shipping new feature during that sprint.
ResortPass Testimonial, by Leora Juster, December 10, 2018
Justin and his team were instrumental in assisting us in setting design foundations and standards for our transition to a react on rails application. Just three months of work with the team at Shaka code and we have a main page of our application server-side rendering at exponentially improved speeds.
From Joel Hooks, Co-Founder, Chief Nerd at egghead.io, January 30, 2017:

For more testimonials, see Live Projects and Kudos.
The following companies support this open source project, and ShakaCode uses their products! Justin writes React on Rails on RubyMine. We use Scout to monitor the live performance of HiChee.com, Rails AutoScale to scale the dynos of HiChee, and HoneyBadger to monitor application errors. We love BrowserStack to solve problems with oddball browsers. Status Hero keeps the team posted on daily progress; it's so much better than live standups.


ShakaCode's favorite project tracking tool is ClubHouse. If you want to try ClubHouse and get 2 months free beyond the 14-day trial period, click here to use ShakaCode's referral code. We're participating in their awesome triple-sided referral program, which you can read about here. By using our referral code you'll be supporting ShakaCode and, thus, React on Rails!
Aloha and best wishes from Justin and the ShakaCode team!
ShakaCode is hiring passionate software engineers to work on our projects, including HiChee.
The gem is available as open source under the terms of the MIT License.