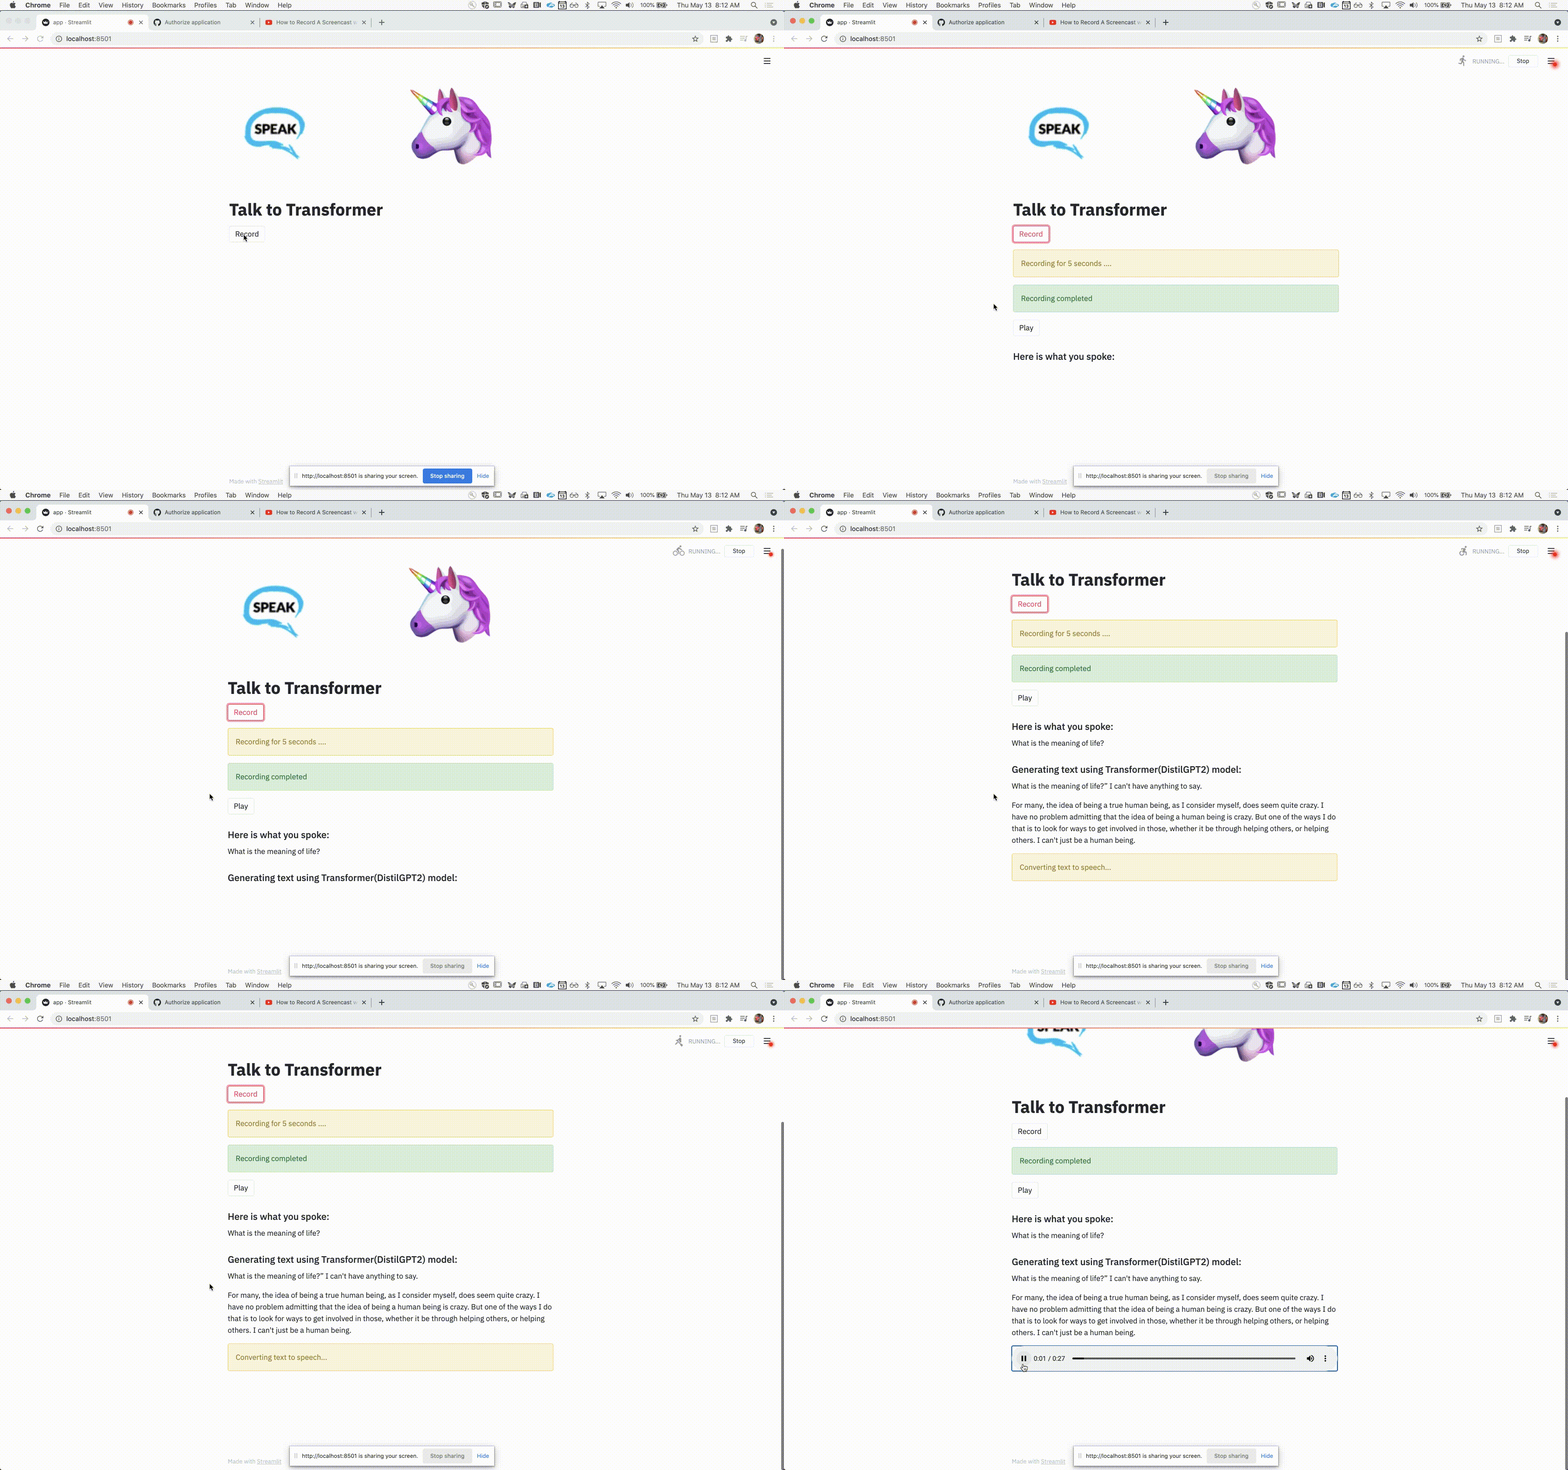
An application that talks back to you when you seed it with some words. Under the hood, a transformer model is used for text generation.
This app does these 3 things in sequence:
- Converts speech to text using Wave2Vec model from Huggingface
- Text generation using DistilGPT-2, which is another model from Huggingface library
- Converts text to speech using the Tacotron model from Coqui library
This app is inspired from the pre-existing web-app, which is a text only version. This app takes it to the next level where you can talk and listen to the generated text.
$ git clone https://github.com/kumar-abhishek/fsdl-talk-to-transformer
$ cd fsdl-talk-to-transformerYou can install the required packages using any
one of the 3 optionsbelow. However,Option 1is well tested and recommended. If you have to use other options, you would likely have to tweak the list of versions/packages in environment.yml from Option 1.
Please also note that since this has been developed and tested on a Mac OS, you may encounter some minor installation issues on other operating systems.
-
Download and install miniconda or anaconda if you don't have conda installed in your system.
-
Create a new environment 'tf' using the following command:
# if you need to install conda on ubuntu/debian based OS
eval "$(/root/miniconda3/bin/conda shell.bash hook)"

$ conda env create -f environment.yml

# to update the environment, make sure have already activated the environment
conda env update --file environment.yml
If an error like the one shown below occurs:
ResolvePackageNotFound:
    - appnope=0.1.0
    - libcxx=4.0.1
Just remove those packages from the file
environment.ymland rerun the above command. Then activate the environment by$ conda activate tf
-
If you face trouble installing packages, you may install using
setup.sh. If you use bash shell instead of zsh, edit line 2 ofsetup.shby replacing zsh with bash. i.e.eval "$(conda shell.zsh hook)"
Then run the following commands
$ chmod +x setup.sh
$ ./setup.sh
-
Install virtualenv using pip and create a virtual environment '.venv'
$ pip install virtualenv
$ virtualenv .venv
-
Activate the virtual environment '.venv' and install required packages
$ source .venv/bin/activate
$ pip install -r requirements.txt
-
First, check the info of the audio recording device of your system by running
$ python -m src.soundYou will receive output something like this:
pygame 1.9.6
Hello from the pygame community. https://www.pygame.org/contribute.html
src.sound - INFO - List of System's Audio Devices configurations:
src.sound - INFO - Number of audio devices: 2
src.sound - INFO - [('index', 0), ('name', 'MacBook Pro Microphone'), ('maxInputChannels', 1), ('defaultSampleRate', 44100.0)]
src.sound - INFO - [('index', 1), ('name', 'MacBook Pro Speakers'), ('maxInputChannels', 0), ('defaultSampleRate', 44100.0)]

src.sound - INFO - Audio device configurations currently used
src.sound - INFO - Default input device index = 0
src.sound - INFO - Max input channels = 1
src.sound - INFO - Default samplerate = 44100
-
Check if the
index,maxInputChannelsanddefaultSampleRateof your recording device or microphone (eg. MacBook Pro Microphone) matches with the device configurations currently used (both displayed in the output). The configurations for my recording device is:index = 0 maxInputChannels = 1 defaultSampleRate = 44100.0
-
Open
settings.pyand modify the values accordingly in line numbers 38 to 40# Audio configurations INPUT_DEVICE = 0 MAX_INPUT_CHANNELS = 1 # Max input channels DEFAULT_SAMPLE_RATE = 44100 # Default sample rate of microphone or recording device
-
Execute the python file
app.pyusing streamlit$ streamlit run app.py -
The webapp is launched in your browser and opened automatically as shown below. You may also open it by visiting http://localhost:8501
-
Click
Recordand say something. It records for 5 seconds(configurable) and saves the output wav file torecording/recorded.wav. -
Click
Playto listen to the recorded speech. -
Click
Play generated textto play the generated text
If you want to experiment by training the model used for text generation(in generate_text.py file) yourself with your own data or the data used currently, follow the steps below:
- Open the file notebooks/train_text_generator.ipynb in Google Colab(link at the top of the file) and run all the cells.
- You would have to save the trained model and use that model in generate_text.py instead of using the pre-trained model from huggingface library.
If you have any issues with the app, please report it here: Issues
Talk-To-Transformer is licensed under the GNU GPLv3 license.
credits: Heavily influenced from this repo
