Replaces original Tuya firmware on Beca thermostat with ESP8266 wifi module. The firmware is tested with following devices:
- BHT-002-GBLW (floor heating)
- BAC-002-ALW (heater, cooling, ventilation)
- BHT-6000
- BHT-002-GCLW (Water/Gas Boiler)
Other models will work in some way also, but other functions must be implemented additionally.

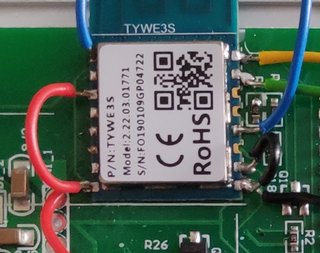
Compatible devices looks inside like this. On the right you can see the ESP8266 module (TYWE3S)

Modifying and flashing of devices is at your own risk. I'm not responsible for bricked or damaged devices. I strongly recommend a backup of original firmware before installing any other software.
- Configuration of Wifi and MQTT connection via web interface
- Firmware upload via web interface
- NTP and time zone synchronisation to set the clock of thermostat
- Reading of parameters via MQTT: desiredTemperature; actualTemperature; deviceOn:true|false; manualMode:true|false; ecoMode:true|false; locked:true|false
- Only BHT-002-GBLW: actualFloorTemperature (external temperature sensor)
- Only BAC-002-ALW: fanSpeed:auto|low|medium|high; systemMode:cooling|heating|ventilation
- Setting of all parameters above via MQTT
- Reading and setting of time schedules
- Parameter 'schedulesDayOffset' to correct weekend, which are not starting on Saturday in some regions. The original firmware defines weekday 1-5 as workdays and weekday 6-7 as weekend. If your weekend starts on friday at example, the firmware will send the actual date + 1 day offset to the thermostat, to start the weekend (day 6) one day earlier. This offset can be defined by parameter 'schedulesDayOffset'.
The thermostat is working independent from the Wifi-Module. That means, functionality of the thermostat itself will not and can't be changed. This firmware replaces only the communication part of the thermostat, which is handled by the ESP module. The firmware will partially work with other devices too. The Tuya devices has a serial communication standard (MCU commands) which is only different in parameters. Unknown commands will be forwarded to the MQTT server.
There are many ways to get the physical connection to ESP module. I soldered the connections on the device for flashing. Maybe there is a more elegant way to do that. It's quite the same, if you try to flash any other Sonoff devices to Tasmota. So get the inspiration for flashing there: https://github.com/arendst/Sonoff-Tasmota/wiki
Following connections were working for me (refer to ESP-12E pinout):
- Red: ESP-VCC and ESP-EN connected to Programmer-VCC (3.3V)
- Black: ESP-GND and ESP-GPIO15 connected to Programmer-GND
- Green: ESP-RX connected to Programmer-TX
- Yellow: ESP-TX connected to Programmer-RX
- Blue right: ESP-GPIO0, must be connected with GND during power up
- Blue left: ESP-Reset, connect to GND to restart the ESP
Flasing will fail, if the thermostat is still powered during this operation.
Don't skip this. In case of malfunction you need the original firmware. Tasmota has also a great tutorial for the right esptool commands: https://github.com/arendst/Sonoff-Tasmota/wiki/Esptool. So the backup command is:
esptool -p <yourCOMport> -b 460800 read_flash 0x00000 0x100000 originalFirmware1M.bin
for example:
esptool -p /dev/ttyUSB0 -b 460800 read_flash 0x00000 0x100000 originalFirmware1M.bin
Get the ESP in programming mode first. Erase flash:
esptool -p /dev/ttyUSB0 erase_flash
After erasing the flash, get the ESP in programming mode again. Write firmware (1MB)
esptool -p /dev/ttyUSB0 write_flash -fs 1MB 0x0 ThermostatBecaWifi.bin
- Remove all connections from flashing
- Power on the device. The device will operate normally because this is untouched by the ESP module.
- Switch the device off with the power button. The device is not really off, only the display.
- Hold the 'Temp down' button for 5 to 8 seconds, until the Wifi logo and display is blinking. This is the same procedure like connecting to the Tuya-Android-App
- The ESP will start a Wifi Access Point. SSID is 'Thermostat_Beca-Wifi_ChipID', the password is '12345678'. Connect to this AP
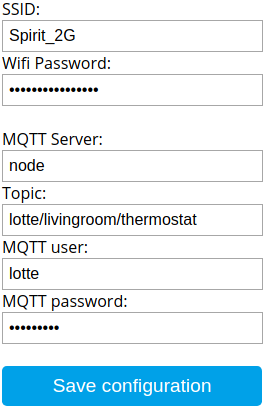
- Open the web browser and go to '192.168.4.1', the configuration page will prompt up. Go to 'Configure device'. There you can type in the parameters for your router(2G), password and also the connection to your MQTT broker, topic(<YOUR_TOPIC>) and user.
- Save settings, the ESP will restart, the thermostat is switched off
- Switch on the device. The clock should update automaticly within 30 seconds via NTP. If not, the wireless connection failed. Restart the configuration.
Your MQTT broker receive all messages to <YOUR_TOPIC>. The following commands will be send from the device:
- <YOUR_TOPIC>/state at every change on the device and/or every 5 minutes
- <YOUR_TOPIC>/schedules at the start of the device, at every change or request
- <YOUR_TOPIC>/mcucommand can contain 2 strings: 'unknown' for unknown commands received from MCU or 'mcu: <0x0.>' for logged messages from MCU, if command 'logMcu' enabled this before (default: disabled)
You can send the following commands to the device:
- <YOUR_TOPIC>/schedules/0 to request for the schedules. The schedules come back in 3 separate messages for workday, saturday and sunday
- <YOUR_TOPIC>/state/0 to request the state record of the device.
- <YOUR_TOPIC>/clock/0 to request detail info about time synchronization results.
- <YOUR_TOPIC>/webServer/true|false can be called with an bool to switch the web service on or off
- <YOUR_TOPIC>/mcucommand sends directly serial mcu commands to the device. The has to be a string in hexa-form without the checksum byte at the end, e.g. to set the desired temperature to 24.5C: "55 aa 01 07 00 08 02 02 00 04 00 00 00 31". This command is only for testing of unknown Tuya MCU commands and will not be required for regular work with the device.
- <YOUR_TOPIC>/logMcu/true|false enables or disables forwarding of all MCU messages to the MQTT broker. Only for testing.
The state record of the device is send in follwing json structure:
{
  "deviceOn":false,
  "desiredTemperature":21.5,
  "actualTemperature":20.5,
  "actualFloorTemperature":20, //only_BHT-002-GBLW
  "manualMode":false,
  "ecoMode":false,
  "locked":false,
  "fanSpeed":"auto|low|medium|high", //only_BAC-002-ALW
  "systemMode":"cooling|heating|ventilation", //only_BAC-002-ALW
  "thermostatModel": "BHT-002-GBLW",
  "logMcu": false,
  "schedulesDayOffset": 0,
  "weekend": false, //true_indicates_that_weekend_schedule_is_running_at_device
  "clockTime": "2019-05-03 12:04:26",
  "validTime": true,
  "timeZone": "Asia/[...]",
  "lastNtpSync": "2019-05-03 12:03:30",
  "firmware": "0.91",
  "ip":"192.168.0.174",
  "webServerRunning":false
 }
You can set the parameters via MQTT with the parameter name and the direct value as payload: <YOUR_TOPIC>/ and value in payload. e.g.: <YOUR_TOPIC>/desiredTemperature; payload: 22.5
The schedules are only sent once at the start, at every change or on request. The structure of json (for workday):
{
  "workday":{
    "0":{"h":"06:00","t":20},
    "1":{"h":"08:00","t":15},
    "2":{"h":"11:30","t":15},
    "3":{"h":"13:30","t":15},
    "4":{"h":"17:00","t":22},
    "5":{"h":"22:00","t":15}
  }
}
Same 2 other messages are send for "saturday" and "sunday". The schedules can be set/modified with same structure or only parts of it. To set for example the schedule 0 for workday, send <YOUR_TOPIC>/schedules with following json:
{
  "workday":{
    "0":{"h":"6:00","t":22}
  }
}
Only the specified parts of schedules will be changed.
Flash the original firmware (see installation). Write me a message with your exact model and which parameter was not correct. Maybe your MQTT-server received some unknown messages - this would be also helpful for me. Again: I have tested this only with model BHT-002-GBLW. If you have another device, don't expect that this is working directly.
For build from sources you can use the Arduino-IDE or Sloeber. All sources needed are inside the folder 'src'. You will need some libraries: esp8266, ArduinoJson, DNSServer, EEPROM, NTPClient, TimeLib - It's all available via board and library manager inside of ArduinoIDE