Note that Hyper-V is not available on the Windows 10 Home edition, and requires Windows 10 Pro or equivalent.
- Open "Programs and Features" in the Control Panel (
appwiz.cpl). - Select "Turn Windows features on or off" in the sidebar and check "Hyper-V" in the dropdown, then press OK.
Note: In order to download the latest release which contains bugfixes you should use these instructions instead.
- Open the Windows 10 settings app, and select the "Apps" panel.
- Under the "Apps & features" tab, press "Optional features."
- Click on "Add a feature", then check "OpenSSH Client" and press "Install."
In order to finish activating the features you must reboot Windows.
(See here for newer instructions on setting up Hyper-V networking.)
If you need the VM to directly connect to your network, use an External Switch instead. An Internal Switch will create a subnet inside the host computer that VMs can connect to. You can give these VMs access to the internet by using Windows Internet Connection Sharing.
To set up an Internal Switch with Internet Connection Sharing, go through the following steps:
- Inside the Hyper-V Manager (
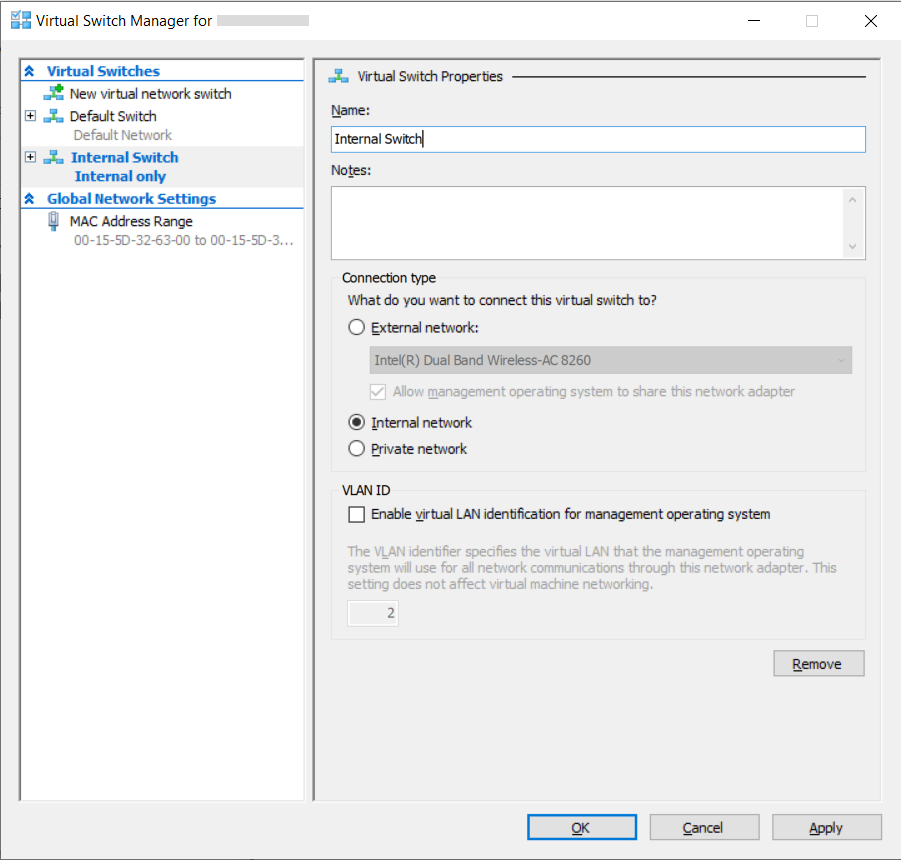
virtmgmt.msc), open the Virtual Switch Manager. Create and name your Internal Switch.
- Open the Network Connections Control Panel (
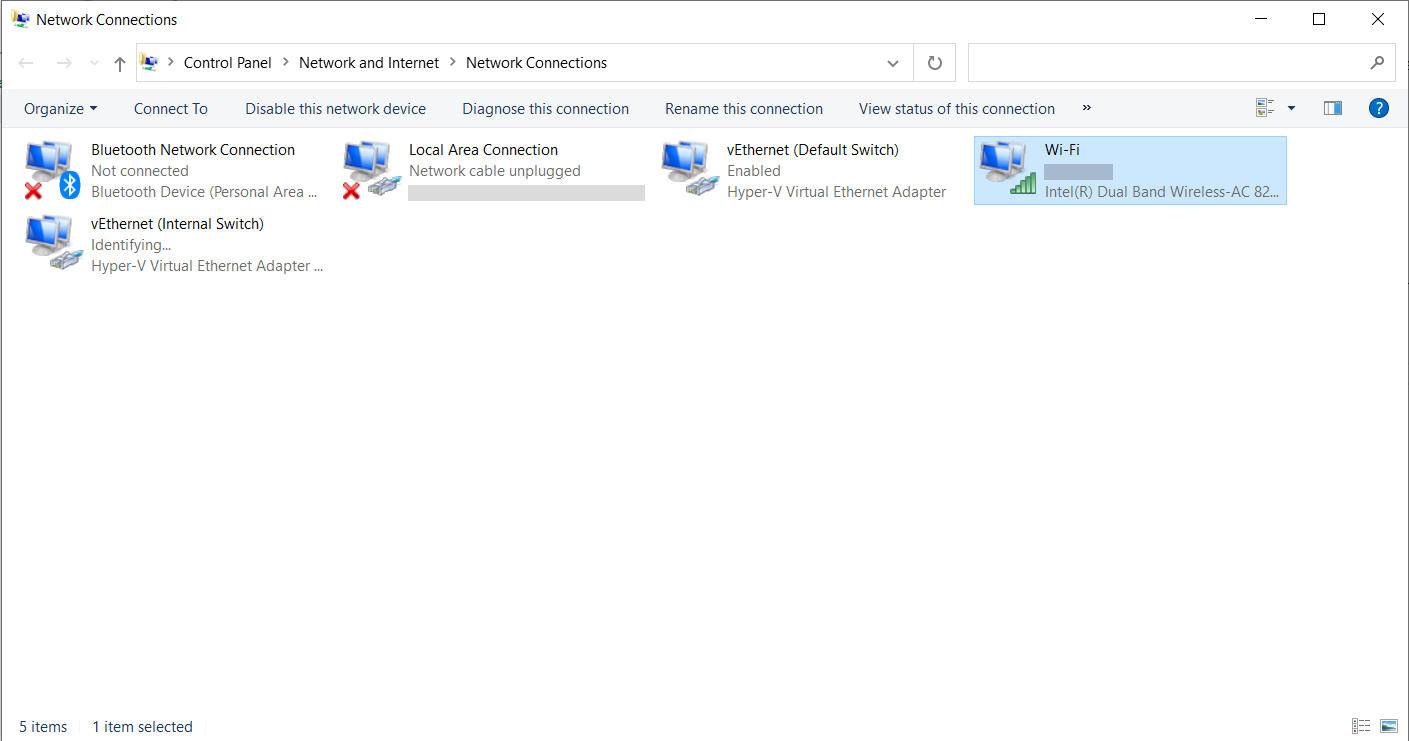
ncpa.cpl). Select a network adapter that has internet access, that you would like to connect the Internal Switch to.
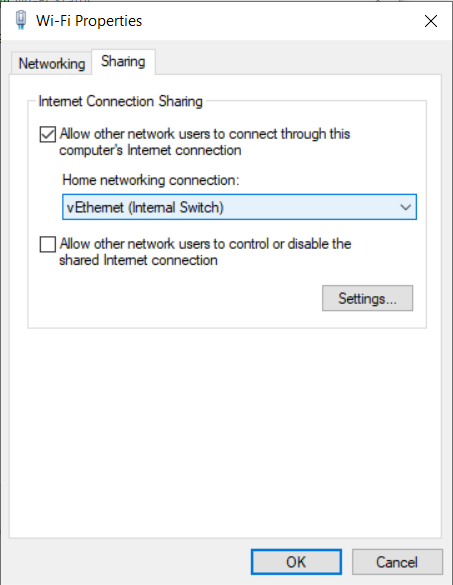
- Open the Sharing tab in the adapter's properties panel, check the "Allow other network users to connect through this computer's Internet connection" box. Select the Internal Switch as the "Home networking connection."
Note: If you have issues with Windows Internect Connection Sharing not working after a reboot or ICS service restart, check this help page from Microsoft.
Open the Hyper-V Manager (virtmgmt.msc), and select New > Virtual Machine... to open the New Virtual Machine Wizard.
Go through the wizard as you normally would but take note of the following settings:
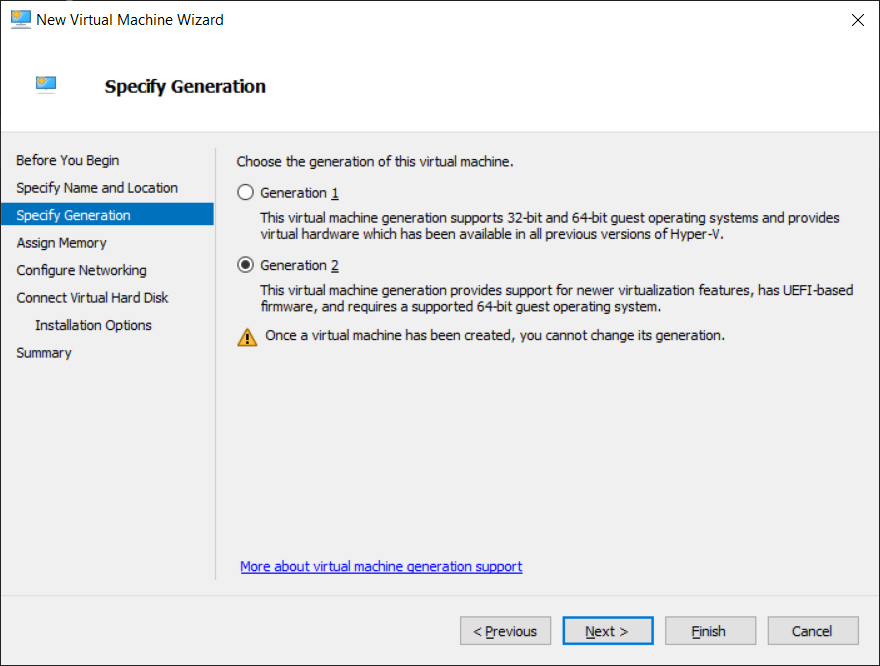
- When specifying the Hyper-V Generation, use Generation 2 to create a UEFI virtual machine.
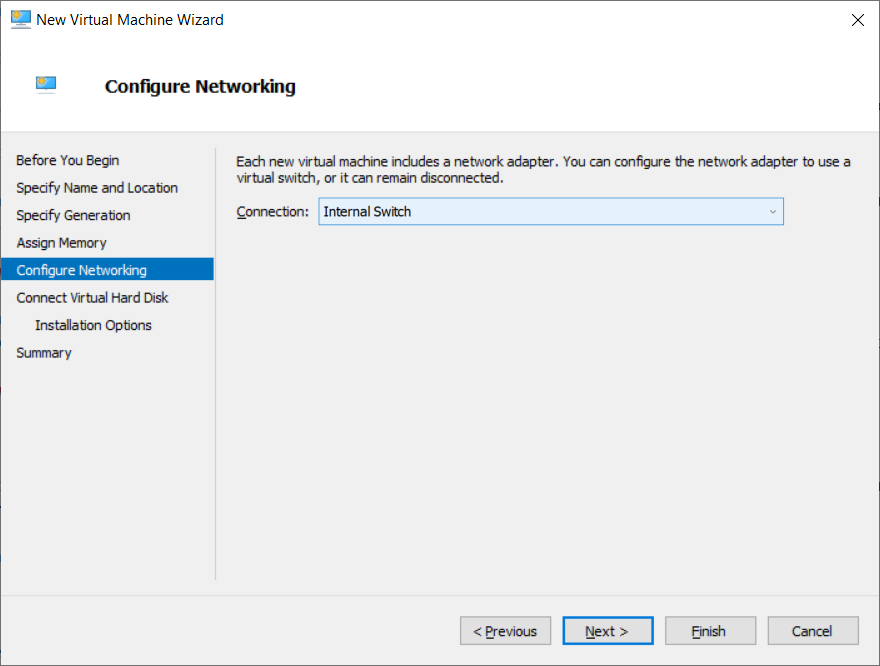
- Select the Internal Switch you created when configuring networking.
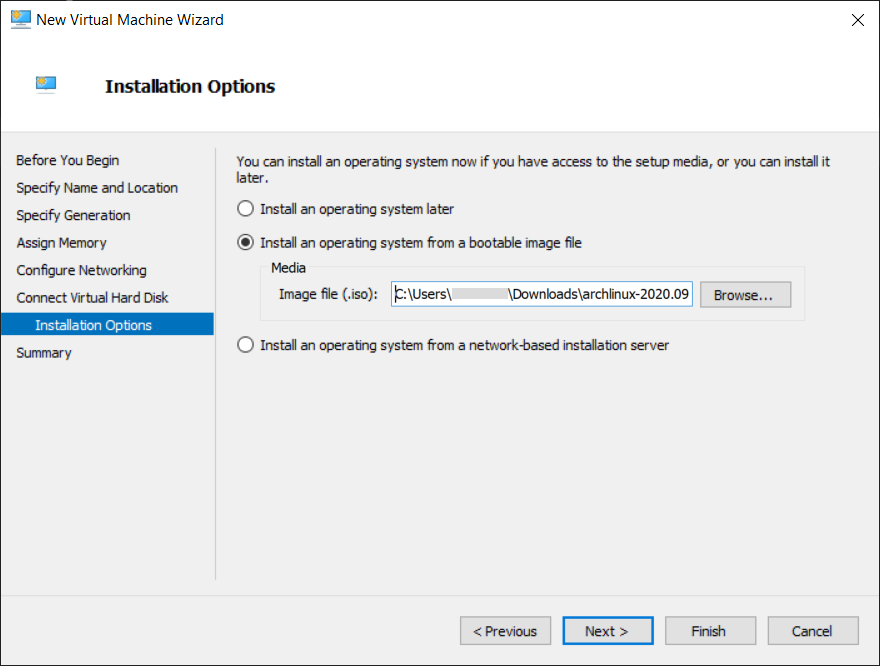
- Select "Install an operating system from a bootable image file" and set it to your Arch Linux installation image.
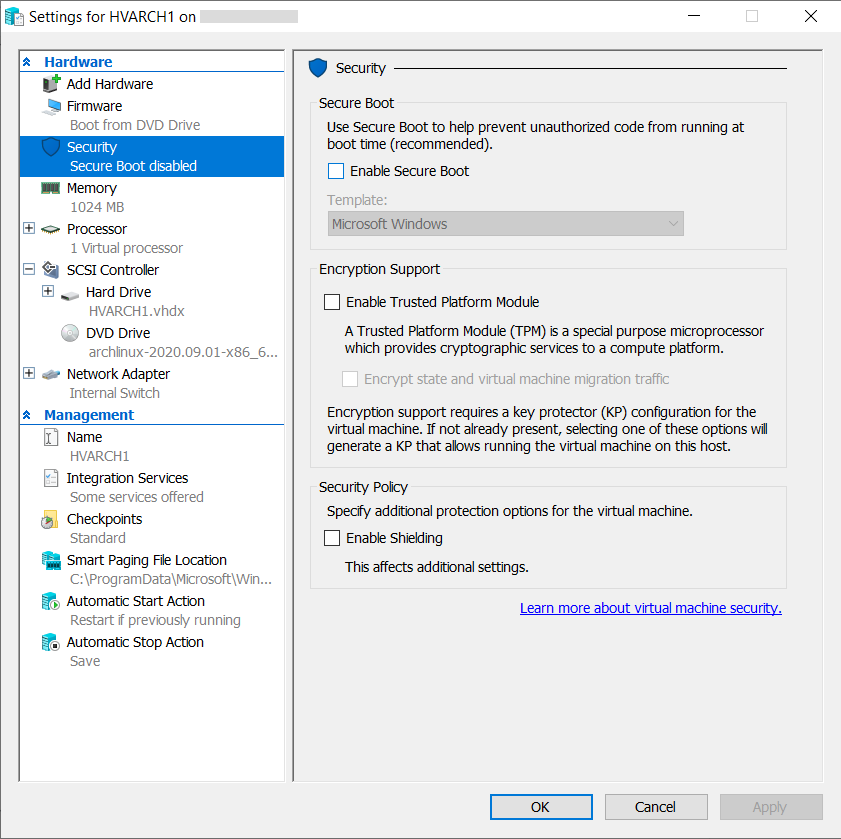
Secure Boot requires that the bootloader be signed with Microsoft's key. In order to boot into the Arch Linux installation image you need to disable Secure Boot. In your virtual machine's settings go to the Security tab and uncheck "Enable Secure Boot"
It is easier to interact with the installation image via SSH. To do so, go through the following steps:
- After having started the virtual machine, set your keyboard layout using
loadkeys.
# loadkeys fr
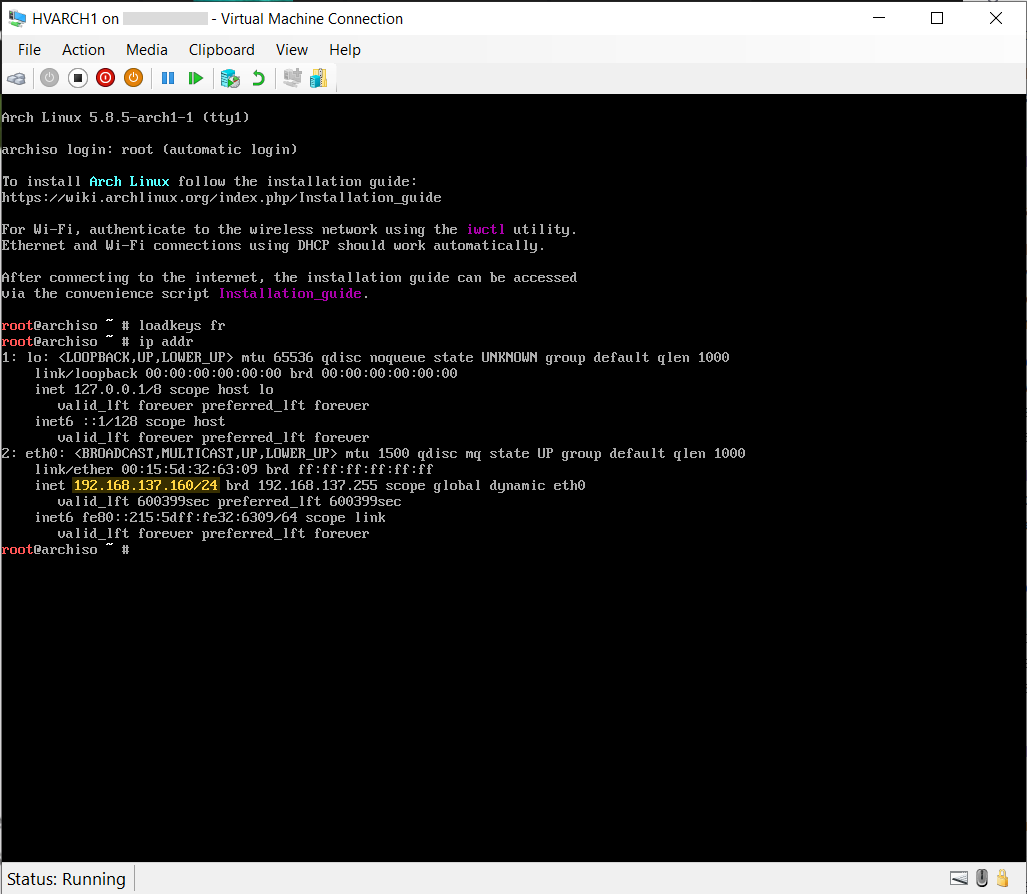
- Note down the DHCP-assigned IP address of the virtual machine.
# ip addr
- Set the password of the root user so that you can connect to it via SSH.
# passwd
Now you can connect to the installation image using the root account.
The next steps in order to install are well detailed in the wiki's installation guide. You should follow those instructions but here are some steps that are specific to our virtual machine:
Since we are using UEFI, you must create an EFI system partition for the BIOS to find the bootloader in.
# fdisk /dev/sda

Welcome to fdisk (util-linux 2.36).
Changes will remain in memory only, until you decide to write them.
Be careful before using the write command.

Device does not contain a recognized partition table.
Created a new DOS disklabel with disk identifier 0x93c960bd.

Command (m for help): n
Partition type
   p   primary (0 primary, 0 extended, 4 free)
   e   extended (container for logical partitions)
Select (default p): ↵

Using default response p.
Partition number (1-4, default 1): ↵
First sector (2048-266338303, default 2048): ↵
Last sector, +/-sectors or +/-size{K,M,G,T,P} (2048-266338303, default 266338303): +512M

Created a new partition 1 of type 'Linux' and of size 512 MiB.

Command (m for help): n
Partition type
   p   primary (1 primary, 0 extended, 3 free)
   e   extended (container for logical partitions)
Select (default p): ↵

Using default response p.
Partition number (2-4, default 2): ↵
First sector (1050624-266338303, default 1050624): ↵
Last sector, +/-sectors or +/-size{K,M,G,T,P} (1050624-266338303, default 266338303): ↵

Created a new partition 2 of type 'Linux' and of size 126.5 GiB.

Command (m for help): w
The partition table has been altered.
Calling ioctl() to re-read partition table.
Syncing disks.In this case we are using FAT for the EFI System Partition and ext4 for the root partition.
# mkfs.fat /dev/sda1
# mkfs.ext4 /dev/sda2
The EFI System Partition is generally mounted at /boot on the root partition.
# mount /dev/sda2 /mnt
# mkdir /mnt/boot
# mount /dev/sda1 /mnt/boot
Use pacstrap to install the base package, along with the Linux kernel, the DHCP client, SSH and nano.
# pacstrap /mnt base linux linux-firmware dhcpcd openssh nano
- Generate an
fstabfile:
# genfstab -U /mnt >> /mnt/etc/fstab
- Change root into the new system:
# arch-chroot /mnt
- Set the timezone:
# ln -sf /usr/share/zoneinfo/Europe/Paris /etc/localtime
- Edit
/etc/locale.genand uncommenten_US.UTF-8 UTF-8, then runlocale-gen.
# nano /etc/locale.gen
# locale-gen
- Create
/etc/locale.confand set theLANGvariable:
# nano /etc/locale.conf
LANG=en_US.UTF-8- Set the framebuffer keyboard layout:
# nano /etc/vconsole.conf
KEYMAP=fr- Set the hostname and add entries to the hosts file.
# nano /etc/hostname
hv-arch1
# nano /etc/hosts
127.0.0.1	localhost
::1 localhost- Enable the DHCP client service along with the SSH server.
# systemctl enable dhcpcd.service
# systemctl enable sshd.service
- Remove default password on the root account to make it passwordless:
# passwd -d root
- Allow passwordless and root logins on SSH by adding the following to the config:
# nano /etc/ssh/sshd_config
...
PermitEmptyPasswords yes
PermitRootLogin yes
Note: No ports of the virtual machine should be exposed outside of the host, so setting root as passwordless is not very problematic since it can only be accessed straight from the host.
The Linux kernel supports booting off of EFI directly without the need for a bootloader when it is configured with
CONFIG_EFI_STUB support. The kernel parameters are stored in the EFI parameters in the BIOS and passed on to the EFI
stub in the kernel on startup.
-
Exit out of the
chrootusingexitor Ctrl + D. -
First find the partition UUID of the root partition by using
blkid:
# blkid /dev/sda2
- Use
efibootmgrto create an EFI entry for the Linux kernel, and use the PARTUUID from the root partition.
# efibootmgr --disk /dev/sda --part 1 --create --label "Linux Kernel" --loader /vmlinuz-linux --verbose \
    --unicode 'root=PARTUUID=XXXXXXXX-XX rw initrd=\initramfs-linux.img'
- Poweroff the installation image cleanly:
# poweroff
- In the virtual machine settings, remove the installation image from the SCSI Controller.
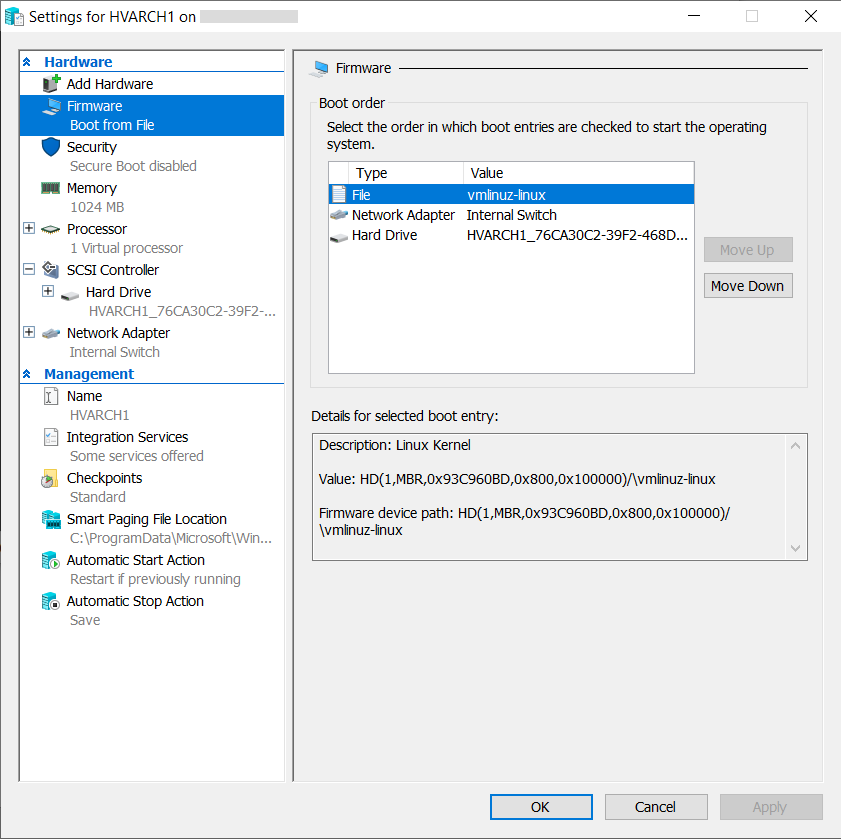
Arch Linux is now installed on the virtual machine. You should be able to see the vmlinuz-linux kernel file in the
Firmware tab.
The virtual machine's IP address is assigned by DHCP. In order to add the virtual machine to the HOSTS file on the
Windows side, you need to request an IP when doing the DHCP handshake. To do this edit /etc/dhcpcd.conf. In this case
we are requesting 192.168.137.10.
# nano /etc/dhcpcd.conf
...
request 192.168.137.10
You now add the entry to the HOSTS file and reboot the VM:
C:\Windows\System32\drivers\etc\hosts
...
192.168.137.10	hv-arch1
You now can SSH into the machine using ssh root@hv-arch1. Note that you can use a Desktop shortcut with this command
as a target so that you can customize the look of cmd.exe. When you edit the properties in cmd.exe they will attach
to the shortcut you used to launch. (Recommend using the Underscore cursor instead of the default Legacy one.)
Use the following commands to create a passwordless account with sudo privileges:
# pacman -Syu sudo
...
# useradd -m username
# usermod -aG wheel username
# passwd -d username
Also uncomment the line from the /etc/sudoers file to enable the wheel group privileges:
# EDITOR=nano visudo
...
%wheel ALL=(ALL) ALLIt is a good idea to occasionally to refresh the mirror list. There is a service packaged with reflector that does
this on system startup. Under normal circumstances you will not restart the virtual machine often since Hyper-V suspends
its state when you shut down Windows.
$ sudo pacman -S reflector
$ sudo systemctl enable reflector.service
You can configure the parameters in /etc/xdg/reflector/reflector.conf.
Zsh is a good alternative shell to the default Bash shell. The Arch Linux installation images uses a Zsh configuration
that you can install straight from pacman called grml zsh.
$ sudo pacman -S zsh grml-zsh-config
$ sudo chsh -s /bin/zsh username
$ touch ~/.zshrc
Note: You do not usually require root privileges to change your own shell but by default PAM is not configured to allow passwordless accounts to change shell.
Use WinSCP in "Explorer" mode to easily access the virtual machine's files. It is recommended to change the default
permissions when transferring files to 644 for files and 755 for directories. You can do so by going to
Preferences > Transfer, then selecting "Default" clicking on "Edit..." and enabling "Set permissions".
(These are steps that probably need to be incorporated into the guide, but I haven't found the time)
- Setting the numbers of processor cores to max in Hyper-V VM settings!
- Install and enable Hyper-V extensions
- Recommend setting swappiness to 0
- Using the Arch User Repository (AUR)
