
Residuum is a line following robot. It's a simple construction based on the Arduino board, an array of eight reflectance sensors and two DC motors.

The main goal of this project was to expedite participation in a contest of robots. Such an attitude enabled me to finish this construction in a short time (~2 months) but also resolved many of my doubts - whenever I had a few possible solutions, I chose the easier one. Of course such an approach also has its drawbacks - Residuum is definitely not a speed daemon.
The project, however, is complete and I significantly expanded my knowledge in robotics during this time. The robot contest was also a very good lesson for such beginner as I. I have many ideas that I want to implement so this is definitely not my last line follower.
Let's go briefly through all construction details.
Arduino Leonardo is a Residuum brain. I used this board because years ago I attended soldering workshops and during this event we assembled Arduino Leonardo. So it's not an original board but rather my own production. It has an ATmega32U4 microcontroller with 32kB of flash memory, 2.5kB RAM, 1kB EEPROM, built in USB 2.0 controller and a few standard LEDs and buttons. Nothing fancy, but, more importantly in this project, it's sort of a "plug-n-play" device.

Next body part - eyes. I used the Pololu QTR-8RC component with 8 reflectance sensors to detect a line ahead of my robot. This module is specially designed for line following robots. Moreover, the supplier provides a library for the Arduino family of boards and all you have to do is call the readLine() function. It’s as simple as that. Another advantage of the QTR-8RC is that it works with digital I/O pins so that a limited number of analog-to-digital converters is not a problem (e.g. my Arduino has only 6 of them).

Ok, so we have covered the brain and the eyes - we can see the line and we can decide where to go. Now we must move the robot in a given direction.
Residuum uses a Pololu DRV8835 dual motor driver to control two DC motors. This tiny H-bridge module can drive a pair of motors with standard PWM speed control and also separates the main circuit from the motor’s voltage supply.
I used a Dualsky Li-Pol 7.4V (220mAh 25C 2S) battery as a power source for the Residuum. My main criteria for choosing this part was weight. This battery weighs only 16g and can power my robot for a few minutes of driving. It's more than enough for the robot contest where you can change your battery for a fresh one even every single ride.
The voltage from the two-cell Li-Pol is ideal for motors but it's a bit too high for the digital part of my Residuum. I had to use a Pololu D24V10F3 step-down voltage regulator, which steps the 7.4V down to 3.3V.
Last but not least - LCD screen and a few tactile switches. This is the interface between me and my robot. I used a SparkFun Graphic LCD 84x48 (which is popularly known as the screen from the Nokia 5110) to display and control all of the robot’s settings and functions.

All of these parts were soldered onto a single board in the shape of the Arduino Shield. I used a 50 x 70 mm PCB prototype matrix board, on which I soldered the following circuit:

Finally, something interesting - motors! Residuum uses two Pololu 30:1 micro motors (Micro Metal Gearmotor MP 6V) to move forward and change direction. To be honest, I didn't spend much time to calculate if this is the best choice in my case. I've seen that many people are using those motors, so I ordered them as well. The torque is high enough to move my construction smoothly. I also bought two Pololu 60×8mm wheels, Pololu motor brackets, and a Pololu ball caster (3/8" Plastic Ball) which is placed at the front of my Residuum. Buying my components from the same manufacturer assures me that everything will fit together perfectly.

Of course all those elements have to be attached to some type of chassis. In this case I used 3D print technology. The Residuum was designed in SketchUp - a very simple and freely available program for 3D modeling. It took me only a few hours to prepare a model from scratch and to find somebody on [3D Hubs] (https://www.3dhubs.com/) who will print it. It's really an amazing feeling when something from your screen transform into a physical object in a matter of hours.

Maybe the Residuum chassis does not follow the latest design fashions but it does combine with other parts perfectly.
The Residuum program is written in C++. I used the PlatformIO environment to manage the build process, requirements, and testing. The PlatformIO toolset provides many useful features like CI integration and an Atom editor plugin. It really helped out quite a bit to find myself back again in the world of old-school C++.
The main ‘following’ algorithm is based on the PID controller and, more precisely, uses only two members, P and D. A brief example of code would serve the reader more suitably than a lengthy description.
void Follower::follow() {
  int error = this->lineDetector.detectLine();
  int speedDelta = this->kP * error + this->kD * (error - this->lastError);
  this->lastError = error;
  this->motorsDriver.setLeftMotorSpeed(this->motorsDriver.getBaseMotorSpeed() + speedDelta);
  this->motorsDriver.setRightMotorSpeed(this->motorsDriver.getBaseMotorSpeed() - speedDelta);
}
The above few lines are the most important of the Residuum codebase. Let’s sprint through them. The detectLine() function returns 0 if the line is precisely under the middle sensor, -X if its under the leftmost, and +X if its under the rightmost. In my case (8 sensors) X equals 3500 (1000 per sensor), so detectLine() returns values between -3500 and 3500. When a "line error" occurs, we can calculate the delta which should be applied to our motors. I'm using here a simple version of a PD controller that calculates the motor’s speed delta based on the current error and the previous one. Finding the correct value of each member gain (kP and kD) is the trickiest part of such an algorithm. With a calculated speed delta, we can change the speed of each motor.
All settings like the kP and kD values, the motor’s base speed, etc, are available via a menu system that I implemented especially for this project. All menu items are rendered on an LCD screen and the user can move between them with tactile switches. My menu configuration looks like this:
menu.addItem(new ActionMenuItem("FOLLOW", new FollowCommand(lineDetector, motorsDriver, EDIT_BUTTON_PIN)));
menu.addItem(new ActionMenuItem("CALIBRATE", new CalibrateCommand(qtr)));
menu.addItem(new IntegerValueMenuItem("BASE SPEED", settings.motorsBaseSpeed, new UpdateMotorsBaseSpeedCommand()));
menu.addItem(new FloatValueMenuItem("KP", settings.followerKp, FOLLOWER_KP_BASE, new UpdateFollowerKpCommand()));
menu.addItem(new FloatValueMenuItem("KD", settings.followerKd, FOLLOWER_KD_BASE, new UpdateFollowerKdCommand()));
During development I tried to implement all parts of the ‘OS Residuum’ program as standardized C++ libraries, without messing around with the more proprietary Arduino-specific code. This approach affords me the ability to closely test the entire codebase effortlessly in my local environment. Moreover, this code is now portable. Of course, there must be a connection between my code and the Arduino. This thin layer is realized as an implementation of a few abstract base classes that act as interfaces in my architecture.
Below you will find a list of all of Residuum’s parts and ancillary associated expenses. As I said, I didn't buy my Arduino, but I think that it should be listed here, because it's comparatively an expensive part of the robot. On the other hand, I haven’t itemized here some common (and inexpensive, as well) elements like resistors, wires, solder, etc.
- Pololu 30:1 Micro Metal Gearmotor MP 6V x 2 - 129,80 PLN
- Pololu Ball Caster with 3/8" Plastic Ball - 7,90 PLN
- Pololu QTR-8RC Reflectance Sensor Array - 39,90 PLN
- Pololu Wheel 60×8mm Pair Black - 29,90 PLN
- Pololu DRV8835 Dual Motor Driver Carrier - 17,90 PLN
- Pololu 3.3V, 1A Step-Down Voltage Regulator D24V10F3 - 30,90 PLN
- Pololu Micro Metal Gearmotor Bracket Pair Black - 18,50 PLN
- Dualsky Li-Pol 220mAh 25C 2S 7.4V - 22,90 PLN
- SparkFun Graphic LCD 84x48 - Nokia 5110 - 38,90 PLN
- PCB Prototype Matrix Board 50 x 70 mm - 4,50 PLN
- Arduino Leonardo - 88,00 PLN
- 3D print via 3dhubs.com - 61,90 PLN
Sum: 491 PLN (110 EUR / 125 USD)
I achieved the main goal of this project - I took part in a robot contest, but... I placed almost last. Only two LEGO-based robots were slower than me. My best time was 13.046 while the fastest robot finished the same track in 6.683. To me, this means that I can't upgrade Residuum. I realize now that I must build something from scratch, but this time with renewed requirements. Going forward I will focus on the robot’s weight and speed.
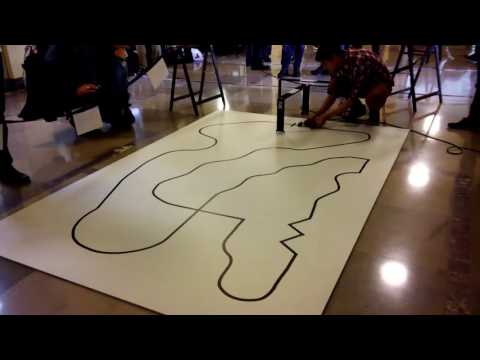
One of my fastest rides from Robocomp 2016 at Kraków, Poland:
Residuum during Robomaticon 2017 at Warsaw, Poland:
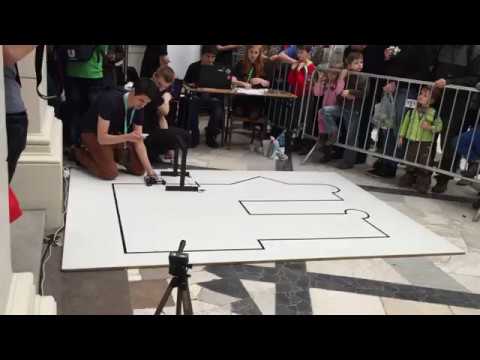
For this contest I upgraded Residuum a little bit. Instead of displaying all robot settings on an LCD screen and using buttons to interact with Residuum, I added a Bluetooth module (HC-08, 26,90 PLN) and implemented a simple Android application - LF Cockpit. All Bluetooth related code is placed in bluetooth branch.
The robot dimensions:
- length: 19 cm
- width: 14 cm
- height: 6 cm
The Residuum weights 166 g with a Li-Pol battery.