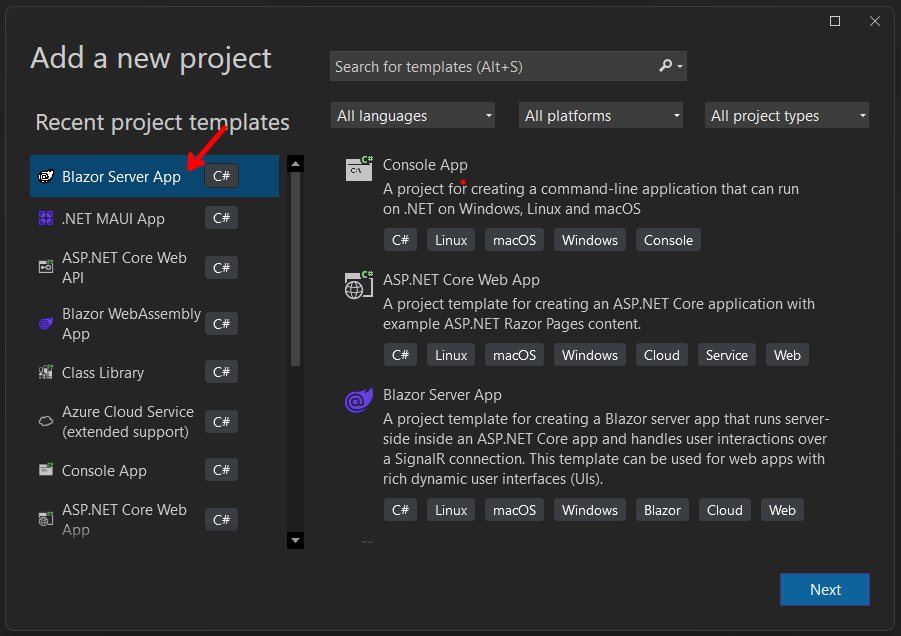
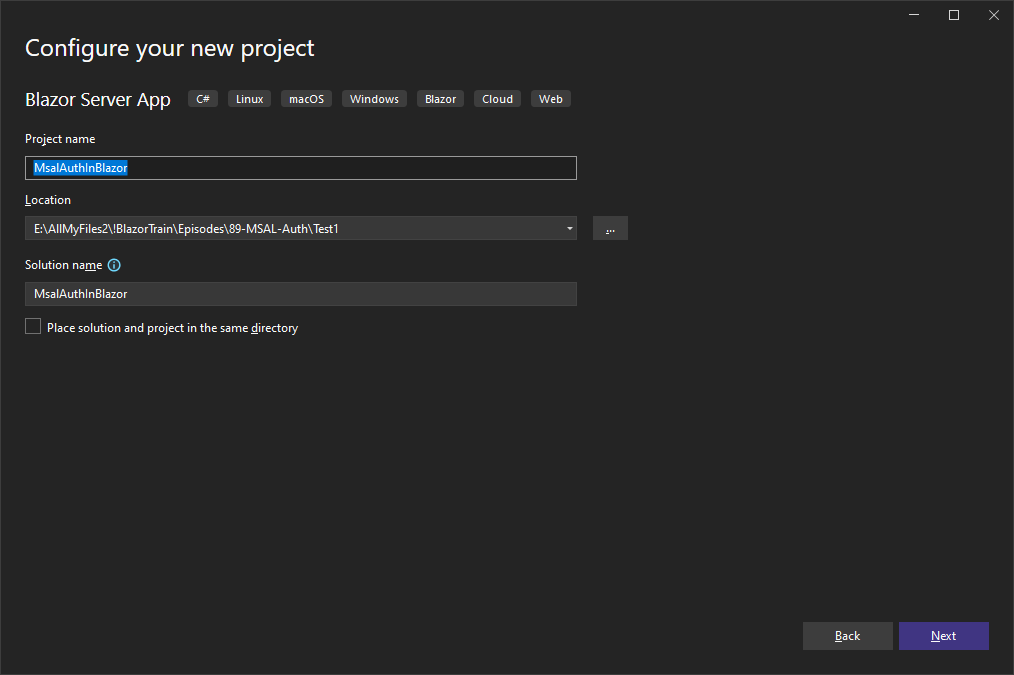
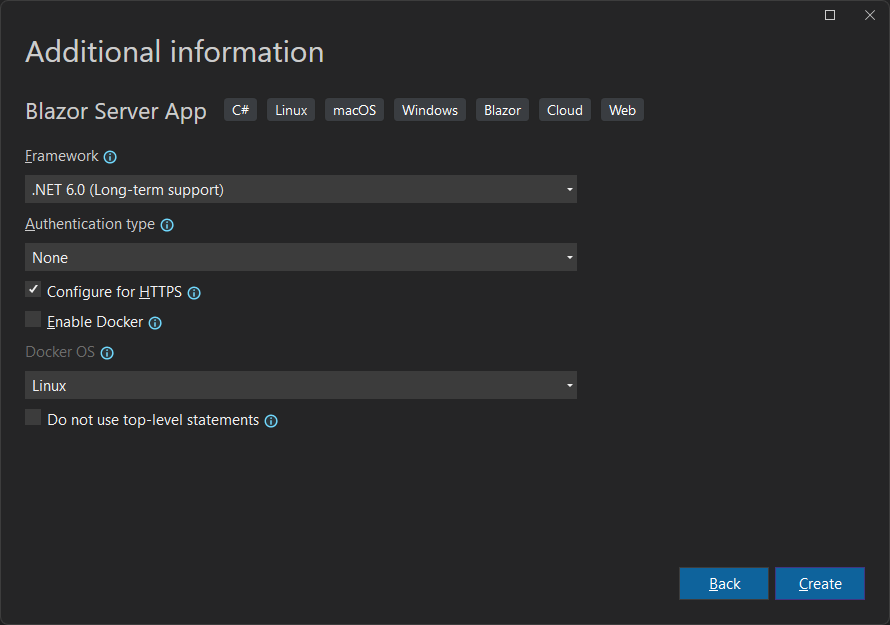
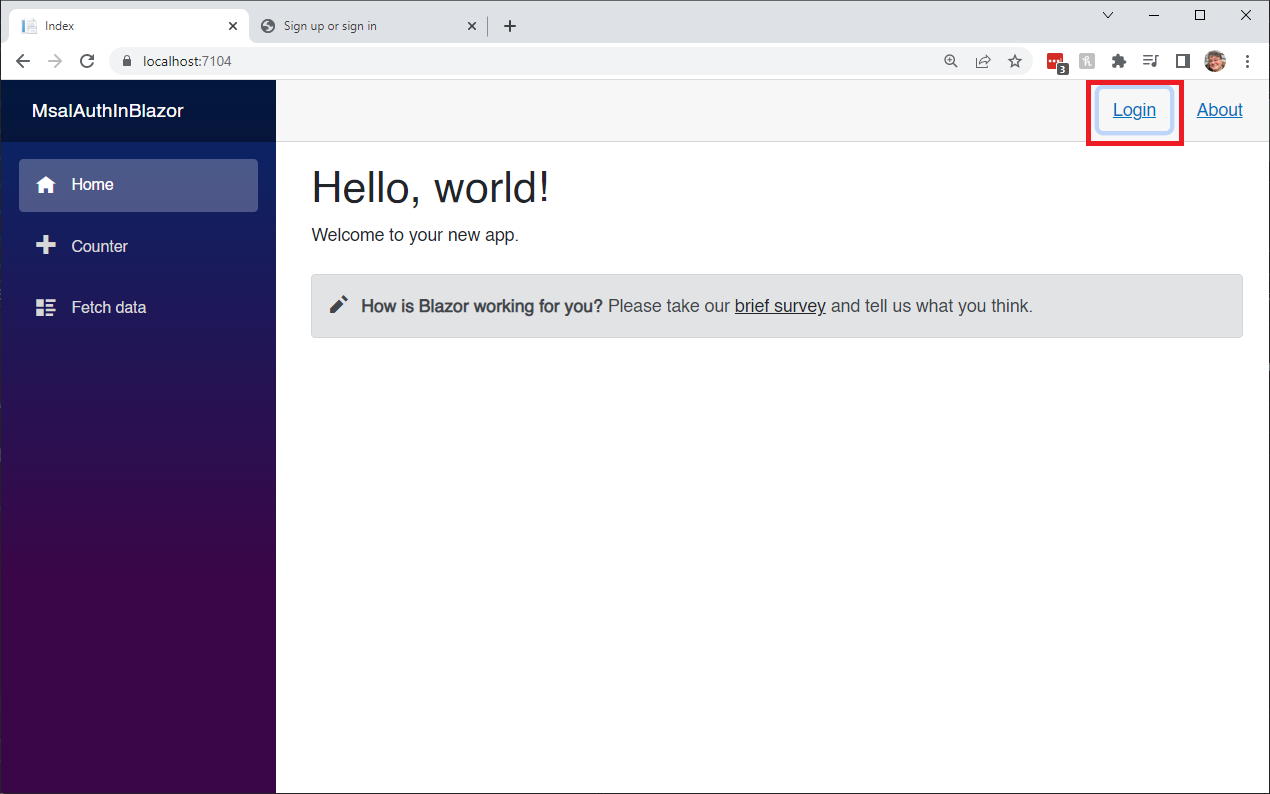
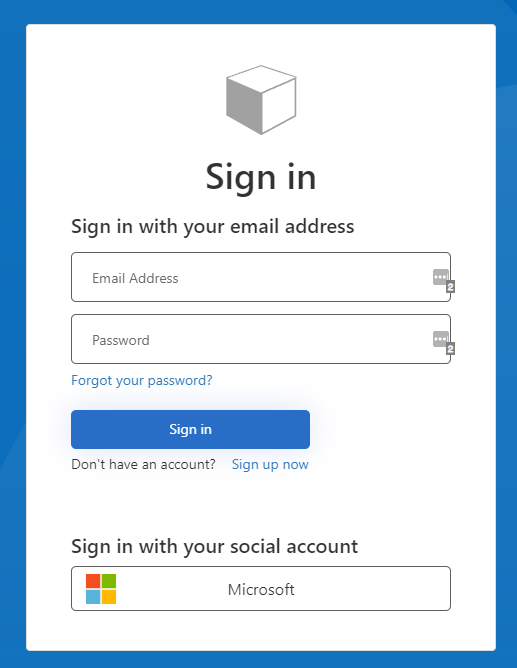
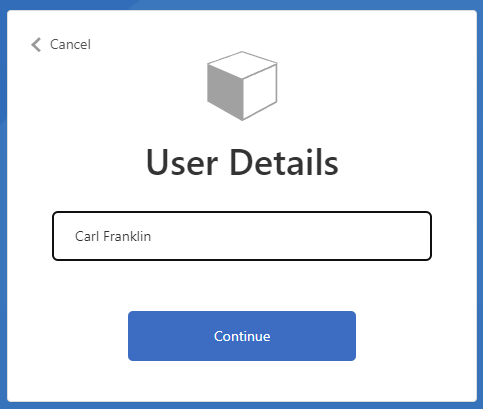
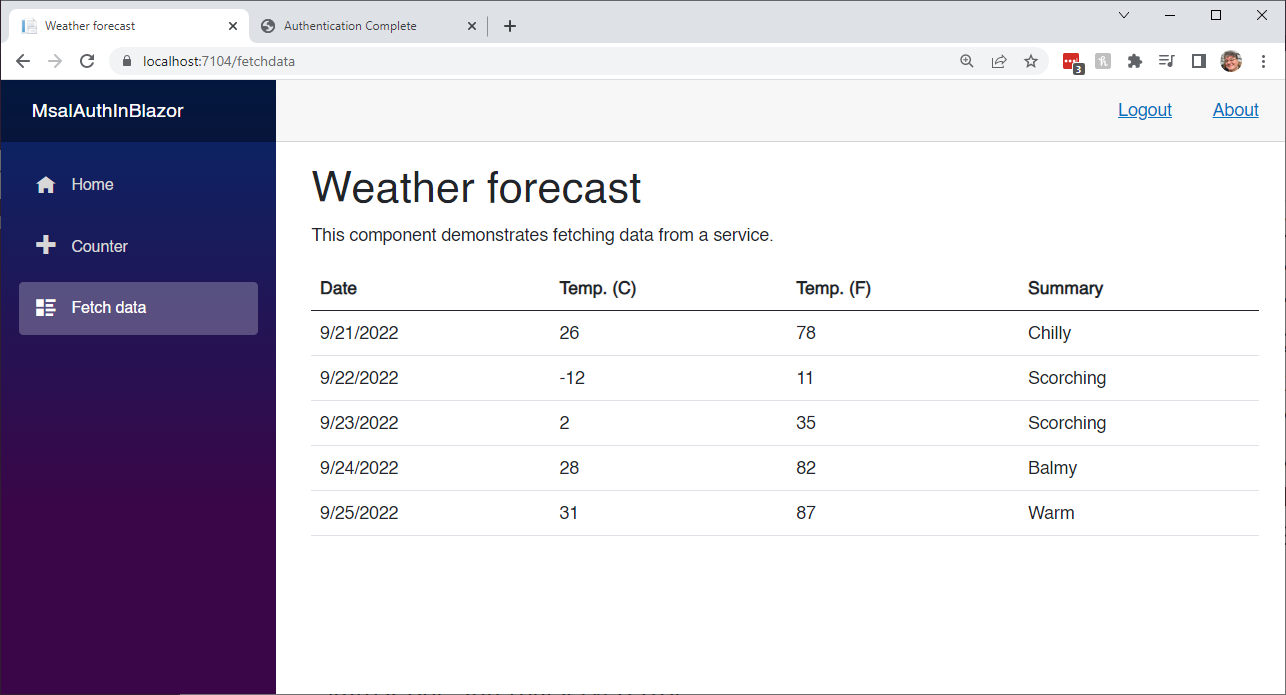
In this episode, we are going to create a secure web api application and deploy it to Azure. We are going to create a new Azure AD B2C tenant, and configure it for authentication. We are going to create a new Blazor Server application, and add authentication support for the Microsoft identity provider using MSAL .NET. In later episodes we will add support for the Twitter, and Google identity providers. Then we are going to use an access token to call a secure Web API.
For similar demos, but using MAUI, consider watching the following episodes.
| Episode | YouTube URL | GitHub Repo URL |
|---|---|---|
| Calling Secured APIs with MSAL Auth in MAUI: The .NET Show with Carl Franklin Ep 24 | https://www.youtube.com/watch?v=p8NRvakFW2M | https://github.com/carlfranklin/MsalAuthInMaui |
| MSAL Twitter Auth in MAUI: The .NET Show with Carl Franklin Ep 25 | https://www.youtube.com/watch?v=AIO2qOKC7Vc | https://github.com/carlfranklin/MsalSocialAuthInMaui |
| MSAL Google Auth in MAUI: The .NET Show with Carl Franklin Ep 26 | https://www.youtube.com/watch?v=PpJ8YqzoWds | https://github.com/carlfranklin/MsalGoogleAuthInMaui |
Let's get to it.
The following prerequisites are needed for this demo.
Download the latest version of the .NET 6.0 SDK here.
For this demo, we are going to use the latest version of Visual Studio 2022.
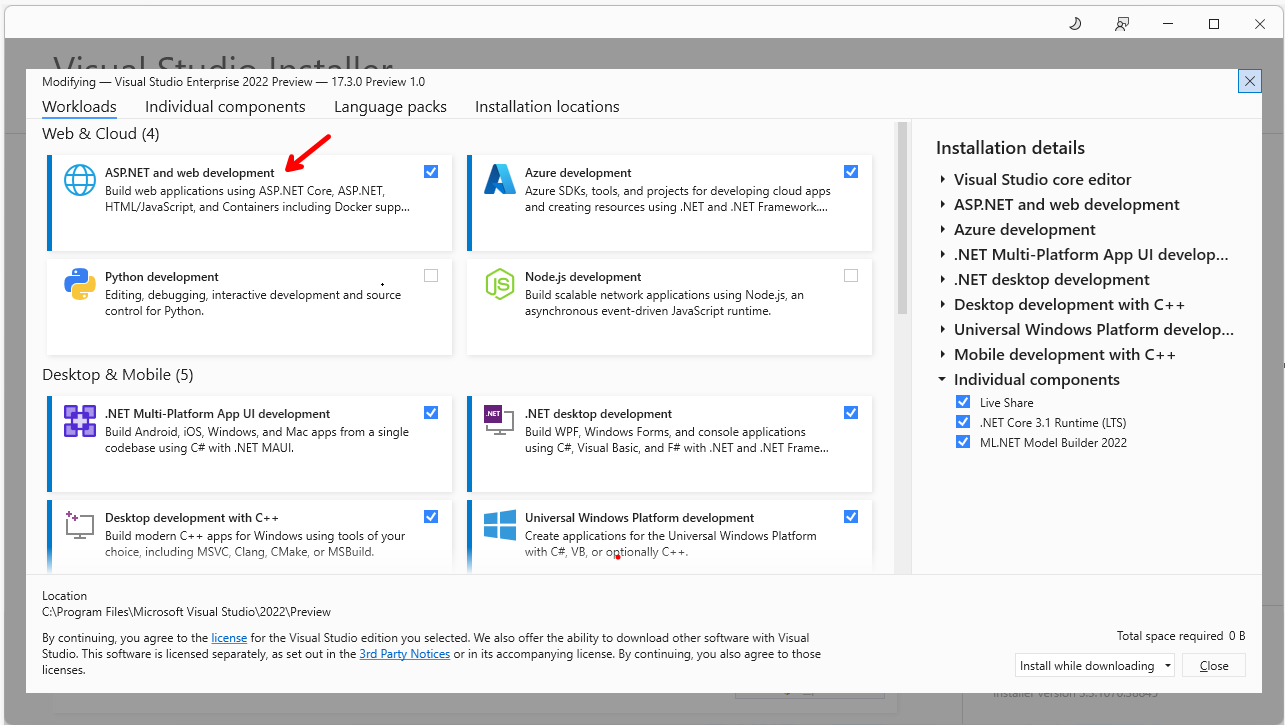
For this demo, the required workload is needed.
In order to build Blazor apps, the ASP.NET and web development workload needs to be installed, so if you do not have that installed let's do that now.
If you do not have an Azure subscription, go ahead and create one for free at here.
In the following demo we will perform the following actions:
- Create a ASP.NET Core Web API application
- Secure the ASP.NET Core Web API application
- Create and configure an Azure AD B2C app registration to provide authentication workflows
- Deploy the ASP.NET Core Web API application to Azure
- Configure an Azure AD B2C Scope
- Set API Permissions
- Create a Blazor Server application
- Configure our Blazor Server application to authenticate users and get an access token
- Call our secure ASP.NET Core Web API application from our Blazor Server application
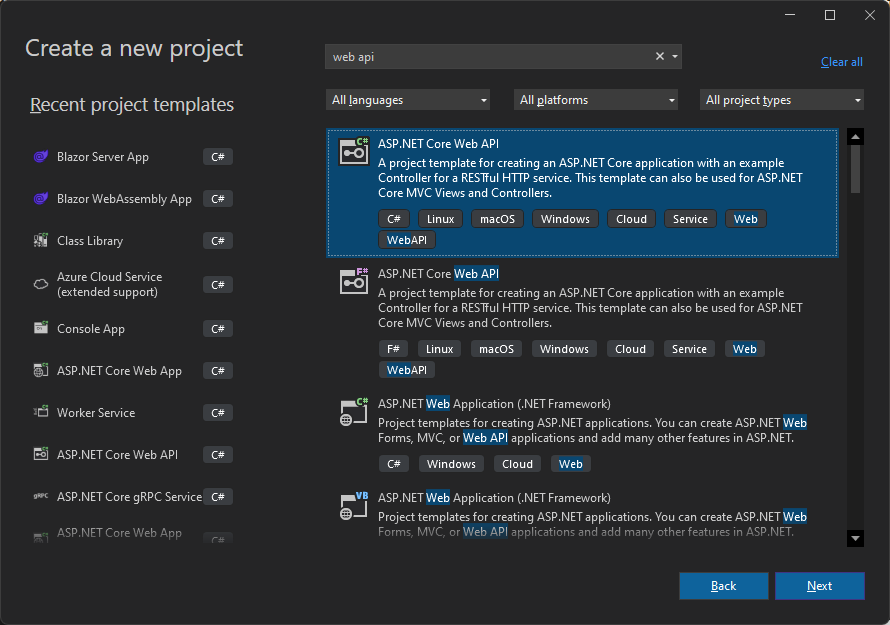
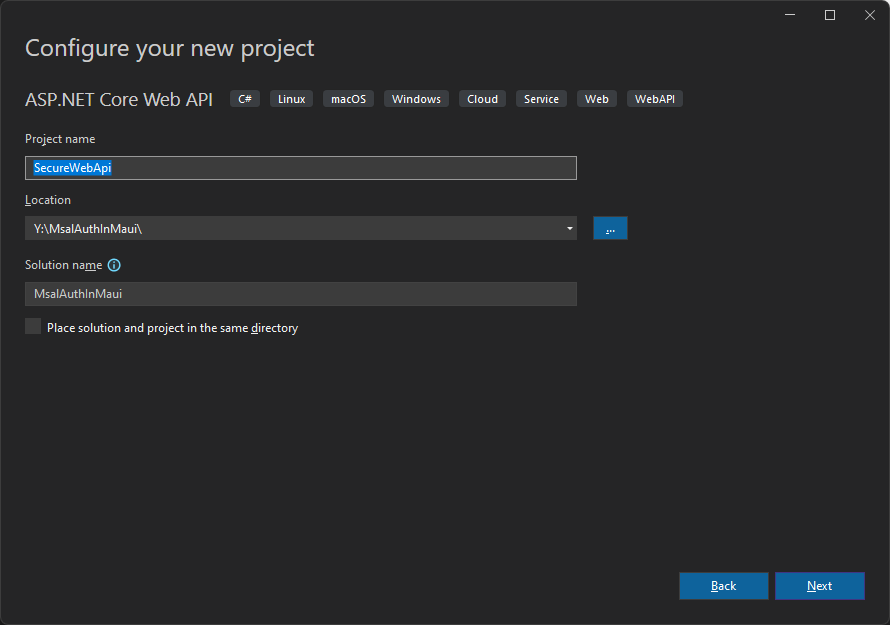
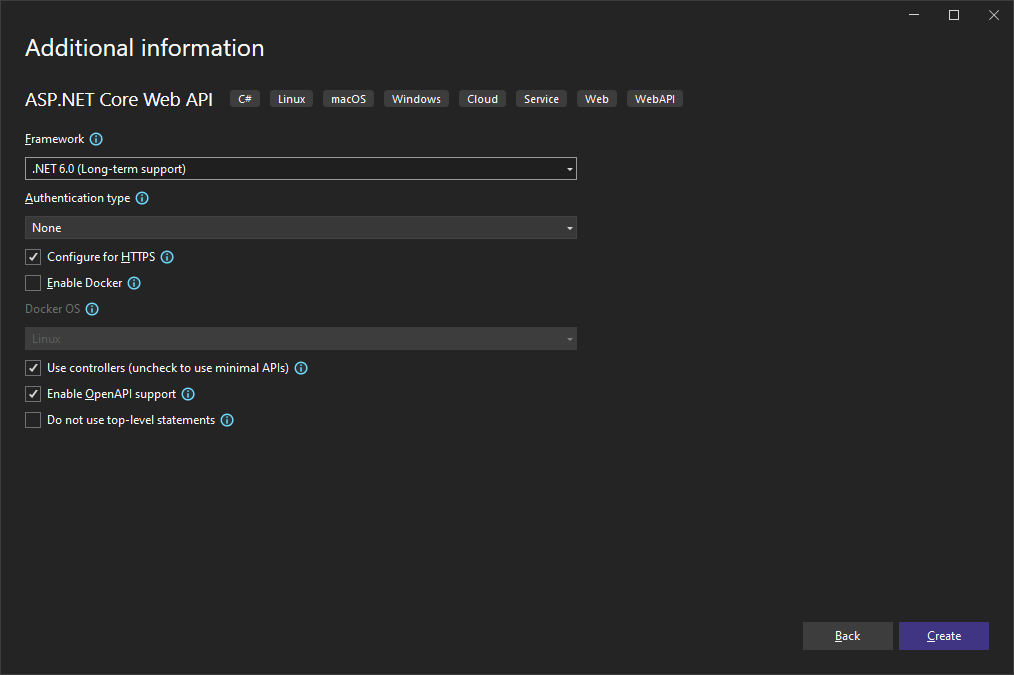
In this demo, we are going to start by creating an ASP.NET Core Web API application using the default template, which will not be secure. We are going to make it secure by using the Microsoft identity platform.
We will create an Azure AD B2C app registration to provide an authentication flow, and configure our ASP.NET Core Web API application to use it.
And finally, we will deploy the ASP.NET Core Web API application to Azure.
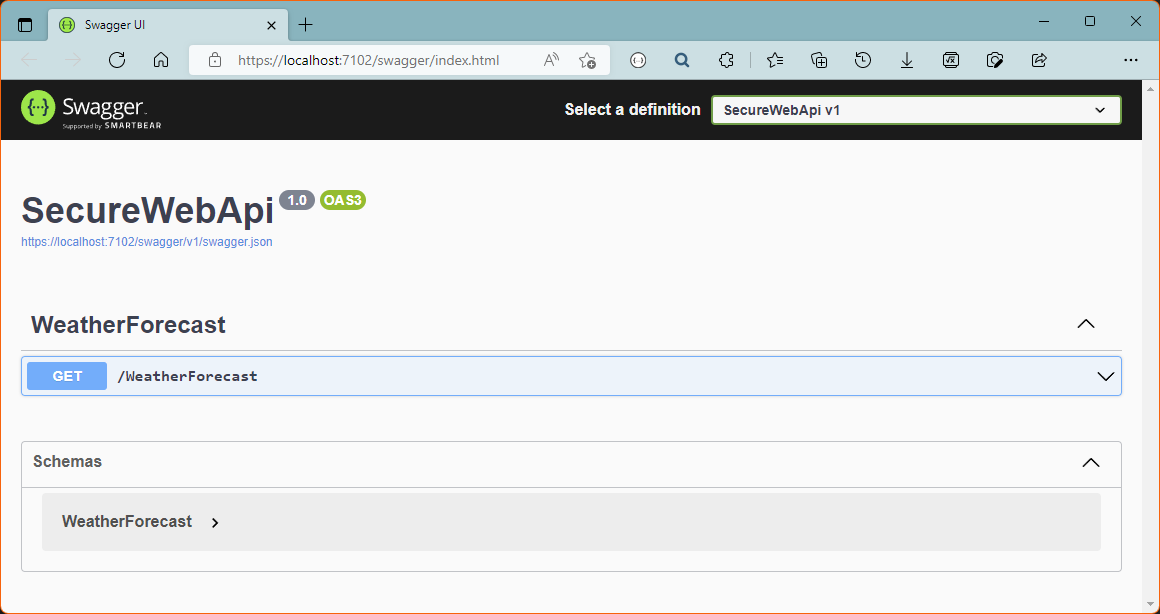
Run the application to make sure the default templates is working.
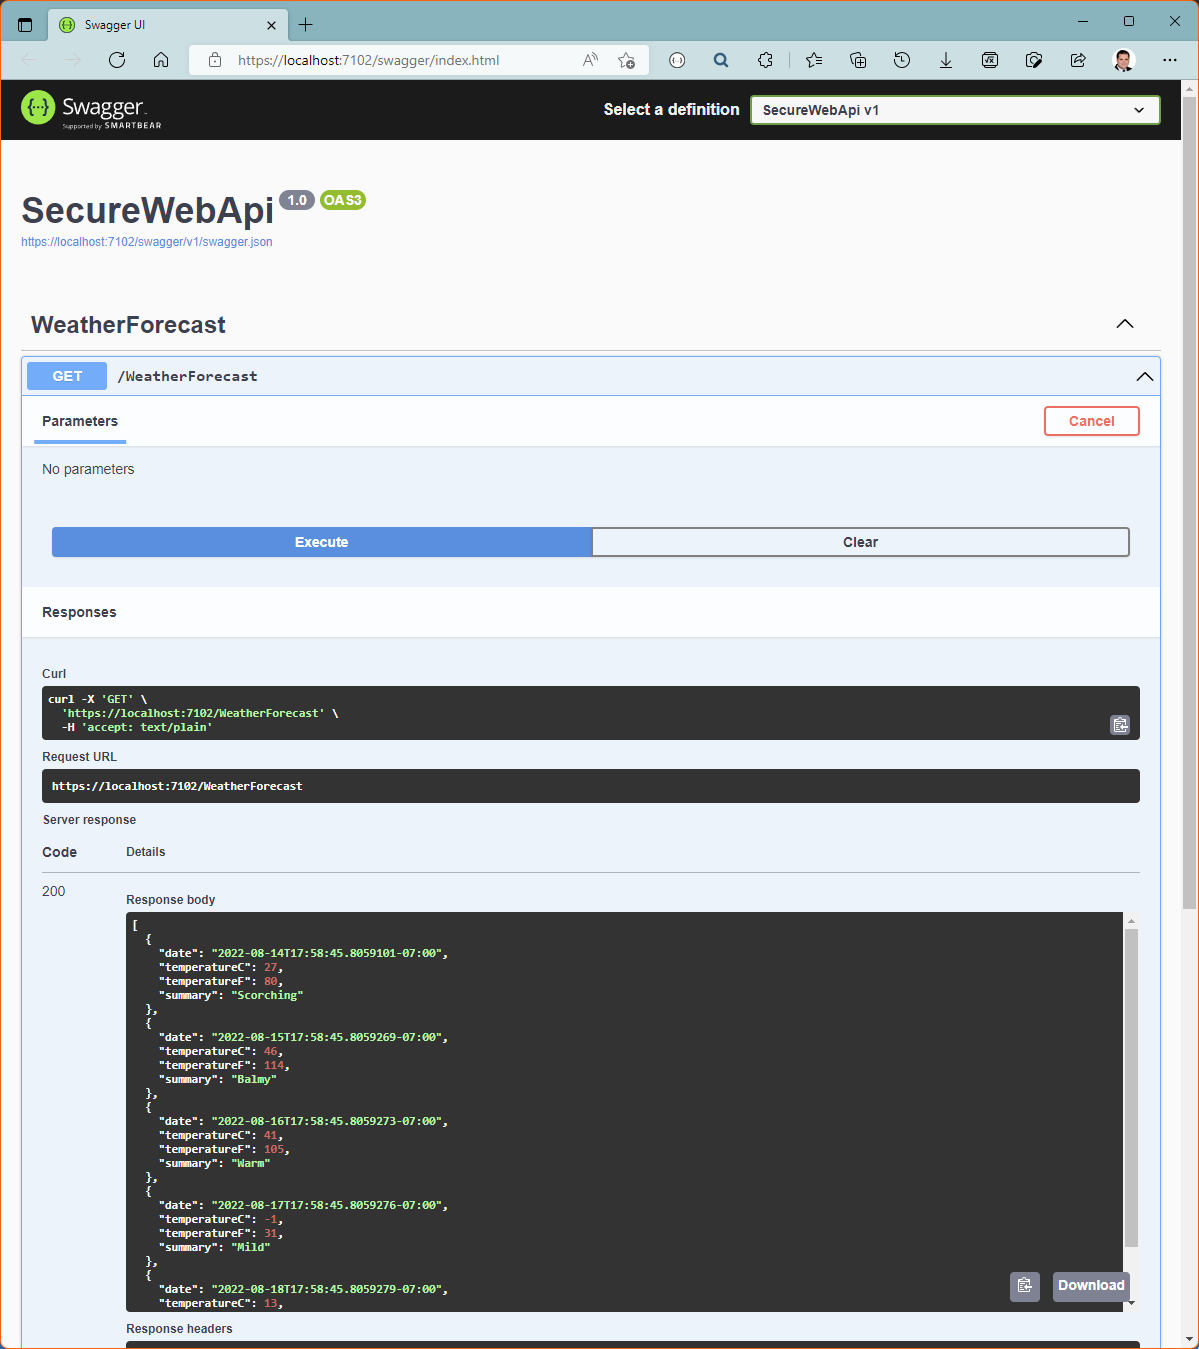
Expand GET /weatherforecast, click on Try it out, then on Execute.
We get data, so it is working, but it is not secure.
Let's make our ASP.NET Core Web API app secure.
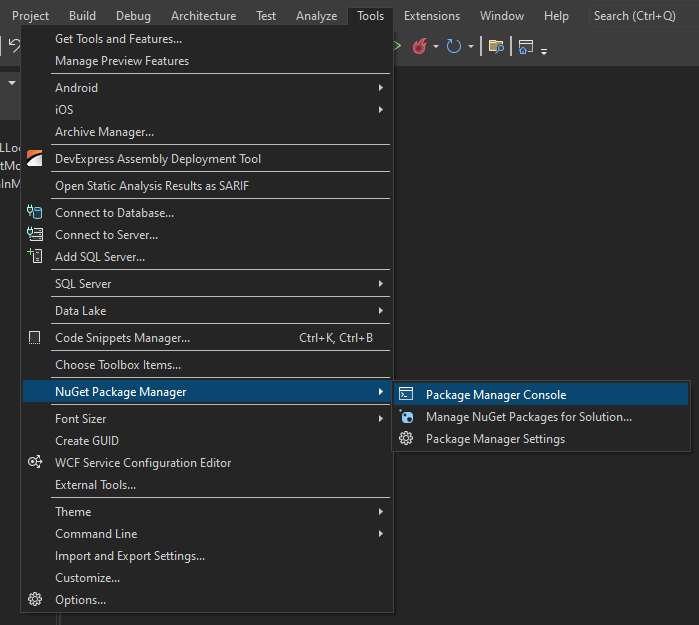
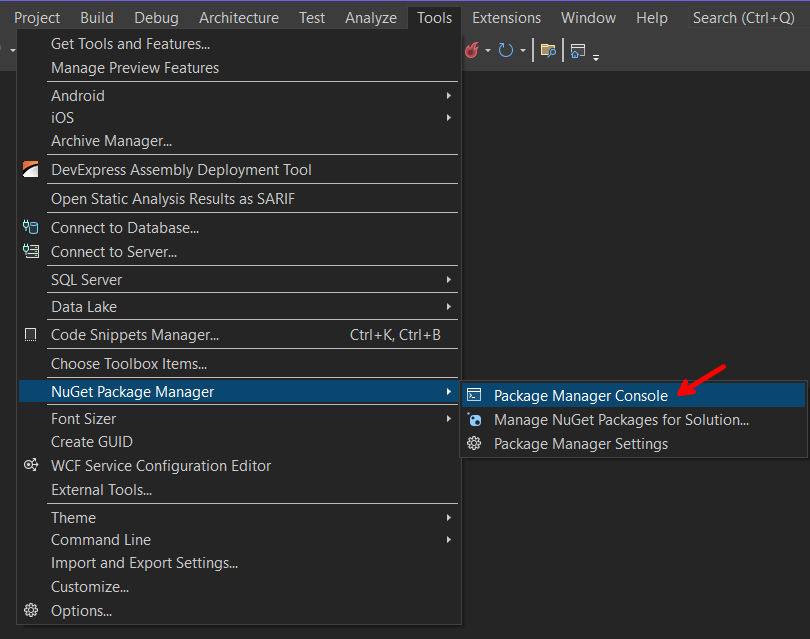
Open the Package Manager Console:
And add the following NuGet packages:
- Microsoft.AspNetCore.Authentication.JwtBearer
- Microsoft.Identity.Web
- Microsoft.Identity.Web.MicrosoftGraph
- Microsoft.Identity.Web.UI
By running the following commands:
install-package Microsoft.AspNetCore.Authentication.JwtBearer
install-package Microsoft.Identity.Web
install-package Microsoft.Identity.Web.MicrosoftGraph
install-package Microsoft.Identity.Web.UI
Your project file should look like this:
<Project Sdk="Microsoft.NET.Sdk.Web">

  <PropertyGroup>
    <TargetFramework>net6.0</TargetFramework>
    <Nullable>enable</Nullable>
    <ImplicitUsings>enable</ImplicitUsings>
  </PropertyGroup>

  <ItemGroup>
    <PackageReference Include="Microsoft.AspNetCore.Authentication.JwtBearer" Version="6.0.9" />
    <PackageReference Include="Microsoft.Identity.Web" Version="1.25.3" />
    <PackageReference Include="Microsoft.Identity.Web.MicrosoftGraph" Version="1.25.3" />
    <PackageReference Include="Microsoft.Identity.Web.UI" Version="1.25.3" />
    <PackageReference Include="Swashbuckle.AspNetCore" Version="6.2.3" />
  </ItemGroup>

</Project>
Open the Program.cs file and add the following using statements:
using Microsoft.Identity.Web;
using Microsoft.AspNetCore.Authentication.JwtBearer;
Below var builder = WebApplication.CreateBuilder(args);, add the following code:
builder.Services.AddAuthentication(JwtBearerDefaults.AuthenticationScheme)
    .AddMicrosoftIdentityWebApi(builder.Configuration.GetSection("AzureAd"))
        .EnableTokenAcquisitionToCallDownstreamApi()
            .AddMicrosoftGraph(builder.Configuration.GetSection("MicrosoftGraph"))
            .AddInMemoryTokenCaches()
            .AddDownstreamWebApi("DownstreamApi", builder.Configuration.GetSection("DownstreamApi"))
            .AddInMemoryTokenCaches();
builder.Services.AddAuthorization();
At the bottom, before app.UseAuthorization(); add the following two lines:
app.UseAuthentication();The complete Program.cs file should look like this now:
using Microsoft.Identity.Web;
using Microsoft.AspNetCore.Authentication.JwtBearer;

var builder = WebApplication.CreateBuilder(args);

builder.Services.AddControllers();

// Add services to the container.
builder.Services.AddAuthentication(JwtBearerDefaults.AuthenticationScheme)
    .AddMicrosoftIdentityWebApi(builder.Configuration.GetSection("AzureAd"))
        .EnableTokenAcquisitionToCallDownstreamApi()
            .AddMicrosoftGraph(builder.Configuration.GetSection("MicrosoftGraph"))
            .AddInMemoryTokenCaches()
            .AddDownstreamWebApi("DownstreamApi", builder.Configuration.GetSection("DownstreamApi"))
            .AddInMemoryTokenCaches();
builder.Services.AddAuthorization();

// Learn more about configuring Swagger/OpenAPI at https://aka.ms/aspnetcore/swashbuckle
builder.Services.AddEndpointsApiExplorer();
builder.Services.AddSwaggerGen();

var app = builder.Build();

// Configure the HTTP request pipeline.
if (app.Environment.IsDevelopment())
{
    app.UseSwagger();
    app.UseSwaggerUI();
}

app.UseHttpsRedirection();

app.UseAuthentication();
app.UseAuthorization();

app.MapControllers();

app.Run();
Add the [Authorize] attribute to the WeatherForecastController. It should look like this:
using Microsoft.AspNetCore.Authorization;
using Microsoft.AspNetCore.Mvc;

namespace SecureWebApi.Controllers
{
    [Authorize]
    [ApiController]
    [Route("[controller]")]
    public class WeatherForecastController : ControllerBase
    {
        private static readonly string[] Summaries = new[]
        {
            "Freezing", "Bracing", "Chilly", "Cool", "Mild", "Warm", "Balmy", "Hot", "Sweltering", "Scorching"
        };

        private readonly ILogger<WeatherForecastController> _logger;

        public WeatherForecastController(ILogger<WeatherForecastController> logger)
        {
            _logger = logger;
        }

        [HttpGet(Name = "GetWeatherForecast")]
        public IEnumerable<WeatherForecast> Get()
        {
            return Enumerable.Range(1, 5).Select(index => new WeatherForecast
            {
                Date = DateTime.Now.AddDays(index),
                TemperatureC = Random.Shared.Next(-20, 55),
                Summary = Summaries[Random.Shared.Next(Summaries.Length)]
            })
            .ToArray();
        }
    }
}
The ASP.NET Core Web API app is secure now, but we need to add some IDs, and settings in the appsettings.json file.
Replace the contents of the appsettings.json file with this:
{
  "AzureAd": {
    "Instance": "https://{YOUR-TENANT-NAME-HERE}.b2clogin.com/",
    "Domain": "{YOUR-TENANT-NAME-HERE}.onmicrosoft.com",
    "TenantId": "{REPLACE-WITH-YOUR-TENANT-ID}",
    "ClientId": "{REPLACE-WITH-YOUR-CLIENT-ID}",
    "CallbackPath": "/signin-oidc",
    "Scopes": "access_as_user",
    "ClientSecret": "{REPLACE-WITH-YOUR-CLIENT-SECRET}",
    "ClientCertificates": [],
    "SignUpSignInPolicyId": "b2c_1_social_susi"
  },
  "MicrosoftGraph": {
    "BaseUrl": "https://graph.microsoft.com/v1.0",
    "Scopes": "user.read"
  },
  "DownstreamApi": {
    "BaseUrl": "{REPLACE-WITH-YOUR-SECURE-WEB-API-URL}",
    "Scopes": "user.read"
  },
  "Logging": {
    "LogLevel": {
      "Default": "Information",
      "Microsoft.AspNetCore": "Warning"
    }
  },
  "AllowedHosts": "*"
}For social authentication, we will need to create a new tenant, so we can take advantage of the Azure's Identity Providers to allow social network authentication support, including Twitter, Google, Facebook, Apple, and others. If you already have a tenant with Identity Provider support, you can skip over this section.
Go to Azure, and select your subscription.
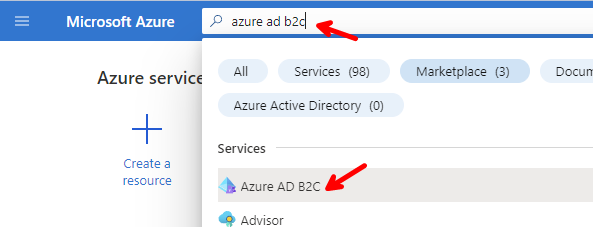
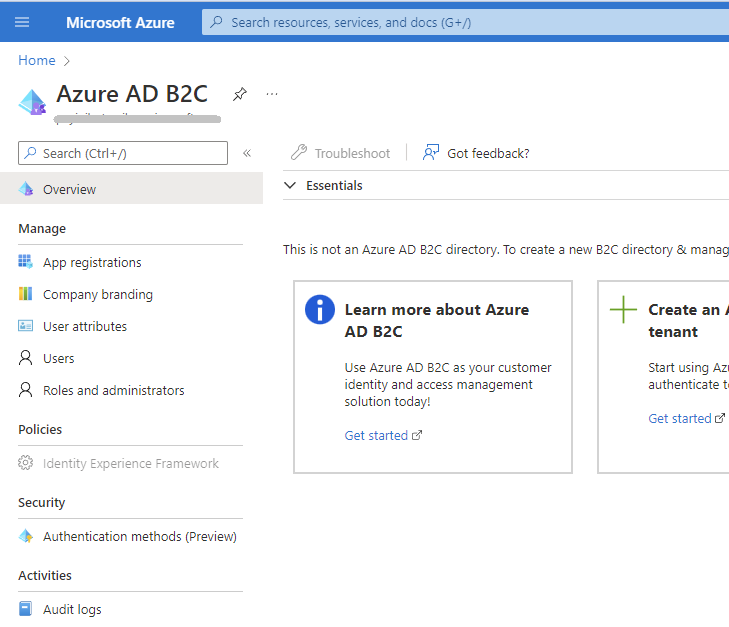
Type azure b2c in the search box, and click on Azure AD B2C.
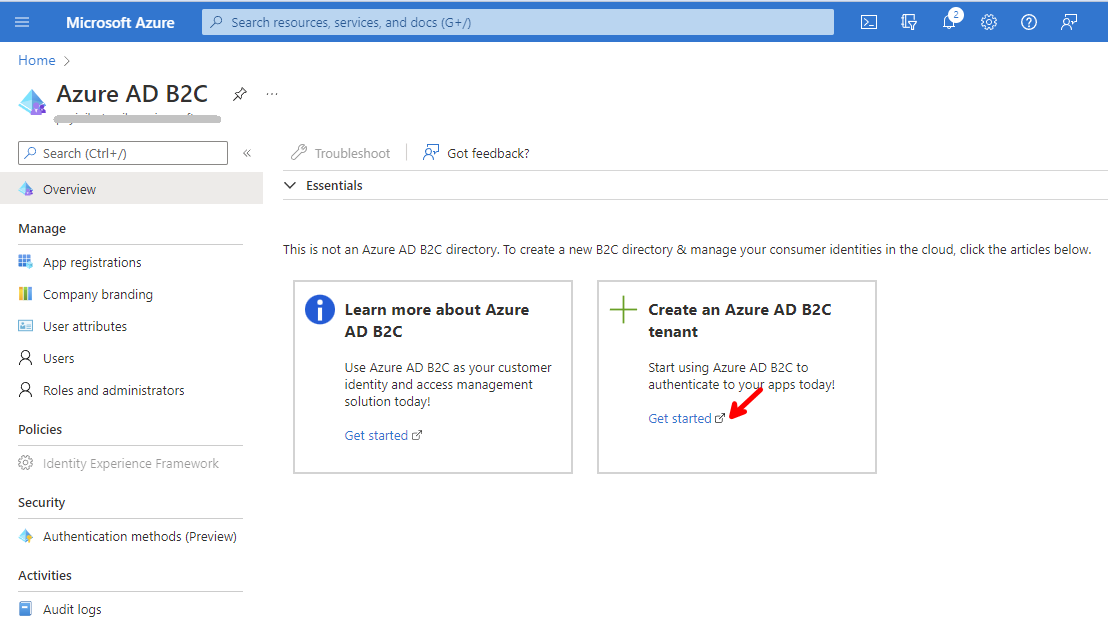
Click on Get started, under Create an Azure AD B2C tenant, to get the instructions on how to create a new Azure AD B2C tenant.
That should take you to Tutorial: Create an Azure Active Directory B2C tenant with instructions on to create an Azure AD B2C tenant. Follow the instructions, and make sure you set the Initial domain name to a unique value.
☝️ In these screen captures we used the name MsalAuthInMaui, but since the name of the tenant must be unique, make sure you replace MsalAuthInMaui with your own name, during the whole demo. We will refer to {YOUR-TENANT-NAME} in the config files.
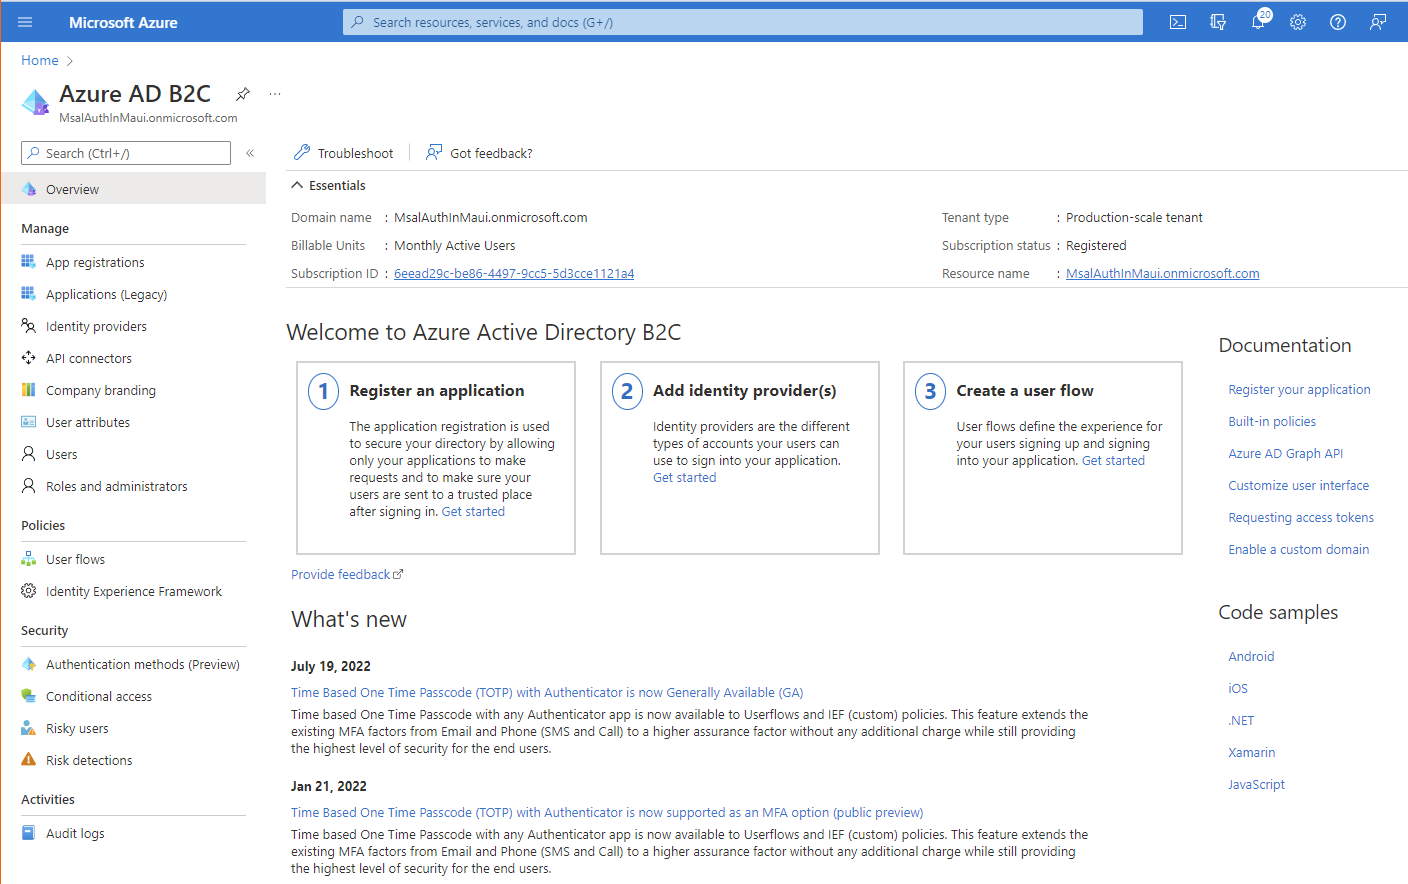
Once you create your new Azure B2C tenant, and switch to it, you should be able to see the following
☝️ Notice that the left menu now has Identity Providers, API connectors, User Flows, etc.
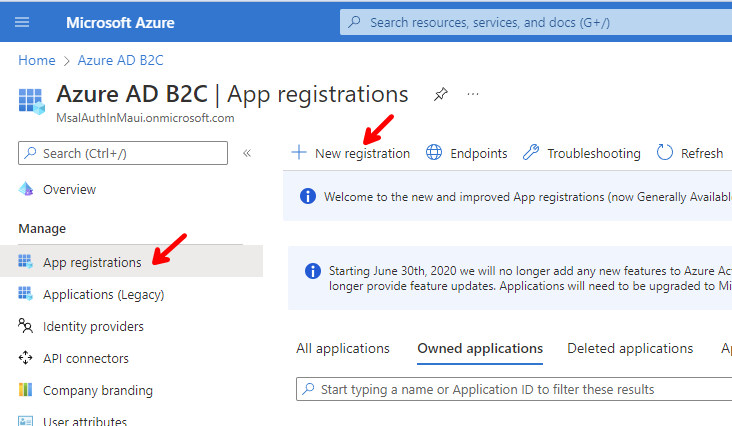
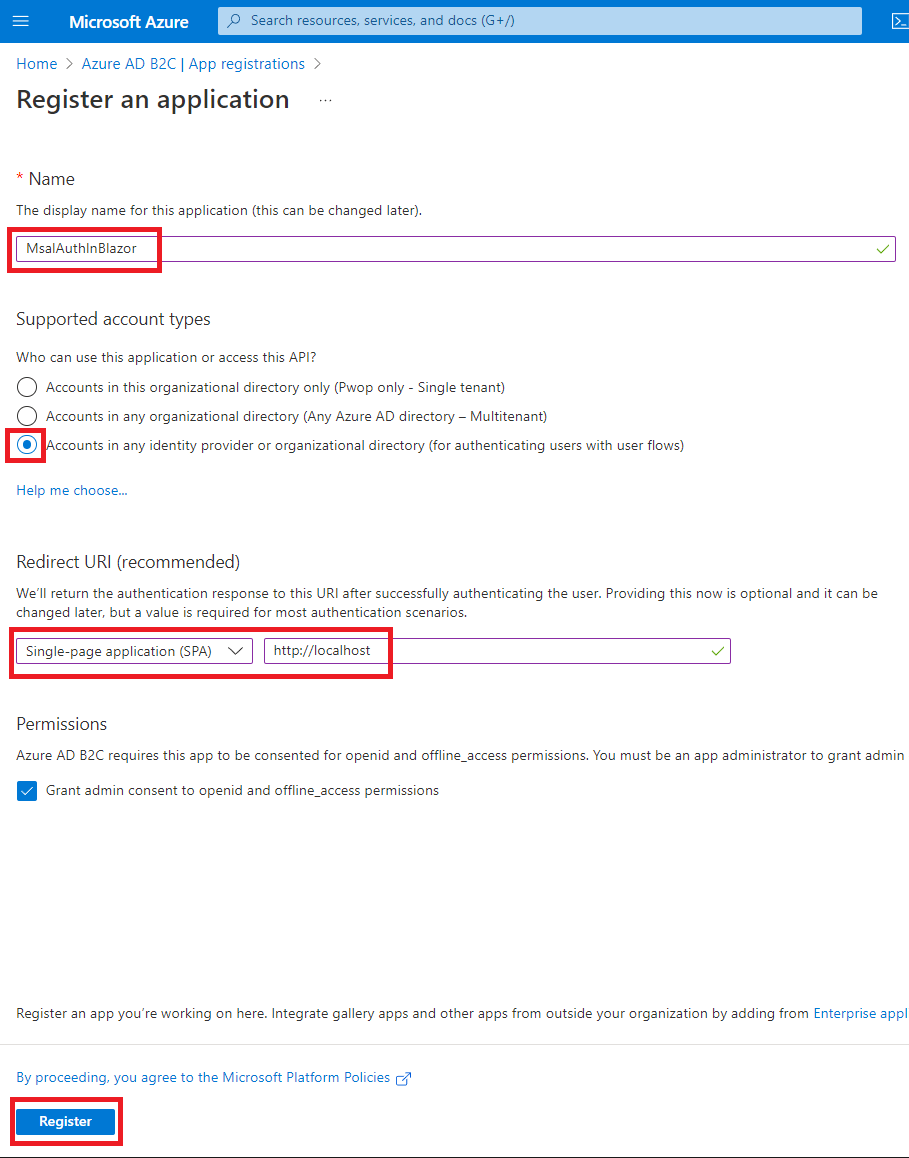
Go to App registrations, add New registration, enter the following values, and click on Register.
| Setting | Value |
|---|---|
| Name | MsalAuthInBlazor. If this is not available, make a unique version of it and remember it. |
| Supported account types | Accounts in any identity provider or organizational directory (for authenticating users with user flows) |
| Redirect URI | Select Single-page application (SPA), and enter http://localhost for the redirect url |
| Permissions | Check the Grant admin consent to openid and offline_access permissions box |
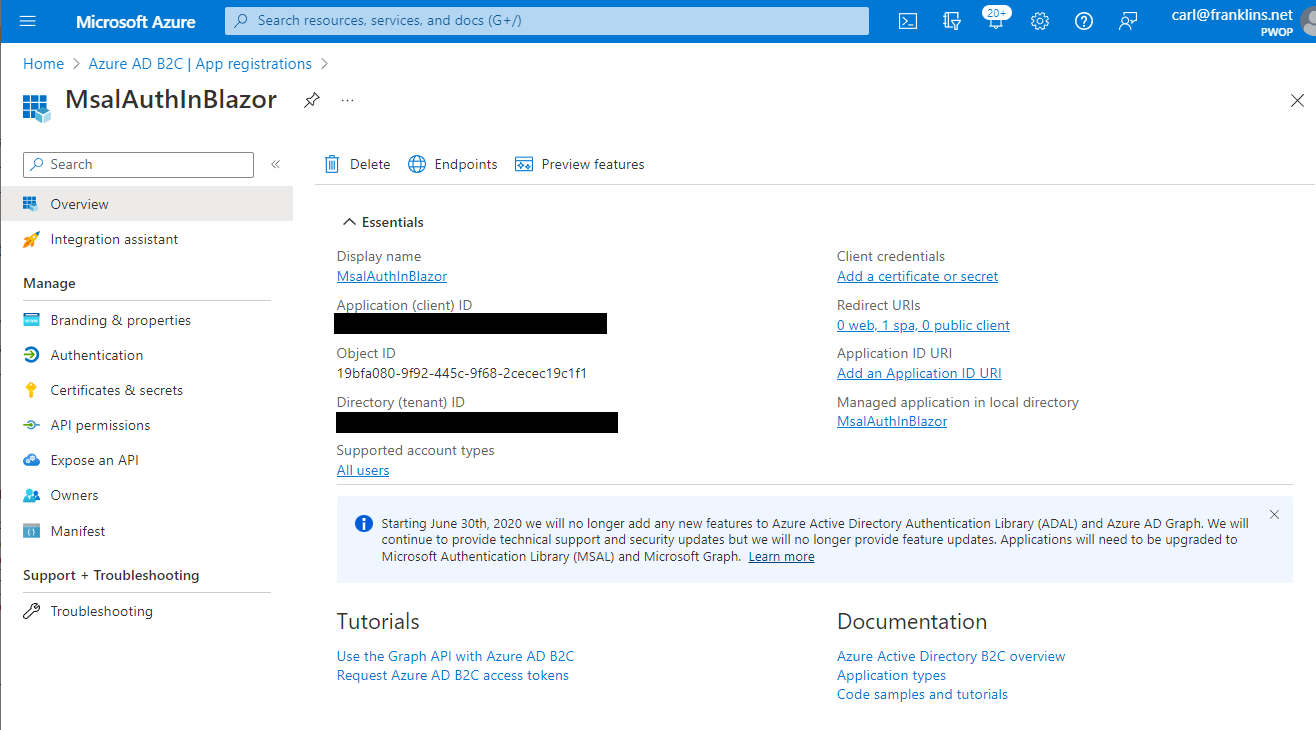
Notice a new Application (client) ID, and Directory (tenant) ID, will be generated.
Go ahead, and copy those new values, and replace the ones in the appsettings.json file of our SecureWebApi project.
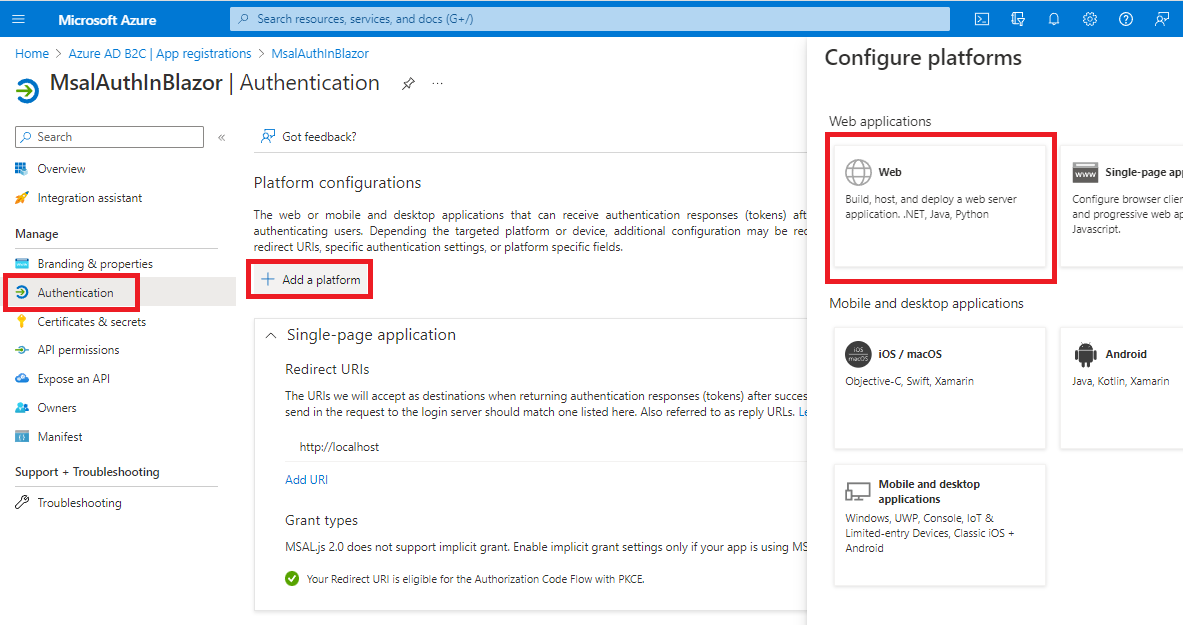
Go to Authentication, click on + Add a platform, then on Web.
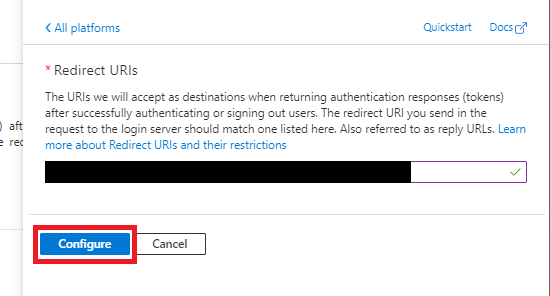
Enter https://{YOUR-TENANT-NAME}.b2clogin.com/{YOUR-TENANT-NAME}.onmicrosoft.com/oauth2/authresp as the redirect url, using your Tenant Id, then click the Configure button.
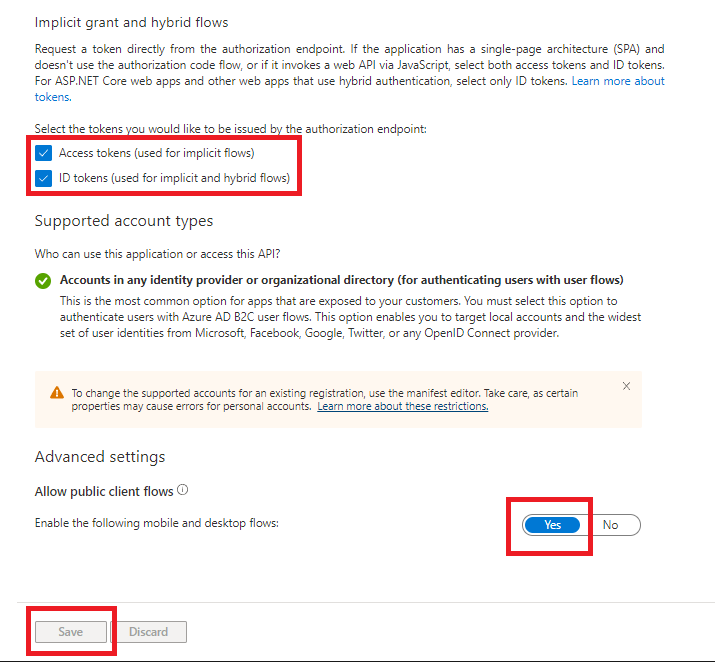
Make the following selections, and click on Save.
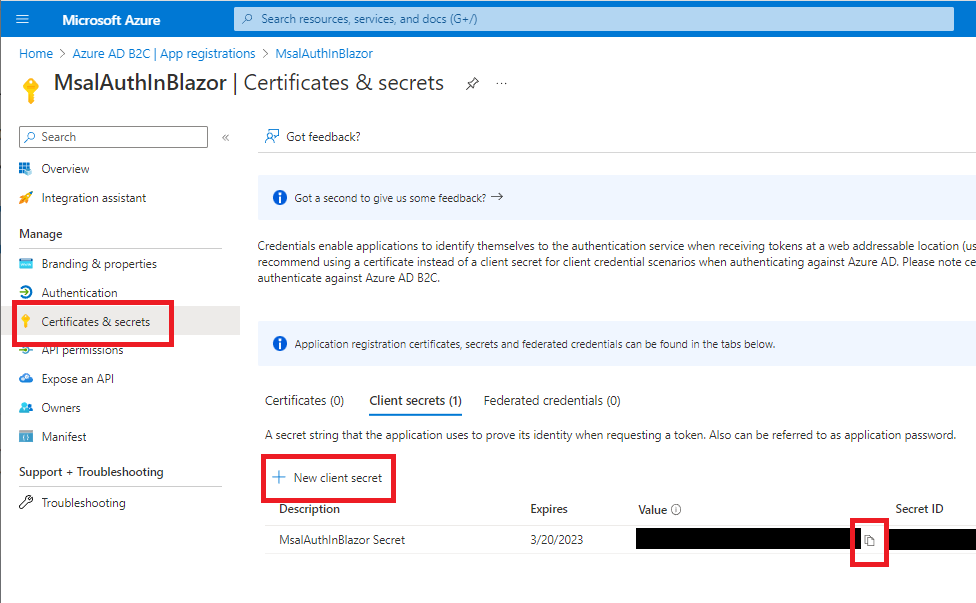
Go to Certificates & secrets to add a new client secret with the description MsalAuthInBlazor Secret. Copy the value, and replace the ClientSecret setting in our SecureWebApi's appsettings.json file.
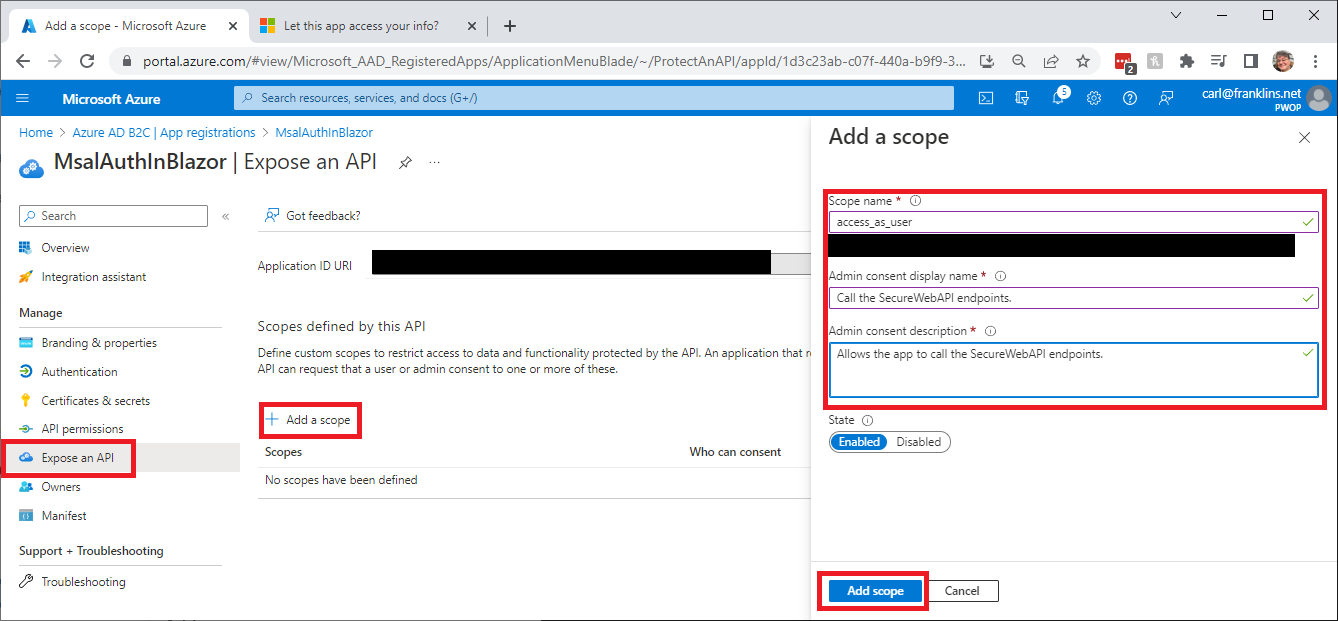
Go to Expose an API, click on + Add a scope, and enter access_as_user for the Scope name, Call the SecureWebAPI endpoints. for the Admin consent display name, and Allows the app to call the SecureWebAPI endpoints. for the Admin consent description. Then keep Enabled checked, and click on Add scope.
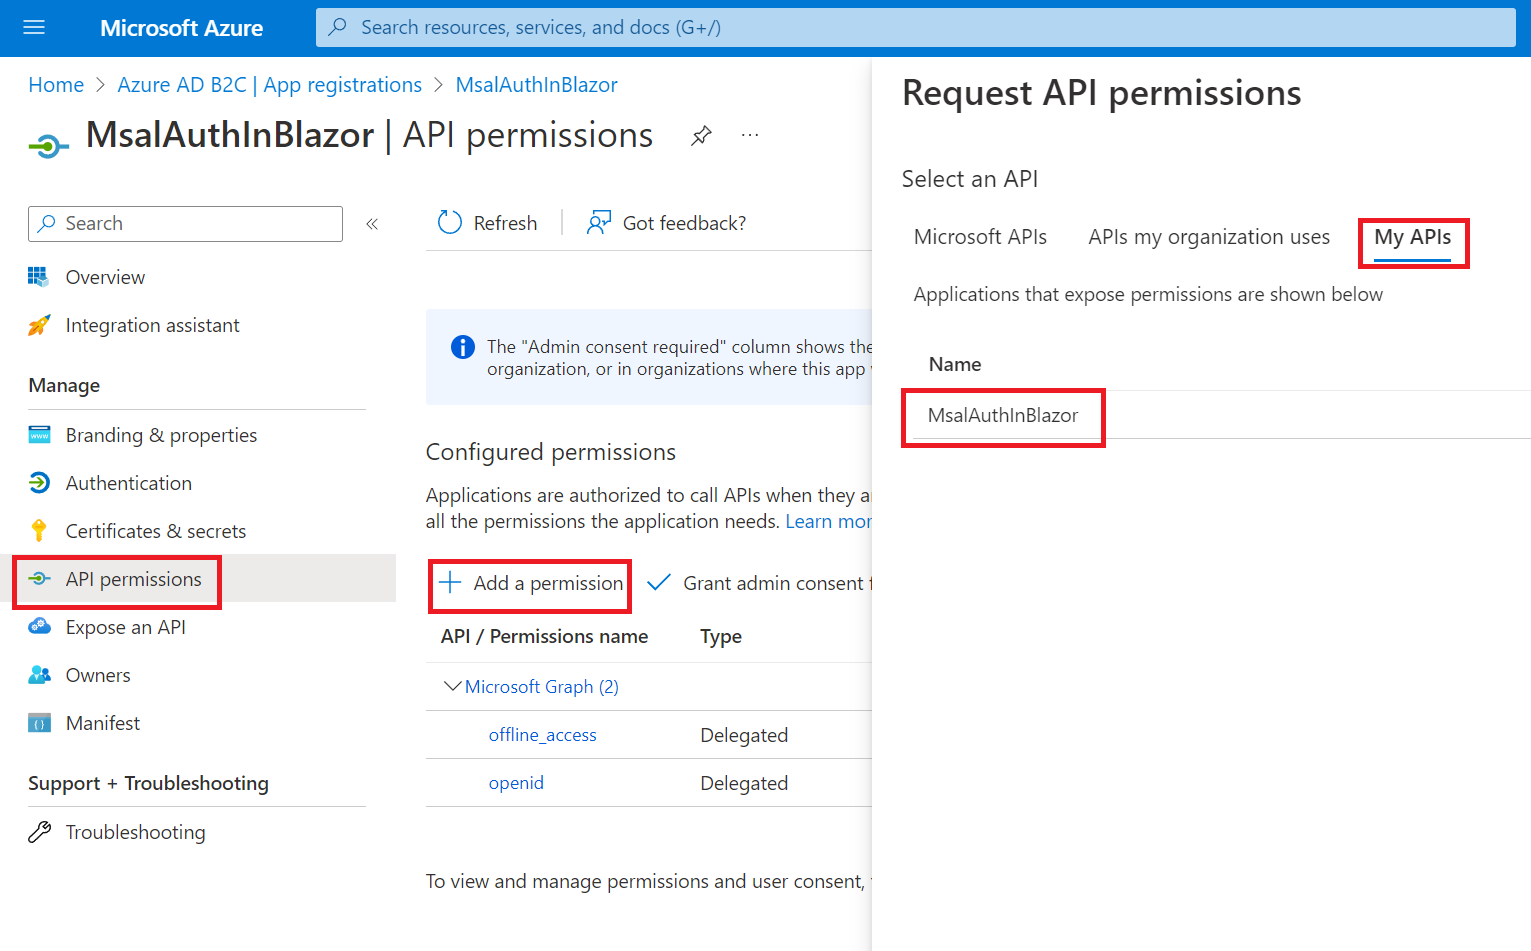
Go to API permissions, click on + Add a permission, then on My APIs, and select MsalAuthInBlazor.
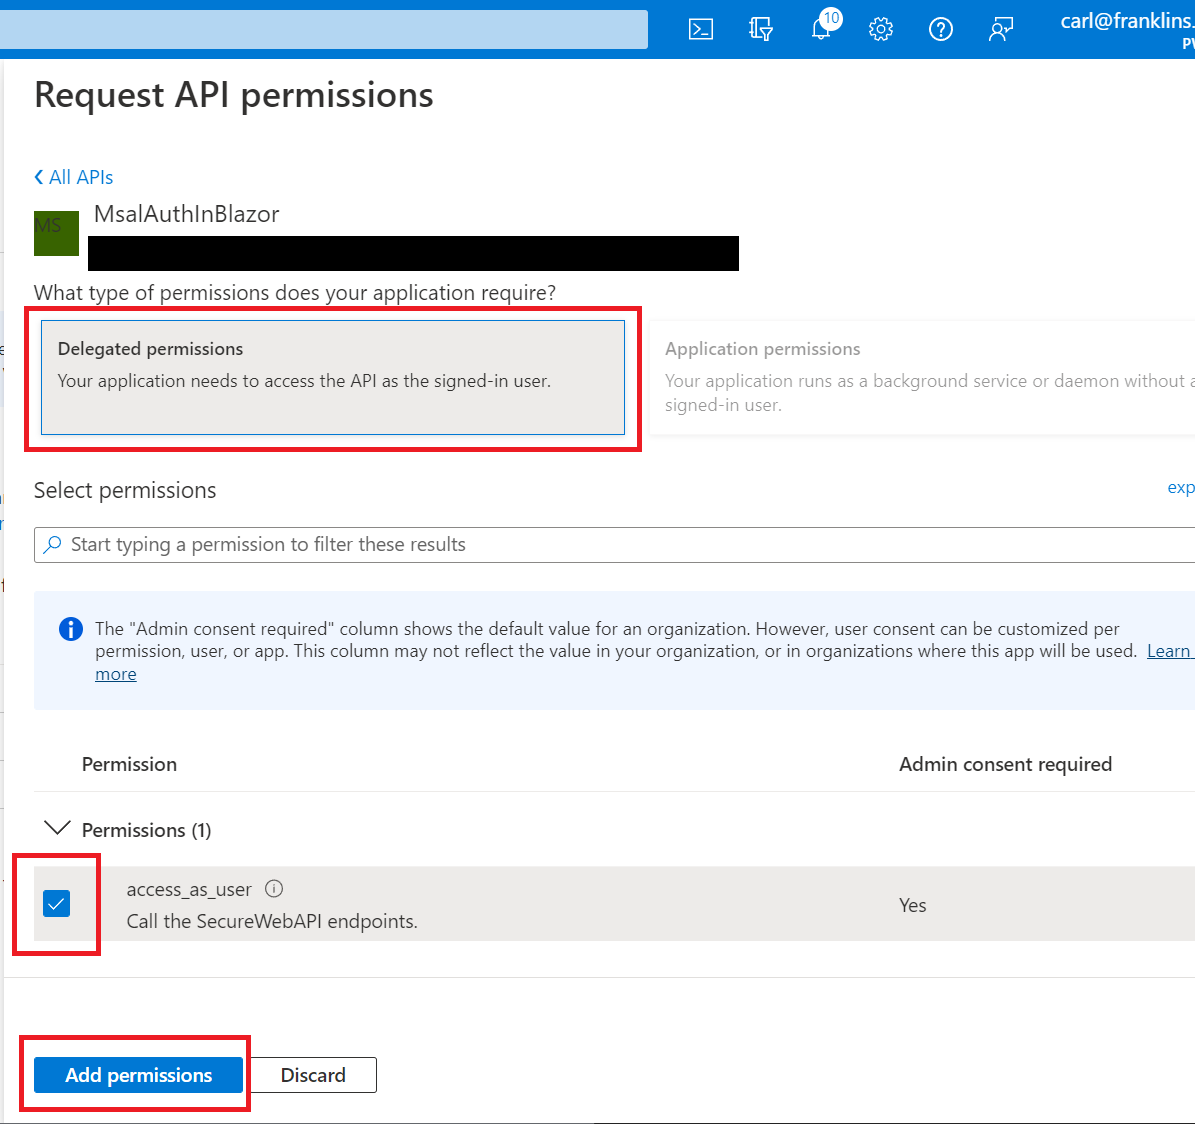
Then click on Delegated permissions, check access_as_user, and click Add permissions.
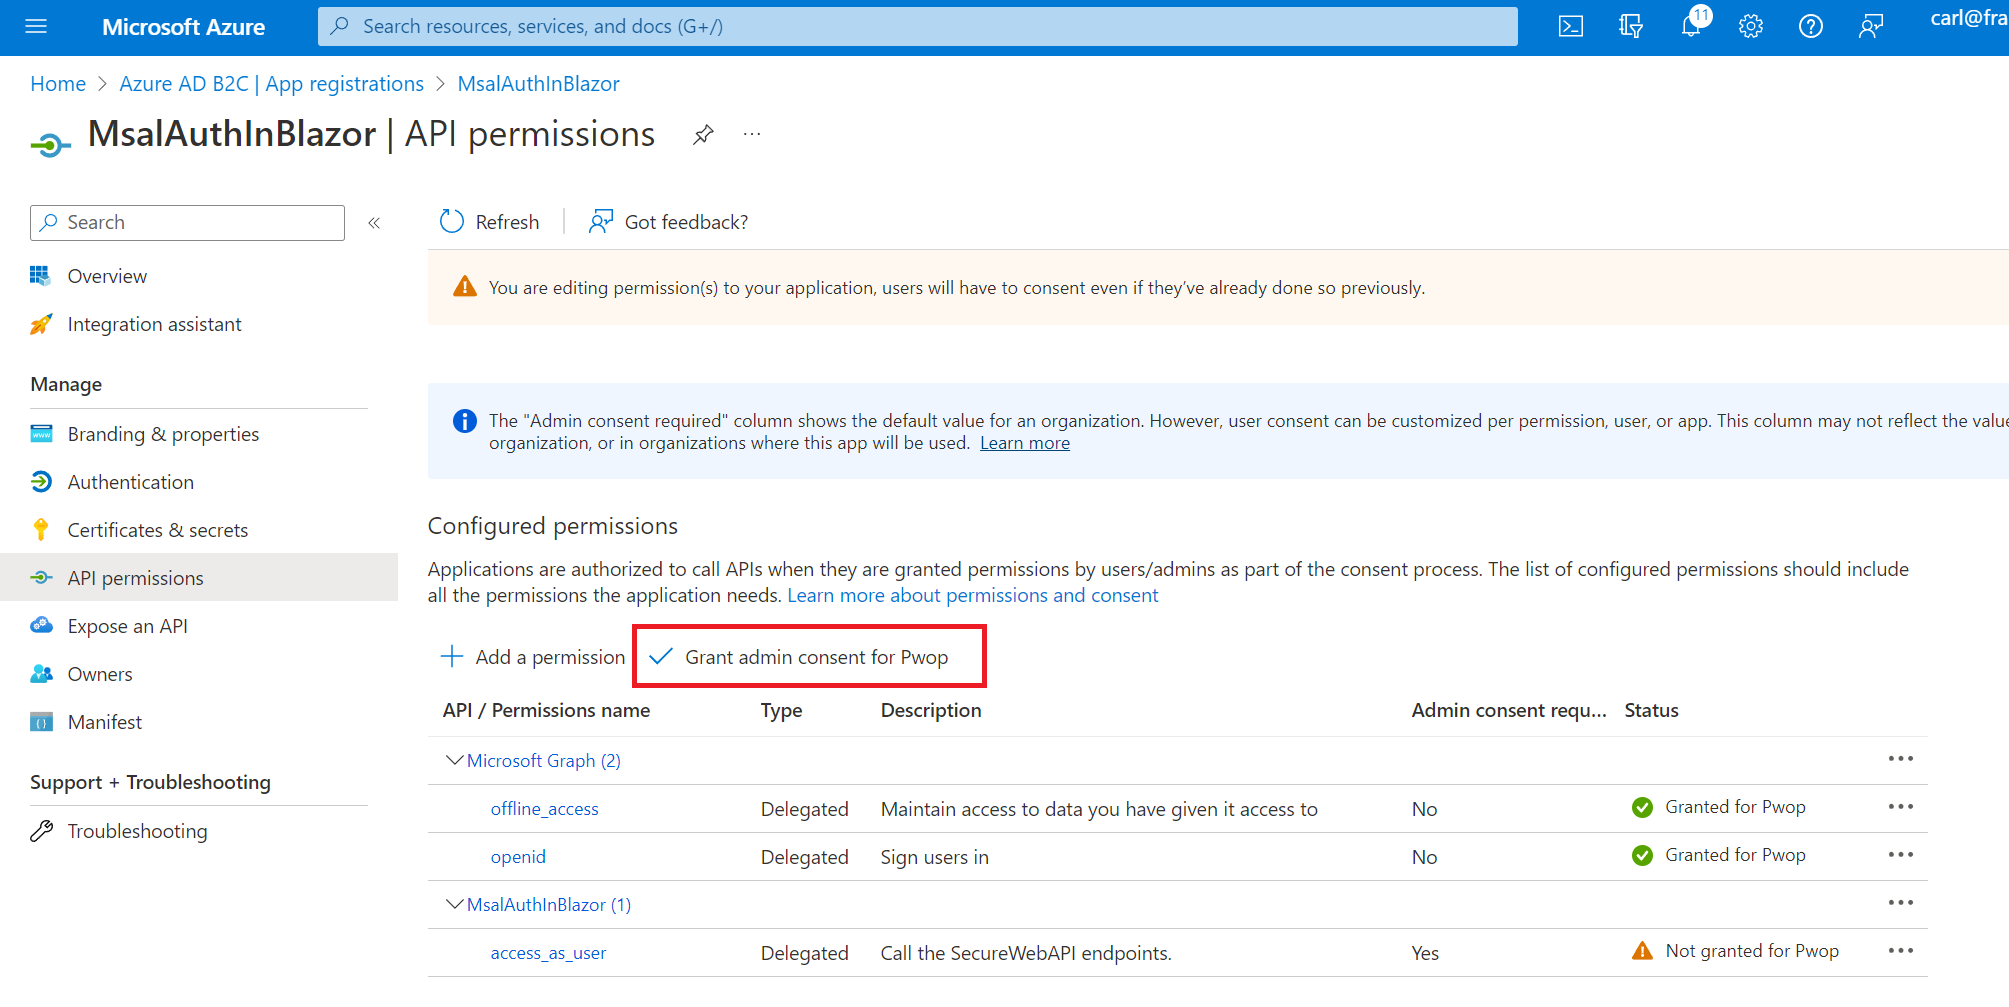
Next, you need to grand admin consent. Select the button as shown, and confirm:
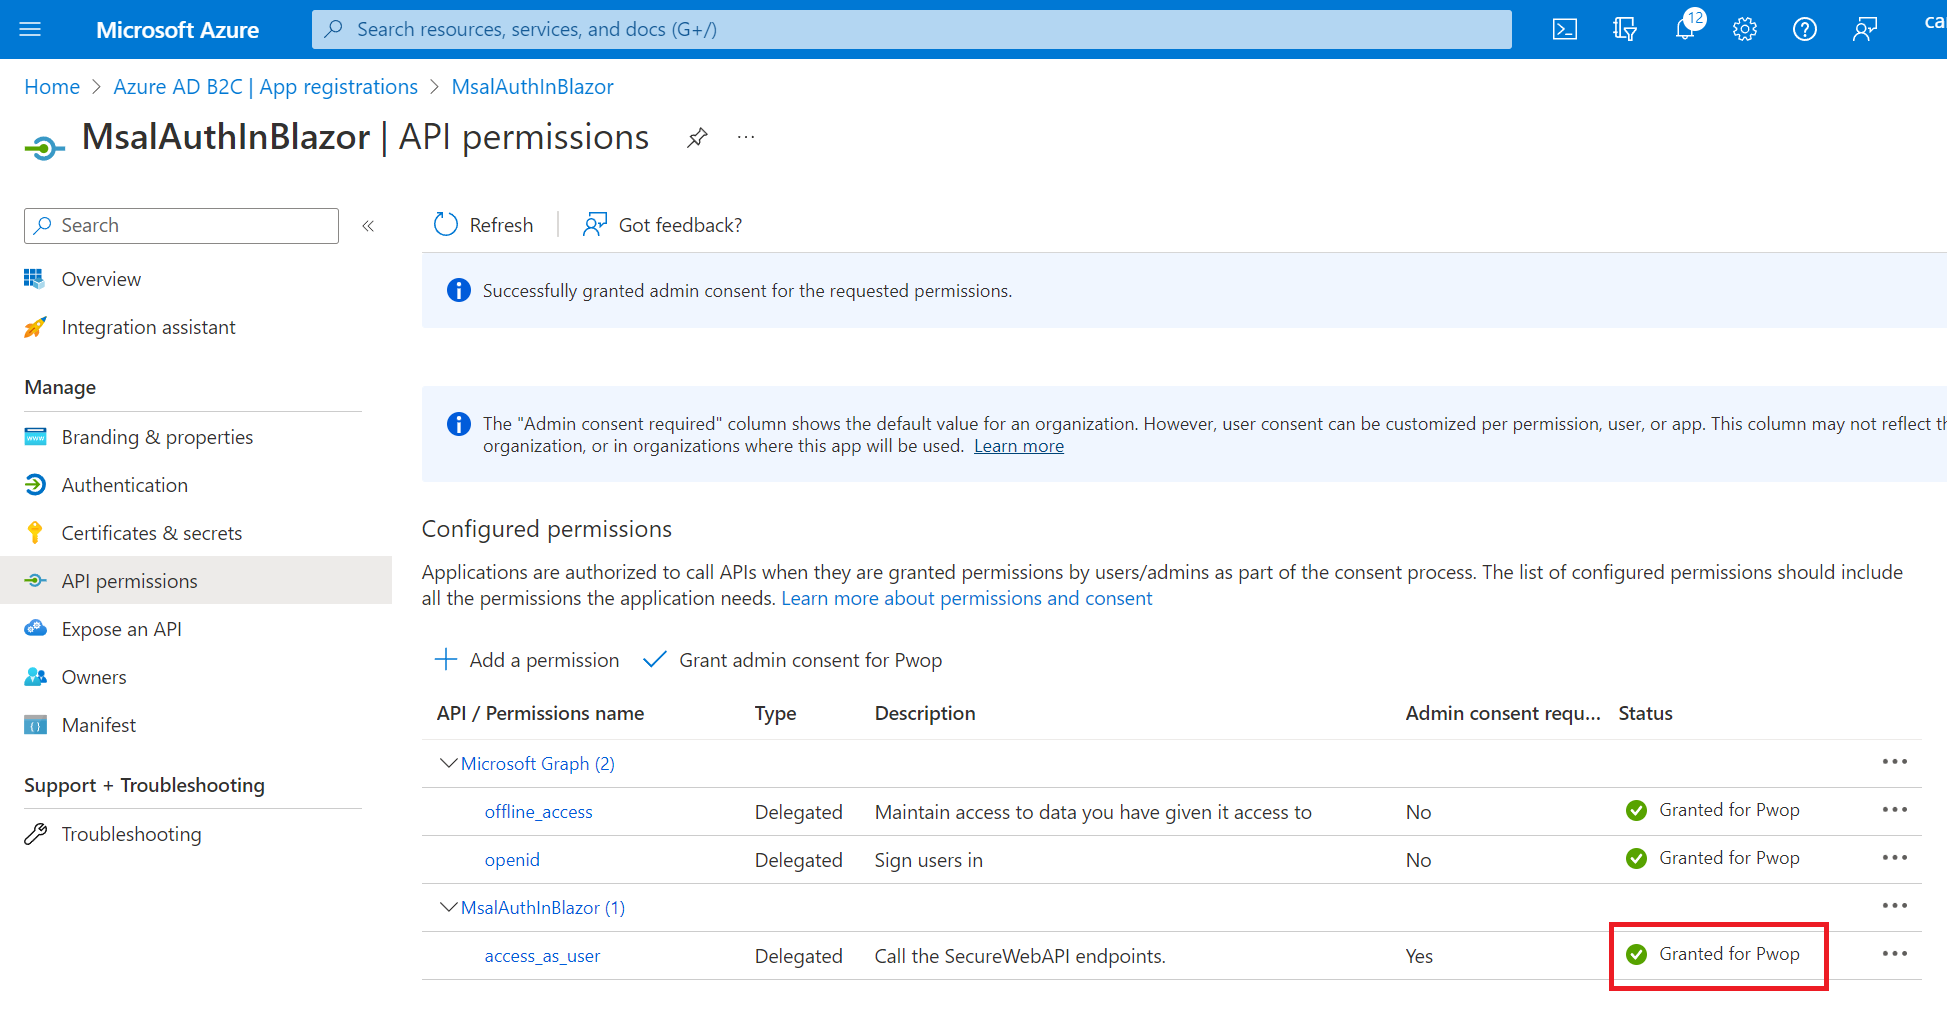
The screen will reflect the change:
Finally, go to Branding & properties, and get the Publisher domain, and update the Domain setting in the appsettings.json file of the SecureWebApi project.
Then for the Instance setting, also in appsettings.json, use https://{YOUR-TENANT-NAME-HERE}.b2clogin.com/.
The complete file should look like below, but with your own IDs:
{
  "AzureAd": {
    "Instance": "https://{YOUR-TENANT-NAME-HERE}.b2clogin.com/",
    "Domain": "{YOUR-TENANT-NAME-HERE}.onmicrosoft.com",
    "TenantId": "{REPLACE-WITH-YOUR-TENANT-ID}",
    "ClientId": "{REPLACE-WITH-YOUR-CLIENT-ID}",
    "CallbackPath": "/signin-oidc",
    "Scopes": "access_as_user",
    "ClientSecret": "{REPLACE-WITH-YOUR-CLIENT-SECRET}",
    "ClientCertificates": [],
    "SignUpSignInPolicyId": "b2c_1_social_susi"
  },
  "MicrosoftGraph": {
    "BaseUrl": "https://graph.microsoft.com/v1.0",
    "Scopes": "user.read"
  },
  "DownstreamApi": {
    "BaseUrl": "{REPLACE-WITH-YOUR-SECURE-WEB-API-URL}",
    "Scopes": "user.read"
  },
  "Logging": {
    "LogLevel": {
      "Default": "Information",
      "Microsoft.AspNetCore": "Warning"
    }
  },
  "AllowedHosts": "*"
}
☝️ Do not forget to replace the placeholders with your own values.
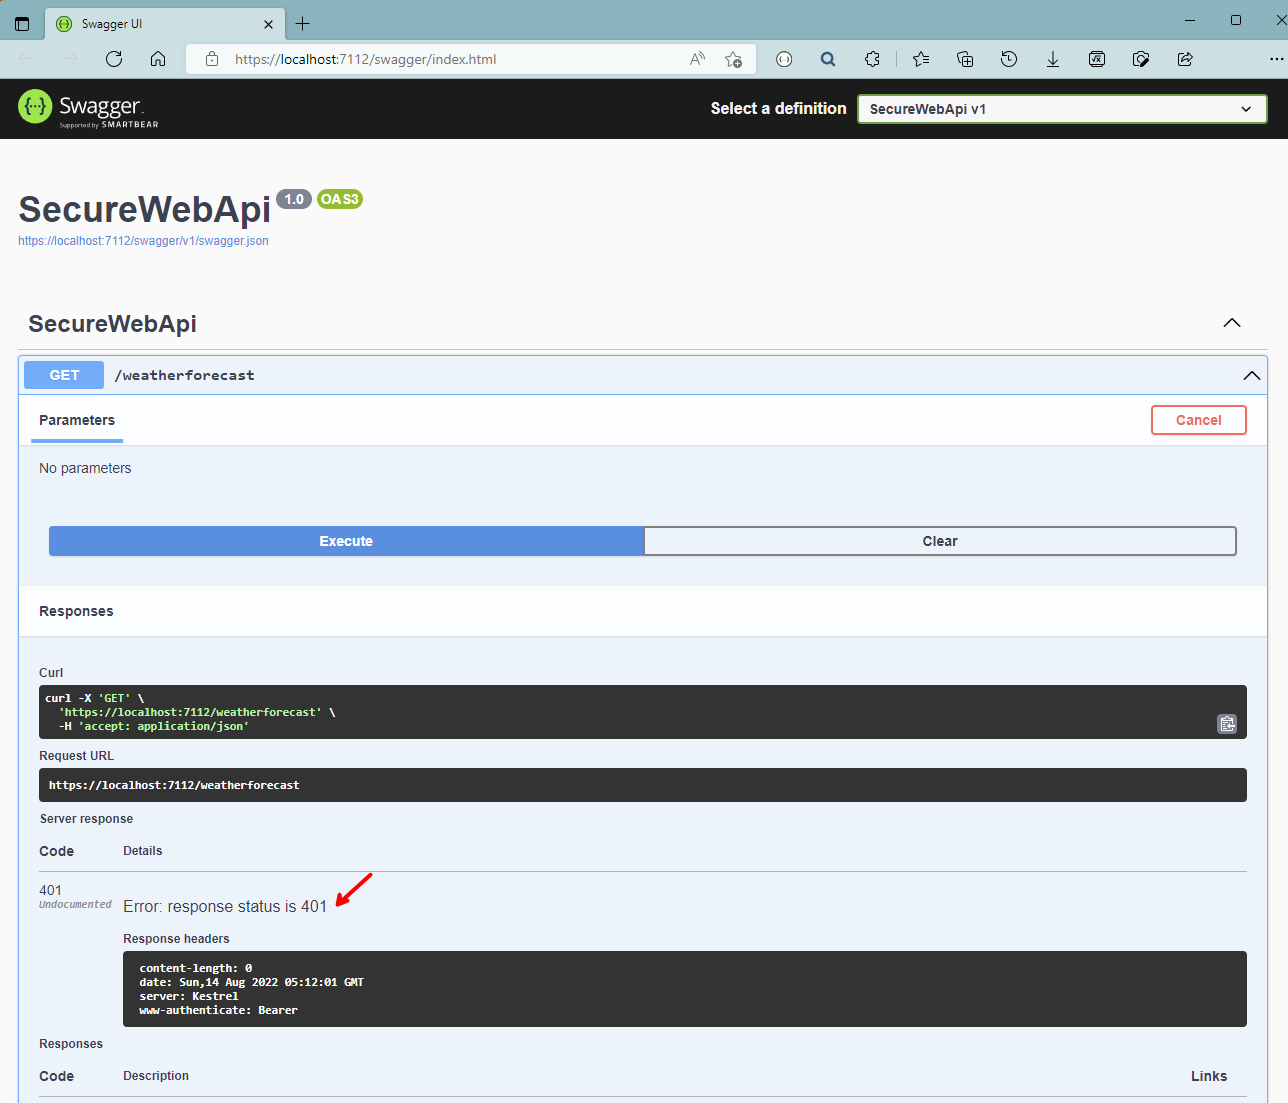
Build and run the application, expand GET /weatherforecast again, click on Try it out, then on Execute.
This time, you should get an Unauthorized 401 HTTP code back.
Our Web API application is secure!
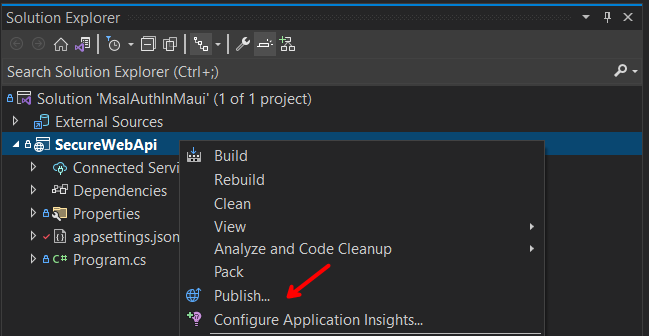
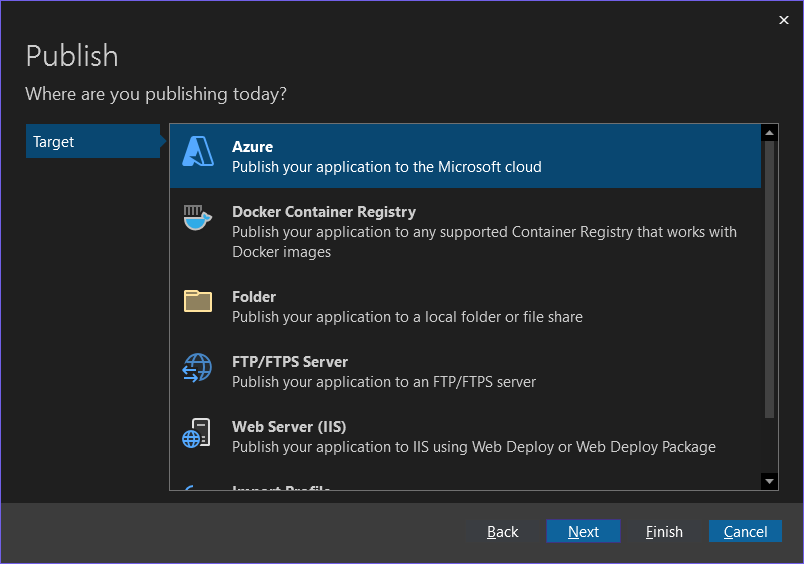
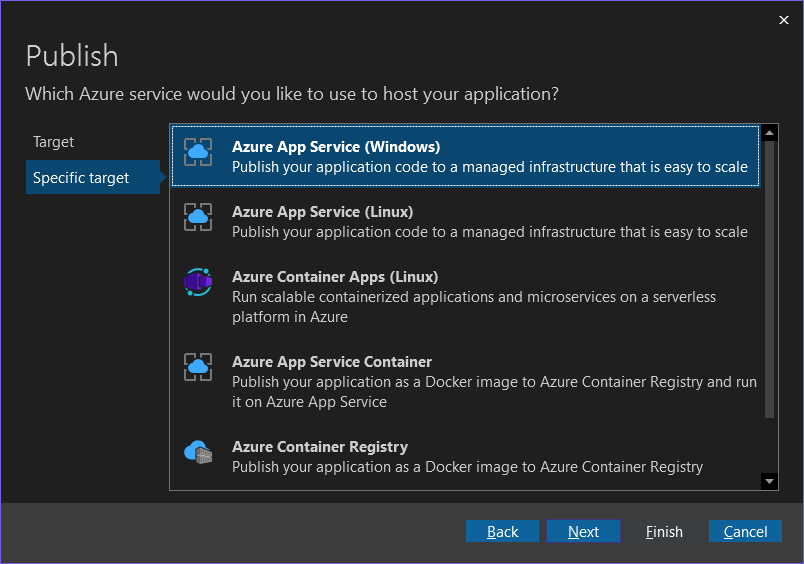
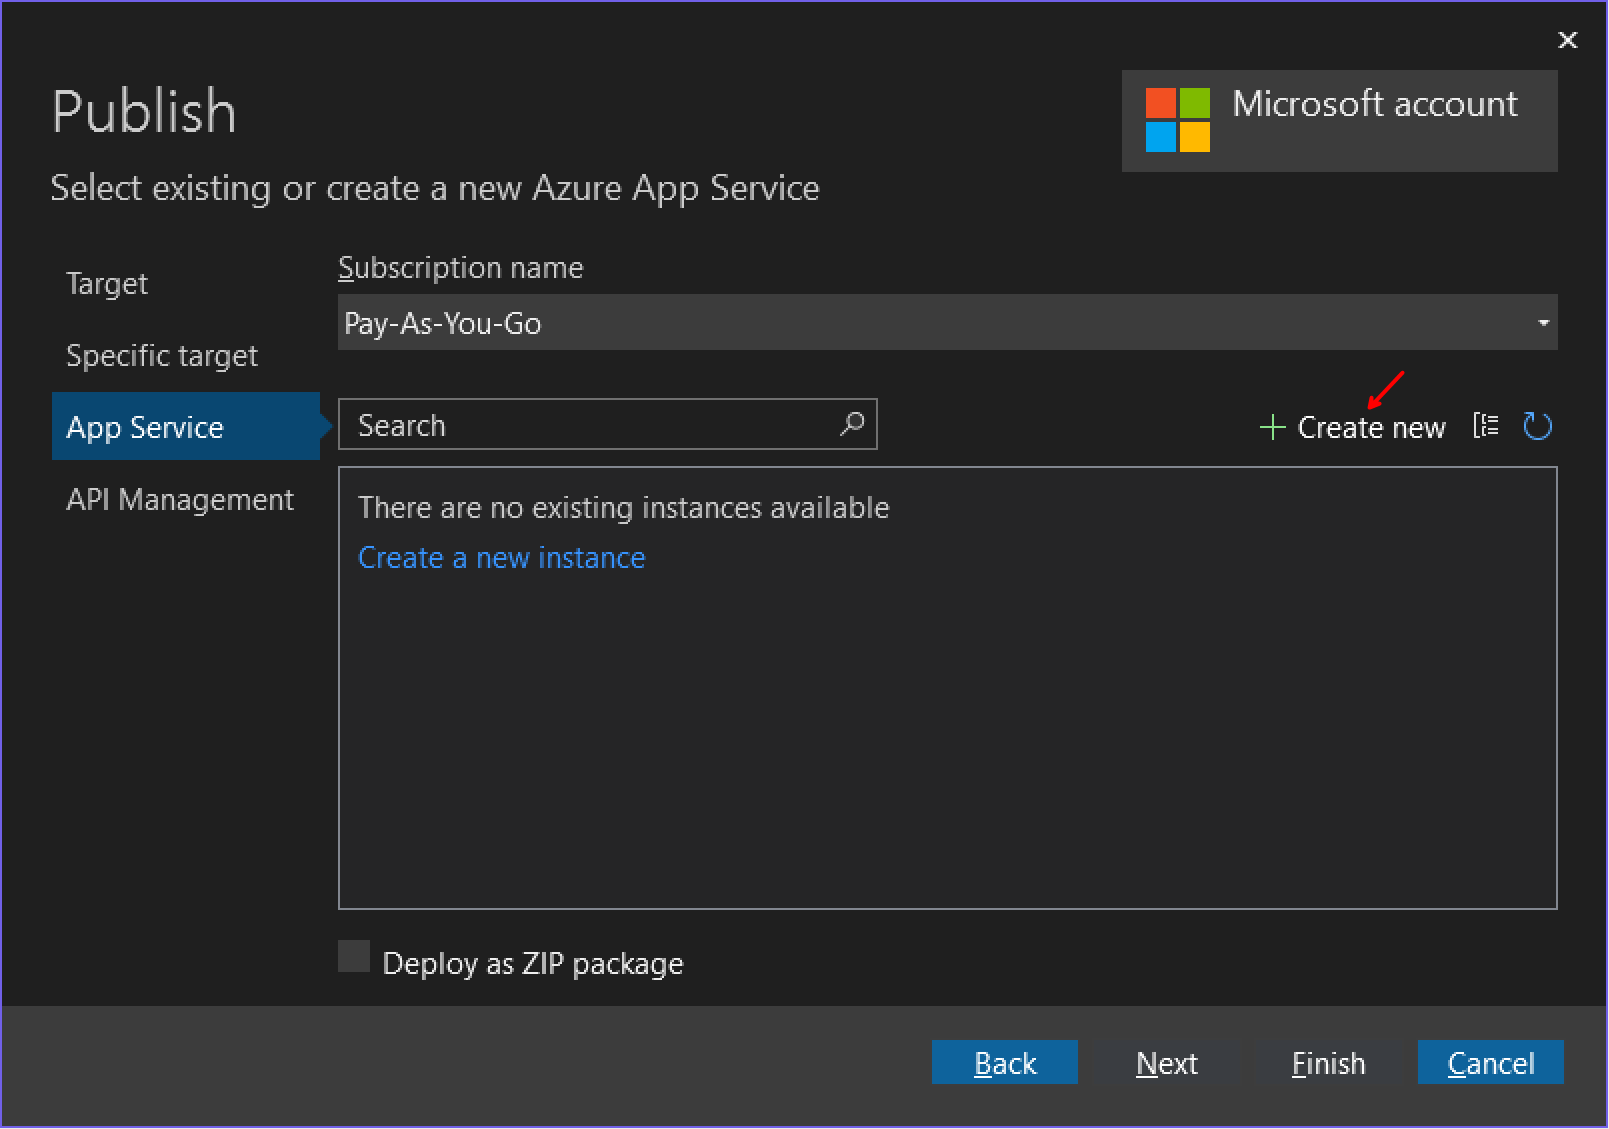
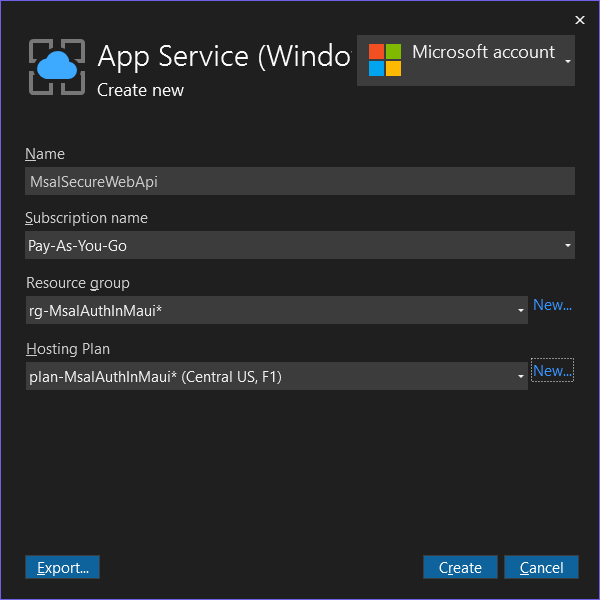
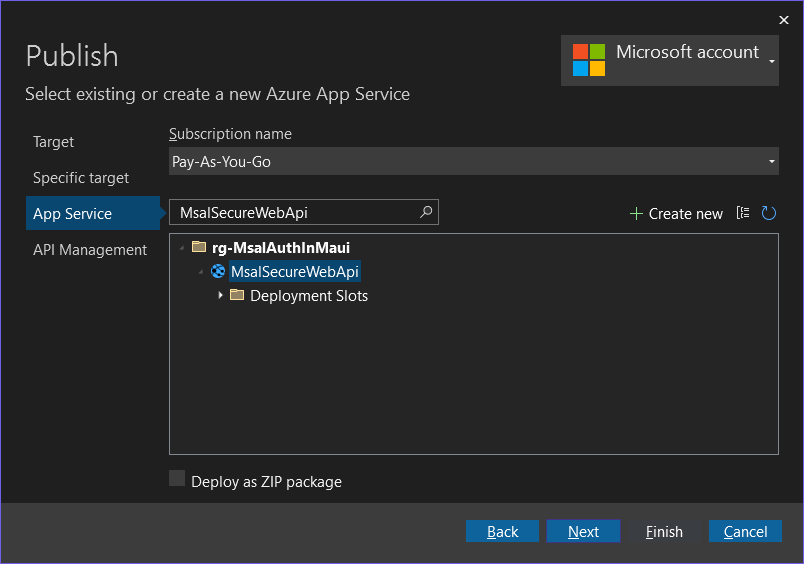
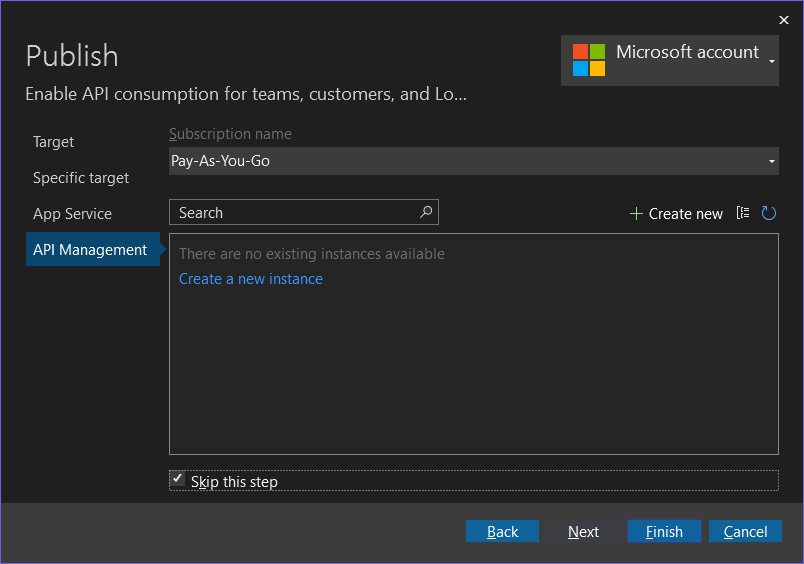
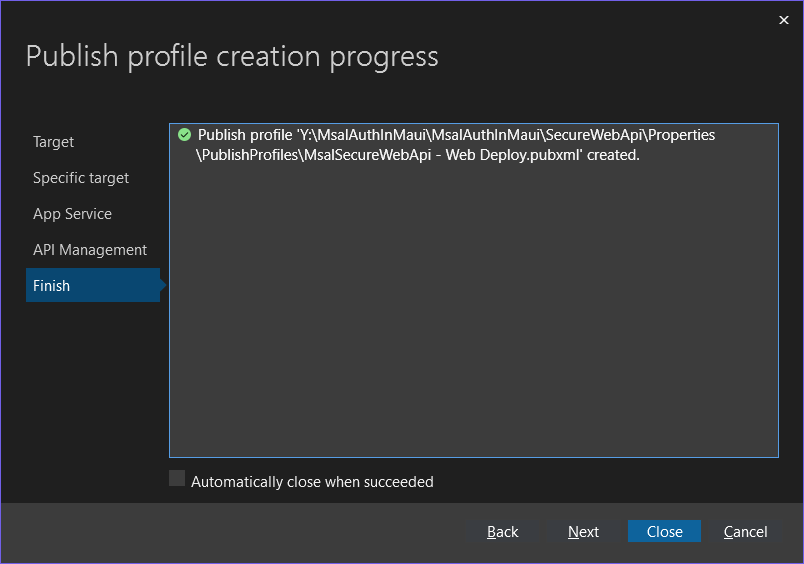
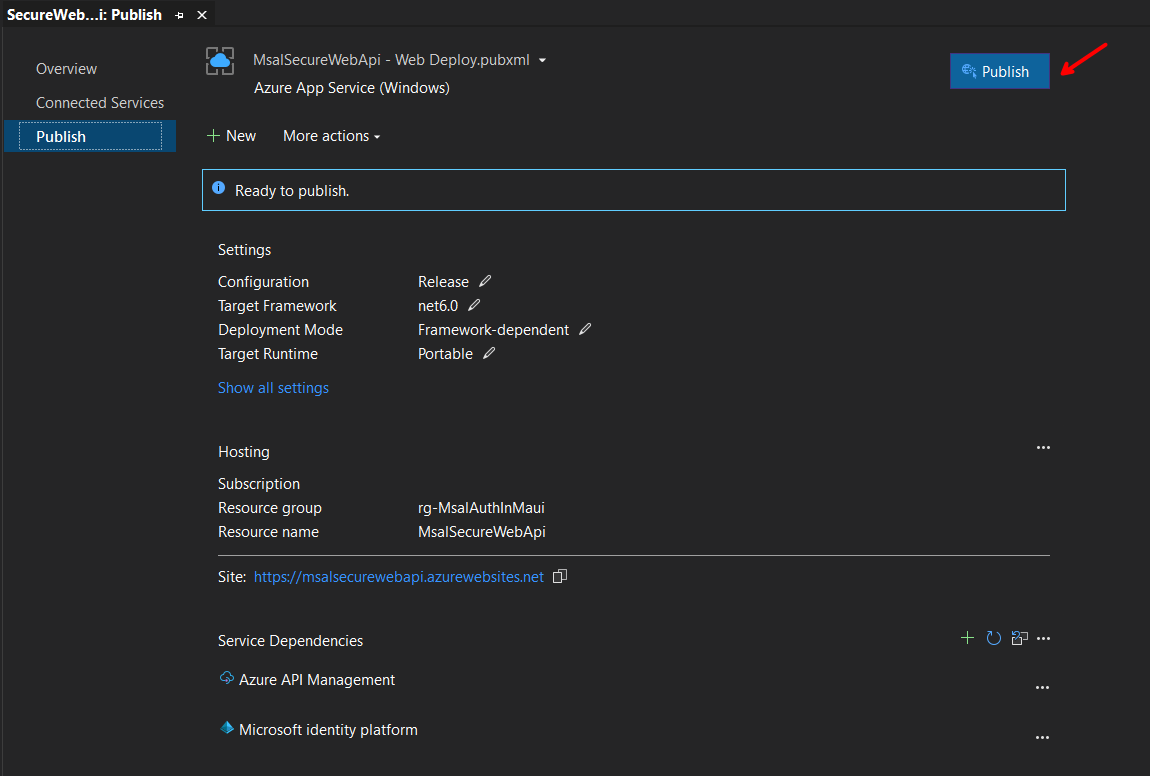
Right-click on the SecureWebApi.csproj file, and select Publish..., then follow the following steps:
Note: Skip the API Management step
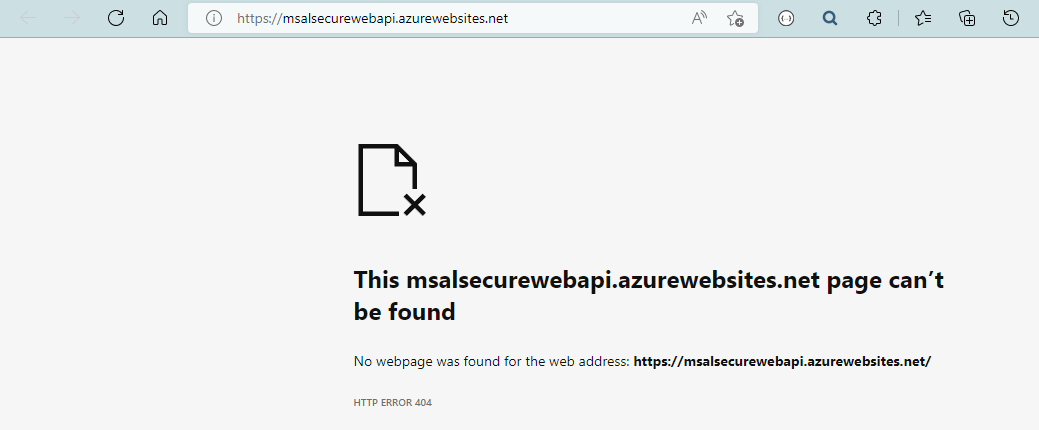
After deployment, the application will launch but you will get a HTTP Error 404.
Worry not, this is because for security reason, Swagger is only enabled running in Development mode.
If you want to enable it for testing purposes, you can comment-out the if (app.Environment.IsDevelopment()) condition in the Program.cs file.
// Configure the HTTP request pipeline.
if (app.Environment.IsDevelopment())
{
    app.UseSwagger();
    app.UseSwaggerUI();
}
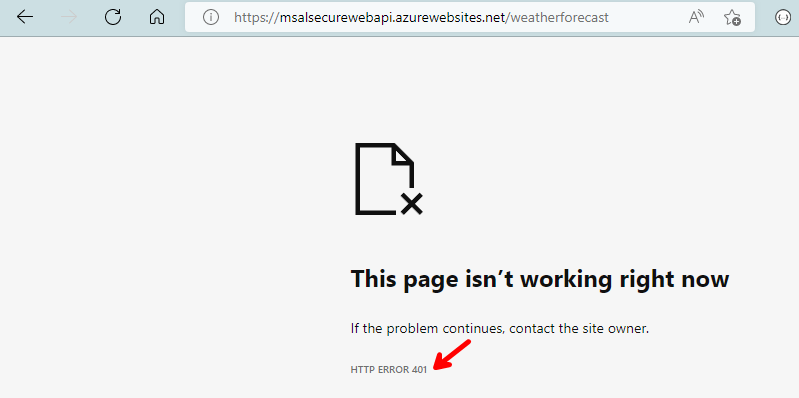
If you append /weatherforecast to the URL, you will see that indeed, the application is running, as the proper Unauthorized 401 shows up, as we are not passing an access token.
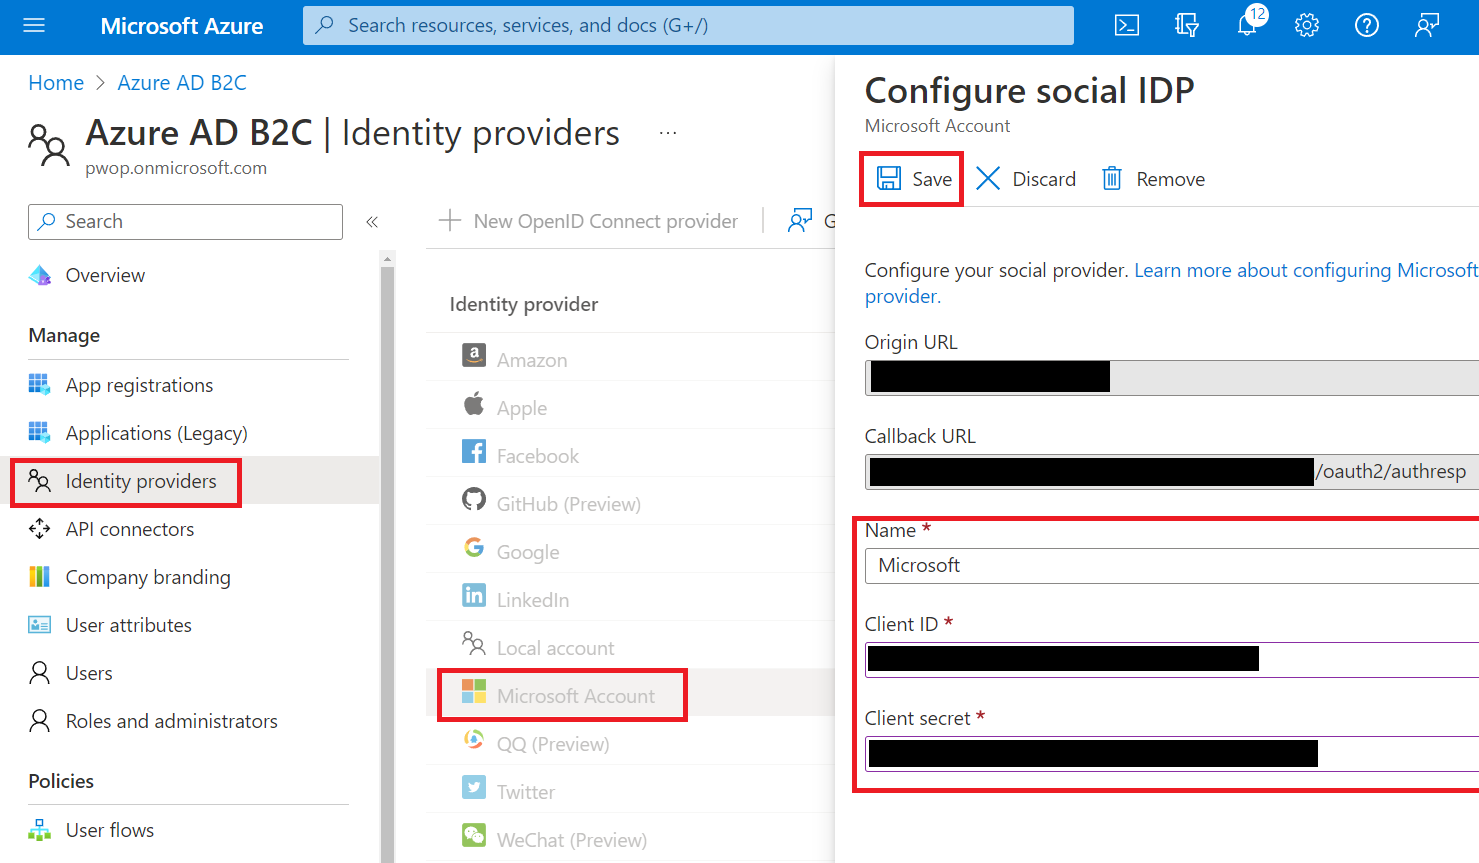
Go back to Azure, go to your Azure AD B2C tenant, click on Identity providers, then on Microsoft Account, and enter Microsoft for the name, and paste the Client ID and Client Secret, we saved in a previous step.
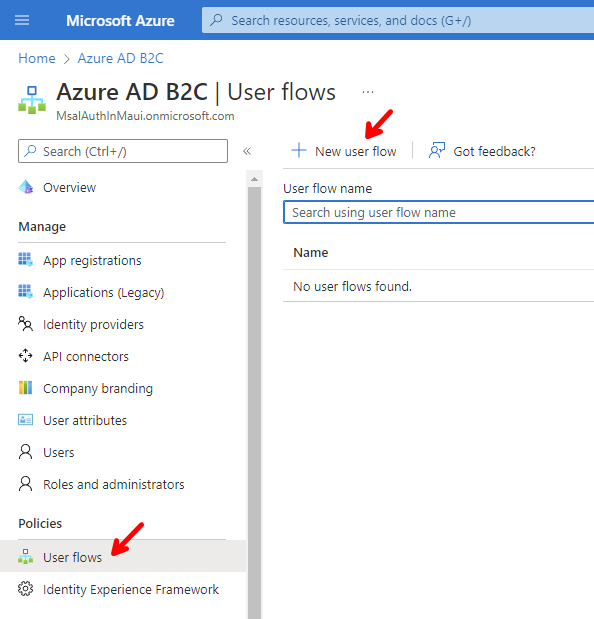
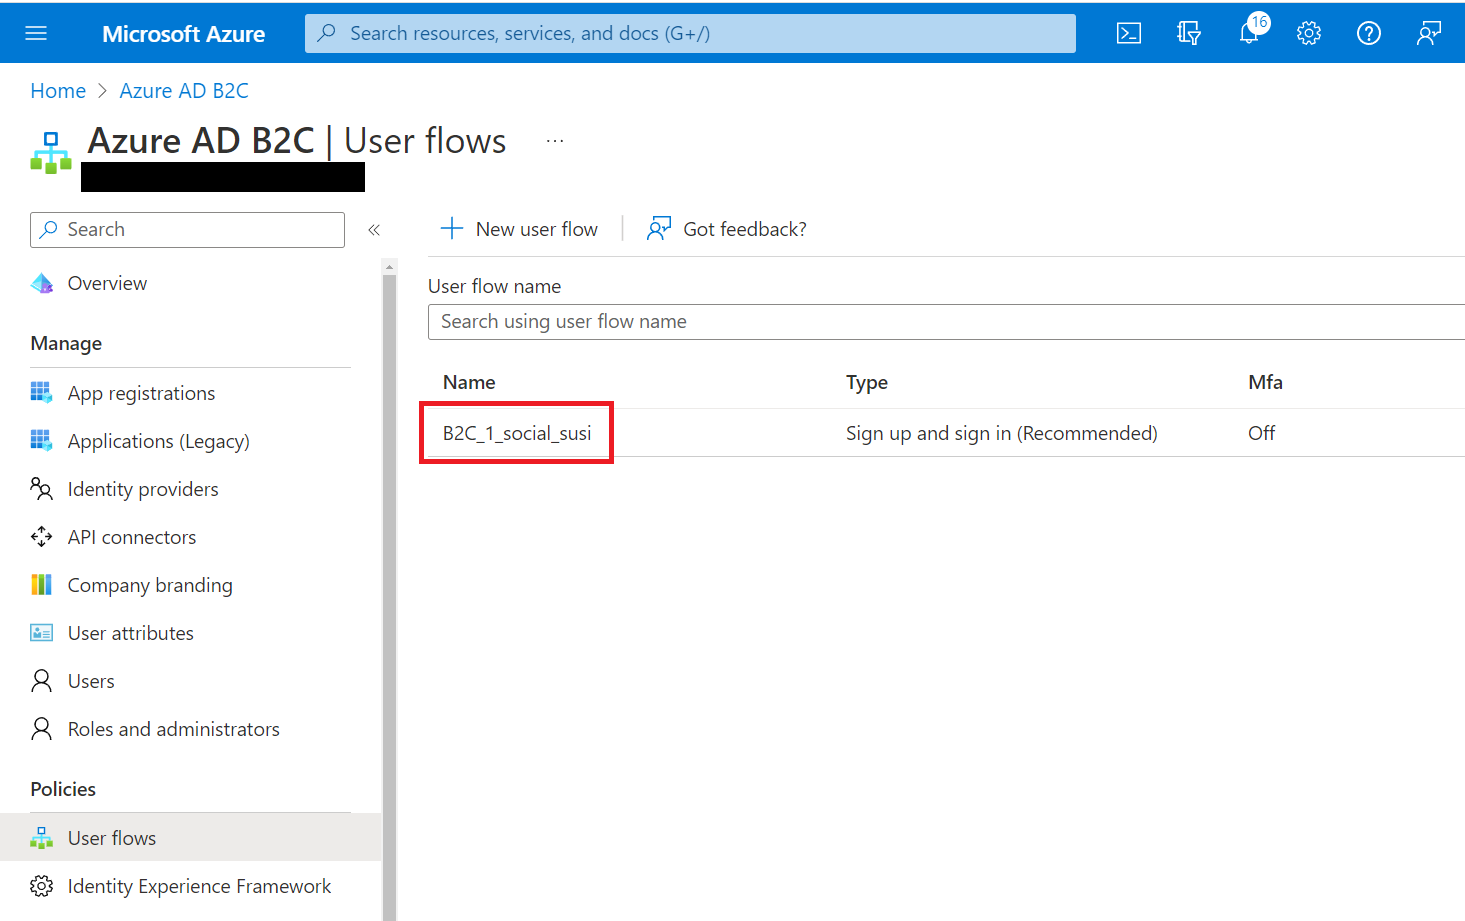
Now we need to create a Sign up and sign in user flow. Go to User flows, and click on + New user flow.
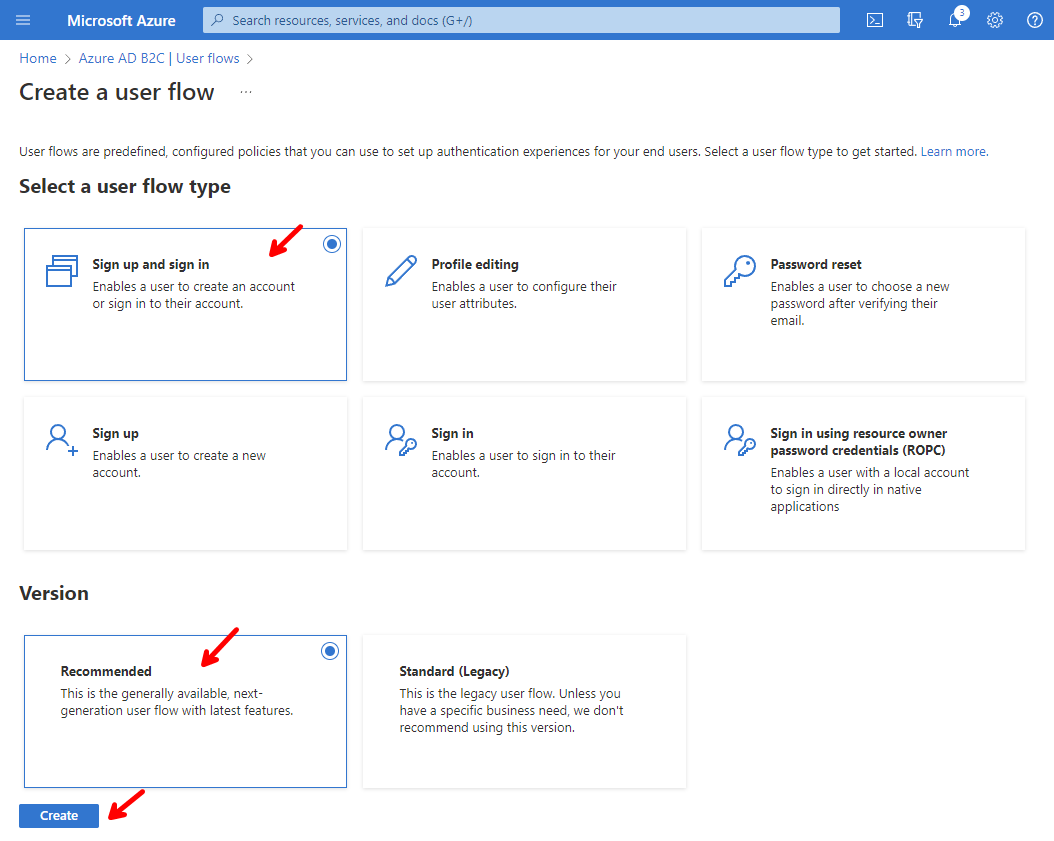
Here we can create a few different user flows, depending on the things we want to allow in our application. For now, we are only interested in the Sign up and sign in user flow, so click that, then keep the recommended version, and click on Create.
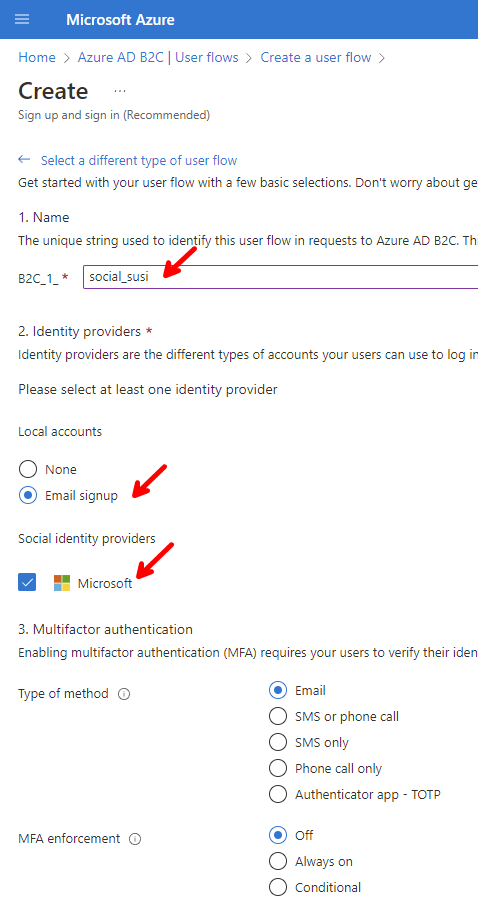
Give it a name of social_susi to distinguish from other identity provider flows, for instance if we add support for Google, Facebook, etc. Enable Email signup, this will allow the users to create accounts with their own email, and password. Check the Microsoft box under Social identity providers, and keep the Email, MFA enforcement defaults.
☝️ Notice that the full name will be B2C_1_social_susi, and B2C_1_ is pre-appended. This is important, as we are going to need the name of the flow in our Blazor application.
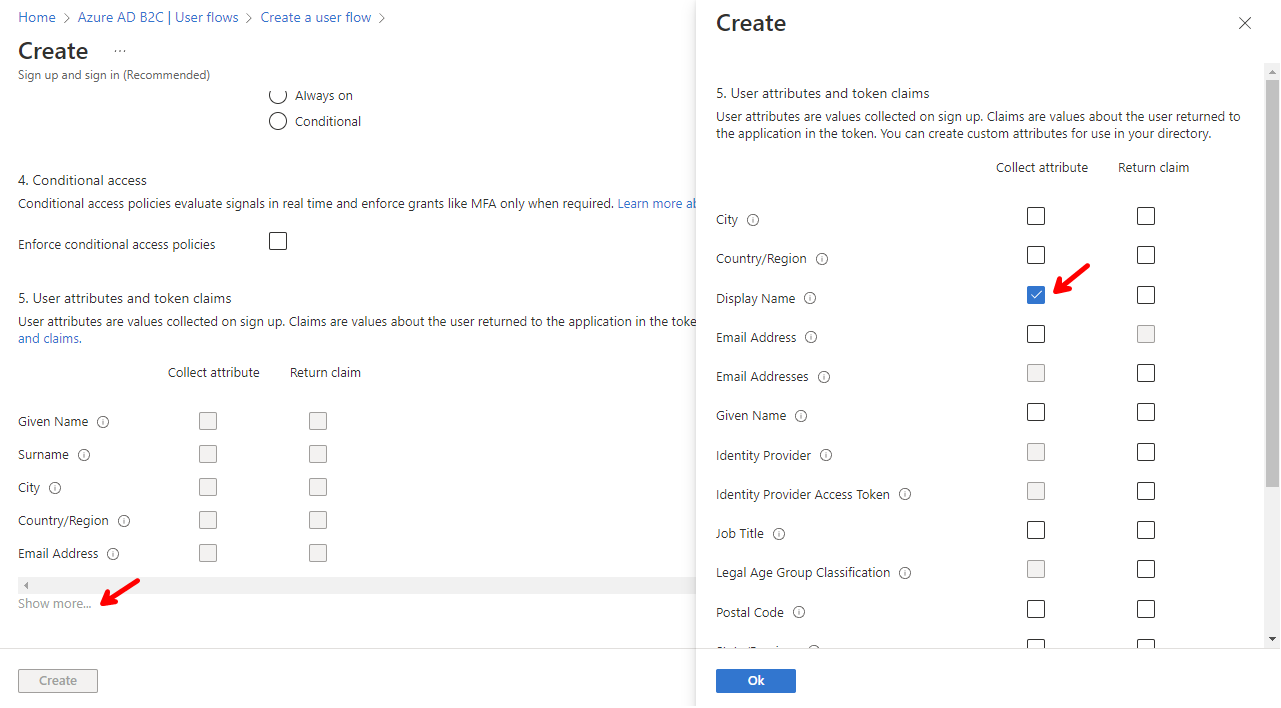
Check the attributes you want to collect when the users create an account with email and password, and any attributes you want to return in the access token. For our purposes, we are only going to select the Display Name, and keep the rest of the default values, (this selections can be changed later at any time.) Click on Show more..., in order to select Display Name, then click on Ok, and finally on Create.
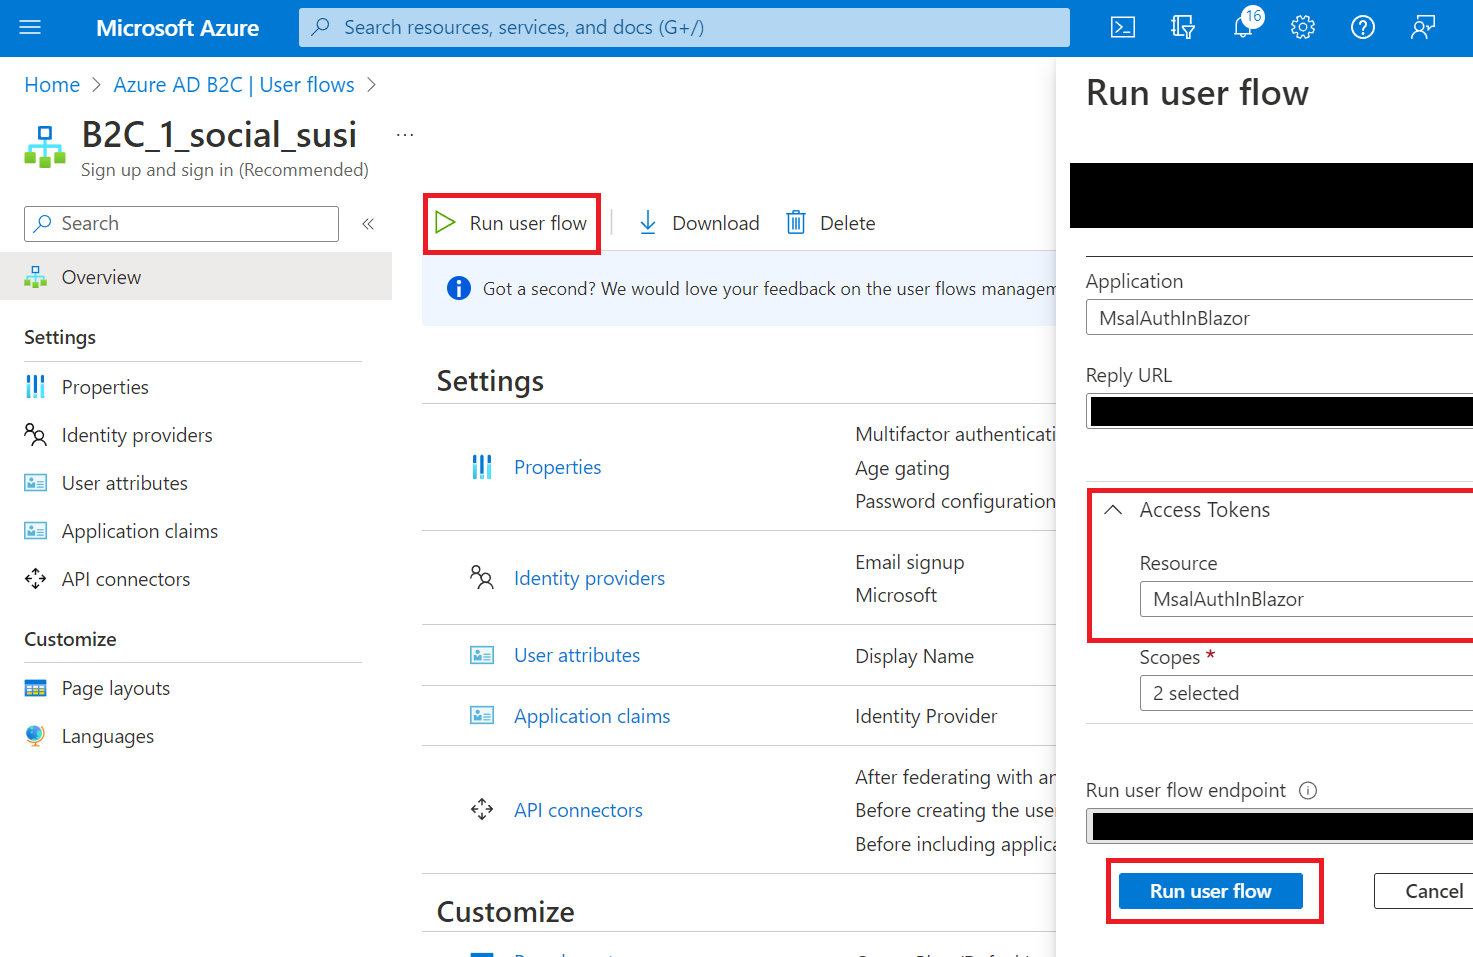
You can test the user flow, by clicking on it, and then clicking on Run user flow.
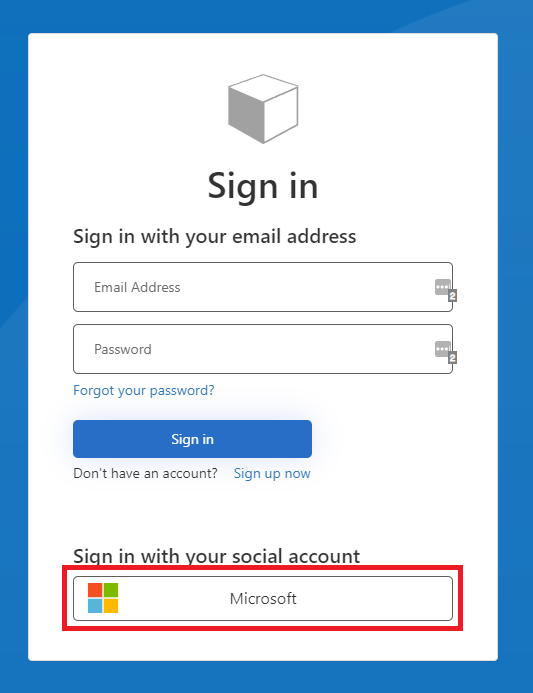
If everything is successfully configured, you should see a new tab, with the UI that eventually is going to show up in our Blazor Server application. Select Microsoft
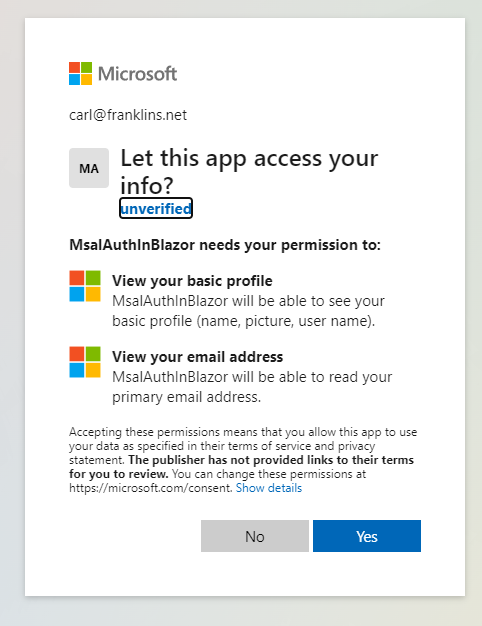
If you see this screen, you're halfway home!
Go to NuGet Package Manager/Package Manager Console, and add a package reference to Microsoft.Identity.Client.
install-package Microsoft.Identity.ClientWe are going to need to read the appsettings.json, so to make it easier to use those setting values, let's add two files:
namespace MsalAuthInBlazor
{
    public class Settings
    {
        public string? ClientId { get; set; }
        public string? Tenant { get; set; }
        public string? TenantId { get; set; }

        public string? InstanceUrl { get; set; }
        public string? PolicySignUpSignIn { get; set; }
        public string? Authority { get; set; }
        public NestedSettings[]? Scopes { get; set; }
        public string? ApiUrl { get; set; }
    }
}namespace MsalAuthInBlazor
{
public class NestedSettings
{
public string? Value { get; set; } = null;
}
}We are also going to need to turn our array of NestedSettings for Scopes, into a string array, so to make it easier, add an Extensions.cs class with the following code:
namespace MsalAuthInBlazor
{
    public static class Extensions
    {
        public static string[] ToStringArray(this NestedSettings[] nestedSettings)
        {
            var result = new string?[nestedSettings.Length];

            for (int i = 0; i < nestedSettings.Length; i++)
            {
                result[i] = nestedSettings[i].Value;
            }

            return result!;
        }
    }
}
We are going to create a wrapper to call the Public Client Application (PCA) code, available in the Microsoft.Identity.Client namespace. Let's call it PCAWrapper.cs, and create an interface for it.
Add a MsalClient folder, and add the following files, with the following content:
using Microsoft.Identity.Client;

namespace MsalAuthInBlazor.MsalClient
{
    public interface IPCAWrapper
    {
        string[]? Scopes { get; set; }
        Task<AuthenticationResult?> AcquireTokenInteractiveAsync(string[]? scopes);
        Task<AuthenticationResult?> AcquireTokenSilentAsync(string[]? scopes);
        Task SignOutAsync();
    }
}// Copyright (c) Microsoft Corporation. All rights reserved.
// Licensed under the MIT License.
using Microsoft.Identity.Client;
namespace MsalAuthInBlazor.MsalClient
{
/// <summary>
/// This is a wrapper for PCA. It is singleton and can be utilized by both application and the MAM callback
/// </summary>
public class PCAWrapper : IPCAWrapper
{
private readonly IConfiguration _configuration;
private readonly Settings? _settings;
internal IPublicClientApplication? PCA { get; }
internal bool UseEmbedded { get; set; } = false;
public string[]? Scopes { get; set; }
// public constructor
public PCAWrapper(IConfiguration configuration)
{
_configuration = configuration;
_settings = _configuration.GetRequiredSection("Settings").Get<Settings>();
if (_settings?.Scopes == null)
return;
Scopes = _settings.Scopes.ToStringArray();
// Create PCA once. Make sure that all the config parameters below are passed
PCA = PublicClientApplicationBuilder
.Create(_settings?.ClientId)
.WithB2CAuthority(_settings?.Authority)
.WithRedirectUri("http://localhost")
.Build();
}
/// <summary>
/// Acquire the token silently
/// </summary>
/// <param name="scopes">desired scopes</param>
/// <returns>Authentication result</returns>
public async Task<AuthenticationResult?> AcquireTokenSilentAsync(string[]? scopes)
{
if (PCA == null)
return null;
var accounts = await PCA.GetAccountsAsync(_settings?.PolicySignUpSignIn).ConfigureAwait(false);
var account = accounts.FirstOrDefault();
var authResult = await PCA.AcquireTokenSilent(scopes, account)
.ExecuteAsync().ConfigureAwait(false);
return authResult;
}
/// <summary>
/// Perform the interactive acquisition of the token for the given scope
/// </summary>
/// <param name="scopes">desired scopes</param>
/// <returns></returns>
public async Task<AuthenticationResult?> AcquireTokenInteractiveAsync(string[]? scopes)
{
if (PCA == null)
return null;
var accounts = await PCA.GetAccountsAsync(_settings?.PolicySignUpSignIn).ConfigureAwait(false); ;
var account = accounts.FirstOrDefault();
return await PCA.AcquireTokenInteractive(scopes)
.WithB2CAuthority(_settings?.Authority)
.WithAccount(account)
.WithParentActivityOrWindow(PlatformConfig.Instance.ParentWindow)
.WithUseEmbeddedWebView(false)
.ExecuteAsync()
.ConfigureAwait(false);
}
/// <summary>
/// Sign out may not perform the complete sign out as company portal may hold
/// the token.
/// </summary>
/// <returns></returns>
public async Task SignOutAsync()
{
if (PCA == null)
return;
var accounts = await PCA.GetAccountsAsync().ConfigureAwait(false);
foreach (var acct in accounts)
{
await PCA.RemoveAsync(acct).ConfigureAwait(false);
}
}
}
}// Copyright (c) Microsoft Corporation. All rights reserved.
// Licensed under the MIT License.
namespace MsalAuthInBlazor.MsalClient
{
/// <summary>
/// Platform specific configuration.
/// </summary>
public class PlatformConfig
{
/// <summary>
/// Instance to store data
/// </summary>
public static PlatformConfig Instance { get; } = new PlatformConfig();
/// <summary>
/// Platform specific Redirect URI
/// </summary>
public string? RedirectUri { get; set; }
/// <summary>
/// Platform specific parent window
/// </summary>
public object? ParentWindow { get; set; }
// private constructor to ensure singleton
private PlatformConfig()
{
}
}
}Now, let's setup our PCAWrapper.cs to be injected into our Blazor pages. Go to Program.cs and add the following code, after builder.Services.AddSingleton<WeatherForecastService()>;.
builder.Services.AddSingleton<IPCAWrapper, PCAWrapper>();The complete Program.cs file should look like this:
using Microsoft.AspNetCore.Components;
using Microsoft.AspNetCore.Components.Web;
using MsalAuthInBlazor.Data;
using MsalAuthInBlazor.MsalClient;

var builder = WebApplication.CreateBuilder(args);

// Add services to the container.
builder.Services.AddRazorPages();
builder.Services.AddServerSideBlazor();
builder.Services.AddSingleton<WeatherForecastService>();
builder.Services.AddSingleton<IPCAWrapper, PCAWrapper>();

var app = builder.Build();

// Configure the HTTP request pipeline.
if (!app.Environment.IsDevelopment())
{
    app.UseExceptionHandler("/Error");
    // The default HSTS value is 30 days. You may want to change this for production scenarios, see https://aka.ms/aspnetcore-hsts.
    app.UseHsts();
}

app.UseHttpsRedirection();

app.UseStaticFiles();

app.UseRouting();

app.MapBlazorHub();
app.MapFallbackToPage("/_Host");

app.Run();
Open the appsettings.json file, and add the following JSON, replacing the placeholders with your values:
{
  "Settings": {
    "ClientId": "<REPLACE-WITH-YOUR-CLIENT-ID>",
    "Tenant": "<REPLACE-WITH-YOUR-TENANT-NAME>.onmicrosoft.com",
    "TenantId": "<REPLACE-WITH-YOUR-TENANT-ID>",
    "InstanceUrl": "https://<REPLACE-WITH-YOUR-TENANT-NAME>.b2clogin.com",
    "PolicySignUpSignIn": "b2c_1_social_susi",
    "Authority": "https://<REPLACE-WITH-YOUR-TENANT-NAME>.b2clogin.com/tfp/<REPLACE-WITH-YOUR-TENANT-NAME>.onmicrosoft.com/b2c_1_social_susi",
    "Scopes": [
      { "Value": "https://<REPLACE-WITH-YOUR-TENANT-NAME>.onmicrosoft.com/<REPLACE-WITH-YOUR-CLIENT-ID>/access_as_user" }
    ],
    "ApiUrl": "<REPLACE-WITH-YOUR-SECURE-WEB-API-URL>"
  },
  "Logging": {
    "LogLevel": {
      "Default": "Information",
      "Microsoft.AspNetCore": "Warning"
    }
  },
  "AllowedHosts": "*"
}
☝️ Make sure you replace the placeholders above, with your own values.
Open _Imports.razor, and add the following:
@using Microsoft.Identity.Client
@using MsalAuthInBlazor.Data
@using MsalAuthInBlazor.MsalClient
@using System.Text.Json;
Before we can call our PCAWrapper.cs code to authenticate using MSAL .NET, we are going to need a place to store our access token, after successful authentication. Let's add a Globals.cs file with the following code:
namespace MsalAuthInBlazor
{
    public class Globals
    {
        public static string? AccessToken;
    }
}
Now, we are ready to create log in, and log out buttons, and use the PCAWrapper code to authenticate using MSAL .NET.
Open MainLayout.razor, and replace it's contents with the following code:
@inherits LayoutComponentBase
@inject IPCAWrapper _pcaWrapper;
@inject IConfiguration _configuration;

<PageTitle>Msal Auth In Blazor</PageTitle>

<div class="page">
    <div class="sidebar">
        <NavMenu />
    </div>

    <main>
        <div class="top-row px-4">
            @if (IsLoggedIn)
            {
                <button class="btn btn-link" @onclick="OnLogoutClicked">Logout</button>
            }
            else
            {
                <button class="btn btn-link" @onclick="OnLoginClicked">Login</button>
            }
            <a href="https://docs.microsoft.com/aspnet/" target="_blank">About</a>
        </div>

        <article class="content px-4">
            @Body
        </article>
    </main>
</div>


@code {
    private List<WeatherForecast> weatherForecast = new();

    bool _isLoggedIn = false;
    public bool IsLoggedIn
    {
        get => _isLoggedIn;
        set
        {
            if (_isLoggedIn == value) return;
            _isLoggedIn = value;
            InvokeAsync(StateHasChanged);
        }
    }

    private async void OnLoginClicked()
    {
        try
        {
            // Attempt silent login, and obtain access token.
            var result = await _pcaWrapper.AcquireTokenSilentAsync(_pcaWrapper.Scopes).ConfigureAwait(false);

            // Set access token.
            Globals.AccessToken = result?.AccessToken;
        }
        // A MsalUiRequiredException will be thrown, if this is the first attempt to login, or after logging out.
        catch (MsalUiRequiredException)
        {
            try
            {
                // Perform interactive login, and obtain access token.
                var result = await _pcaWrapper.AcquireTokenInteractiveAsync(_pcaWrapper?.Scopes).ConfigureAwait(false);

                // Set access token.
                Globals.AccessToken = result?.AccessToken;
            }
            catch (Exception ex)
            {
                // Ignore.
            }
        }
        catch (Exception ex)
        {
            IsLoggedIn = false;
        }

        IsLoggedIn = true;
    }

    private async void OnLogoutClicked()
    {
        await _pcaWrapper.SignOutAsync().ConfigureAwait(false);
        IsLoggedIn = false;
        Globals.AccessToken = null;
    }
}
Now, let's reuse the WeatherForecastService.cs service provided in the template, but modify the code to return the weather forecast data from our Secure Web API, rather than random generated data. Replace the code with the following:
using Microsoft.Extensions.Configuration;
using System.Text.Json;

namespace MsalAuthInBlazor.Data
{
    public class WeatherForecastService
    {
        private readonly IConfiguration _configuration;
        private readonly Settings? _settings;

        public WeatherForecastService(IConfiguration configuration)
        {
            _configuration = configuration;
            _settings = _configuration.GetRequiredSection("Settings").Get<Settings>();
        }

        // Call the Secure Web API.
        public async Task<List<WeatherForecast>> CallSecureWebApi()
        {
            if (Globals.AccessToken == null)
                return new();

            var result = new List<WeatherForecast>();

            // Get the weather forecast data from the Secure Web API.
            var client = new HttpClient();

            // Create the request.
            var message = new HttpRequestMessage(HttpMethod.Get, $"{_settings?.ApiUrl}weatherforecast" );

            // Add the Authorization Bearer header.
            message.Headers.Add("Authorization", $"Bearer {Globals.AccessToken}");

            // Send the request.
            var response = await client.SendAsync(message).ConfigureAwait(false);

            // Get the response.
            var options = new JsonSerializerOptions
            {
                PropertyNameCaseInsensitive = true
            };

            var responseString = await response.Content.ReadAsStringAsync().ConfigureAwait(false);
            result = JsonSerializer.Deserialize<List<WeatherForecast>>(responseString, options);

            // Ensure a success status code.
            response.EnsureSuccessStatusCode();

            // Return the response.
            return result!;
        }
    }
}
Then, replace the @code section in the FetchData.razor file, to call our new function in WeatherForecastService.cs.
From this:
@code {
    private WeatherForecast[]? forecasts;

    protected override async Task OnInitializedAsync()
    {
        forecasts = await ForecastService.GetForecastAsync(DateTime.Now);
    }
}
To this:
@code {
    private List<WeatherForecast>? forecasts;

    protected override async Task OnInitializedAsync()
    {
        forecasts = await ForecastService.CallSecureWebApi();
    }
}
And, that is it. Go ahead and run the application, you should be able to log in, using any of the identity providers we setup, and call the web api securely with an access token.
In this episode, we created a secure web api application and deployed it to Azure. Then we created a new Azure AD B2C tenant, and configured it for authentication using the Microsoft Identity Provider. Finally we created a Blazor Server application, and leveraged the Azure AD B2C tenant to provide authentication support.
For more information about the topics involved in this demo, check the links in the resources section below.
The complete code for this demo can be found in the link below.
| Resource Title | Url |
|---|---|
| BlazorTrain with Carl Franklin | https://blazortrain.com |
| The .NET Show with Carl Franklin | https://www.youtube.com/playlist?list=PL8h4jt35t1wgW_PqzZ9USrHvvnk8JMQy_ |
| Download .NET | https://dotnet.microsoft.com/en-us/download |
| Overview of the Microsoft Authentication Library (MSAL) | https://docs.microsoft.com/en-us/azure/active-directory/develop/msal-overview |
| Minimal APIs overview) | https://docs.microsoft.com/en-us/aspnet/core/fundamentals/minimal-apis?view=aspnetcore-6.0 |
| Calling Secured APIs with MSAL Auth in MAUI: The .NET Show with Carl Franklin Ep 24 | https://www.youtube.com/watch?v=p8NRvakFW2M |
| Calling Secured APIs with MSAL Auth in MAUI: Repo | https://github.com/carlfranklin/MsalAuthInMaui |
| System Browser on .Net Core | https://github.com/AzureAD/microsoft-authentication-library-for-dotnet/wiki/System-Browser-on-.Net-Core |
