#Epicodus Tutorial
##Day 13 ###Task: Make a new webpage about a place you'd like to go on vacation. Use Bootstrap for your styles.
###Screenshot:
- Override some of Bootstrap's styles with your own. Use a second stylesheet; don't change Bootstrap's code!
###Screenshot:
- Search for Bootstrap themes, and pick out another theme built with Bootstrap. Replace Bootstrap's origin CSS with the theme's CSS.
###Screenshot:
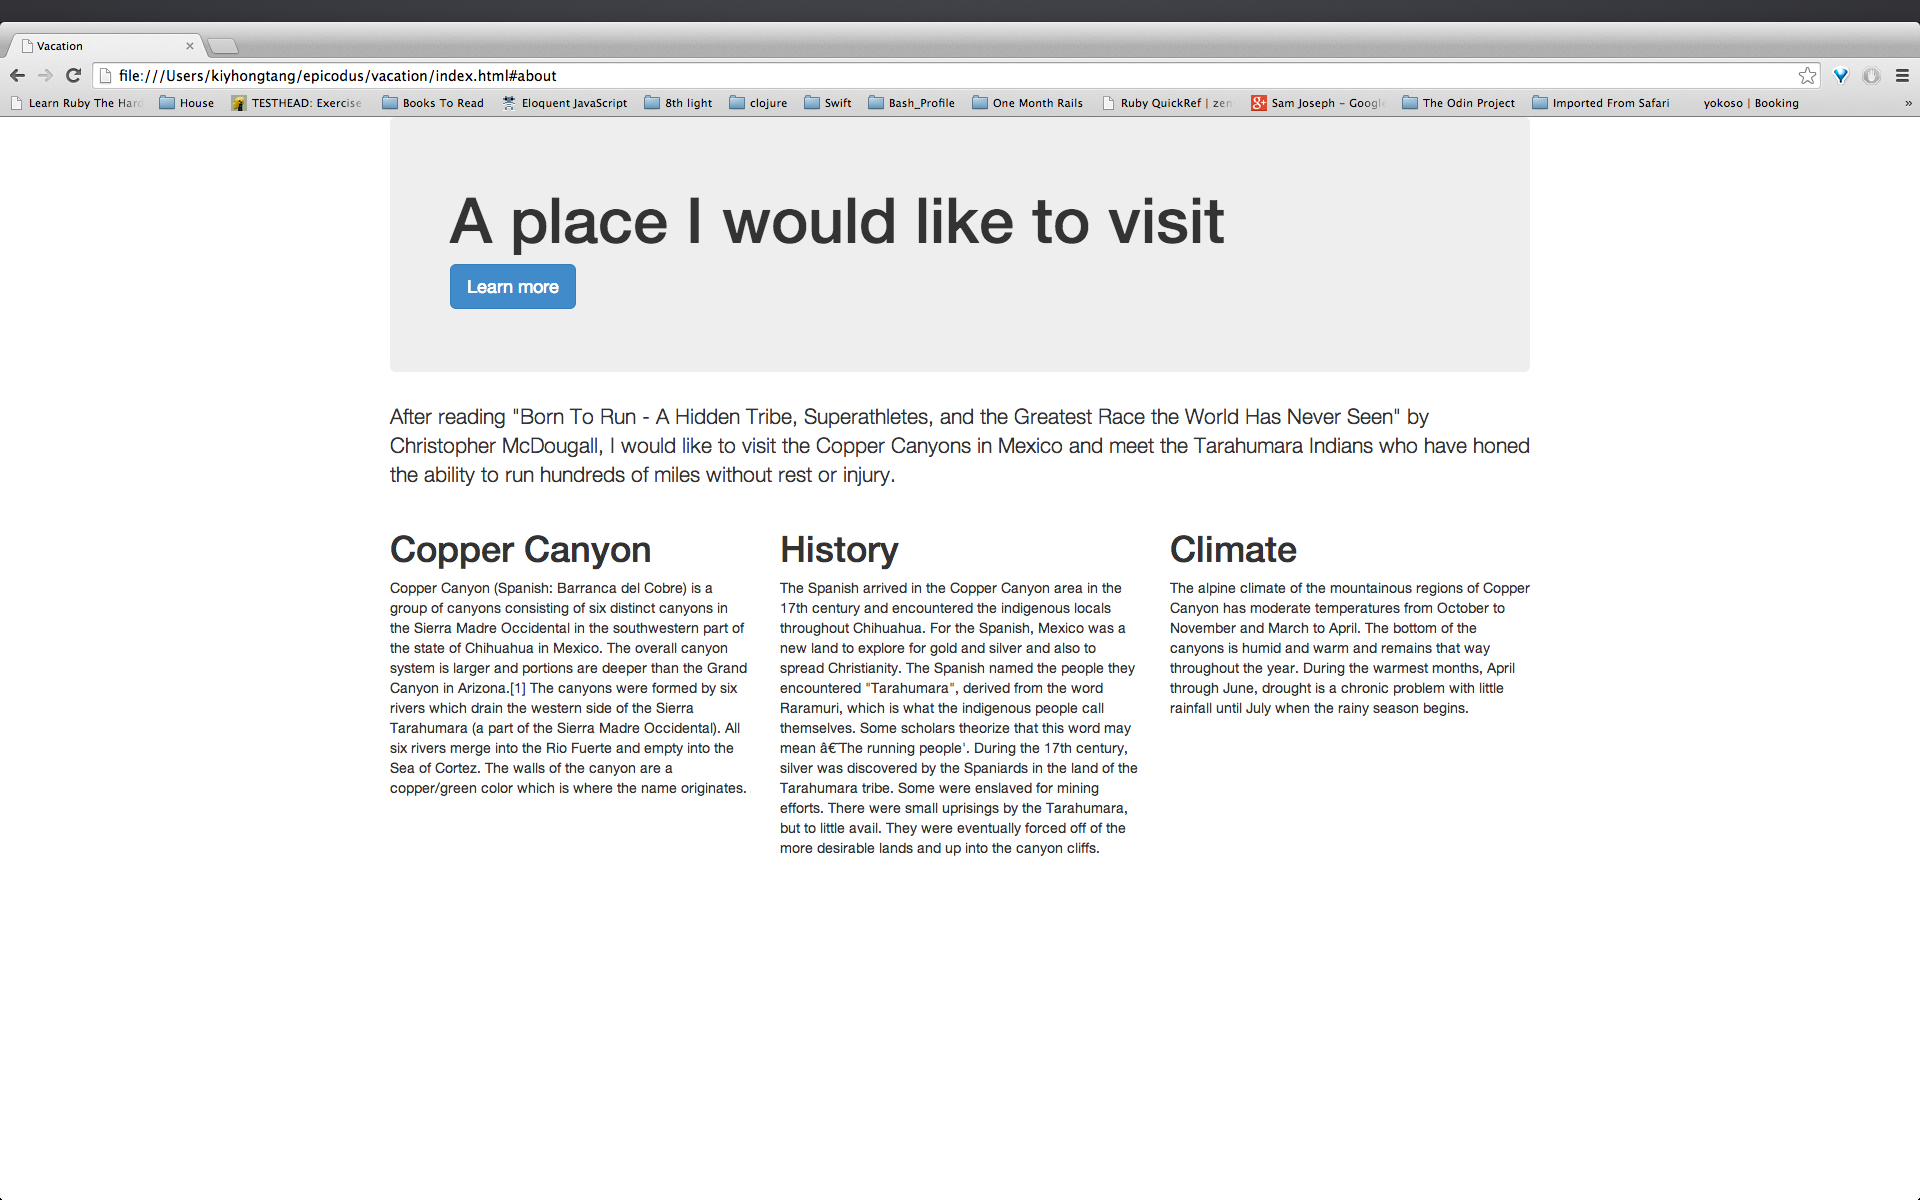
###Task: Add columns and rows to your vacation page. To complete this section I implemented Bootstrap "Example: Stacked-to-horizontal" code into my 'Vaction' web page. To furhter highlight the difference in rows and columns, I assigned specfic colors as folows:
 .col-md-1 {
    color: blue;
}
 .col-md-4 {
    color: white;
}

 .col-md-6 {
    color: yellow;
}
 .col-md-8 {
    color: green;
}
###Screenshoot:
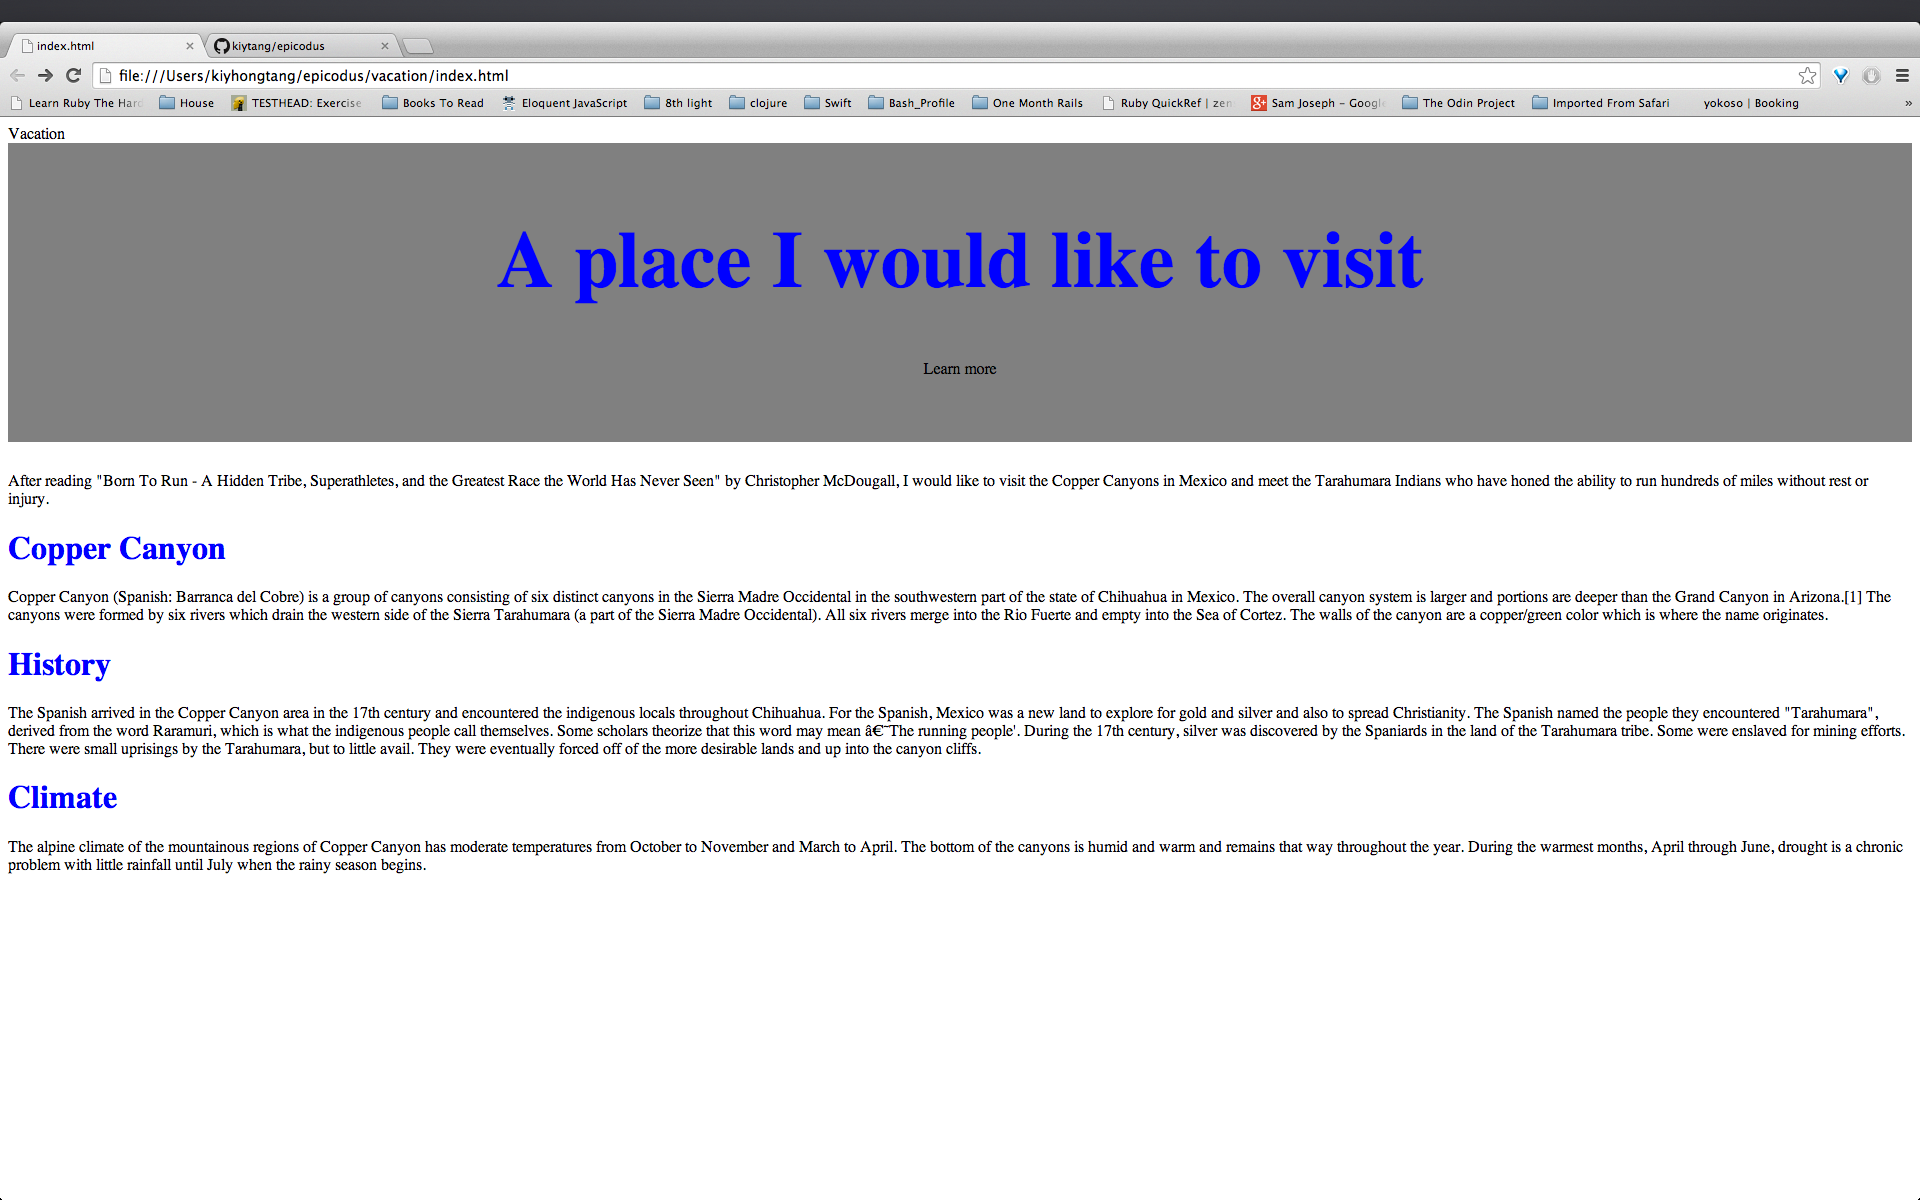
##Day 14 ###Task:
Rework one of your existing pages to use Bootstrap's grid. For theis task I made use of Bootstraps's ".col-md-4", to include three subject topics:
- How I construct my day
- Nutrtional Values
- What I am currently Reading
Rows must be placed within a .container (fixed-width) or .container-fluid (full-width) for proper alignment and padding.
###Screenshot:

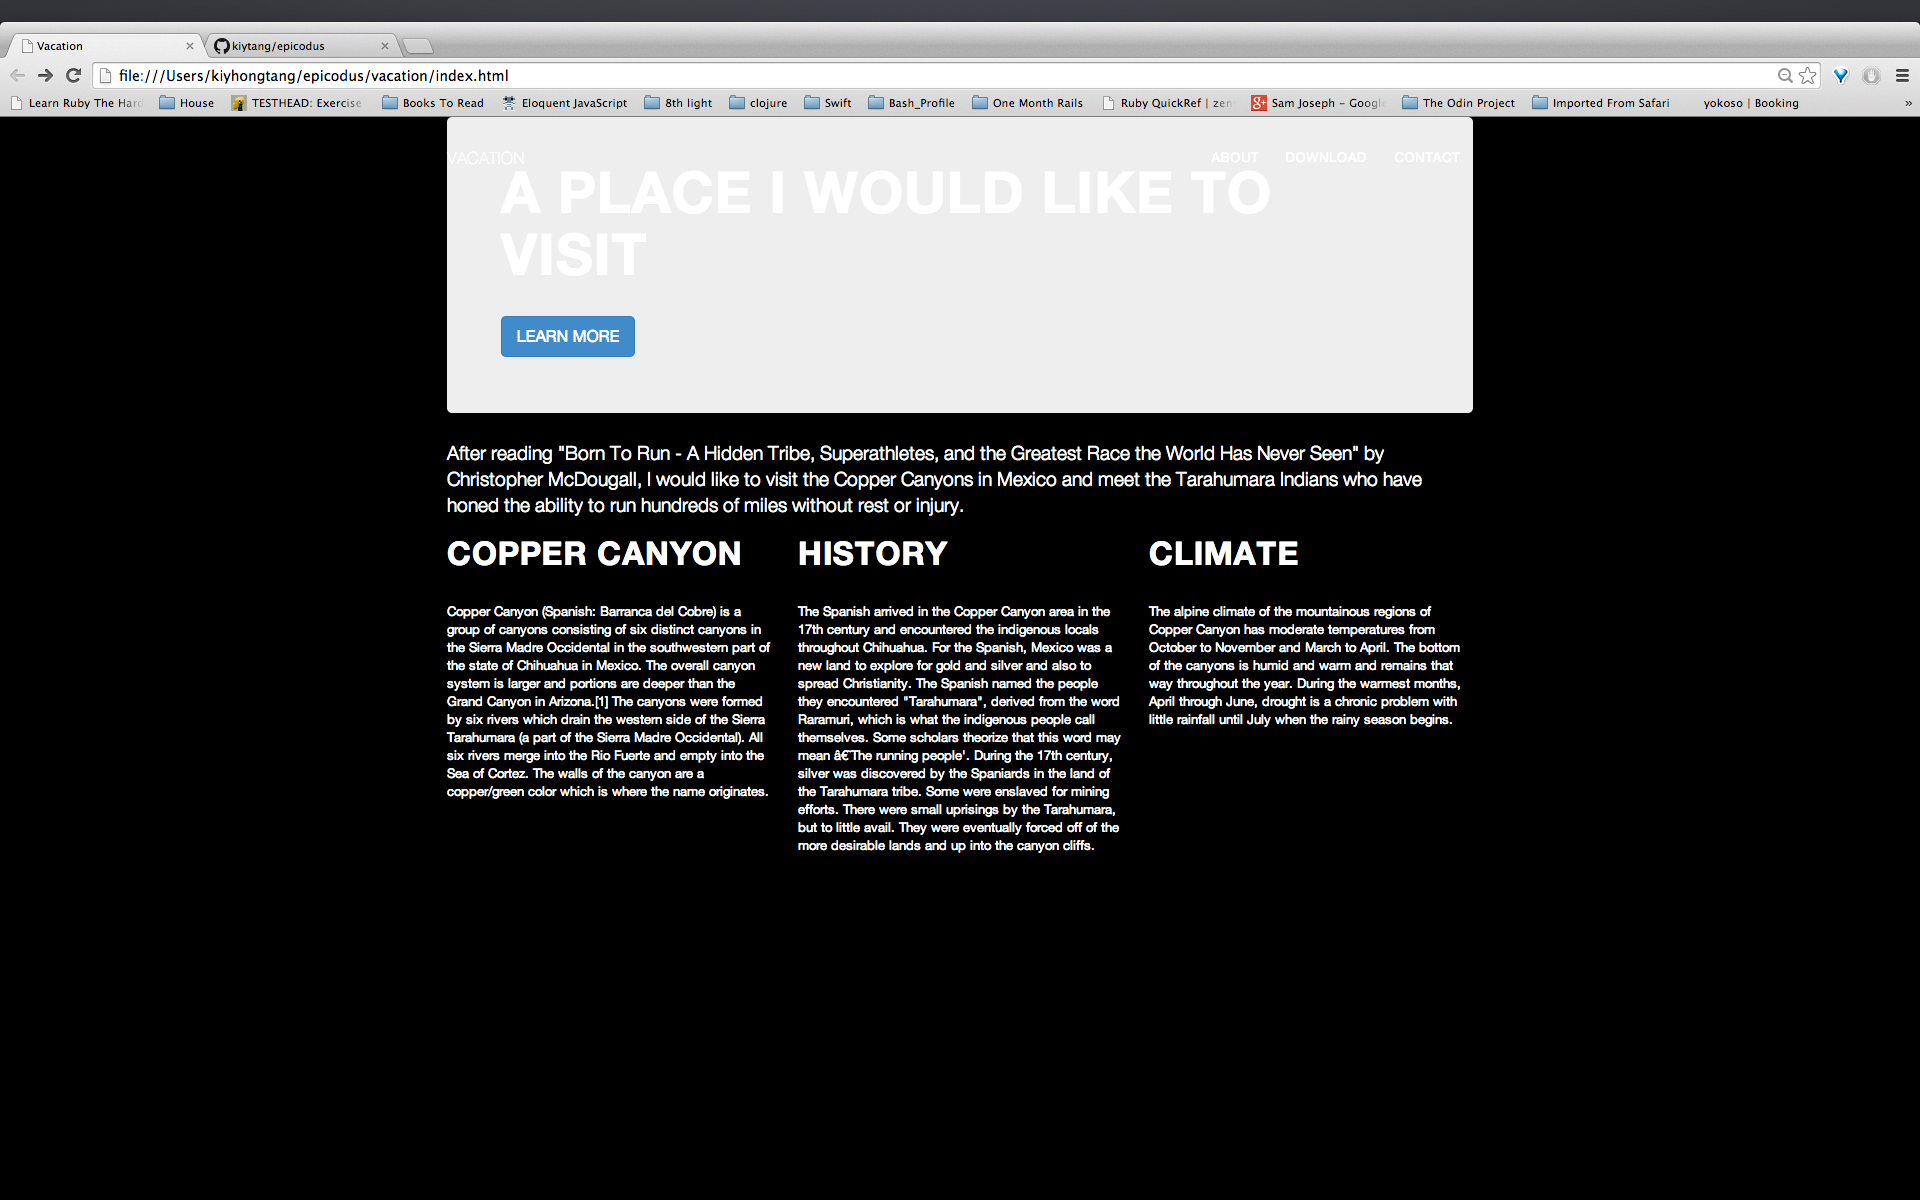
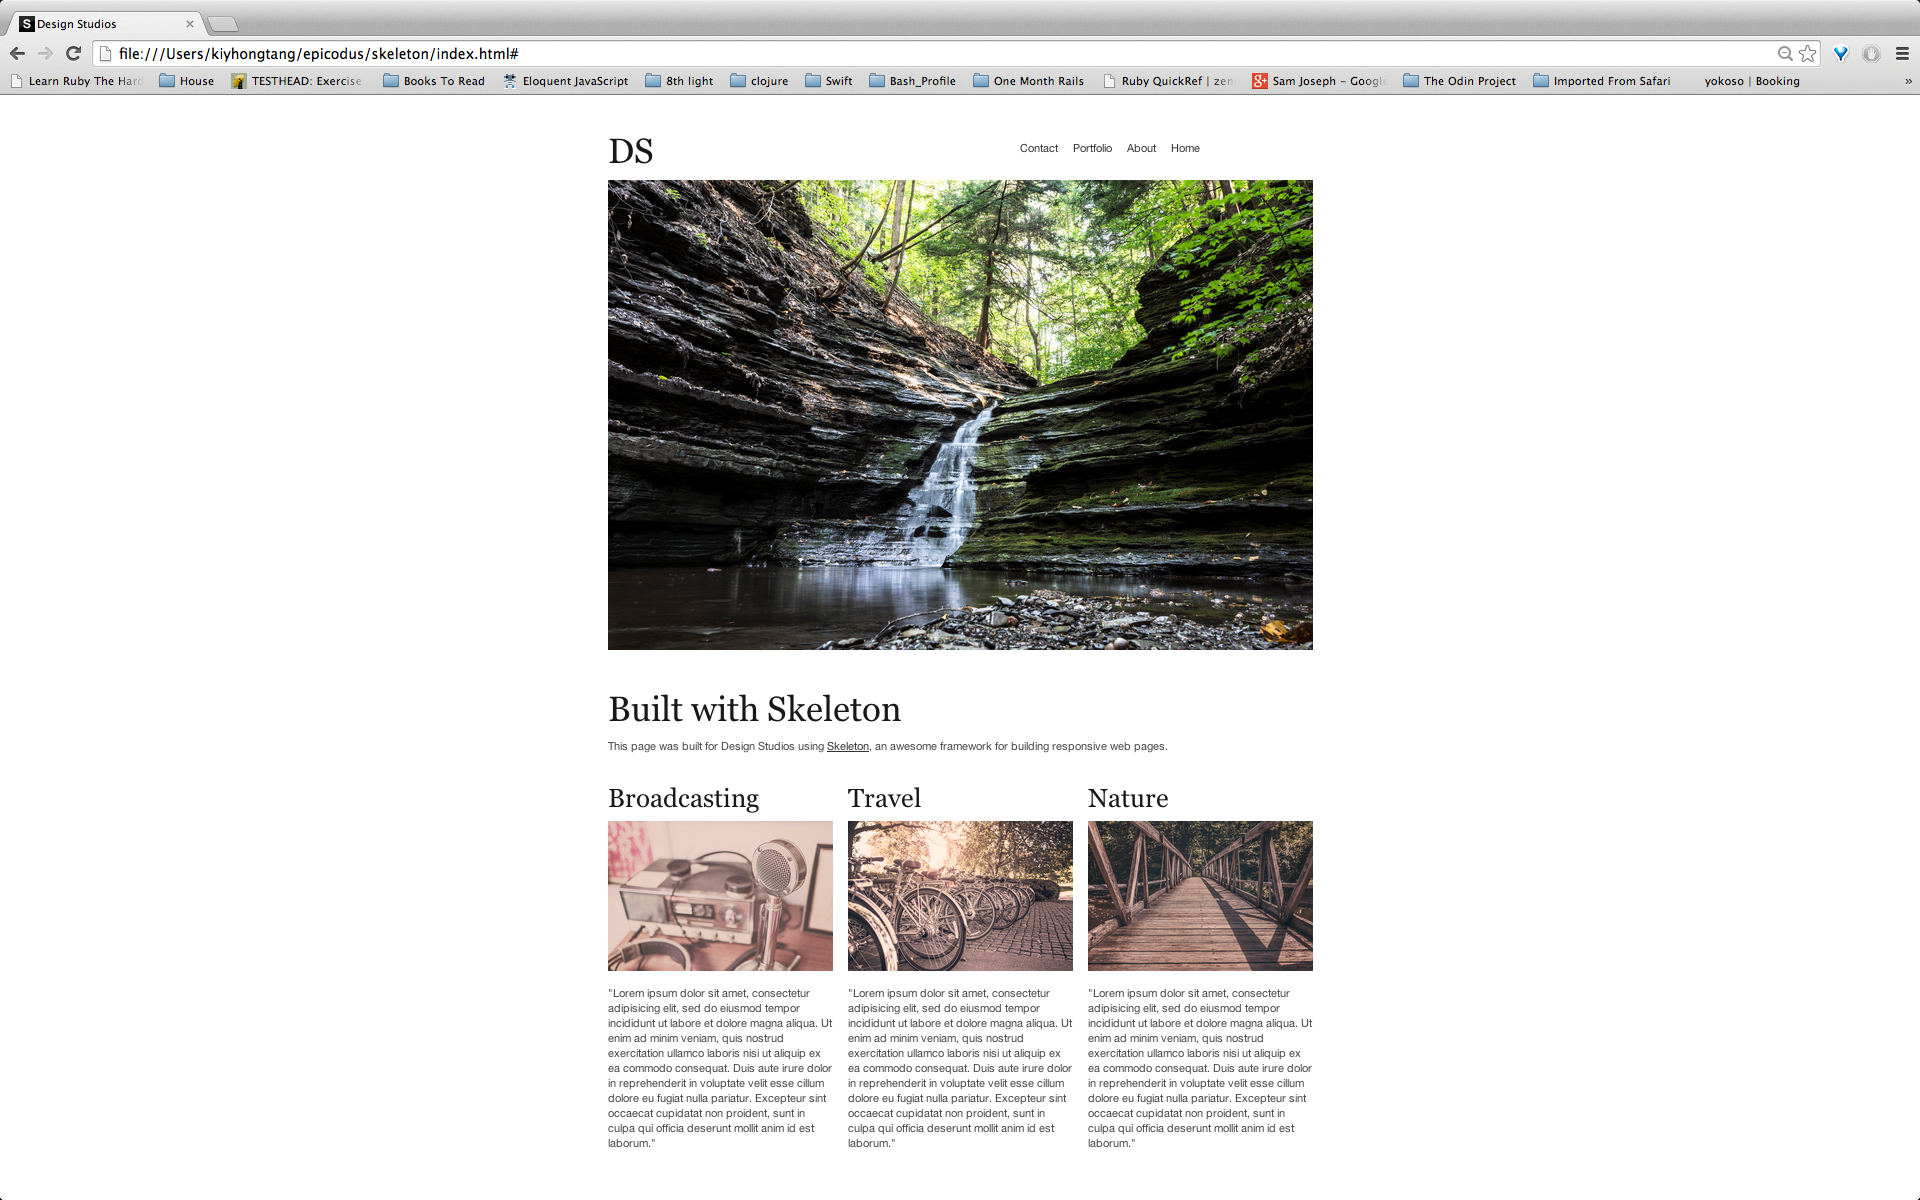
##Day 15 ###Task: Make a page with !Skeleton.
Skeleton contains a "one-third" class which allows one to split the width into three columns. In my example I made use of the "one-third" class to split my three subjects:
- Broadcasting
- Travel
- Nature
-
In order for the images to resize accordingly to their given containers, max-width was set to '100%'' and height set to 'auto'.
-
Viewport declaration:
###Screenshot:
##Day 16
Today I read more on Skeletons'offsets' feature. From my understanding, one uses offset-by-(size... one, three, seven, fifteen.....) to create gutters/gaps in between blocks in one row.
##Day 17
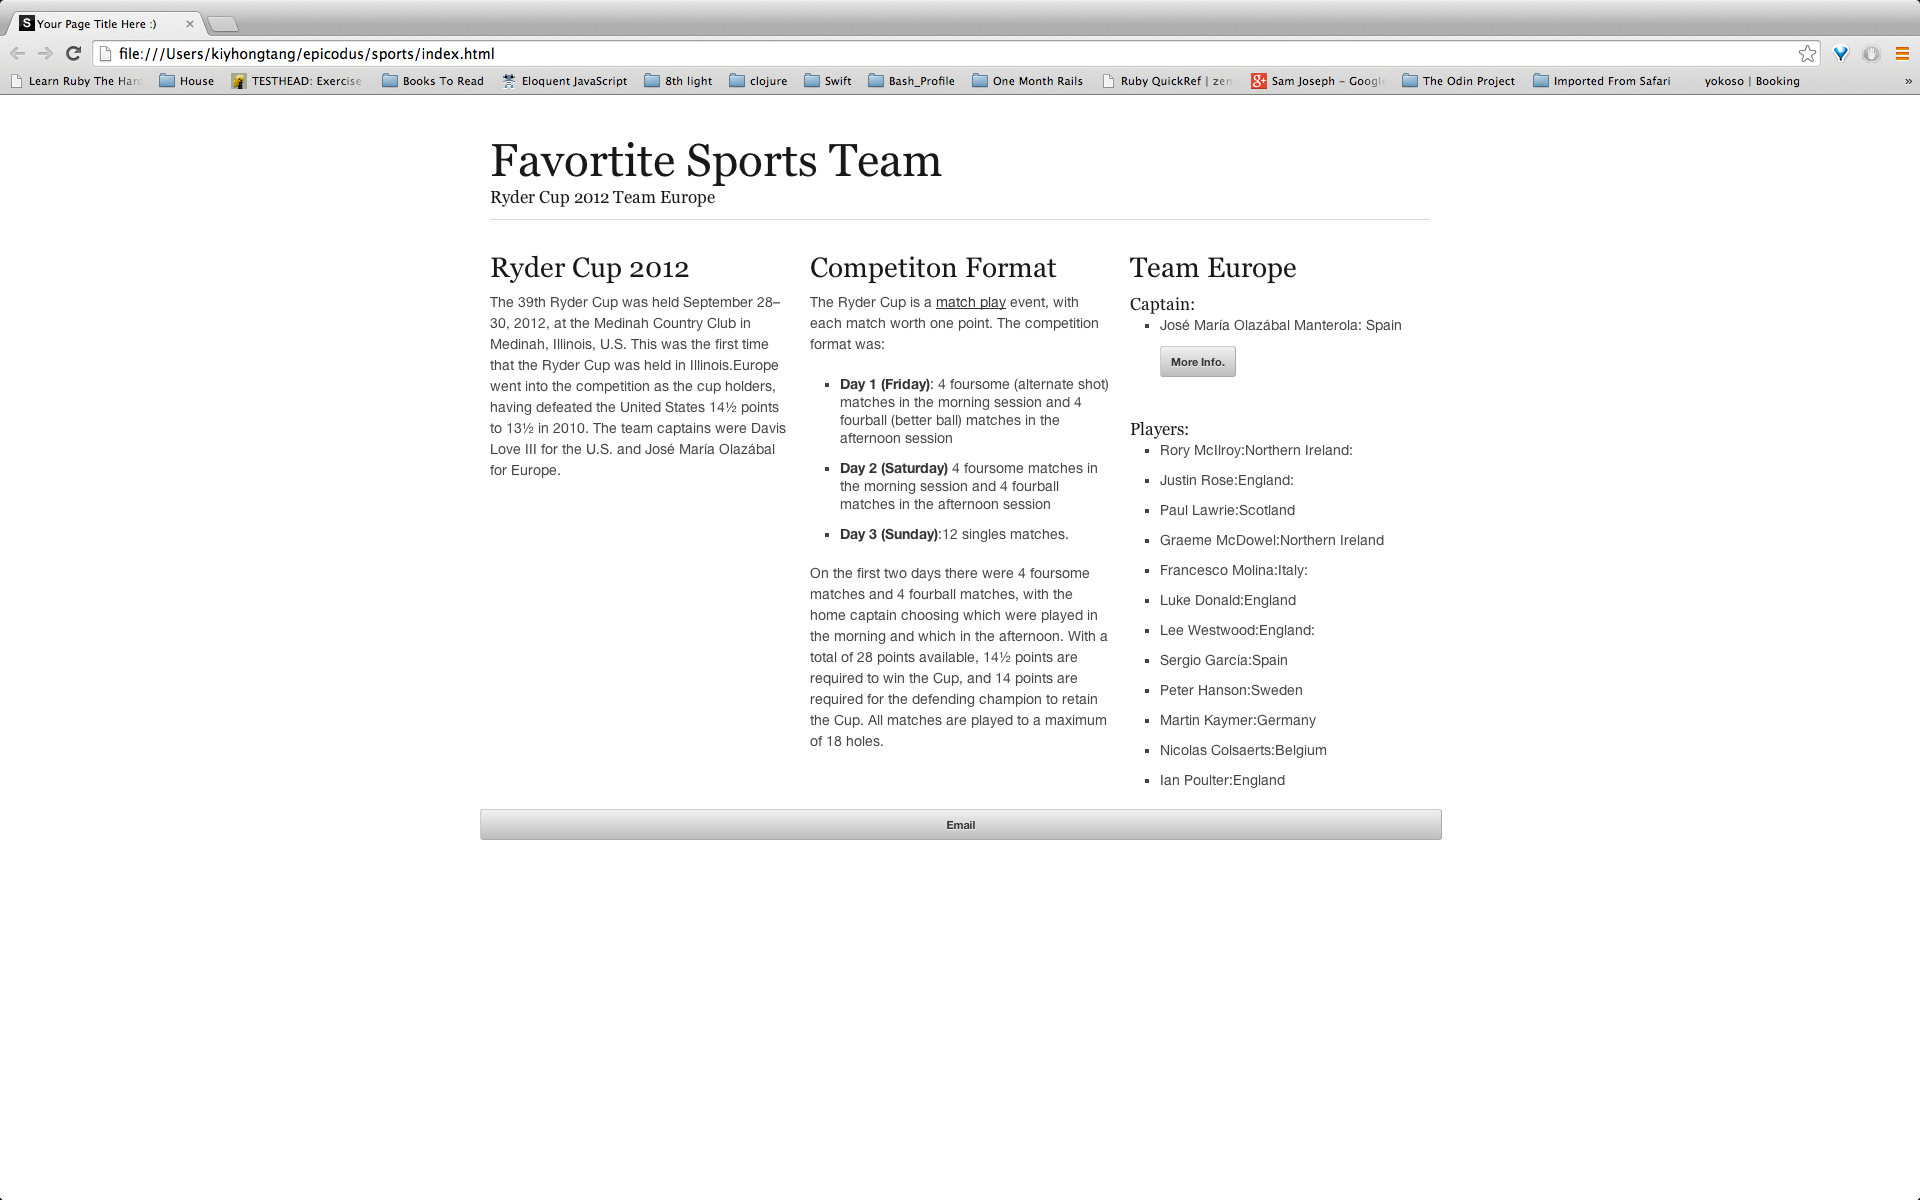
###Task: Make a page about your favorite sports team with Skeleton.
Incorporated buttons within my sports page. For this task I used two types:
- a standard size:
<a href="http://en.wikipedia.org/wiki/José_Mar%C3%ADa_Olazábal"
class="button">More Info.</a>
- full-width button.
<a href="#" class="full-width button">Email</a>####Screenshot
##Day 18
###Task: Pick one of your pages that has images on it. Create a class for images that should not be shown on small screens. Add a media query that hides these images (using display: none) on smaller screen sizes.
To complete this task I created the following class for the image:
<img src="img/cat.gif" alt="A photo of cat with optical glasses" class="small_image">
In order for the image to not display on a typical small screen device, I used the following @media query:
@media (min-width: 0px) and (max-width:400px){
	.small_image {
		display: none;
	}
}- min-width This sets the minimum browser width that the specified styles are applied to.
##Day 19
###Task: Make a page about your best friend with Foundation.
Inside the CSS folder provided by Foundation, there consists of three separate files, two of which I had to research more to further understand:
-
foundation.min.css This particular files is essentially the same as foundation.css, where it differs is that the .min files has had all its spaces and returns removed- The purpose is to reduce file size to minimize load times.
-
normailize.css To demonstrate one of the many uses of this file, I will base my example by using unordered-list. Some browsers will use margin to push an unordered list off the edge the page, whilst others may use padding. For the purpose of consistency, Normalize will set everything up to use either margin or padding.
-
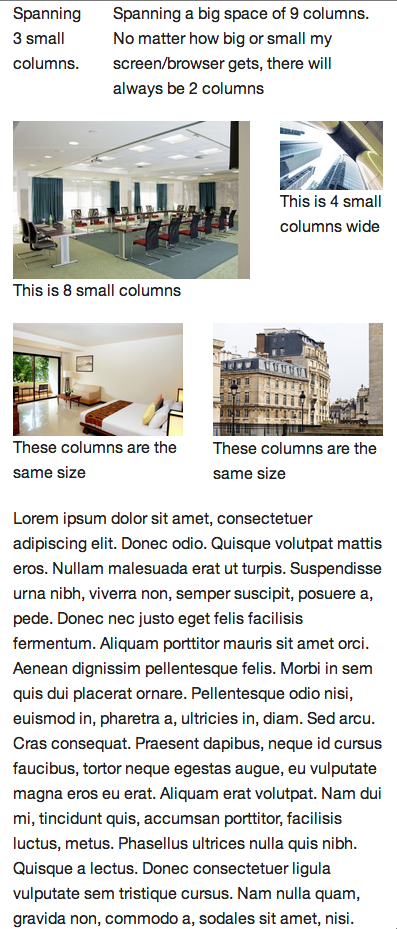
Foundation's small grid system: Foundation consists of a default 12 grid system. The simplest way to set up a grid system is by creating a div tag with class of row. Each row consists of 12 columns, so we are able to create as many instances as possible so long as the total amounts to 12.
Example:
 <div class="row">
      <div class="small-8 columns">
        <p>This is 8 small columns</p>
      </div>
      <div class="small-4 columns">
        <p>This is 4 small columns wide</p>
      </div>
    </div>
Note:
<div class="small-8 columns">
In the above div, there are two classes
- class of 'columns'
- class of 'small-8'
As there are 12 columns in total, small-8 means that this div will account for 8 out of the 12 columns. In Foundation, 'small' ensures that the grid remains the same for all devices. This is in contrast to both 'medium' and 'large' grids where at specific break points the columns will stack ontop of each other.
In the sceenshot below, I have reduced the screen size to its lowest width.As you can see the columns as per the small-grid feature, remains unstacked.
####Screenshot:
##Day 20 Continuing with learning Foundation:
###Task:Combining grids in a single div This allows one to specify in advanced the layout dimensions for various devices:tablets, mobile and desktop.
Example:
   <div class="row">
      <aside class="medium-3 small-9 columns">
        <p>Spanning 3 columns.</p>
      </aside>
      <section class="medium-9 small-3 columns">
        <p>Spanning a big space of 9  columns. No matter how big or small my screen browser gets, there will always be 2 columns
        </p>
      </section>
    </div>
In the above, I introduced two classes (medium and small) together:
<aside class="medium-3 small-9 columns">Outcome:
-
For the medium dimensions, the relevant content will occupy three columns.
-
When the break point for the medium occurs, by default Foundation will result in the content being stacked on top of each other vertically. However, as I have specified a small class, the result is a switch to the specified small grid system.
##Day 21
###Task: Applying offsets in the grid: Used to introduce more space between columns.
##Day 22
###Task: Centering columns
Refers to the centering element to which the class is applied. It does not refer to text within the div. To center text you will need to add a custom style.
##Day 24
###Task: Nested grid systems
##Day 25
###Task:
Block grids:
This places a series of items into rows and grids.
The following sample below will result in a unordered list of bulleted images.
    <div class="row">
      <div class="large-9 columns">
          <ul>
            <li><img src="img/sfbook.jpg" alt="Browsing for books. "></li>
            <li><img src="img/sfdog.jpg" alt="Dogs in the park. "></li>
            <li><img src="img/sfbike.jpg" alt="Biking in San Francisco. "></li>
            <li><img src="img/sfcafe.jpg" alt="People in cafe. "></li>
            <li><img src="img/sfmarket.jpg" alt="Farmer's market. "></li>
            <li><img src="img/sfrocks.jpg" alt="Hot rock massage. "></li>
          </ul>
      </div>
    </div>
In order to convert the markup of the unordered list to a block grid that contains three pieces of content placed across each row (medium size), add the following class to <ul>:
<ul class="medium-block-grid-3">Note:
In this example I only accommodated for medium resolution, to cater for small resolutions, we can add the following (I used 2 images for this example):
<ul class="medium-block-grid-3 small-block-grid-2">##Day 26
###Task: Typography
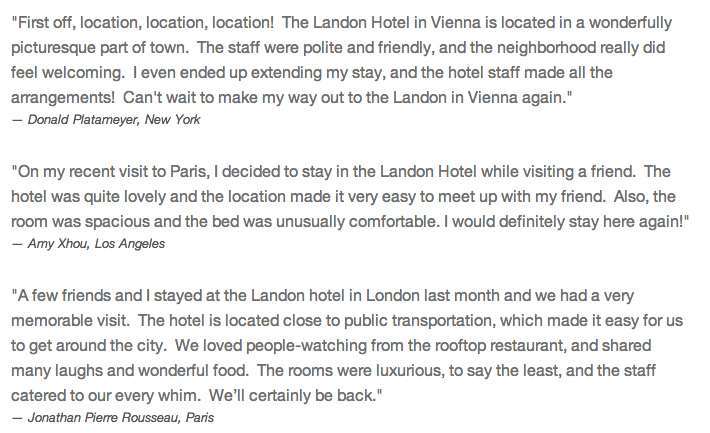
A good pratice for marking up quotes and citations in Foundation is using both the <blockquote> and <cite> tag.
Example:
`<blockquote>`"On my recent visit to Paris, I decided to stay in the Landon Hotel while visiting a friend. The hotel was quite lovely and the location made it very easy to meet up with my friend. Also, the room was spacious and the bed was unusually comfortable. I would definitely stay here again!" <cite> Amy Xhou, Los Angeles</cite></blockquote>###Screenshot:
Unordered list by default are marked with a bullet point format. To remove the bullet point, add a class of no-bullet to <ul>:
Example:
<ul class="no-bullet">
          <li>Bernal Hill Park</li>
          <li>San Francisco Public Library</li>
        </ul>
##Day 27
###Task:
- Text alignment options
- Styling buttons
- Panels
- Thumbnails
You can hide an element by adding the class .hide. Note that a hidden element does not equate to faster load times. The element still runs behind the scenes each time your site is loaded; the only difference is that it does not get displayed on screen.
Text-alignment:
-
Adding a class of
.text_centerwill align the element to the center, irrespective of the screen size. -
Adding a
sizeto the front of the text align class will cause it to be applied on that screen size or larger.
In the example below, the text 'Ciao Mondo' will be centered for screen sizes medium and above:
<p class="medium-text-center"><Ciao Mondo></p>- Adding both
sizeandonlywill apply the text alignment just for that specific media query. Below the text 'Ciao Mondo' will align to the right only within the medium screen size dimensions.
<p class="medium-only-text-right"><Ciao Mondo></p>Button:
To style a button in Foundation is relatively straightforward. In the example below I included a class of .button inside of the <a> tag in order to create a 'Read More' button.
<p><a href="#" class="button round">Read More</a></p>Foundation colours: By default Foundation has five colours:
- Blue
- Gray
.secondary - Red
.alert - Green
.success - Orange
.warning
The size of the buttons can be selected by adding the following classes:
.tiny.small.large
Panels:
Used to highlight certain areas of the web page. To apply, simply add the class .panel Note: In the example below, I have added a additional utlility class of .radius to give the panel corners a rounded appearence.
<p class="panel radius">Ciao Mondo</p>Thumbnails:
To covert the images below (the four images are located within a block grid) to thumbnails, include the class .th to the <a> tag.
As with previous examples, the added class of .radius is optional.
<ul class="small-block-grid-2 large-block-grid-4">
  <li><a href="#" class="th radius"><img src="img/sfmarket.jpg" alt="Farmer's market. "></a></li>
  <li><a href="#" class="th radius"><img src="img/sfrocks.jpg" alt="Hot rock massage. "></a></li>
  <li><a href="#" class="th radius"><img src="img/sfbike.jpg" alt="Biking in San Francisco. "></a></li>
  <li><a href="#" class="th radius"><img src="img/sfcafe.jpg" alt="Coffee at a cafe. "></a></li>
</ul>
##Day 28
###Task
- Overriding Foundation's core CSS
We need to add a custom stylesheet within the HTML document in order to allow the customization to take place.
Note: Although you can use add customtomization to the existing Foundation stylesheet, it is generally noted as bad practice as any future version upgrades will result in styles being lost.
How to add cutomisation:
- 1/ Add a additional link tag within the HTML document. In my example, I have named my stylesheet
stylesheet.cssand the resulting link tag is as follows:
<link rel="stylesheet" href="css/foundation.css" />
<link href="css/stylesheet.css" rel="stylesheet" type="text/css" media="all"/>- 2/ Locate the CSS folder inside of Foundation and create a file named
stylesheet.css
Within this newly created file stylesheet.css, you are able to customize all elements within the HTML document.
Below, I have created a custom style whereby all my title headings are coloured purple
h1, h2, h3, h4, h5, h6 {
  color: #5F2D8C;
}
##Day 29
###Task
- Visibility classes
- Adding Google Fonts
- Adding Navigation
Earlier (Day 27) I mentioned how we could use .hide. For added hide/show customization, Foundation offers a visibility classes.
A example I use below is how one could tailor a website so that:
-
When viewed using a mobile device, the contact information will link directly create a call using the device's call application using
tel:+ -
When viewed using a medium screened and above devices, the contact information links to the contact site address.
<p class="hide-for-medium-up"><a href="tel:+000123123">Call</a>today for reservations!</p>
<p class="show-for-medium-up"><a href="#">Make your reservation today!</a></p>
Adding Google Fonts:
There are steps required in order to use the Google Fonts API to add fonts to your webpages:
- 1/ Add a stylesheet link in the HTML document you wish to add the font. Note: In my example I have chosen to use the font style named
Tangerine
<link rel="stylesheet" type="text/css" href="http://fonts.googleapis.com/css?family=Herr+Von+Muellerhoff">
<link rel="stylesheet" href="css/foundation.css" />
<link rel="stylesheet" href="css/stylesheet.css" />- 2/ Refer to the font in your CSS style sheet:
Below I have made use of the Google Font
Herr+Von+Muellerhofffor all my heading tags.
h1, h2, h3, h4, h5, h6 {
  color: #5F2D8C;
  font-family: 'Herr Von Muellerhoff', cursive;
}
Navigation:
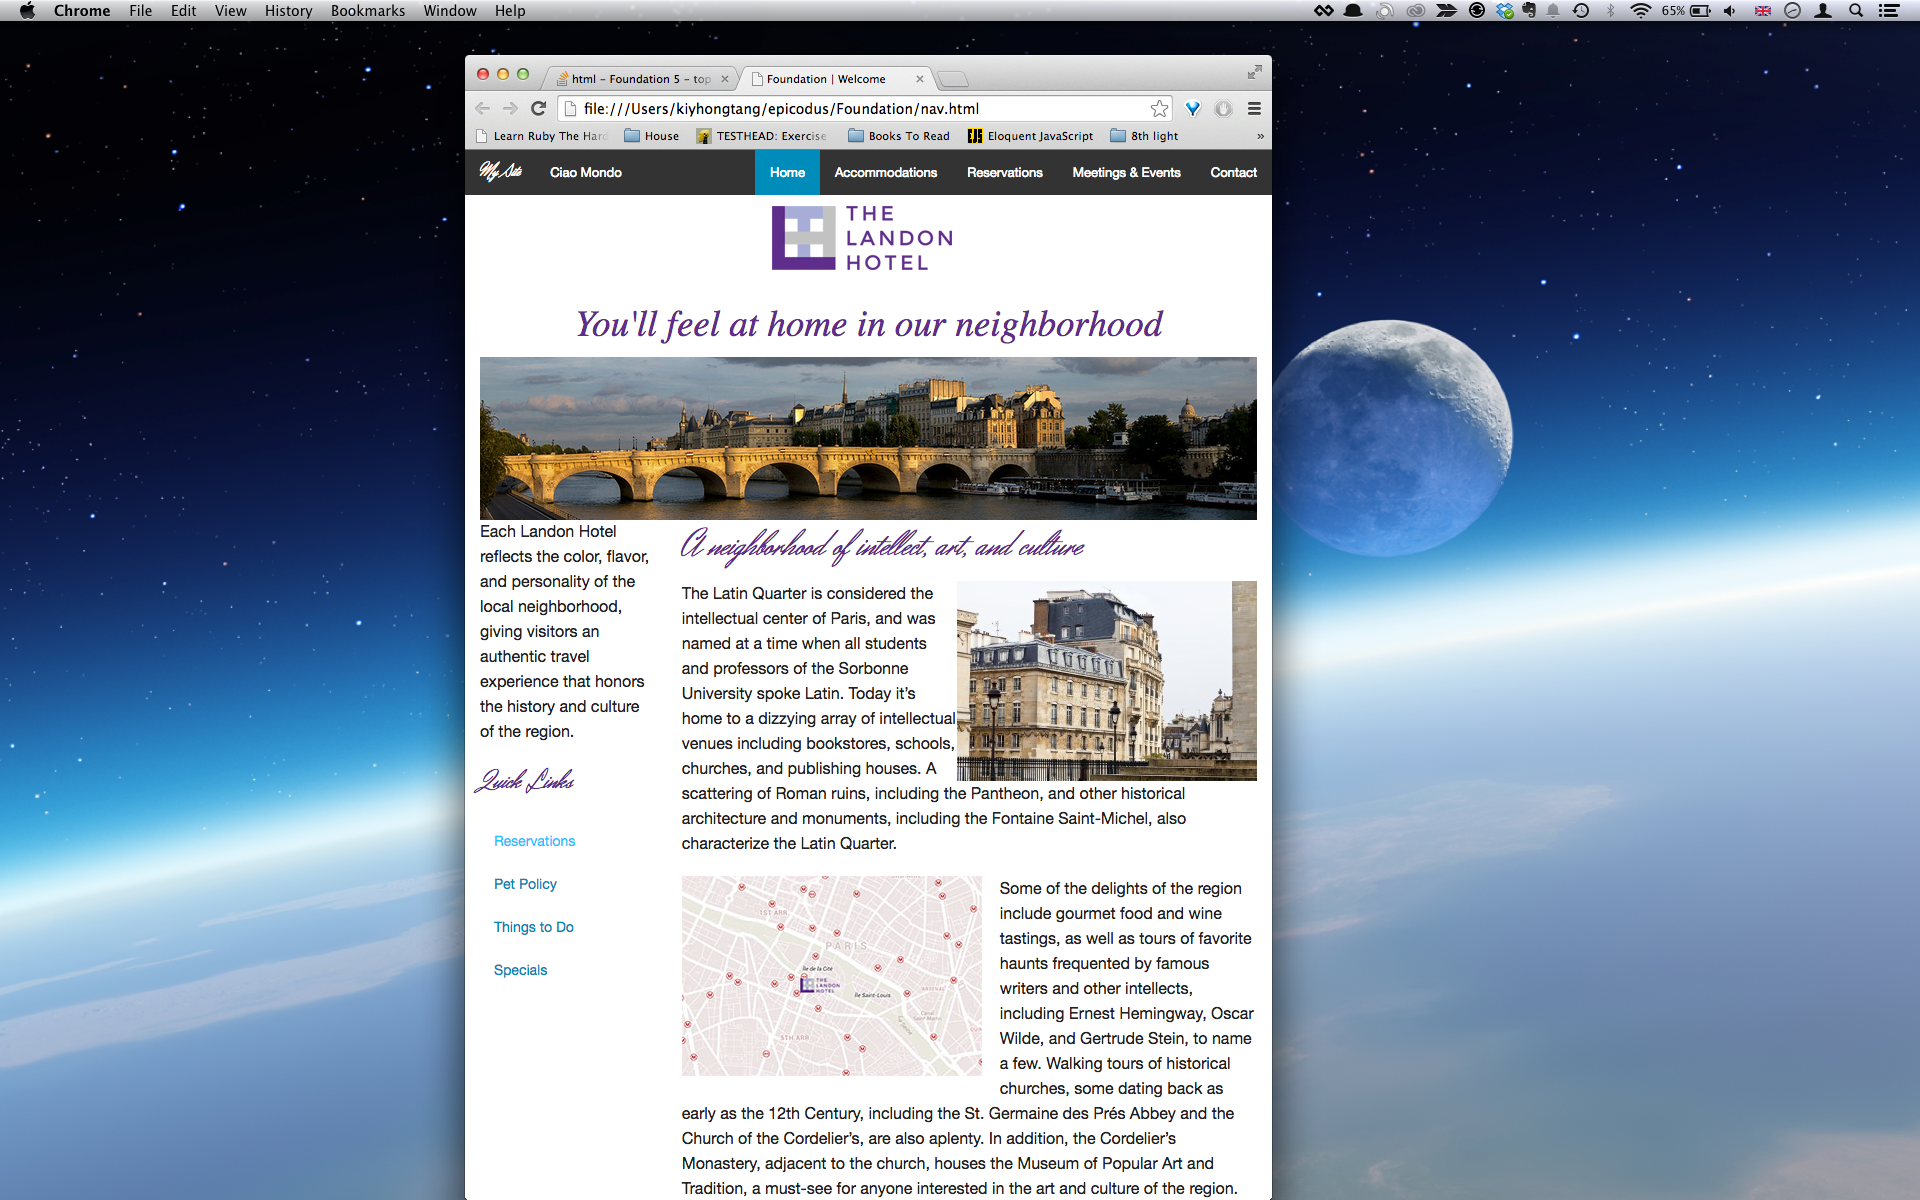
The HTML required to create a top bar in Foundation is as shown below.
<nav class="top-bar" data-topbar role="navigation">
<ul class="title-area">
<li class="name">
<h1><a href="#">My Site</a></h1>
</li>
<!-- Remove the class "menu-icon" to get rid of menu icon. Take out "Menu" to just have icon alone -->
<li class="toggle-topbar menu-icon"><a href="#"><span>Menu</span></a></li>
</ul>
<section class="top-bar-section">
<ul class="right">
<li class="active"><a href="#">Home</a></li>
<li><a href="#">Accommodations</a></li>
<li><a href="#">Reservations</a></li>
<li><a href="#">Meetings & Events</a></li>
<li><a href="#">Contact</a></li>
</ul>
<!-- Left Nav Section -->
<ul class="left">
<li><a href="#">Ciao Mondo</a></li>
</ul>
</section>
</nav> Notes:
-
To create a top-bar, add the class
.top-barto thenavclass:
<nav class="top-bar" data-topbar role="navigation">
Notice adata-topbaris also added. Anytime we seedata-, it indicates that we are working with JavaScript. -
<li class="toggle-topbar menu-icon"><a href="#"><span>Menu</span></a></li>will trigger the menu botton (often referred to as the Hamburger button) to appear at small screen. -
<section class="top-bar-section">contains the main navigation for our webpage. I have added a class of.rightto position my navigation on the right side of the screen. -
<li class="active"><a href="#">Home</a></li>
A class of.activeinside a<li>indicates the page you are currently on.
###Screenshot:
####Non collapsed Screen:
####Small Screen:
##Day 30
###Task:
Adding a Dropdown menu
Below is a example of how to add a dropdown menu:
-
1/ Add a class of
.has-dropdownto<li>you wish to have a dropdown menu. -
2/ Add a class of
.dropdownto the<ul>nested within the<li>of (1)
<li class="has-dropdown"><a href="#">Sports</a>
  <ul class="dropdown">
    <li><a href="#">Barefoot Running</a></li>
    <li><a href="#">Crazy Golf</a></li>
    <li><a href="#">Beach Volleyball</a></li>
  </ul>
</li>
##Day 31
###Task:
Off-Canvas Menu: "off-canvas menus are positioned outside of the viewport and slide in when activated." source Foundation-Zurb documentation.
Below is a guide on how to implement off-canvas :
-
1/
.off-canvas-wrapPlaced after the<body>tag, this<div>class forms the outer-most element. It contains the entire off-canvas layout and hides overflows. -
2/
.inner-wrap
This is the element that is amimated. -
3/ In the
<nav>create a class of.tab-barInside of this tag create a<section>with class of eitherrightorleftdepending on where you want the positioning. Inside<section>we have:
<a class="left-off-canvas-toggle menu-icon" href="#"><span></span></a>Note:
menu-iconwill display the menu icon andleft-off-canvas-togglewill style the canvas to appear of the left of page. -
4/ At this point end of both
<nav>and<section>tags. -
5/ The
tag with class<ul>is incorporated in a.left-off-canvas-menu. The<ul>tag itself will have a class.off-canvas-listThis is the panel that slided in and out when activated. You can place it on either the left or right side. -
6/ After the closing of
</aside>tag add:
<a class="exit-off-canvas"></a>to close off the canvas
##Day 32 ###Task: Combining top-bar with off-canvas
The aim of this task is to create a responsive page where at large resolutions the navigation menu is configured by top-bar and the resolution size is reduced, a menu buton will appear linking to the off-canvas style navigation.
-
Start with the off-canvas navigation HTML.
-
Add after the off-canvas code, the code for the top-bar.
-
Visibility Class:
For the `<nav>` tag located within the code for off-canvas, add the visibility class:
.hide-for-medium-up
For the `<nav>`tag located within the code for the top-bar, add the class:

`.show-for-medium-up`
##Day 33 ###Task:
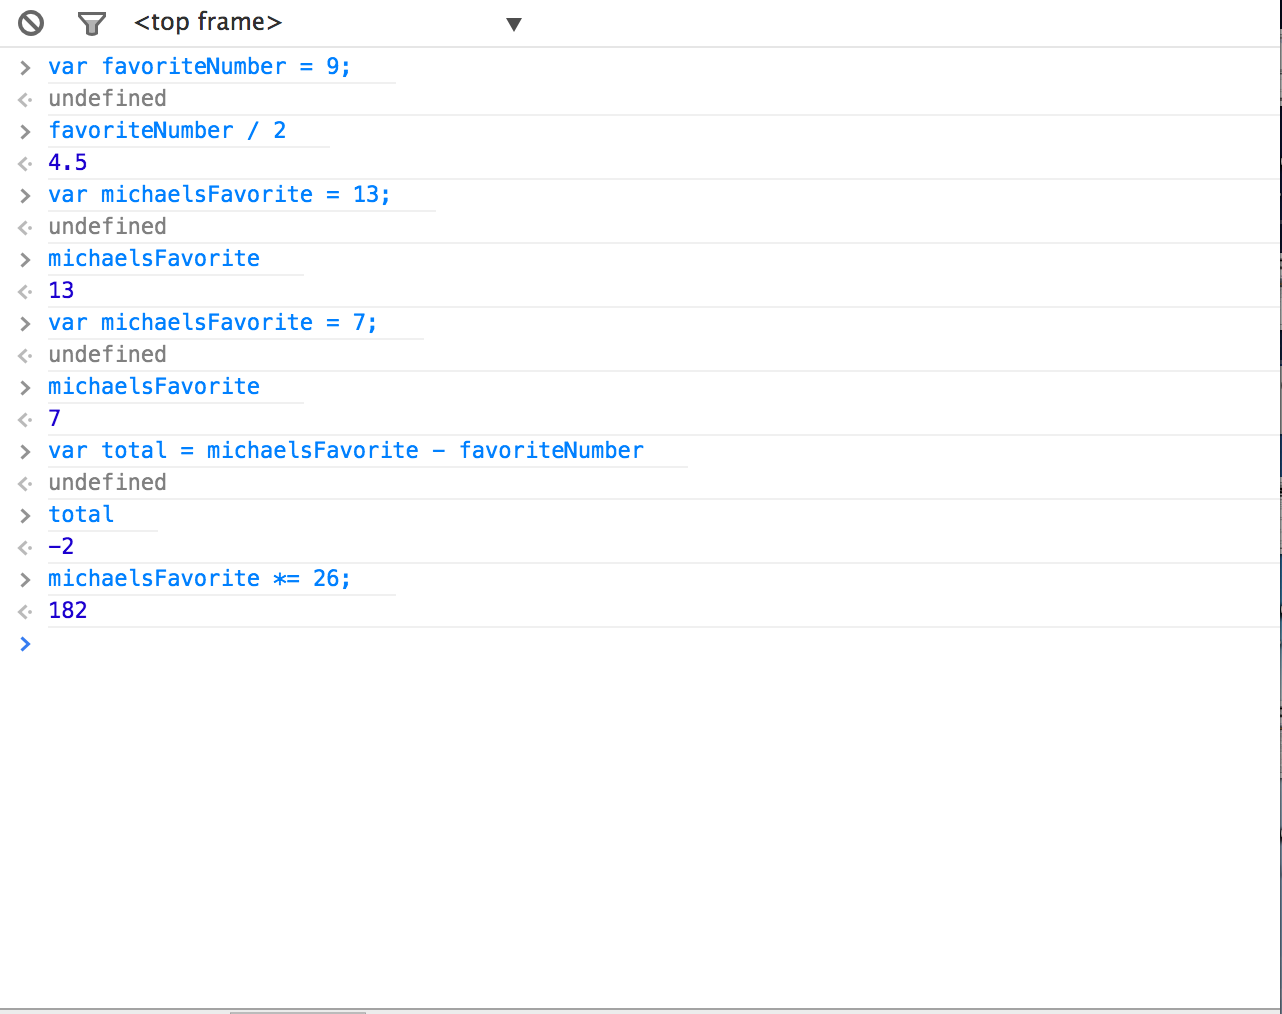
##Day 34: JavaScript primitives, methods and functions
###Task:
- Set a variable called favoriteNumber equal to your favorite number.
- Calculate what your favorite number divided by 2 is.
- Set another variable called michaelsFavorite equal to 13.
- Change the value of michaelsFavorite to 7.
- Subtract your favorite number from mine.
- Change the value of my favorite number to be 26 times its current value
####Screenshot:
###What I learnt:
Web Browsers can do three things:
- Display content with HTML
- Style HTML content with CSS
- Change what is displayed with JS
To access JS console in Chrome:
cmd + alt + j
To clear the JS console in Chrome:
cmd + k
Dividing a number by zero returns Infinity
Dividing zero by zero returns NaN (Not-a-Number)
Both Infinity and NaN are considered a type of number in JS
Variables: To create a new variable in JS, use the following best practices:
- Begin with
var - Name the variable name in lower cammalcase style
- End your JS statments with
;
Example:
var myNumber = 10;
###Day 35
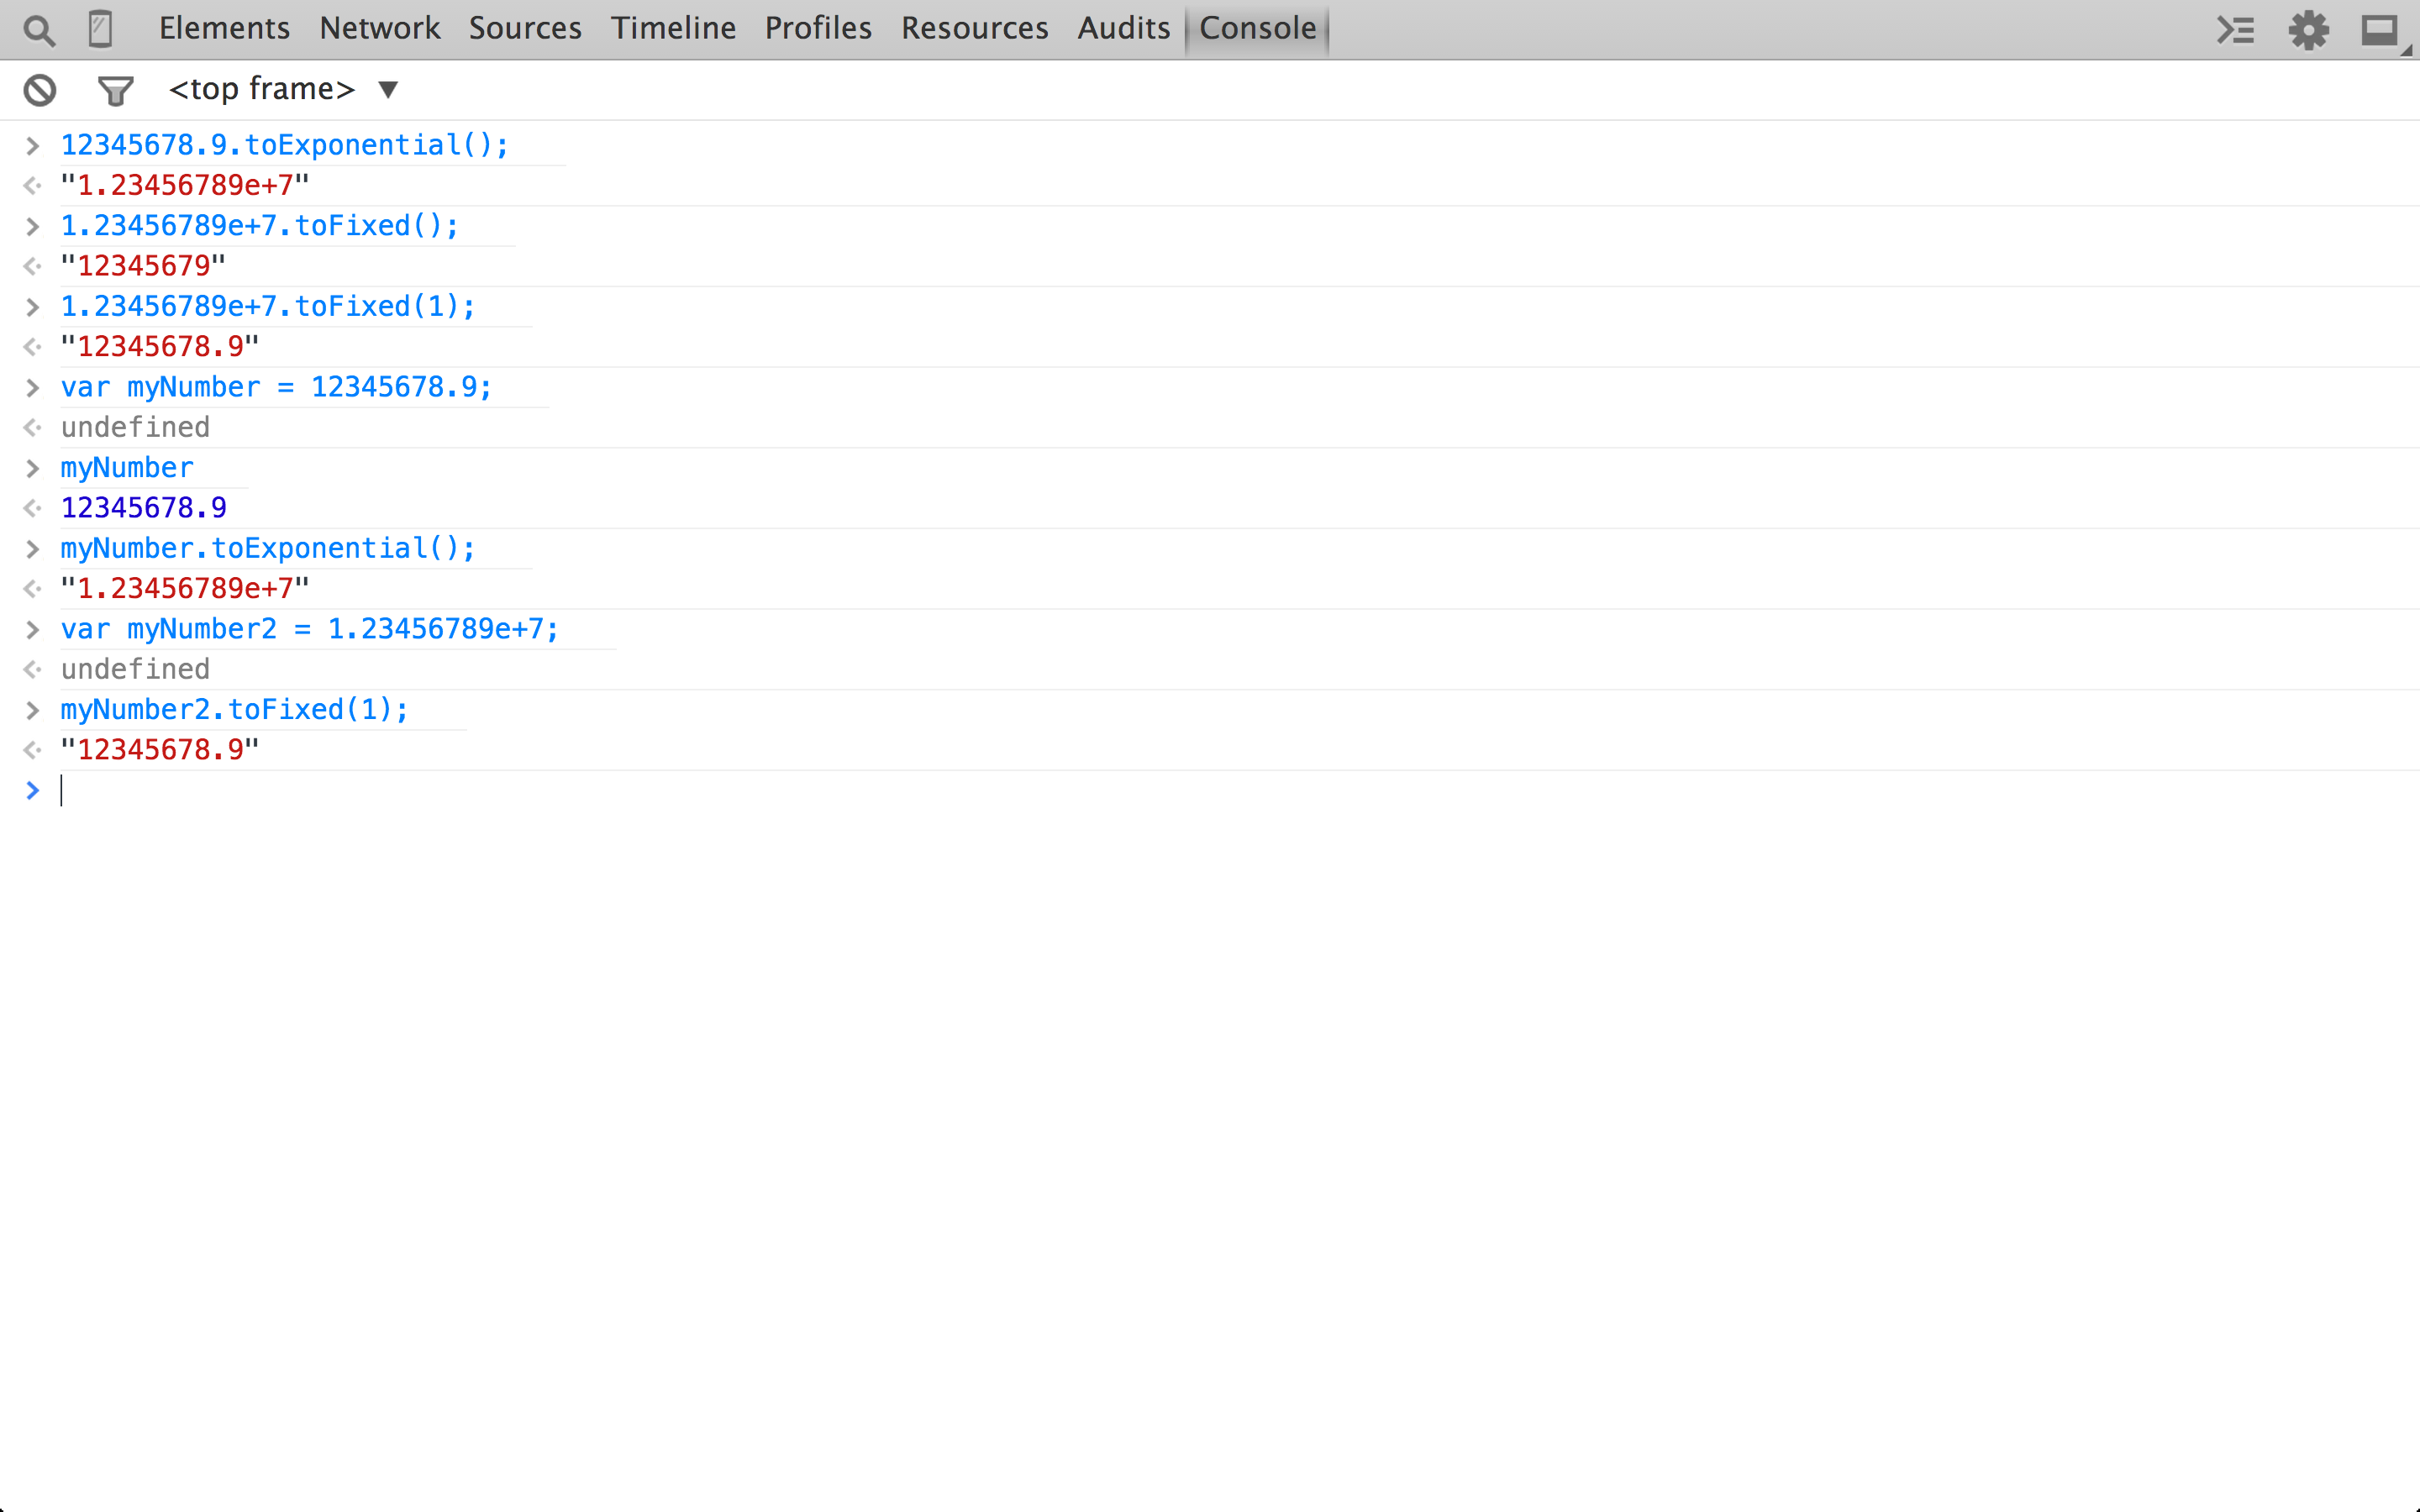
###Task:
- Convert a number to exponential notation.
- Convert it back.
- Specify the number of decimals it should have.
- Repeat all of these using a variable set equal to a number.
###Screenshot:
###Day 36
###Task: Practice using strings:
- Set a variable equal to a string.
- Call a method on that variable.
- Make sure you're clear on the difference between "9" with quotes and 9 without.
- Check out the MDN's documentation of string methods and try out at least five yourself. If some of them don't make sense, don't worry about it - just try the ones that do. (Stick to the section labelled Methods unrelated to HTML.)
###Day 37
###Task:
###String-Methods:
-
concat(): used to join two or more strings
-
charAt(): returns the character at the specific index in a string.
Note: The index of the last character in a string is:
string.lenght -1 -
indexOf(): returns the position of the first occurrence of a specified value in a string. Returns
-1if the value to search never occurs. -
lastIndexOf(): returns position if the last occurrence of a specified value in a string.
Example:
Below we search the string"canalla"for the last occurrence of the value"a", starting the search at position2Syntax:
string.lastOfIndex(search-value,start)
Example:
"canalla".lastIndexOf("a",2)
** The parameter
2in this instance represents how many character indexes to count. For the letterlat index5, the menthod.lastOfIndexwill seach the string up to the value os5and then track the last occurrence of thesearch-valuewhich in this instance isato return a value of3
###Day 38
###Task: Continuing with JS string methods:
-
search()
-
slice()
###Day 39
###Task: Continuing with JS string methods:
-
split()
-
substr()
###Day 40
###Task: Continuing with JS string methods:
-
substring()
-
trim()
###Day 41
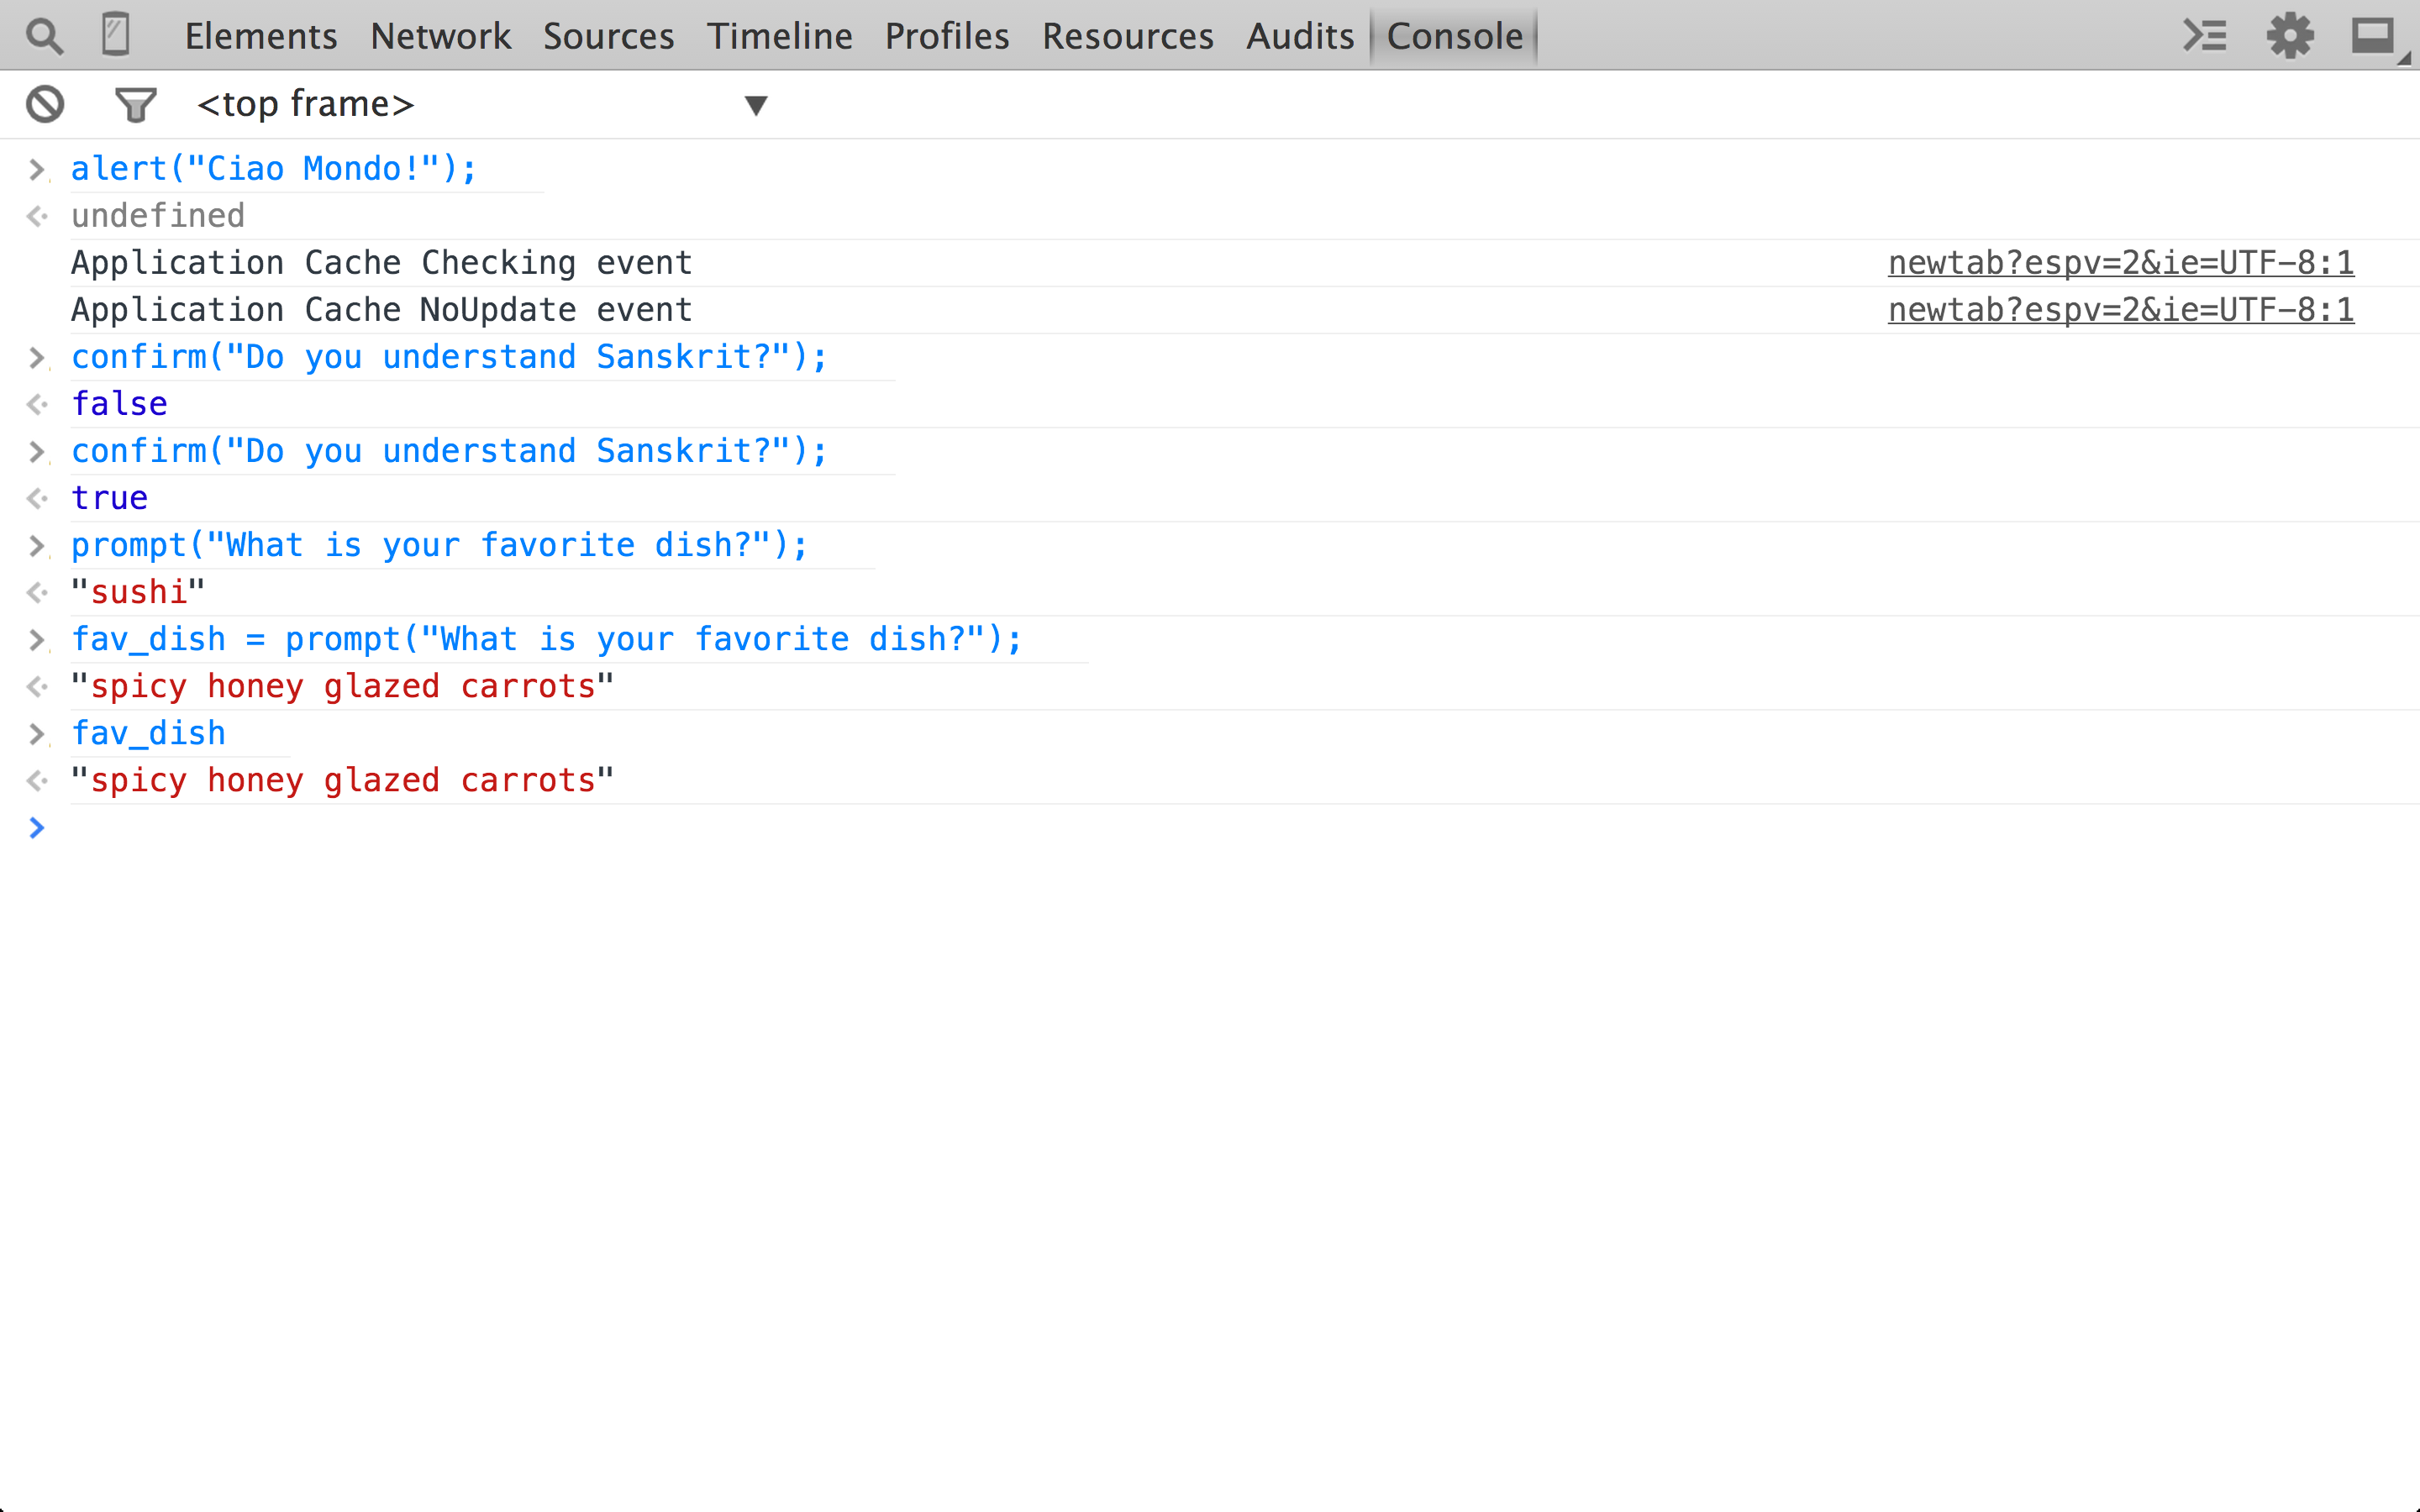
###Task: JS Functions
- Use alert() to pop up a dialog box.
- Use confirm() to ask a yes or no question.
- Use prompt() to ask a question.
- Save the response to the prompt() as a variable, and then run a string method of your choice on it.
###ScreenShot
###Day 42
###Task Write functions of your own to:
- take somebody's name and say a greeting to them;
- subtract two numbers;
- multiply two numbers;
- divide two numbers.
####What I learnt: There are 5 basic JS datatypes/primatives:
- Numbers
- Strings
- Booleans
- Undefined
- Null
###Day 43
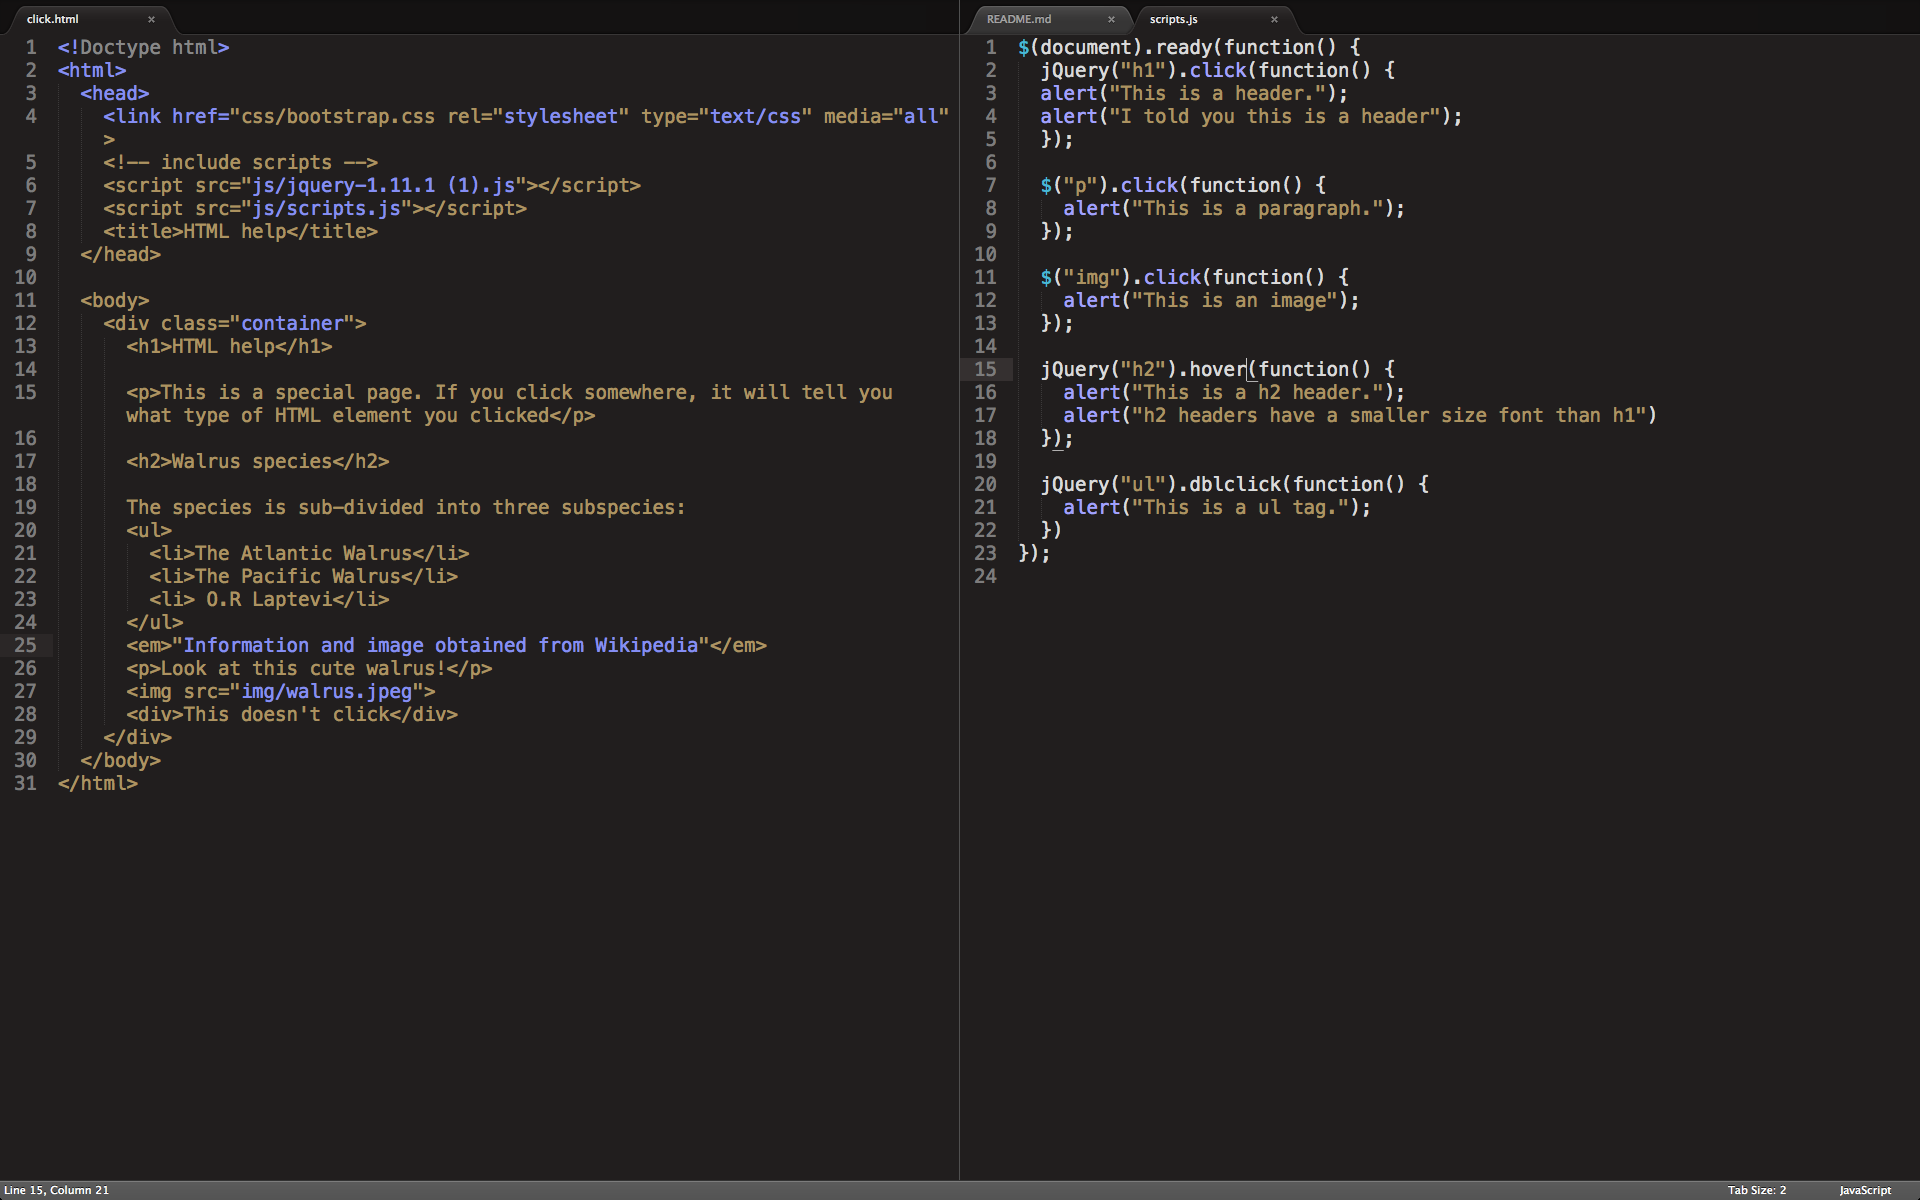
###Task jQuery practice
- Create a HTML page.
- Add an
<h2>and bind an event handler to it with.click(). Pass in a callback that contains analert(). - Do the same for a
<ul>. - Swap out the
.click()method for.dblclick()and.hover()in a couple places.
###Screenshot
###Day 44
###Task jQuery effects practice
- On your cat's homepage, add some text that alternates between saying "Hide/show images", and toggles the images appropriately.
###What I learnt: To add jQuery to my kats webpage:
- first download a copy of jQuery and place it in the same directory as the HTML file
- then reference it with the HTML
<script>tag. - Create a file called
scripts.jsto store our own JavaScript code and reference it by also making making use of the<script>tag.
Note: The scripts.js file must come after jQuery library, since the scripts.js file relies on the functionality that jQuery provides.
<!DOCTYPE html>
<html>
  <head>
  <link href="css/styles_cat.css" rel="stylesheet" type="text/css" media="all">
    <link href="css/bootstrap.css" rel="stylesheet" type="text/css" media="all">
  <script src="js/jquery-1.11.1 (1).js"></script>
  <script src="js/scripts.js"></script>
  <title>kitty-kat adventures</title>
  </head>
###jQuery Syntax:
jQuery(selector).action()
jQueryto define.access jQuery (note a$sign can be used instead ofjQuery(selector)to find theHTMLelements.actionis a jQuery action to be performed on the element(s)
Example:
To assign a click event to all <h1>'s on a page:
#####Note:
-
All the different visitor's actions that a web page can respond to are called events.(obtained from w3schools)
-
When you pass in a function as an argument to another function, the function being passed in is called a callback.
jQuery("h1").click();The next step is to define what should happen when the event fires. In order to complete this, you must pass a function to the event:
jQuery("h1").click(function () {
  alert("This is a h1 tag");
});- Document Ready Event: It is good practice to allow the document to be fully loaded before working on it. To allow for this we place all our jQuery method inside a document ready event:
jQuery(document).ready(function() {
//jQuery methods go here...
}):
###Day 45
###Task
####What I learnt:
For a better user experience it is common for elements that are clickable to:
- change a different colour
- when a user hovers their mose over it, the cusor should change to a hand and the text will be underlined.
The above can be implemented with CSS
p {
  cursor: pointer;
  color: res;
}

p:hover {
  text-decoration:underline;
}
The <span> tag is used to group inline-elements in a document. In my example
I used the <span> tag to specifically only target the "Click here" Without the <span>, the CSS properties would have been applied to all <p> tags.
<div id="initial-show">
 <p><span class="clickable">Click here</span> to see the surprise!</p>
</div>

<div id="initial-hide">
 <p>What a smart kitty-kat! <span class="clickable">Click here</span> to hide me!</p>
###Day 46
###Task
####What I learnt: Document Object Model (DOM) The DOM is your browser's interpretation of the HTML it reads. If you inspect an element of the page, you're actually seeing the DOM, not the HTML
Difference between a class selector and an id selector id's are unique
- Each element can have only one ID
- Each page can have only one element with that ID Using an id, you can be clear that you're referring to one particular thing, rather than potentially referring to several.
Classes are not unique
- Can use the same class on multiple elements.
- Can use multiple classes on the same element.
Any styling information that needs to be applied to multiple objects on a page should be done with a class. Take for example a page with multiple "HongKong":
<div class="HongKong"></div>
<div class="HongKong"></div>
<div class="HongKong"></div>
You can now use the class name "HongKong" as your hook to apply the same set of styling to each one of these. But what if you need one of them to be bigger than the other, but still share all the other attributes? Classes has you covered there, as you can apply more than one class:
<div class="HongKong"></div>
<div class="HongKong China"></div>
<div class="HongKong"></div>
###Day 47
###Task Manipulation and traversal
- Inserting content to the DOM
What I learnt:
Today when faced with the following code below today, I had to refresh my Bootstrap knowledge on buttons:
<button class="btn btn-primary" id="hello">Say "hello"</button>
<button class="btn btn-inverse" id="goodbye">Say "goodbye"</button>
<button class="btn btn-danger" id="stop>Say">Say "stop copying me!"</button>
Bootstrap includes a variety of button colours that can be applied as well, using additional classnames. The available color classes are:
- btn-primary,
- btn-info,
- btn-success,
- btn-warning,
- btn-danger,
- btn-inverse, and
- btn-link.
Note:
In order to apply a colour to a button, the regular <btn> class must also be present.
###Day 48
###Task Inserting elements to the Dom
- Writing JS to make buttons repsond
First we locatethe button with ID#hello, attach a click listener to it. When clicked, the <ul> is selected and preprends (put inside at the beginning) the <li> tag "Hello!"
Do the same for goodbye, ie: grab button with id#goodbye, attach a click listener and prepend with the <li> tag "Goodbye!"
$(document).ready(function() {
  $("button#hello").click(function() {
    $("ul").prepend("<li>Hello!</li>");
  });

  $("button#goodbye").click(function() {
    $("ul").prepend("<li>Goodbye!</li>");
  });
});
At present we have both the user and the webpage saying the same thing. To differentite between the two we:
- 1/ Change the
<ul>tags to have IDs foruserandwebpageon the HTML
<div class="col-md-6">
  <h2>You said:</h2>
  <ul class="unstyled" id="user">
  </ul>
</div>

<div class="col-md-6">
  <h2>The web page said back:</h2>
  <ul class="unstyled" id="webpage">
  </ul>
</div>- 2/ Inside the scripts.js file we can now apply the individual prepends to the user and webpage.
$(document).ready(function() {
  $("button#hello").click(function() {
    $("ul#user").prepend("<li>Hello!</li>");
    $("ul#webpage").prepend("<li>Why hello there!</li>");
  });

  $("button#goodbye").click(function() {
    $("ul#user").prepend("<li>Goodbye!</li>");
    $("ul#webpage").prepend("<li>Goodbye, dear user!</li>");
  });

  $("button#stop").click(function() {
    $("ul#user").prepend("<li>Stop copying me!</li>");
    $("ul#webpage").prepend("<li>Pardon me. I meant no offense.</li>");
  });
});
Removing elements from the DOM:
A basic test to make sure that we are selecting the right element is to change the background colour:
$("button#hello").click(function() {
  $("ul#user").prepend("<li>Hello! <span class='clickable delete'>x</span></li>");
  $("ul#webpage").prepend("<li>Why hello there! <span class='clickable delete'>x</span></li>");
  $('li').css('background-color', 'green');
});
Once we have made sure we are selecting the correct element, we can attach a click handler in place of changing the background. In the example below I have replaced the background color change into opening a dialogue box:
$("button#hello").click(function() {
  $("ul#user").prepend("<li>Hello! <span class='clickable delete'>x</span></li>");
  $("ul#webpage").prepend("<li>Why hello there! <span class='clickable delete'>x</span></li>");
  $('li').click(function() {
    alert('Ciao');
  });
});
To modify the code so that attach handlers are only attached to the most recently added message, we can select the <ul>, look through its child elements (the <li>s) and select the first one of them.
Instead of tracking all the <ul>s we
- track only the ul#user,
- then grab the children of that ul
- just grab the lis
- grab the 1st of those children This is the element we add the click handler to.
$("ul#user").children("li").first().click(function() {
  alert('hi');
});
$("ul#webpage").children("li").first().click(function() {
  alert('hi');
});
Finally, in order to allow for content to be deleted, replace $aler('hi'); with $(this).remove(); (this refers to whatever is being clicked at the time)
$("ul#user").children("li").first().click(function() {
$(this).remove();
});
$("ul#webpage").children("li").first().click(function() {
$(this).remove();
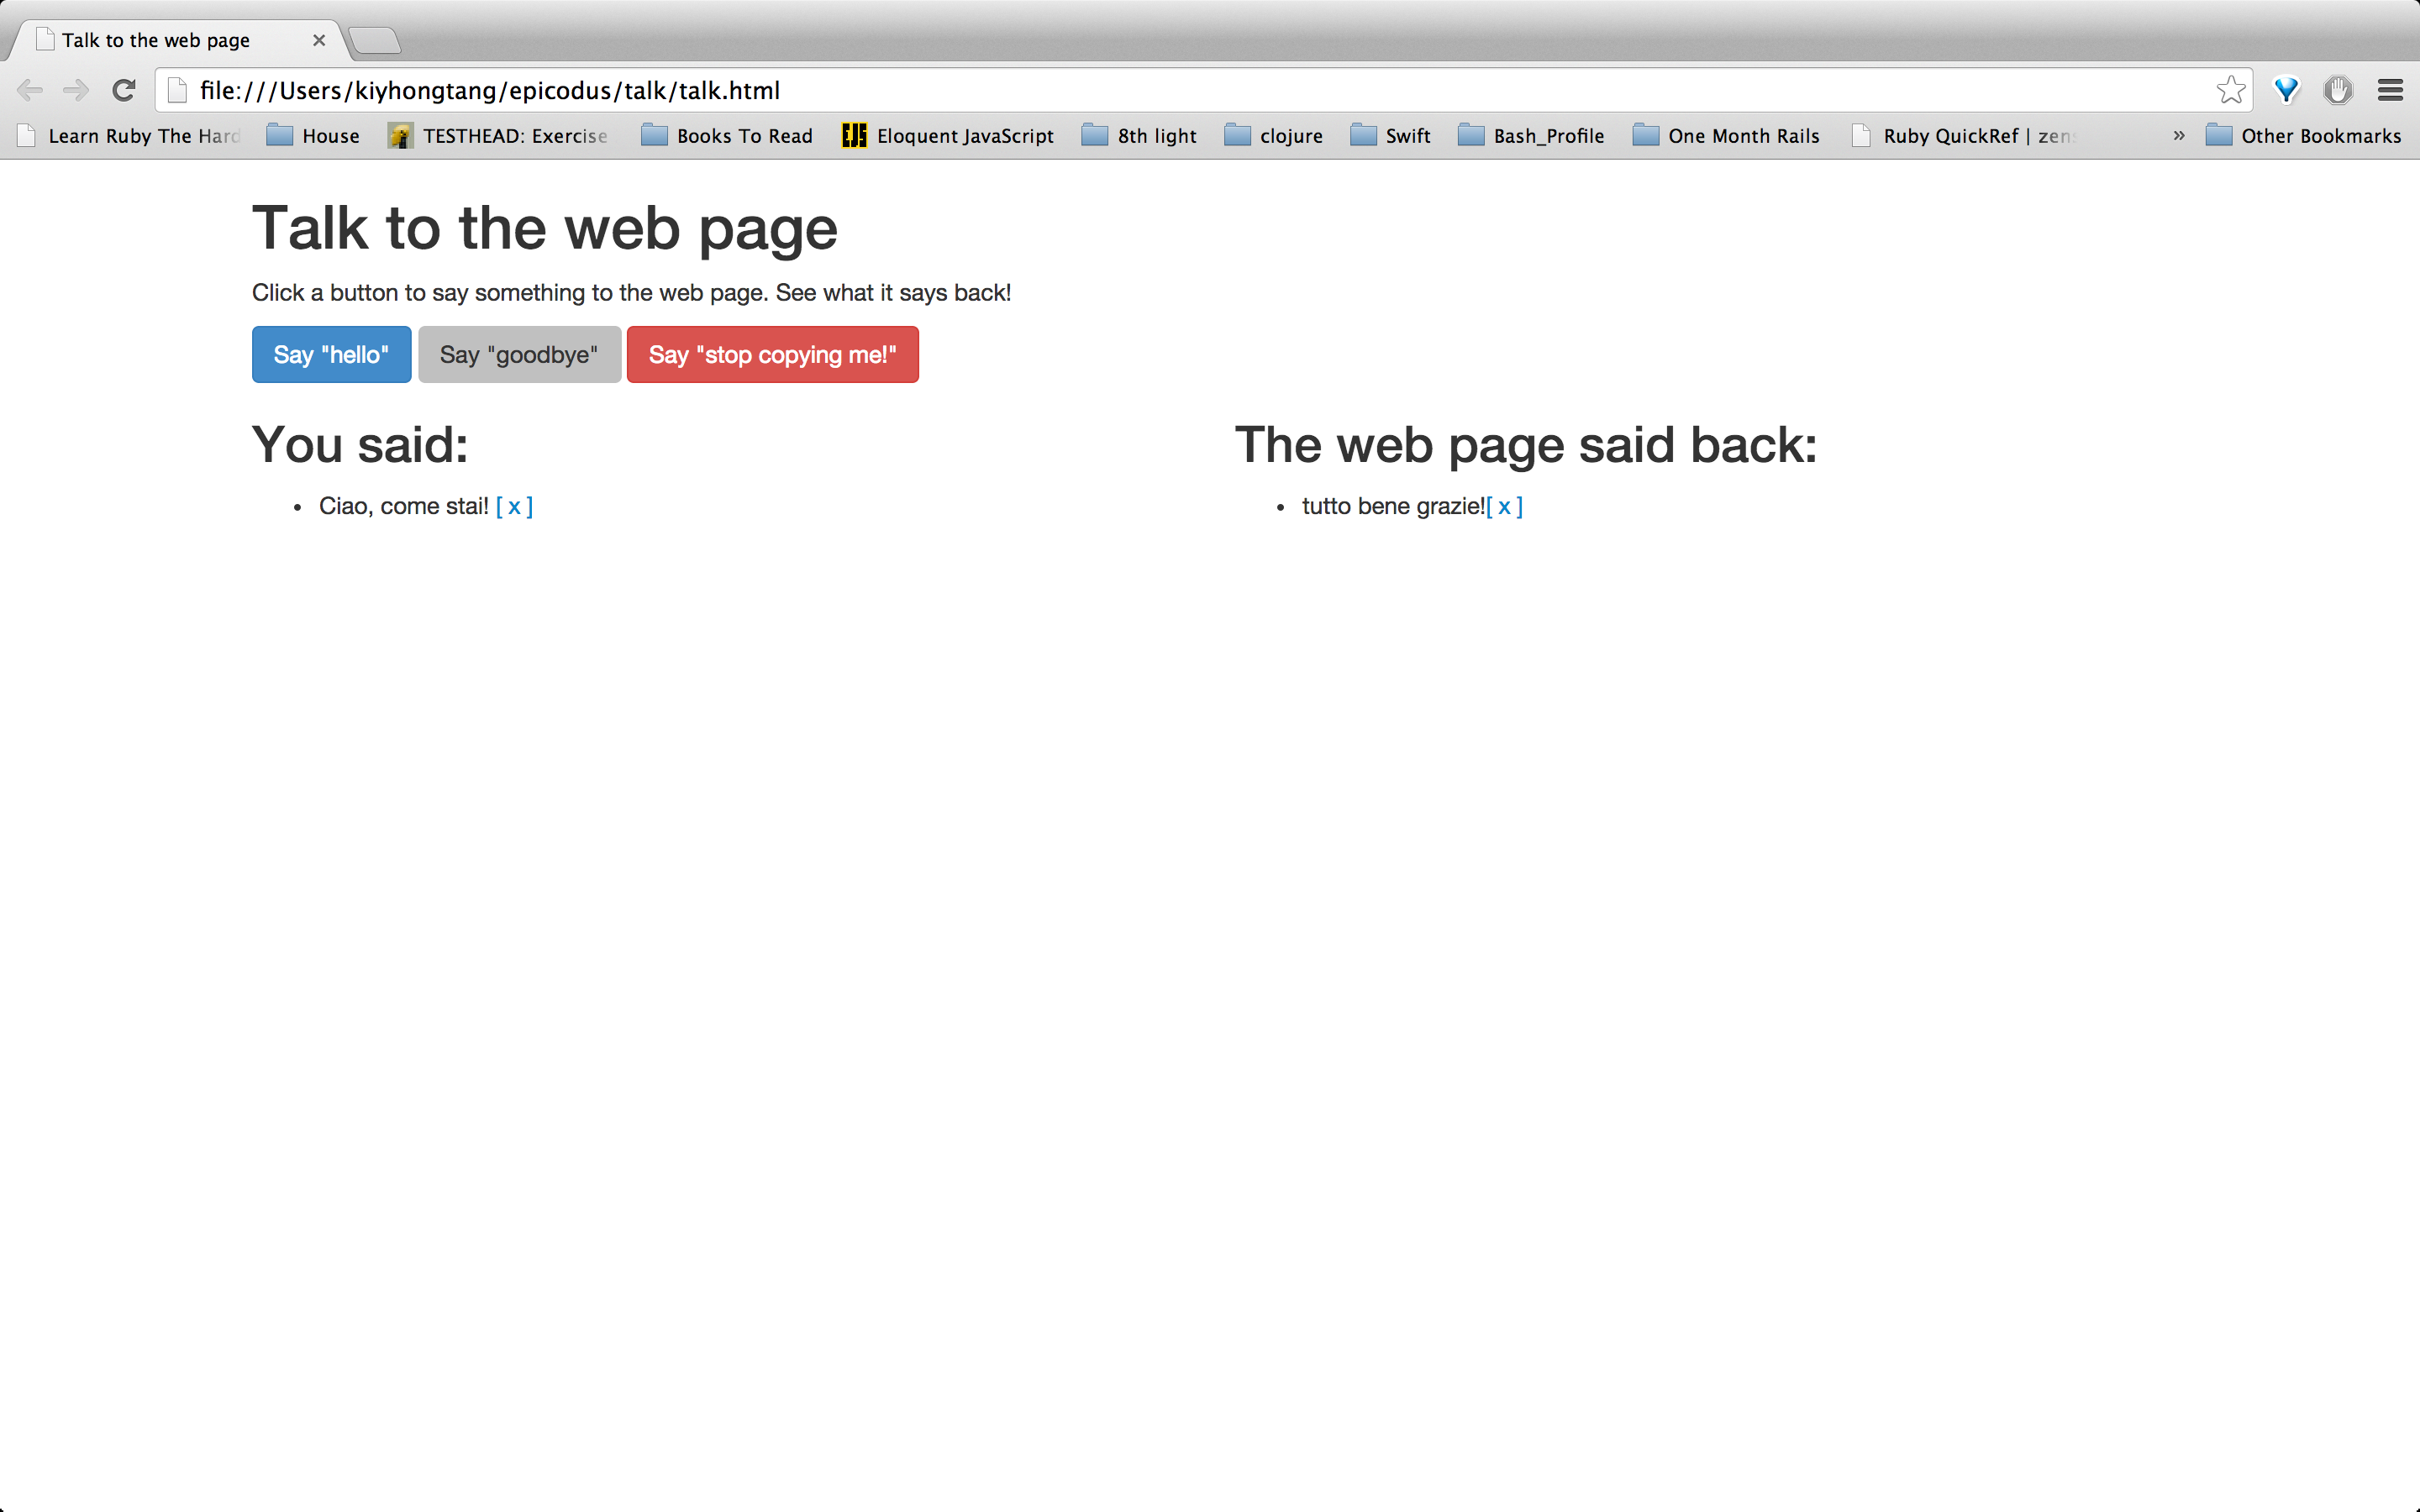
});###Day 49
###Task
- Add a feature so that each message has an "x" next to it. When you click the "x", it should delete the line.
In order to complete this task, I:
- 1/ Added a
<span>tag withclass=clickable
$(document).ready(function() {
  $("button#hello").click(function() {
    $("ul#user").prepend("<li>Ciao, come stai! <span class='clickable'>[ x ]</span></li>");
    $("ul#webpage").prepend("<li>tutto bene grazie!<span class='clickable'>[ x ]</span></li>");

    $("ul#user").children("li").first().click(function() {
      $(this).remove();
    });

    $("ul#webpage").children("li").first().click(function() {
      $(this).remove();
    })
});- 2/ Updated the CSS as below
.clickable {
  cursor: pointer;
  color: #0088cc;
}

.clickable:hover {
  text-decoration: underline;
}
###Screeshot
###Day 50
Task: Make a "cat vs dog" page - if you click a button for the cat to meow, the dog should bark back, and vis versa. Include the same deleting functionality as in talk.html (but re-write the code yourself!).
Beware of typos! Today I spent 40mins deconstructing my code as I was unable to implement js into my webpage. After vetting through each line of the code I later found out that my mistatke was due to a typo when creating my scripts.js file.
Completed:
- Added
<span>tag to specify the text colour for bothbuttonandimage
<p>Click on a <span class="button">button</span> or <span class="image">image</span> to begin a conversation between Mufasa and Droopy</p>- In addition I added two clickable images that would start initiate a conversation between cat and dog.
<div class="row">
  <div class="col-md-6">
    <img src="img/mufasa.png" alt="Picture of a tough cat" class="img-responsive img-circle" id="cat_img">
  </div>
  <div class="col-md-6">
    <img src="img/Droopy_dog.png" alt="Picture of a relaxed dog" class="img-responsive img-thumbnail" id="dog_img">
  </div>
</div>
Note:
In the above code, I have made the images both responsive-firendly via the img-responsive class and have also styled the image using both the img-circle and img-thumbnail class.
###Day 51
Today I contiued and completed Day 50's task.
Extra credit: Have you noticed how there's a lot of repetition in you JavaScript? On talk.html, there's three sections that select a button, attach a click event listener, and pass a callback that looks the same except for the message. The only things that differ among them are the ID of the button and the message. Eliminate this repetition by creating a function that accepts two arguments for the ID and the message, and then finds the appropriate button and binds a callback with the appropriate message.
###Day 52
###Task Forms
###What I learnt $(document).ready(function(): Defer loading until the document is ready. When the form submits we want to take a action to insert the stuff into the spans. The way we bind to a to a form submitting, we need to select the form with js, look for id blanks and inside the id of blanks we grab the form. Then we attach a event listener for when a form is submited(submit) and pass a callback fuction that will be run when form is submitted. Inside the function we add: $('.person1').append("blah blah");
span person1 we want to append to
Add a paramenter to the callback fucntion called event:
The event.preventDefault() method stops the default action of an element from occuring.
###Day 53
####Task: Create a page that asks the user to type something into a field, and when they submit the form, have the page say it back to them in all uppercase.
###Day 54
####Task:
###What I learnt
JavaScript Callback or Higher order function A callback function, is a function that is passed to another function (let's call this other function "otherFunction") as a parameter, and the callback function is called (excuted) inside otherFunction.
Below is a simple use of a callback function in jQuery:
//the item in the click method's parameter is a function, not a variable.
//the item is a callback function
$("#btn_1").click(function(){
  alert("Btn 1 clicked");
});
As you can see in the preceeding example, we pass a function as a parameter to the click method. The click method will call (execute) the callback function we passed to it. Note we have passed a anonymous function(a function without a name) to the click method as a parameter.
Note: In JS, functions are first class objects, which means functions can be used in a first-class manner like objects, since they are in fact objects themselves: They can be:
- stored in variables,
- passed as arguments to functions,
- created within functions,
- returned from functions
###Day 55
###What I learnt
.removeClass
The removeClass() method removes one or more class names from the selected elements.
Note: If no parameter is specified, this method will remove ALL class names from the selected elements.
The method is often used with .addClass() to switch element's classes from one to another, like so:
$("p").removeClass("banana apple").addClass("pineapple")Here, the banana and apple classes are removed from all paragraphs, while pineapple is added.
To replace all existing classes with another class, we can use .attr( "class", "newClass" ) instead.
.addClass(className)
Adds the specified class(es) to each of the set matched elements.
Example:
$(document).ready(function() {
  $("button#green").click(function() {
    $("body").removeClass();
    $("body").addClass("green-background");
  });
});
In the above when a user clicks the green button, jQuery will add the green-background class to the <body> element. In order for the background color to change, we then can go into our styles.css and create the folowing:
.green-background {
  background-color: green;
}
Example of bad practices:
$("button#green").click(function() {
  $("body").css("background-color", "green");
});
This example will also allow for a change the CSS of an element with jQuery and at first appearences may seem more self-explanatory. However, this method is generally considered as bad practice for the following reasons:
1/First we are mixing our concerns. JS is responsible for how the page behaves; CSS is responsible for how it looks. In thia example we have placed how the page should looks in our JavaScript. This makes it difficult for other programmers who might need to change this page in the future to know where to look for the appropriate code.
2/ You loose the biggest advantage os usinf CSS: the ability to create a class and re-use that style across elements and pages. Here, when we put a style in our JS, it cannot be re-used.
###Day 56
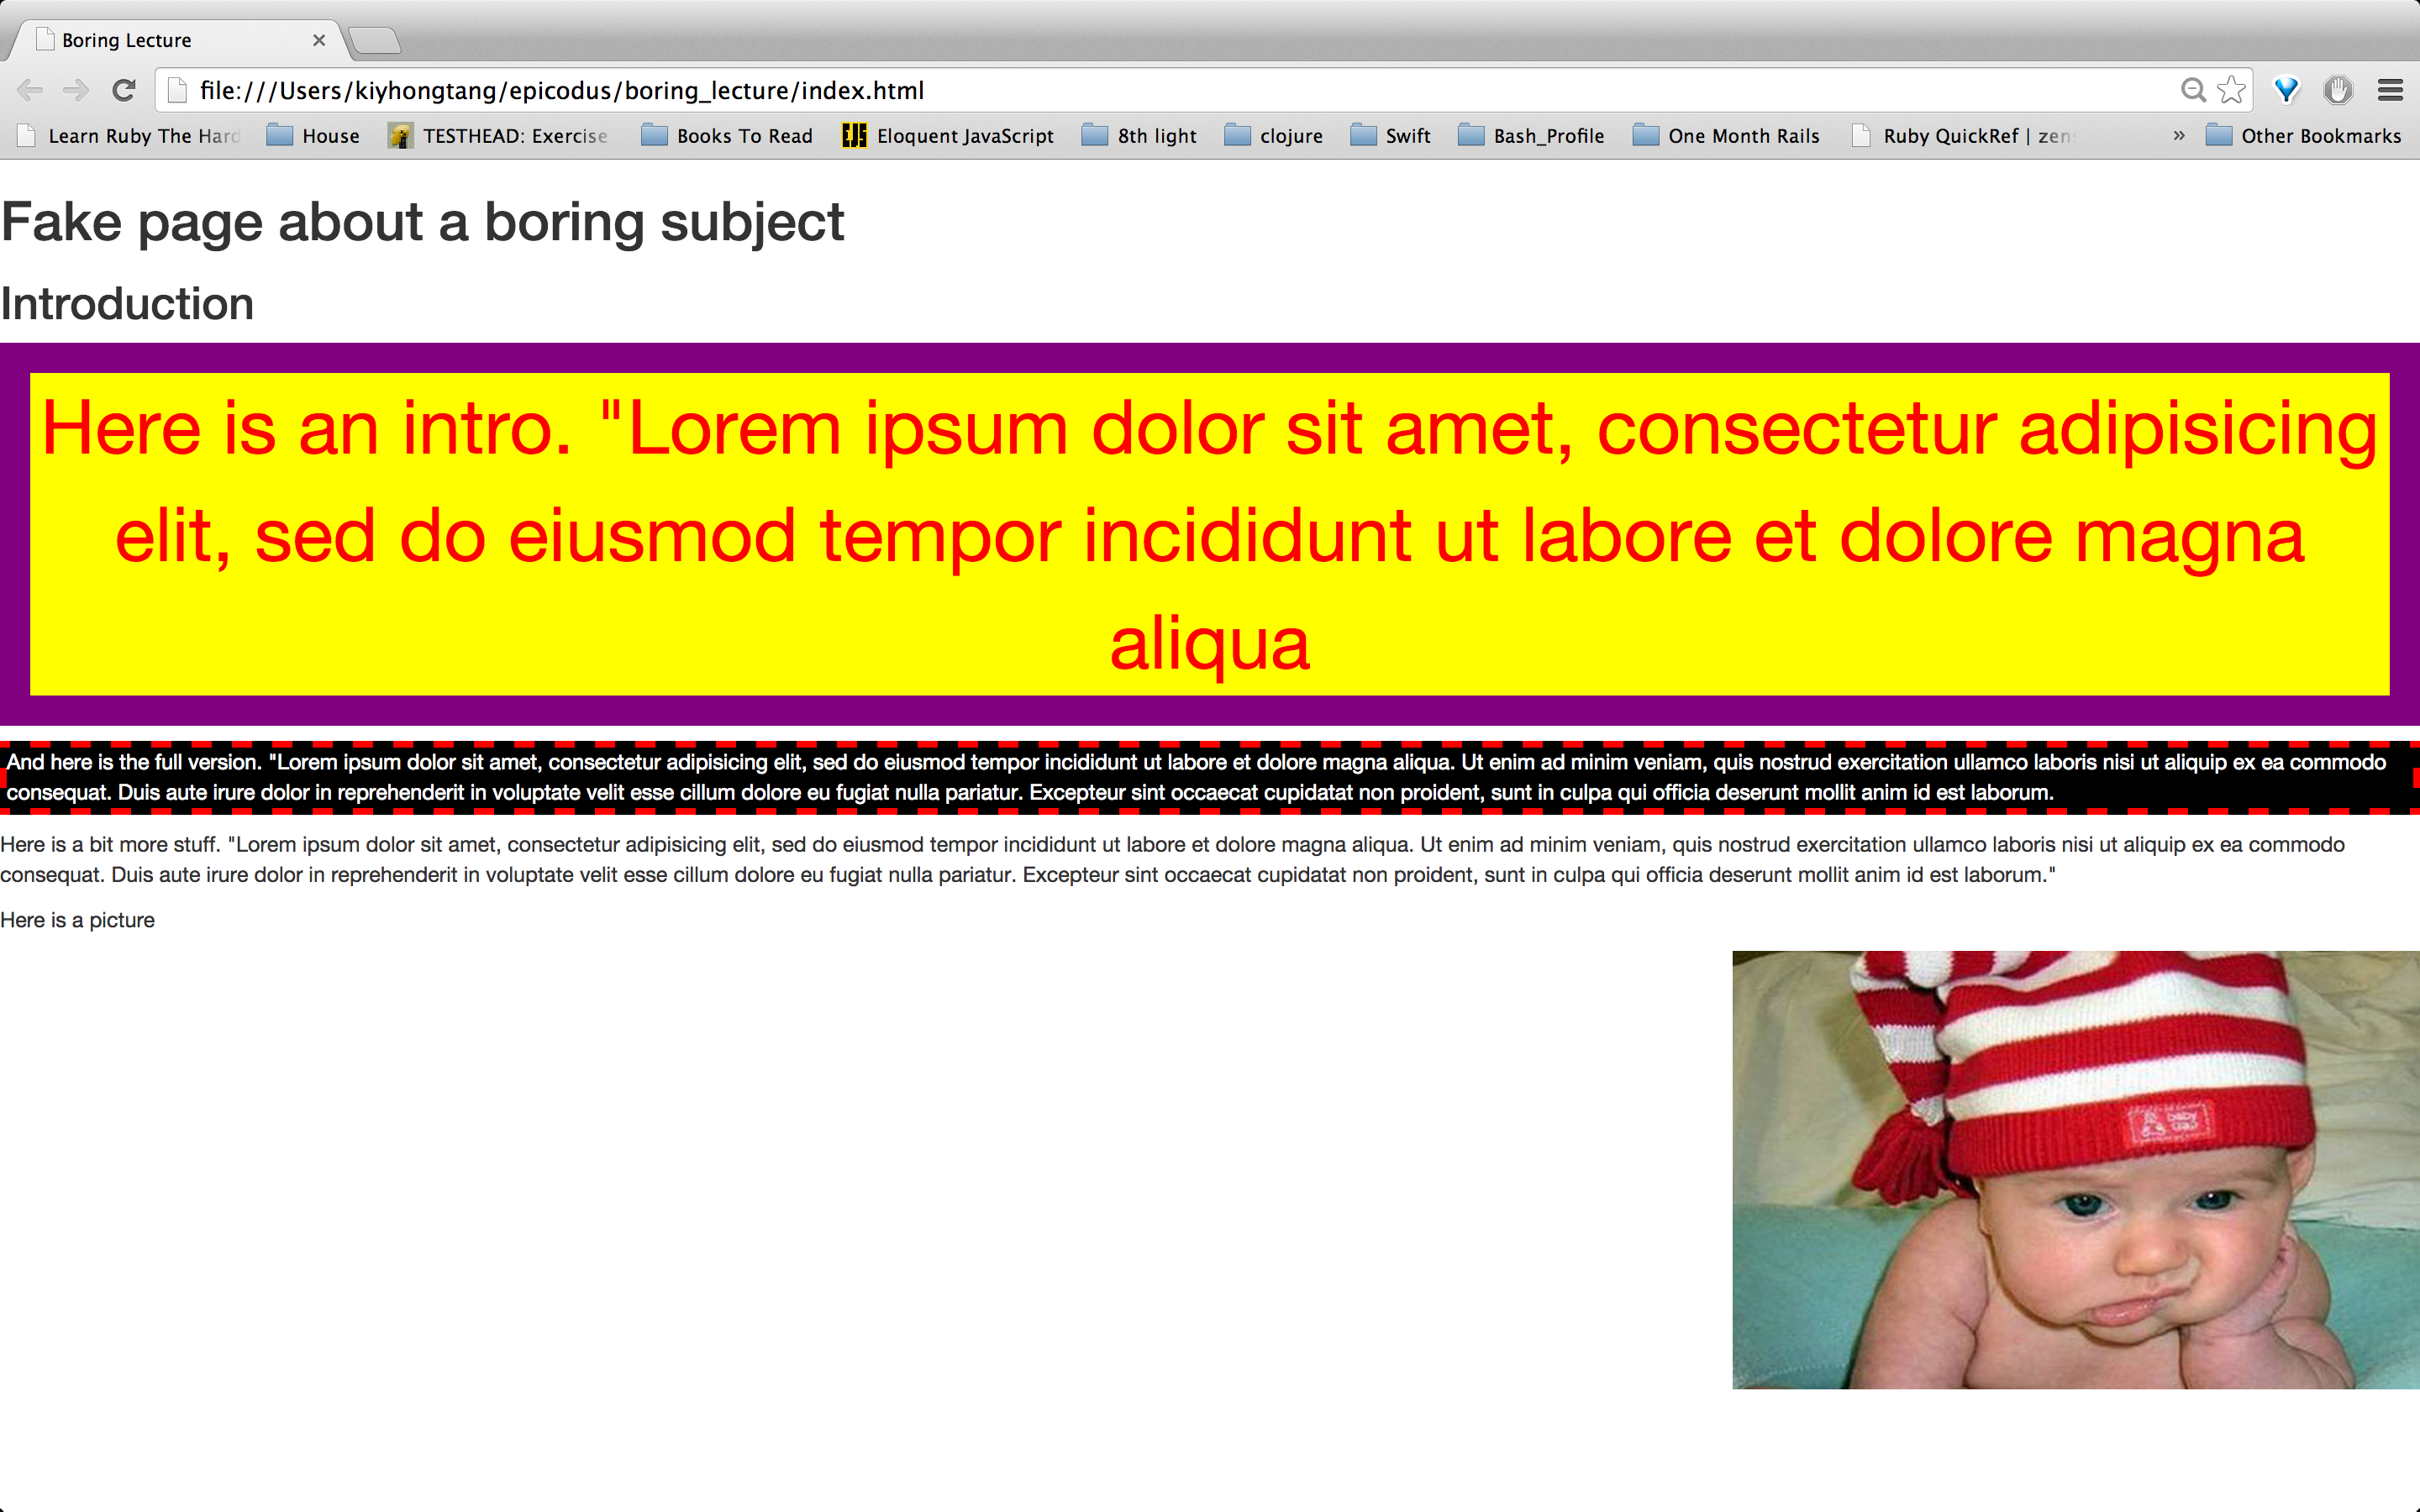
###Task: Update your boring lecture page so that when somebody clicks on a paragraph, it highlights it and adds a box around the edges.
In order to complete this task I completed the folowing steps:
1/ Added the necessary links to jQuery:
  <script src="js/jquery-1.11.1 (1).js"></script>
  <script src="js/scripts.js"></script>
To keep my application consistent with my other examples, I also linked to Bootstap:
<link href="css/bootstrap.css" rel="stylesheet" type="styles/css">
2/ I specifically separated the paragraphs so that each had their unique hightlight and border color. To implement this I first added <id>'s to the individual paragraphs:
<p id="first"> Here is an intro. "Lorem ipsum dolor sit amet, consectetur adipisicing elit, sed do eiusmod tempor incididunt ut labore et dolore magna aliqua</p>

<p id="second">And here is the full version. "Lorem ipsum dolor sit amet, consectetur adipisicing elit, sed do eiusmod tempor incididunt ut labore et dolore magna aliqua. Ut enim ad minim veniam, quis nostrud exercitation ullamco laboris nisi ut aliquip ex ea commodo consequat. Duis aute irure dolor in reprehenderit in voluptate velit esse cillum dolore eu fugiat nulla pariatur. Excepteur sint occaecat cupidatat non proident, sunt in culpa qui officia deserunt mollit anim id est laborum.</p>

<p id="third">Here is a bit more stuff. "Lorem ipsum dolor sit amet, consectetur adipisicing elit, sed do eiusmod tempor incididunt ut labore et dolore magna aliqua. Ut enim ad minim veniam, quis nostrud exercitation ullamco laboris nisi ut aliquip ex ea commodo consequat. Duis aute irure dolor in reprehenderit in voluptate velit esse cillum dolore eu fugiat nulla pariatur.
3/ Then in scripts.js I added the following:
$(document).ready(function() {
    $("p#first").click(function() {
    $("p#first").removeClass();
    $("p#first").addClass("change-background");
    });

    $("p#second").click(function() {
    $("p#second").addClass("second-background");
  });
})
4/ Here I added the following in CSS
.change-background {
  background-color: yellow;
  border: 20px solid purple;
}

.second-background {
  background-color: black;
  color: white;
  border: 5px dashed red;
}
###Screenshot
###Day 57
###Task: Branching Practice: Make a couple web pages incorporating branching:
A page with information about turtles, snakes, and insects that asks you which animal you'd like to learn about.
<!DOCTYPE html>
<html>
  <head>
    <link href="css/bootstrap.css" rel="stylesheet" type="text/css">
    <link href="css/styles.css" rel="stylesheet" type="text/css">
    <script src="js/jquery-1.11.1 (1).js"></script>
    <script src="js/scripts.js"></script>
    <title>Animal Selections</title>
  </head>

  <body>
    <div class="container">
      <h1>Choose your animal</h1>
      <p>Click the specific button to bring more information</p>

      <div id="insect">
        <h2>Insect</h2>
        <ul>
          <li>Insect body have three parts, the thorax, abdomen and head.</li>
          <li>Insects have two antennae</li>
          <li>Insects have three pairs of legs</li>
          <li>Insects are cold blooded</li>
        </ul>
      </div>

      <div id="turtle">
        <h2>Turtles</h2>
        <ul>
          <li>Turtles have existed for around 215 million years</li>
          <li>The largest turtle is the leatheback sea turtle, can weigh over 900kg</li>
          <li>The upper shell that helps protect them is called the a 'carapace'</li>
        </ul>
      </div>

      <div id="snake">
        <h2>Snakes</h2>
        <ul>
          <li>Snakes are carnivores</li>
          <li>Snakes have internal ears, not external ears</li>
          <li>Snakes cannot bite food so have to swallow it whole</li>
          <li>Snakes smell with their tongues</li>
        </ul>
      </div>
    </div>
</body>$(document).ready(function() {
var animal = prompt("For more information, please type either 'insect', 'turtle' or 'snake'");
if (animal === 'insect') {
$('#insect').show();
} else if (animal === 'turtle') {
$('#turtle').show();
} else if (animal === 'snake') {
$('#snake').show();
} else {
alert('Unrecognised request, please try again');
};
});A page with information about voting that displays different information to minors. A page for an amusement park that only shows you information on rides that you're tall enough to go on.
###Day 58
###Task: jQuery Selectors and Filters: Attribute Filters
[attribute]: only includes the element in the result set if that attribute exists on the element. eg: If we only want to select paragraphs that have a class atribute" $("p[class]").css('border', "3px solid red");
[attribute=value]: Checks to see if the attributes' value is equal to the value that you supply eg: Filter paragraphs that have an id attribute equal to para1 $("p[id=para1]").css('border', "3px solid red");
[attribute!=value]: only includes the element in the result if the attribute does not have the value that is listed here.
The next two below are similar to regular expressions in JavaScript
[attribute^=value]: checks to see if the attribute starts with the string that you give here eg: Find paragraph that have the id attribute but it has to start with the string "para" $("p[id^para]").css('border', "3px solid red");
[attribute*=value]: checks to see if the attribute ends with the value that you have given Below I will use a multiple requirement: Fiter paragraphs that have ids that start with para and it also has to have the language attribute that contains "en-" $("p[id^para] [lang*=en-").css('border', "3px solid red");
###Day 59
###Task: Complete the folowing in Ruby:
Fixnum:
- +()
- -()
- *()
- /()
- **() # This means take whatever is in the box (the receiver) and raise it to the power of whatever Fixnum is in the argument.
String:
- split()
- join()
- capitalize()
- reverse()
- split!()
- join!()
- capitalize!()
- reverse!()
Fixnum:
2.0.0-p247 :187 > number = 80
 => 80

2.0.0-p247 :188 > number + 19
 => 99

2.0.0-p247 :189 > number
 => 80

2.0.0-p247 :190 > number - 8
 => 72

2.0.0-p247 :191 > number
 => 80

2.0.0-p247 :192 > number *13
 => 1040

2.0.0-p247 :193 > number
 => 80

2.0.0-p247 :194 > number / 5
 => 16

2.0.0-p247 :195 > number
 => 80

2.0.0-p247 :196 > number ** 2
 => 6400

2.0.0-p247 :197 > number
 => 80

String:
join()
2.0.0-p247 :227 > a = ["ciao", "mondo"]
 => ["ciao", "mondo"]

2.0.0-p247 :228 > a.join
 => "ciaomondo"

2.0.0-p247 :251 > greetings.capitalize!
 => "Merry christmas"

2.0.0-p247 :252 > greetings
 => "Merry christmas"

2.0.0-p247 :253 > greetings.reverse!
 => "samtsirhc yrreM"

2.0.0-p247 :254 > greetings
 => "samtsirhc yrreM”