rl-teacher is an implementation of Deep Reinforcement Learning from Human Preferences [Christiano et al., 2017].
The system allows you to teach a reinforcement learning agent novel behaviors, even when both:
- The behavior does not have a pre-defined reward function
- A human can recognize the desired behavior, but cannot demonstrate it
It's also just a lot of fun to train simulated robots to do whatever you want! For example, in the MuJoCo "Walker" environment, the agent is usually rewarded for moving forwards, but you might want to teach it to do ballet instead:
See our agent circus for other tricks that you can train an agent to do using rl-teacher
- A reward predictor that can be plugged into any agent, and learns to predict which actions the human teacher would approve of
- Several example agents that learn via a function specified by the reward predictor
- A webapp that humans can use to give feedback, providing the data used to train the reward predictor. The webapp interface is shown below.
Together with a set of integrations to OpenAI gym, these components implement the full system described in Deep RL from Human Preferences

Obtain a license for MuJoCo and install the binaries on your system. For good documentation on MuJoCo installation, and an easy way to test that MuJoCo is working on your system, we recommend following the mujoco-py installation.
Set up a fresh conda environment that uses python 3.5.
Clone the rl-teacher repository anywhere you'd like. (For example, in ~/rl-teacher).
Then run the following to install the rl-teacher code into your conda environment:
cd ~/rl-teacher
pip install -e .
pip install -e human-feedback-api
pip install -e agents/parallel-trpo[tf]
pip install -e agents/pposgd-mpi[tf]
Run the following command to do baseline reinforcement learning directly from the hard-coded reward function. This does not use human feedback at all, but is a good way to test that MuJoCo is working and that the RL agent is configured correctly and can learn successfully on its own.
python rl_teacher/teach.py -p rl -e ShortHopper-v1 -n base-rl
By default, this will write tensorboard files to ~/tb/rl-teacher/base-rl. Start tensorboard as follows:
$ tensorboard --logdir ~/tb/rl-teacher/
Starting TensorBoard b'47' at http://0.0.0.0:6006
(Press CTRL+C to quit)
Navigate to http://0.0.0.0:6006 in a browser to view your learning curves, which should look like the following:
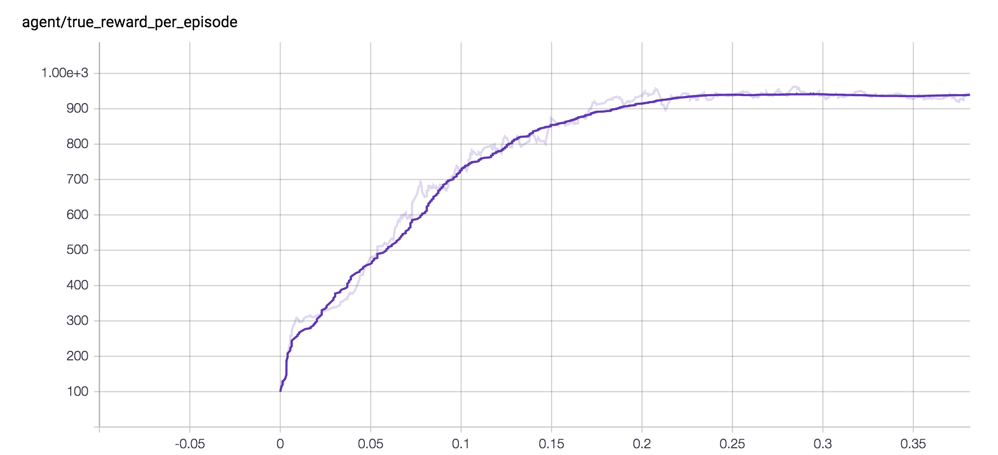
Next we'll use the two-part training scheme (train a separate reward predictor, and use RL on the predicted reward), but instead of collecting genuine human feedback, we'll generate synthetic feedback from the reward function hard-coded into the environment. This provides us with another sanity check and a useful comparison of learning from the reward predictor versus learning from the true reward.
Instead of -p rl above, we specify -p synth to use a synthetic predictor. We'll use the same environment (-e ShortHopper-v1), give this run a new name (-n syn-1400), and ask for 1400 total labels (-l 1400).
python rl_teacher/teach.py -p synth -l 1400 -e ShortHopper-v1 -n syn-1400
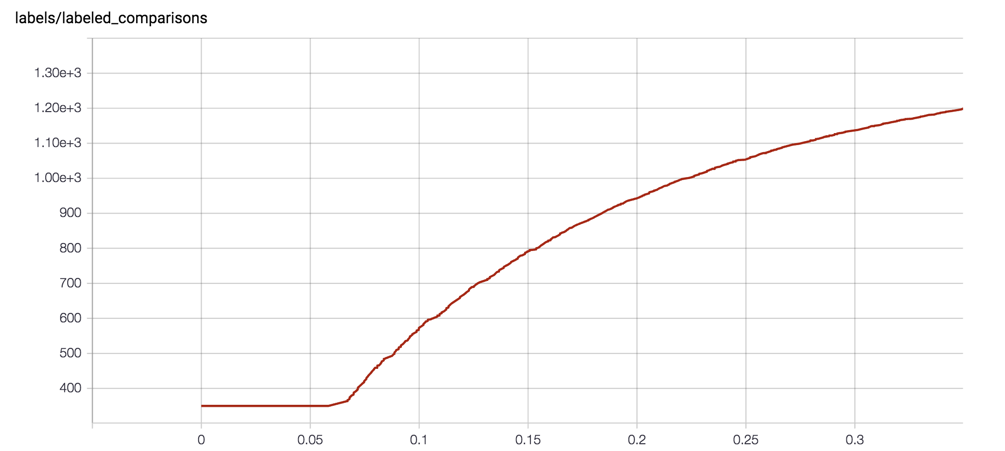
Your tensorboard curves should look like the following (with learning from synthetic labels in brown):

If you'd like to know exactly how synthetic labels are calculated, you can read the code in SyntheticComparisonCollector. The system uses an exponentially decaying labeling rate that tangentially approaches the desired total number of labels:
To train your agent based off of feedback from a real human, you’ll run two separate processes:
- The agent training process. This is very similar to the commands we ran above.
- A webapp, which will show you short video clips of trajectories and ask you to rate which clip is better.
First you'll need to set up django. This will create a db.sqlite3 in your local directory.
python human-feedback-api/manage.py migrate
python human-feedback-api/manage.py collectstatic
Start the webapp
python human-feedback-api/manage.py runserver 0.0.0.0:8000
You should now be able to open the webapp by navigating to http://127.0.0.1:8000/ in any browser. There’s nothing there yet, but when you run your agent, it will create an experiment that will let you add labels.
The training process generates rendered trajectory segments for you to provide feedback on. These are stored in Google Cloud Storage (GCS), so you will need to set up a GCS bucket.
If you don't already have GCS set up, create a new GCS account and set up a new project. Then, use the following commands to create a bucket to host your media and set this new bucket to be publicly-readable.
export RL_TEACHER_GCS_BUCKET="gs://rl-teacher-<YOUR_NAME>"
gsutil mb $RL_TEACHER_GCS_BUCKET
gsutil defacl ch -u AllUsers:R $RL_TEACHER_GCS_BUCKET
Now we're ready to train an agent with human feedback!
Note: if you have access to a remote server, we highly recommend running the agent training remotely, and provide feedback in the webapp locally. You can run both the agent training and the feedback app on your local machine at the same time. However, it will be annoying, because the rendering process during training will often steal window focus. For more information on running the agent training remotely, see the Remote Server instructions below.
Run the command below to start the agent training. The agent will start to take random actions in the environment, and will generate example trajectory segments for you to label:
$ python rl_teacher/teach.py -p human --pretrain_labels 175 -e Reacher-v1 -n human-175
Using TensorFlow backend.
No label limit given. We will request one label every few seconds
Starting random rollouts to generate pretraining segments. No learning will take place...
-------- Iteration 1 ----------
Average sum of true rewards per episode:     -10.5385
Entropy:                                     2.8379
KL(old|new):                                 0.0000
Surrogate loss:                              0.0000
Frames gathered:                           392
Frames gathered/second:                 213857
Time spent gathering rollouts:               0.00
Time spent updating weights:                 0.32
Total time:                                  0.33
Collected 10/875 segments
Collected 20/875 segments
Collected 30/875 segments
...
Once the training process has generated videos for the trajectories it wants you to label, you will see it uploading these to GCS:
...
Copying media to gs://rl-teacher-catherio/d659f8b4-c701-4eab-8358-9bd532a1661b-right.mp4 in a background process
Copying media to gs://rl-teacher-catherio/9ce75215-66e7-439d-98c9-39e636ebb8a4-left.mp4 in a background process
...
In the meantime the agent training will pause, and wait for your feedback:
0/175 comparisons labeled. Please add labels w/ the human-feedback-api. Sleeping...
At this point, you can click on the active experiment to enter the labeling interface. Click the Active Experiment link.

Once you are in the labeling interface, you will see pairs of clips. For each pair, indicate which one shows better behavior, for whatever you are trying to teach the agent to do. (To start with, you might try to teach Reacher how to spin counter-clockwise, or come up with your own task!)

Once you have finished labeling the 175 pretraining comparisons, we train the predictor to convergence on the initial comparisons. After that, it will request additional comparisons every few seconds.
If you see a blank screen like this at any point, it means the clip is not yet ready to display. Try waiting a few minutes and refreshing the page, or click Can't tell to move on and try another clip
That's it! The more feedback you provide, the better your agent will get at the task.
We recommend running the agent on a server with many CPUs in order to get faster training.
If you're running on a remote server, you may need to log into your gcloud account with gcloud auth login.
If you’re running on a linux server without a display, you should follow the headless video rendering instructions below. This is not simply to visualize the agent's progress - it is necessary to render the segments for human labeling.
If you're running on a machine without a physical monitor, you'll need to install XDummy. The following instructions have been tested on Ubuntu 14.04 LTS.
Install requirements
sudo apt-get update && sudo apt-get install -y \
    ffmpeg \
    libav-tools \
    libpq-dev \
    libjpeg-dev \
    cmake \
    swig \
    python-opengl \
    libboost-all-dev \
    libsdl2-dev \
    xpra
Install Xdummy
curl -o /usr/bin/Xdummy https://gist.githubusercontent.com/nottombrown/ffa457f020f1c53a0105ce13e8c37303/raw/ff2bc2dcf1a69af141accd7b337434f074205b23/Xdummy
chmod +x /usr/bin/Xdummy
Start Xdummy on display :0
Xdummy
Test that video rendering works end to end
DISPLAY=:0 python rl_teacher/tests/video_render_test.py
On the right are agents that were trained to do tricks based off human feedback; on the left, their counterparts trained with traditional RL. All videos are cherry-picked. Cheetah was trained using PPO, and all other agents were trained with TRPO.
| Walker Normal | Walker Ballerina |
|---|---|
 |
|
| Reacher Normal | Reacher Opposite |
|---|---|
 |
 |
| Hopper Normal | Hopper Backflip |
|---|---|
 |
 |
| Cheetah Normal | Cheetah Tapdance |
|---|---|
 |
 |
A huge thanks to Paul Christiano and Dario Amodei for the design of this system and for encouragement to make an open source version.
Max Harms (@raelifin) wrote substantial portions of the system. Max integrated and tuned the parellized TRPO implementation, added many additional features and improvements, and trained the picturesque Walker Ballerina featured prominently in this repo.
Also a big thanks to Catherine Olsson (@catherio) for immensely improving the documentation and usability of rl-teacher. And thanks to Kevin Frans (@kvfrans) for his fast open-source parallel-trpo implementation.