Table of Contents generated with DocToc
- Elixir plugin
- Features
- Project
- Project Structure
- Project Settings
- Module Settings
- New Elixir File
- Syntax Highlighting and Semantic Annotation
- Grammar parsing
- Inspections
- Quick Fixes
- Code Folding
- Commenter
- Debugger
- Delimiters
- Building/Compiling
- Live Templates
- Run Configurations
- Completion
- Decompilation
- Go To Declaration
- Formatting
- Go To Symbol
- Go To Test
- Go To Test Subject
- Find Usage
- Refactor
- Structure
- Viewing Embedded Elixir Templates
- Installation
- Screenshots
- Error reporting
- Donations
- Features

This is a plugin that adds support for Elixir to JetBrains IntelliJ IDEA platform IDEs (DataGrip, AppCode, IntelliJ IDEA, PHPStorm, PyCharm, Rubymine, WebStorm).
It works with the free, open source Community edition of IntelliJ IDEA in addition to the paid JetBrains IDEs like Ultimate edition of IntelliJ. No feature is locked to a the paid version of the IDEs, but the plugin works best in IntelliJ because only IntelliJ supports projects with different languages than the default (Java for IntelliJ, Ruby for Rubymine, etc).
The plugin itself is free. Once you have your IDE of choice installed, you can install this plugin
NOTE: This feature only works in IntelliJ IDEA as it depends on an extension point unavailable in language-specific IDEs, like Rubymine.
If you want to create a basic (non-mix) Elixir project with a lib directory, perform the following steps.
- File > New > Project

- Select Elixir from the project type menu on the left
- Click Next

- Select a Project SDK directory by clicking Configure.

- Select a Project SDK directory by clicking Configure.
- The plugin will automatically find the newest version of Elixir installed.
- macOS / OSX
- Homebrew (
/usr/local/Cellar/elixir) - Nix (
/nix/store)
- Homebrew (
- Linux
/usr/local/lib/elixir- Nix and NixOS (
/nix/store)
- Windows
- 32-bit (
C:\Program Files\Elixir) - 64-bit (
C:\Program Files (x86)\Elixir) - (**NOTE: SDK detection only works for Open an issue with information about Elixir install locations on your operating system and package manager to have SDK detection added for it.
- 32-bit (
- macOS / OSX
- If the automatic detection doesn't find your Elixir SDK or you want to use an older version, manually select select the directory above the
bindirectory containingelixir,elixirc,iex, andmix. If thebin,lib,orsrcdirectory is incorrectly selected, it will be corrected to the parent directory. - Click Next after you select SDK name from the Project SDK list.
- Change the
Project nameto the name your want for the project
- (Optionally) change the
Project locationif the directory does not match what you want - (Optionally) expand
More Settingsto change theModule name,Content root,Module file location, and/orProject format. The defaults derived from theProject nameandProject locationshould work for most projects. - Click Finish
- Choose whether to open in a New Window or in This Window.
If you've already created a (non-mix) project, you can load it as an Elixir project into the plugin.
- File > New > Project From Existing Sources...
- Select the root directory of your project.
- Leave the default selection, "Create project from existing sources"
- Click Next
- Project name will be filled with the basename of the root directory. Customize it if you like.
- Project location will be the root directory.
- Click Next.
- If you previously opened the directory in IntelliJ or another JetBrains IDE, you'll be prompted to overwrite the .idea directory. Click Yes.
- You'll be prompted with a list of detected Elixir project roots to add to the project. Each root contains a
mix.exs. Uncheck any project roots that you don't want added. - Click Next.
- Select a Project SDK directory by clicking Configure.
- The plugin will automatically find the newest version of Elixir installed. (NOTE: SDK detection only works for Linux, homebrew installs on OSX, and Windows. Open an issue with information about Elixir install locations on your operating system and package manager to have SDK detection added for it.)
- If the automatic detection doesn't find your Elixir SDK or you want to use an older version, manually select select
the directory above the
bindirectory containingelixir,elixirc,iex, andmix. - Click Next after you select SDK name from the Project SDK list.
- Click Finish on the framework page. (No framework detection is implemented yet for Elixir.)
- Choose whether to open in a New Window or in This Window.
If you've already created a mix project, you can load it as an Elixir project into the plugin.
- File > New > Project From Existing Sources...
- Select the root directory of your project.
- Select "Import project from external model"
- Select Mix

- Click Next
- The "Mix project root" will be filled in with the selected directory.
- (Optional) Uncheck "Fetch dependencies with mix" if you don't want to run
mix deps.getwhen importing the project- If "Fetch dependencies with mix" is checked both
mix hex.local --forceandmix deps.getwill be run.
- If "Fetch dependencies with mix" is checked both
- Ensure the correct "Mix Path" is detected. On Windows, the
mix.bat, such asC:\Program Files (x86)\Elixir\bin\mix.batshould be used instead of themixfile without the extension. - Ensure the "Mix Version" is as expected. The number in parentheses should match the Elixir version.
- Click Next
- All directories with
mix.exsfiles will be selected as "Mix projects to import". To import just the main project and not its dependencies, click Unselect All. - Check the box next to the project root to use only its
mix.exs. (It will likely be the first checkbox at the top.) - Click Next
- Select a Project SDK directory by clicking Configure.
- The plugin will automatically find the newest version of Elixir installed. (NOTE: SDK detection only works for Linux, homebrew installs on OSX, and Windows. Open an issue with information about Elixir install locations on your operating system and package manager to have SDK detection added for it.)
- If the automatic detection doesn't find your Elixir SDK or you want to use an older version, manually select select
the directory above the
bindirectory containingelixir,elixirc,iex, andmix. (On Windows it is the directory containingelixir.bat,elixirc.bat,iex.bat, andmix.bat.) - Click Finish after you select SDK name from the Project SDK list.

- Excluded
_build(Output frommix)rel(Output fromexrm)
- Sources
lib
- Test Sources
test

The Project Settings include
- Project Name
- Project SDK

The Module Settings include Marking directories as
- Excluded
- Sources
- Tests

Module paths list the output directories when compiling code in the module. There is a an "Output path" for dev
MIX_ENV and "Test output path" for the test MIX_ENV.

Module dependencies are currently just the SDK and the sources for the module. Dependencies in deps are not
automatically detected at this time.
- Right-click a directory (such as
libortestin the standardmix newlayout) - Select New > Elixir File.

- Enter an Alias for the Module name, such as
MyModuleorMyNamespace.MyModule. - Select a Kind of Elixir File to use a different template.

An underscored file will be created in an underscored directory lib/my_namespace/my_module.ex) with the given module
name with be created:
defmodule MyNamespace.MyModule do
  @moduledoc false

endAn underscored file will be created in an underscored directory lib/my_namespace/my_module.ex) with the given module
name with be created. It will have a start/2 function that calls MyNamespace.MyModule.Supervisor.start_link/0.
defmodule MyNamespace.MyModule do
  @moduledoc false

  use Application

  def start(_type, _args) do
    MyNamespace.MyModule.Supervisor.start_link()
  end
endAn underscored file will be created in an underscored directory lib/my_namespace/my_module.ex) with the given module
name with be created. It will have a start_link/1 function that calls Supervisor.start_link/0 and init/1 that sets
up the child specs. It assumes a MyWorker child that should be supervised :one_for_one.
defmodule MyNamespace.MyModule.Supervisor do
  @moduledoc false

  use Supervisor

  def start_link(arg) do
    Supervisor.start_link(__MODULE__, arg)
  end

  def init(arg) do
    children = [
      worker(MyWorker, [arg], restart: :temporary)
    ]

    supervise(children, strategy: :one_for_one)
  end
endAn underscored file will be created in an underscored directory lib/my_namespace/my_module.ex) with the given module
name with be created. It will have a start_link/2 function that calls GenServer.start_link/3 and the minimal
callback implementations for init/1, handle_call/3, and handle_cast/2.
The Elixir use GenServer supplies these callbacks, so this template is for when you want to change the callbacks, but
would like the stubs to get started without having to look them up in the documentation.
defmodule MyNamespace.MyModule do
  @moduledoc false

  use GenServer

  def start_link(state, opts) do
    GenServer.start_link(__MODULE__, state, opts)
  end

  def init(_opts) do
    {:ok, %{}}
  end

  def handle_call(_msg, _from, state) do
    {:reply, :ok, state}
  end

  def handle_cast(_msg, state) do
    {:noreply, state}
  end
endAn underscored file will be created in an underscored directory lib/my_namespace/my_module.ex) with the given module
name with be created. The minimal callback implementations for init/1, handle_event/2, and handle_call/2,
handle_info/2.
The Elixir use GenEvent supplies these callbacks, so this template is for when you want to change the callbacks, but
would like the stubs to get started without having to look them up in the documentation.
defmodule MyNamespace.MyModule do
  @moduledoc false

  use GenEvent

  # Callbacks

  def init(_opts) do
    {:ok, %{}}
  end

  def handle_event(_msg, state) do
    {:ok, state}
  end

  def handle_call(_msg, state) do
    {:ok, :ok, state}
  end

  def handle_info(_msg, state) do
    {:ok, state}
  end
end
Syntax highlighting of lexer tokens and semantic annotating of parser elements can be customized in in the Color Settings page for Elixir (Preferences > Editor > Color & Fonts > Elixir).
| Text Attribute Key Display Name | Tokens/Elements | Scheme | |||
|---|---|---|---|---|---|
| Default | Darcula | ||||
| Alias | String |

|

|
||
| Atom |
|

|

|
||
| Braces and Operators | Bit |
|

|

|
|
| Braces and Operators | Braces |
|

|

|
|
| Braces and Operators | Brackets |
|

|

|
|
| Braces and Operators | Character Token | ? |

|

|
|
| Braces and Operators | Comma | , |

|

|
|
| Braces and Operators | Dot | . |

|

|
|
| Braces and Operators | Interpolation |
|

|

|
|
| Braces and Operators | Maps and Structs | Maps |
|

|

|
| Braces and Operators | Maps and Structs | Maps |
|

|

|
| Braces and Operators | Operation Sign |
|

|

|
|
| Braces and Operators | Parentheses |
|

|

|
|
| Braces and Operators | Semicolon | ; |

|

|
|
| Calls | Function | inspect |
 *Only the Italic attribute *Only the Italic attribute
|
 *Only the Italic attribute *Only the Italic attribute
|
|
| Calls | Macro | inspect |
 *Only the Bold and Italic attributes *Only the Bold and Italic attributes
|
 *Only the Bold and Italic attributes *Only the Bold and Italic attributes
|
|
| Calls | Predefined |
|
 *Only the Foreground attribute *Only the Foreground attribute
|
 *Only the Foreground attribute *Only the Foreground attribute
|
|
| Comment | # Numbers |

|

|
||
| Keywords | end |

|

|
||
| Module Attributes | @custom_attr |

|

|
||
| Module Attributes | Documentation | @doc |

|

|
|
| Module Attributes | Documentation | Text | Simple module docstring |

|

|
| Module Attributes | Types | Callback | func |

|

|
| Module Attributes | Types | Specification | func |

|

|
| Module Attributes | Types | Type | parameterized |

|

|
| Module Attributes | Types | Type Parameter | type_parameter |

|

|
| Numbers | Base Prefix | Non-Decimal |
|

|

|
| Numbers | Base Prefix | Obsolete Non-Decimal |
|

|

|
| Numbers | Decimal Exponent, Mark, and Separator |
|

|

|
|
| Numbers | Digits | Invalid |
|

|

|
| Numbers | Digits | Valid |
|

|

|
| Textual | Character List |
'This is a list'
|

|

|
|
| Textual | Escape Sequence |
\x{12}
|

|

|
|
| Textual | Sigil |
|

|

|
|
| Textual | String |
"Hello world"
|

|

|
|
| Variables | Ignored |
_
|

|

|
|
| Variables | Parameter |
| |||
Built on top of highlighted tokens above, the parser understands the following parts of Elixir grammar as valid or allows the grammar because they contain correctable errors:
- Empty Parentheses (
()) - Keyword Lists
- Keyword Keys - Aliases, identifiers, quotes, or operators when followed immediately by a colon and horizontal or vertical space.
- Keyword Values - Empty parentheses (
()) and matched expressions.
- Matched Expressions,
in other words, unary and binary operations on variable, function, and macro names and values (numbers, strings,
char lists, sigils, heredocs,
true,false, andnil). - No Parentheses expressions, which
are function calls with neither parentheses nor
doblocks that have either (1) a positional argument and keyword arguments OR (2) two or more positional arguments with optional keyword arguments. - Anonymous function calls
.()with either no arguments; a no parentheses arguments expression as an argument; keywords as an argument; positional argument(s); or positional arguments followed by keywords as arguments. - Remote function calls (
Alias.function,:atom.function, etc) and local function calls (function) with...- No Parentheses with...
- No Arguments (
Alias.function) - Keywords (
Alias.function key: value) - Nested No Parentheses Call (
Alias.function Inner.function positional, key: value) - Positional and Keyword arguments (
Alias.function positional, key: value) - Matched Expression (
Alias.function 1 + 2)
- No Arguments (
- Parentheses with...
- No arguments (
Alias.function()) - No Parentheses Call (
Alias.function(Inner.function positional, key: value) - Keywords (
Alias.function(key: value)) - Positional and Keyword arguments (
Alias.function(positional, key: value)) - Trailing parentheses for quoting (
def unquote(variable)(positional))
- No arguments (
- No Parentheses with...
- Bracket expression (
variable[key]) - Block expressions (
function do end) - Unmatched expressions, in other words combinations of block expressions and matched expressions.
Inspections mark sections of code with warnings and errors. They can be customized from the Preferences > Inspections > Elixir.

Detects when compiler will throw unexpected comma. Parentheses are required to solve ambiguity in nested calls.
Function calls with multiple arguments without parentheses cannot take as arguments functions with multiple arguments
without parentheses because which functional gets which arguments is unclear as in the following example:
outer_function first_outer_argument,
               # second argument is another function call without parentheses, but with multiple arguments
               inner_function first_inner_argument,
               ambiguous_keyword_key: ambiguous_keyword_value
To fix the ambiguity if first_inner_keyword_key: first_inner_keyword_value should be associated, add parentheses
around the inner function's arguments:
# keywords are for inner function
outer_function first_outer_argument
               inner_function(
                 first_inner_argument
                 ambiguous_keyword_key: ambiguous_keyword_value
               )

# keywords are for outer function
outer_function first_outer_argument
               inner_function(
                 first_inner_argument
               ),
               ambiguous_keyword_key: ambiguous_keyword_value
Preferences > Inspections > Elixir > Ambiguous nested calls

Ambiguous nested call inspection marks the error on the comma that causes the ambiguity.

Mousing over the comma marked as an error in red (or over the red square in the right gutter) will show the inspection describing the error.
Detects when compiler will throw unexpected parenthesis. If you are making a function call, do not insert spaces in between the function name and the opening parentheses.
Function calls with space between the function name and the parentheses cannot distinguish between function calls with
parentheses, but with an accidental space before the ( and function calls without parentheses where the first
positional argument is in parentheses.
function ()To fix the ambiguity remove the space or add outer parentheses without the space if the first argument should be ():
# extra space, no arguments to function
function()

# first argument is `()`
function(())function (key: value)Keywords inside parentheses is not valid, so the only way to fix this is to remove the space
function(key: value)function (first_positional, second_positional)A list of positional arguments in parenthenses is not valid, so the only way to fix this is to remove the space
function(first_positional, second_positional)
Preferences > Inspections > Elixir > Ambiguous parentheses

Ambiguous parentheses inspection marks the error on the parenthetical group surrounded by the parentheses that are ambiguous due to the preceding space.

Mousing over the parenthetical group marked as an error in red (or over the red square in the right gutter) will show the inspection describing the error.
Type specifications separate the name from the definition using ::.
@type name: definitionReplace the : with ::
@type name :: definitionone.(
one,
two positional, key: value,
three
)Keywords can only appear at the end of an argument list, so either surround the no parentheses expression argument with parentheses, or move the the keywords to the end of the list if it wasn't meant to be a no parentheses expression.
one.(
  one
  two(positional, key: value),
  three
)
OR
one.(
  one,
  two,
  three,
  key: value
)
Preferences > Inspections > Elixir > Keywords Not At End

Keywords Not At End inspection marks the error over the keywords that need to be surrounded by parentheses or moved to the end of the list.

Mousing over the keywords marked as an error in red (or over the red square in the right gutter) will show the inspection describing the error.
Type specifications separate the name from the definition using ::.
@type name = definitionReplace the = with ::
@type name :: definitionQuick Fixes are actions IntelliJ can take to change your code to correct errors (accessed with Alt+Enter by default).
If a type specification uses a single : instead of ::, then hit Alt+Enter on the : to change it to :: and fix the type spec.
If a type specification uses = instead of ::, then hit Alt+Enter on the = to change it to :: and fix the type spec.
If a set of parentheses is marked as ambiguous then the space before it can be removed to disambiguate the parentheses with Alt+Enter. (Will vary based on keymap.)

Hitting Alt+Enter on ambiguous parentheses error will bring up the Local Quick Fix, "Remove spaces between function name and parentheses". Hit Enter to accept and remove the space.
You can collapse (fold) pre-defined regions of your Elixir code to make it easier to quickly scroll through files or hide details you don't care about right now.
- Position cursor between lines with with downward facing - arrow and upward facing - arrow.
- Cmd+-
- Position cursor on the collapsed line with the square +
- Cmd++
| Expanded | Collapsed | Folded By Default? |
|---|---|---|
do end |
do: ... |
No |
-> and right operand |
-> ... |
No |
@doc VALUE |
@doc "..." |
No |
@moduledoc VALUE |
@moduledoc "..." |
No |
@typedoc VALUE |
@typedoc "..." |
No |
| alias ALIAS1 alias ALIAS1 |
alias ... |
Yes |
| import ALIAS1 import ALIAS2 |
import ... |
Yes |
| require ALIAS1 require ALIAS2 |
require ... |
Yes |
| use ALIAS1 use ALIAS2 |
use ALIAS1 |
Yes |
@for |
FOR in defimpl PROTOCOL, for: FOR |
Yes |
@protocol |
PROTOCOL in defimpl PROTOCOL, for: FOR |
Yes |
| @MODULE_ATTRIBUTE | VALUE in @MODULE_ATTRIBUTE VALUE |
No |
You can comment or uncomment the current line or selected block of source. By selecting a block of source first you can quickly comment out and entire function if you're trying to track down a compiling or testing error that's not giving a helpful line number.
Using the menus
- Highlight one or more lines
- Comment (or Uncomment) with one of the following:
a. Code > Comment with Line Comment
b. On OSX the key binding is normally
Cmd+/.
IntelliJ Elixir allows for graphical debugging of *.ex files using line breakpoints.

Line breakpoints can added by clicking in the left-hand gutter of an editor tab. A red dot will appear marking the breakpoint. When a Run Configuration is Run with the Debug (bug) instead of Run (arrow) button, execution will stop at the breakpoint and you can view the local variables (with Erlang names) and the stackframes.
- Define a run/debug configuration
- Create breakpoints in the
*.exfiles - Launch a debugging session
- During the debugger session, step through the breakpoints, examine suspended program, and explore frames.
After you have configured a run configuration for your project, you can launch it in debug mode by pressing Ctrl+D.
| Action | Keyword Shortcut |
|---|---|
| Toggle Breakpoint | Cmd+F8 |
| Resume Program | Alt+Cmd+R |
| Step Over | F8 |
| Step Into | F7 |
| View breakpoint details/all breakpoints | Shift+Cmd+F8 |
| Variable | Example | Description |
|---|---|---|
| INTELLIJ_ELIXIR_DEBUG_BLACKLIST | iconv,some | Excluding modules from debugger |
Notice: If you want non Elixir. module in blacklist, write it with: :.
This rule applies only to module atoms.
When a breakpoint is set, the editor displays a breakpoint icon in the gutter area to the left of the affected source code. A breakpoint icon denotes status of a breakpoint, and provides useful information about its type, location, and action.
The icons serve as convenient shortcuts for managing breakpoints. Clicking an icon removes the breakpoint. Successive use of Alt - click on an icon toggles its state between enabled and disabled. The settings of a breakpoint are shown in a tooltip when a mouse pointer hovers over a breakpoint icon in the gutter area of the editor.
| Status | Icon | Description |
|---|---|---|
| Enabled |  |
Indicates the debugger will stop at this line when the breakpoint is hit. |
| Disabled |  |
Indicates that nothing happens when the breakpoint is hit. |
| Conditionally Disabled |  |
This state is assigned to breakpoints when they depend on another breakpoint to be activated. |
When the button  is pressed in the toolbar of the Debug tool window, all the breakpoints in a project are muted, and their icons become grey:
  .
.
To view the list of all breakpoints and their properties, do one of the following:
- Run > View Breakpoints
Shift+Cmd+F8- Click the

- Breakpoints are visible in the Favorites tool window.

To view properties of a single breakpoint
- Right-Click a breakpoint icon in the left gutter of the editor.

To configure actions, suspend policy and dependencies of a breakpoint
- Open the Breakpoint Properties
- Right-click a breakpoint in the left gutter, then click the More link or press
Shift+Cmd+F8 - Open the Breakpoints dialog box and select the breakpoint from the list
- In the Favorites tool window, select the desired breakpoint, and click the pencil icon.
- Right-click a breakpoint in the left gutter, then click the More link or press
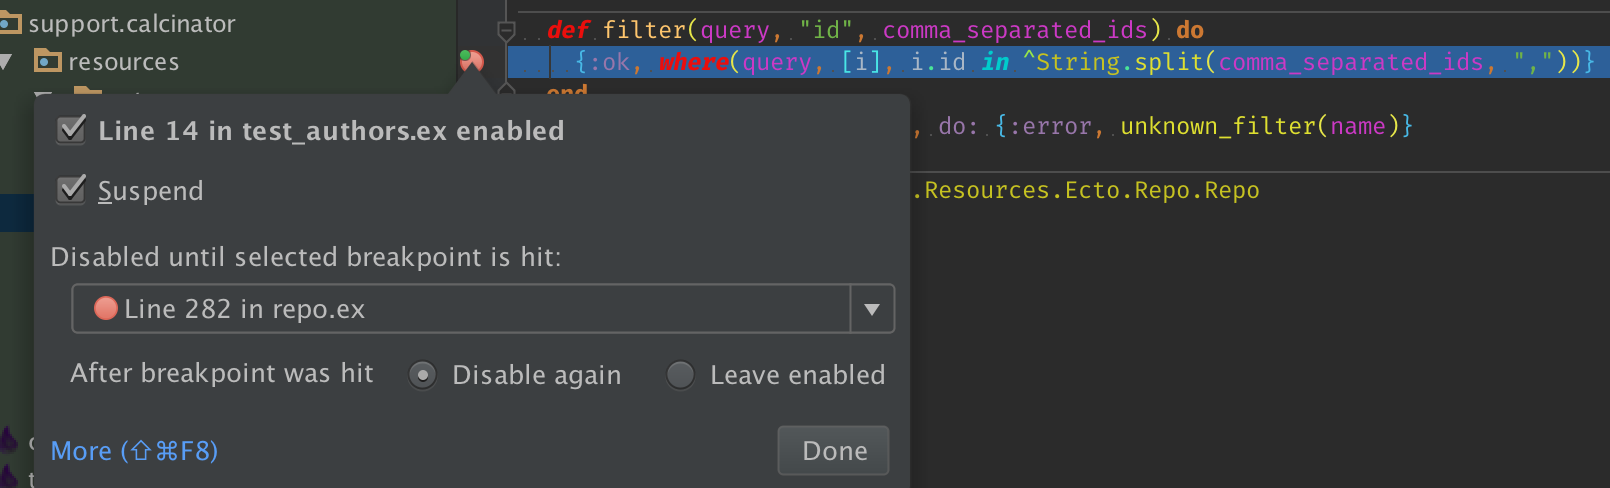
- Define the actions to be performed by IntelliJ IDEA on hitting breakpoint:
- To notify about the reaching of a breakpoint with a text message in the debugging console, check the "Log message to console" check box. A message of the format
*DBG* 'Elixir.IntellijElixir.DebugServer' got cast {breakpoint_reached, PID}will appear in the console. - To set a breakpoint the current one depends on, select it from the "Disabled until selected breakpoint hit" drop-down list. Once dependency has been set, the current breakpoint is disabled until selected one is hit.
- Choose the "Disable again" radio button to disable the current breakpoint after selected breakpoint was hit.
- Choose the "Leave enabled" radio button to keep the current breakpoint enabled after selected breakpoint was hit.
- Enable suspending an application upon reaching a breakpoint by checking the "Suspend" check box.
- To notify about the reaching of a breakpoint with a text message in the debugging console, check the "Log message to console" check box. A message of the format
A line breakpoint is a breakpoint assigned to a specific line in the source code.
Line breakpoints can be set on executable lines. Comments, declarations and empty lines are not valid locations for the line breakpoints.
- Place the caret on the desired line of the source code.
- Do one of the following:
- Click the left gutter area at a line where you want to toggle a breakpoint
- Run > Toggle Line Breakpoint
Cmd+F8
- Open the Breakpoints dialog
- Right-click the breakpoint you want to describe
- Select "Edit description" from the context menu
- In the "Edit Description" dialog box, type the desired description.
- Open the Breakpoints dialog
- Start typing the description of the desired breakpoint
- To view the selected breakpoint without closing the dialog box, use the preview pane.
- To open the file with the selected breakpoint for editing, double-click the desired breakpoint.
- To close Breakpoints dialog, press
Cmd+Down. The caret will be placed at the line marked with the breakpoint in question.
When you temporarily disable or enable a breakpoint, its icon changes from to and vice versa.
- Place the caret at the desired line with a breakpoint.
- Do one of the following:
- Run > Toggle Breakpoint Enable
- Right-click the desired breakpoint icon, select or deselect the enabled check box, and then click Done.
- Alt-click the breakpoint icon
Do one of he following:
- In the Breakpoints dialog box, select the desired line breakpoint, and click the red minus sign.
- In the editor, locate the line with the line breakpoint to be deleted, and click its icon in the left gutter.
- Place caret on the desired line and press
Cmd+F8.
- Select the run/debug configuration to execute
- Do one of the following
- Click
 on the toolbar
 - Run > Debug
Ctrl+D
- Click

OR
Debug quick menu
Ctrl+Alt+D- Select the configuration from the pop-up menu
- Hit
Enter

The "Thread" drop-down lists the current processes in the local node. Only the current process is suspended. The rest of the processes are still running.

The Frames for the current process can be navigated up and down using the arrow keys or clicking on the frame.
- Press
UporDownto change frames - Click the frame from the list
When changing frames or jumping to definitions, you can lose track of where the debugger is paused. To get back to the current execution point, do one of the following:
- Run > Show Execution Point.
Alt+F10- Click
 on the stepping toolbar of the Debug tool window.

While Elixir allows rebinding variable names, Erlang does not, so when viewed in the Variables pane, variables will have an @VERSION after their name indicating which rebinding of a the variable is. Even if there is no variable reuse, the first variable will still have @1 in its name.
| Action | Icon | Shortcut | Description |
|---|---|---|---|
| Show Execution Point |  |
Alt+F10 |
Click this button to highlight the current execution point in the editor and show the corresponding stack frame in the Frames pane. |
| Step Over |  |
F8 |
Click this button to execute the program until the next line in the current function or file, skipping the function referenced at the current execution point (if any). If the current line is the last one in the function, execution steps to the line executed right after this function. |
| Step Into |  |
F7 |
Click this button to have the debugger step into the function called at the current execution point. |
| Step Out |  |
Shift+F8 |
Click this button to have the debugger step out of the current function, to the line executed right after it. |
The right-delimiter will be automatically inserted when the left delimiter is typed. In some cases, to prevent false positives, the the delimiter is only completed if when used for sigils.
| Preceded By | Left | Right |
|---|---|---|
do |
end |
|
fn |
end |
|
[ |
] |
|
{ |
} |
|
( |
) |
|
' |
' |
|
''' |
''' |
|
" |
" |
|
""" |
""" |
|
<< |
>> |
|
~<sigil-name> |
< |
> |
~<sigil-name> |
/ |
/ |
~<sigil-name> |
` | ` |
All delimiters that are auto-inserted are also matched for highlighting
| Left | Right |
|---|---|
do |
end |
fn |
end |
[ |
] |
{ |
} |
( |
) |
' |
' |
''' |
''' |
" |
" |
""" |
""" |
<< |
>> |
< |
> |
/ |
/ |
| ` | ` |

- Compile project with mix (use
mix compileinstead ofelixircdirectly) - Attach docs (don't use
--no-docselixircflag) - Attach debug info (don't use
--no-debug-infoelixircflag) - Ignore module conflict (use
--ignore-module-conflictelixircflag)
- Have a file selected in Project view with the Project view in focus OR have an Editor tab in focus
- Build > Compile 'FILE_NAME'
- Build results will be shown
- If compilation is successful, you'll see "Compilation completed successfully" in the Event Log
- If compilation had errors, you'll see "Compilation completed with N errors and M warnings" in the Event Log and
the Messages Compile tab will open showing a list of Errors

- Build > Make Project
- Build results will be shown
- If compilation is successful, you'll see "Compilation completed successfully" in the Event Log
- If compilation had errors, you'll see "Compilation completed with N errors and M warnings" in the Event Log and
the Messages Compile tab will open showing a list of Errors
Live Templates are snippets of code that can be inserted quickly and have placeholder locations that the cursor will automatically jump to when using the template. Whenever you start typing, Live Templates will start matching against the shortcuts. A template can be selected with Tab.
Live Templates can be customized in Preferences > Editor > Live Templates > Elixir.
Metasyntactic variables are locations where the cursor will jump to.END is the final location of the
cursor.
| Shortcut | Code |
|---|---|
@doc
|
|
case
|
|
cond
|
|
def
|
|
def,
|
|
defi
|
|
defm
|
|
defmac
|
|
defmacp
|
|
defover
|
|
defp
|
|
defpro
|
|
defs
|
|
do
|
|
doc
|
|
fn
|
|
for
|
|
if
|
|
ife
|
|
ii
|
|
mdoc
|
|
rec
|
|
test
|
|
try
|
|
Much like rake tasks in Rubymine, this plugin can run mix tasks.
- Run > Edit Configurations...

- Click +
- Select "Elixir Mix"

- Fill in the "Program arguments" starting with the name of the
mixtask followed by any arguments to that task - Fill in the "Working directory"
- Type the absolute path to the directory.
- Select the path using directory picker by clicking the
...button
- (Optionally) click the
...button on the "Environment variables" line to add environment variables. - Click "OK" to save the Run Configuration and close the dialog
- Click the Run arrow in the Toolbar to run the
mixtask
- The Run pane will open, showing the results of the
mixtask.- If there is an error with a FILE:LINE stack frame, it will be a clickable link that will take you to that location

- If there is an error with a FILE:LINE stack frame, it will be a clickable link that will take you to that location
The mix test task gets a special type of Run Configuration, Elixir Mix ExUnit. Using this Run Configuration type instead, of the basic Elixir Mix Run Configuration will cause the IDE to attach a special formatter to mix test, so that you get the standard graphical tree of Test Results
The Run pane will show Test Results. If there is a compilation error before or during mix test, it will be shown as a test failure. If the compilation failure is in a _test.exs file can it can be inferred from the stacktrace, the compilation error will show up as a test failure in that specific module.
doctest names are rearranged to emphasize the function being tested: "test doc at MODULE.FUNCTION/ARITY (COUNT)" becomes "MODULE.FUNCTION/ARITY doc (COUNT)". If MODULE is the same as the test case without the Test suffix, then MODULE is stripped too and the test name becomes only FUNCTION/ARITY doc (COUNT).
- Run > Edit Configurations...
- Click +
- Select "Elixir Mix ExUnit"

- Fill in the "Program arguments" with the argument(s) to pass to
mix test. Normally, this will be a directory liketest, relative to the "Working directory" - Fill in the "Working directory"
- Type the absolute path to the directory.
- Select the path using directory picker by clicking the
...button
- (Optionally) click the
...button on the "Environment variables" line to add environment variables. - Click "OK" to save the Run Configuration and close the dialog
- Click the RUn arrow in the Toolbar to run the
mix testtask - The Run pane will open showing the Test Results

While you can create Elixir Mix ExUnit run configurations manually using the Run > Edit Configurations... menu, it is probably more convenient to use the context menu.
The context menu must know that the the directory, file, or line you are right-clicking is a test. It does this by checking if the current directory or an ancestor is marked as a Test Sources Root.
- In the Project pane, ensure your OTP application's
testdirectory is marked as a Test Sources Root - Check if the
testdirectory is green. If it is, it is likely a Test Sources Root. This color may differ in different themes, so to be sure you can check the context menu - Right-click the
testdirectory. - Hover over "Mark Directory As >"
* If "Unmark as Test Sources Root" is shown, then the directory is already configured correctly, and create from context will work.
 * If "Test Sources Root" is shown, then the directory need to be configured by clicking that entry

- Right-click the directory in the Project pane
- Click "Run Mix ExUnit", which will both create the Run Configuration and Run it.

- If you want to only create the Run Configuration, select "Create Mix ExUnit" instead
Alternatively, you can use keyboard shortcuts
- Select the directory in the Project pane.
Ctrl+Shift+Rwill create the Run Configuration and Run it.
- Right-click the file in the Project pane
- Click "Run Mix ExUnit", which will both create the Run Configuration and Run it.
- If you want to only create the Run Configuration, select "Create Mix ExUnit" instead
Alternatively, you can use keyboard shortcuts
- Select the directory in the Project pane.
Ctrl+Shift+Rwill create the Run Configuration and Run it.
Finally, you can use the editor tabs
- Right-click the editor tab for the test file you want to run

- Click "Run Mix ExUnit", which will both create the Run Configuration and Run it.
- If you want to only create the Run Configuration, select "Create Mix ExUnit" instead
If you want to be able to run a single test, you can create a Run Configuration for a line in that test
- Right-click a line in the test file

- Click "Run Mix ExUnit", which will both create the Run Configuration and Run it.
- If you want to only create the Run Configuration, select "Create Mix ExUnit" instead
Alternatively, you can use keyboard shortcuts
- Place the cursor on the line you want to test
Ctrl+Shift+Rwill create the Run Configuration and Run it.
When you start typing an Alias, completion will look in three locations:
aliasaliased names in the current fileSuffixforalias Prefix.SuffixMultipleAliasAorMultipleAliasBforalias Prefix.{MultipleAliasA, MultipleAliasB}Asforalias Prefix.Suffix, as: As
- Indexed module names (as available from Go To Symbol)
Prefix.Suffixfromdefmodule Prefix.SuffixMyProtocolfromdefprotocol MyProtocolMyProtocol.MyStructdefimpl MyProtocol, for: MyStructdefimpl MyProtocolnested underdefmodule MyStruct
- Nested modules under aliased names
Suffix.Nestedforalias Prefix.SuffixwherePrefix.Suffix.Nestedis an indexed module, implementation or protocol name.MultipleAliasA.Nestedforalias Prefix.{MultipleAliasA, MultipleAliasB}wherePrefix.MultipleAliasA.Nestedalias Prefix.{MultipleAliasA, MultipleAliasB}is an indexed module, implementation or protocol name.As.Nestedforalias Prefix.Suffix, as: AswherePrefix.Suffix.Nestedis an indexed module, implementation, or protocol name.
When you start typing inside { } for alias Prefix.{} or import Prefix.{}, completion will look for nested modules under Prefix and then remove the Prefix., so completion will look like Suffix.
Completion uses the same presentation as Structure, so you can tell whether the name is function/macro (Time), whether it is public/private (Visibility) and the Module where it is defined. Between the icons and the Modules is the name itself, which is highlighted in bold, the parameters for the call definition follow, so that you can preview the patterns required for the different clauses.

Qualified functions and macro calls will complete using those functions and macros defined in the qualifying Module (defmodule), Implementation (defimpl) or Protocol (defprotocol). Completion starts as shown as . is typed after a qualifying Alias.
Function and macro calls that are unqualified are completed from the index of all function and macro definitions, both public and private. (The index contains only those Elixir functions and macro defined in parsable source, such as those in the project or its dependencies. Erlang functions and Elixir functions only in compiled .beam files, such as the standard library will not complete.) Private function and macros are shown, so you can choose them and then make the chosen function or macro public if it is a remote call.
Module attributes declared earlier in the file can be completed whenever you type @ and some letter. If you want to see all module attributes, you can type @a, wait for the completions to appear, then delete the @ to remove the filtering to a.
Parameter and variable usages can be completed whenever typing an identifier. The completions will include all variables know up from that part of the file. It can include variables from outside macros, like quote blocks.
.beam files, such as those in the Elixir SDK and in your project's build directory will be decompiled to equivalent def and defmacro calls. The bodies will not be decompiled, only the call definition head and placeholder parameters. These decompiled call definition heads are enough to allow Go To Declaration, the Structure pane, and Completion to work with the decompiled .beam files.
Go To Declaration is a feature of JetBrains IDEs that allows you to jump from the usage of a symbol, such as a Module
Alias, to its declaration, such as the defmodule call.
- Place the cursor over an Alias with an aliased name setup by
aliasSuffixifalias Prefix.SuffixcalledMultipleAliasAifalias Prefix.{MultipleAliasA, MultipleAliasB}calledAsifalias Prefix.Suffix, as: As
- Activate the Go To Declaration action with one of the following:
Cmd+B- Select Navigate > Declaration from the menu.
Cmd+Click
- A Go To Declaration lookup menu will appear, allowing you to jump either the
aliasthat setup the aliased name or jumping directly todefmoduleof the unaliased name. Select which declaration you want- Use arrow keys to select and hit
Enter Click
- Use arrow keys to select and hit
You'll know if function or macro usage is resolved and Go To Declaration will work if the call is annotated, which in the default themes will show up as italics.
- Place the cursor over name of the function or macro call.
- Activate the Go to Declaration action with one of the following:
Cmd+B- Select Navigate > Declaration from the menu.
Cmd+Click
- A Go To Declaration lookup menu will appear, allowing you to jump to either the
importthat imported the function or macro or jumping directly to the function or macro definition clause. Select which declaration you want.- Use arrow keys to select and hit
Enter Click
- Use arrow keys to select and hit
- Place the cursor over name of the function or macro call.
- Activate the Go to Declaration action with one of the following:
Cmd+B- Select Navigate > Declaration from the menu.
Cmd+Click
- Whether a lookup a Go To Declaration lookup menu appears depends on the number of clauses in the function or macro definition:
- If there is only one clause in the function or macro definition, you'll jump immediately to that clause
- If there is more than one clause in the function or macro definition, a Go To Declaration lookup menu will appear, allowing you to jump to either the
importthat imported the function or macro or jumping directly to the function or macro definition clause. Select which declaration you want.- Use arrow keys to select and hit
Enter Click
- Use arrow keys to select and hit
- Place the cursor over name of the function or macro call that is qualified by an Alias.
- Activate the Go to Declaration action with one of the following:
Cmd+B- Select Navigate > Declaration from the menu.
Cmd+Click
-
- If there is only one clause in the function or macro definition, you'll jump immediately to that clause
- If there is more than one clause in the function or macro definition, a Go To Declaration lookup menu will appear, allowing you to jump to either the
importthat imported the function or macro or jumping directly to the function or macro definition clause. Select which declaration you want.- Use arrow keys to select and hit
Enter Click
- Use arrow keys to select and hit
- Place the cursor over a fully-qualified Alias
A.BinA.B.func()A.Binalias A.BBinalias A.{B, C}
- Activate the Go To Declaration action with one of the following:
Cmd+B- Select Navigate > Declaration from the menu.
Cmd+Click
If you hold Cmd and hover over the Alias before clicking, the target declaration will be shown.
- Place the cursor over a
@module_attribute - Activate the Go To Declaration action with one of the following:
Cmd+B- Select Navigate > Declaration from the menu.
Cmd+Click
If you hold Cmd and hover over the @module_attribute before clicking, the target declaration will be shown.
- Place the cursor over a parameter or variable usage
- Active the Go To Declaration action with one of the following:
Cmd+B- Select Navigate > Declaration from the menu.
Cmd+Click
If you hold Cmd and hover over the variable before clicking, it will say parameter or variable, which matches the annotation color.
IntelliJ Elixir can reformat code to follow a consistent style.
doblock lines are indenteddoblocksendas the last argument of a no parentheses call unindents to the start of the call- If one clause of a multi-clause anonymous function wraps, all clauses wrap.
- Indent after
else - Indent map and struct keys
- All keys wrap if any key wraps
- No spaces around...
.
- Spaces around...
andinorwhen
- Configure spaces around...
=<-and\\!=,==,=~,!==, and===<,<=,>=, and>+and-*and/- Unary
+,-,!,^, and~~~ ->::|||and|||&&and&&&<~,|>,~>,<<<,<<~,<|>,<~>,>>>, and~>>..^^^++,--,..,<>=>
- Configure spaces before...
,
- No space after...
@
- Spaces after...
notfnaftercatchrescuekey:
- Configure space after...
&,
- Configure spaces within...
{ }<< >>[ ]( )
- No space around
/in&NAME/ARITYand&QUALIFIER.NAME/ARITY whenwraps when its right operand wraps, so that guards start withwhenon a newline when they are too long.- Align
|>at start of indented line for pipelines - Align
endwith start of call instead of start of line fordoblocks in pipelines - Indent list elements when wrapped
- Indent tuple elements when wrapped
- Align type definition to right of
:: - Align guard to right of
whenwhen guards span multiple lines - Align two operator (
++,--,..,<>) operands, so that<>binaries are multiple lines align their starts instead of using continuation indent and being indented relative to first operand. - Align pipe
|operands, so that alternates in types and specs are aligned instead of continuation indented relative to the first operand. - Comments in
spec(that is above operands to|align with the operands - Remove newlines from pipelines, so that all pipelines start with an initial value or call and each
|>is the start of a successive line. - Key exclusivity: if an association operation or keyword key is already on a line, the container value automatically has it's elements wrapped if there is nested associations or keyword pairs, so that two levels of keys are not on the same line.
- Indent bit string (
<< >>) elements when wrapped
All files in a directory can be reformatted.
Using context menu:
- Open the Project pane
- Right-click the directory
- Select Reformat Code
- Set the desired options in the Reformat Code dialog
- Click Run
Using keyboard shortcuts:
- Open the Project pane
- Select the directory
Alt+Cmd+L- Set the desired options in the Reformat Code dialog
- Click Run
All lines in a file can be reformatted.
Using context menu:
- Open the Project pane
- Right-click the file
- Select Reformat Code
- Set the desired options in the Reformat Code dialog
- Click OK
Using keyboard shortcuts:
- Open the Project pane
- Select the file
Alt+Cmd+L- Set the desired options in the Reformat Code dialog
- Click OK
All the lines in the current editor tab file can be reformatted with the current settings.
- Code > Reformat
Alt+Cmd+LAlt+Shift+Cmd+Lto get the Reformat Code dialog.
A subset of a file can be reformatted.
- Highlight the selection
- Use the Reformat Code action
- Code > Reformat Code
Alt+Shift+Cmd+L
Go To Symbol is a way to search for any of the following by name:
- Call definition clauses (
def,defp,defmacro, anddefmacrop) - Callbacks (
@callbackand@macrocallback) - Call definition specifications (
@spec) - Call definition heads (
foo(bar)) for delegation (defdelegate foo(bar), to: BAZ) - Implementations (
defimpl) - Protocols (
defprotocol)
You can bring up Go To Symbol with the keyboard shortcut (⌥⌘O on OSX) or using the menus (Navigate > Symbol...).
Go to Test allows you to jump from the a Source Module to its corresponding Test Module
- Have the cursor in the body of a Module
- Active the Go To Test action with one of the following:
Shift+Cmd+T- Select Navigate > Test from the menu.
Go to Test Subject allows you to jump from the a Test Module to its corresponding Source Module
- Have the cursor in the body of a Test Module
- Active the Go To Test Subject action with one of the following:
Shift+Cmd+T- Select Navigate > Test Subject from the menu.
Find Usage is a feature of JetBrains IDEs that allows you to find all the places a declared symbol, such a Module Alias
in a defmodule, is used, including in strings and comments.
- Place cursor over an
defmoduleAlias. - Activate the Find Usage action with one of the following:
a.
i. Right-click the Alias
ii. Select "Find Usages" from the context menu
b. Select Edit > Find > Find Usages from the menu
c.
Alt+F7
- Place cursor over the
@module_attributepart of the declaration@module_attribute value. - Activate the Find Usage action with one of the following:
1.
1. Right-click the module attribute
2. Select "Find Usages" from the context menu
2. Select Edit > Find > Find Usages from the menu
3.
Alt+F7
- Place cursor over the parameter or variable declaration.
- Active the Find Usage action with one of the following:
1.
1. Right-click the Alias
2. Select "Find Usages" from the context menu
2. Select Edit > Find > Find Usages from the menu
3.
Alt+F7
- Place the cursor over the
@module_attributeusage or declaration. - Active the Rename Refactoring action with one of the following:
1.
1. Right-click the module attribute
2. Select Refactoring from the context menu
3. Select "Rename..." from the Refactoring submenu
2.
Shift+F6 - Edit the name inline and have the declaration and usages update.
- Place the cursor over the parameter or variable usage or declaration
- Active the Rename Refactoring action with one of the following:
1.
1. Right-click the module attribute
2. Select Refactoring from the context menu
3. Select "Rename..." from the Refactoring submenu
2.
Shift+F6 - Edit the name inline and have the declaration and usages update.
You can view the structure of the currently open editor tab using the Structure tool window.
- View > Tool Windows > Structure
- Click the Structure Button (normally in the left tool buttons)
- If you can't see the Tool Buttons, they can be enabled with View > Tool Buttons
Cmd+7

The buttons in the Structure tool are broken into 4 categories:

| Icon | Tooltip | Description |
|---|---|---|
|
|
Sort by Time |
When the defined callable is usable:
|
|
|
Sort by Visibility |
Whether the element visible outside its defining module:
|
|
|
Sort Alphabetically | Sort by name |
NOTE: When any combination of sorters is turned on, they are sorted from left to right (as shown in the button bar), so with all 3 sorters on, the elements are first grouped by Time, then inside each Time group, they are sorted by Visibility, then in each Visibility group, they are sorted by name.

The providers add nodes not in the text of the file, but that will appear in the compiled Module.
| Icon | Tooltip | Description |
|---|---|---|
|
|
Show Used | In Modules that `use ` or `use , arg`, the elements from the last `quote` block in the `__using__/1` for `` are injected. |

The expanders expand or collapse all the elements in the Structure tool window.
| Icon | Tooltip | Description |
|---|---|---|
|
|
Expand All | Expand All Elements in the Structure tool window |
|
|
Collapse All | Collapse All Elements in the Structure tool window |

The autoscrollers link together the editor tab's location and the Structure tool windows selected element.
| Icon | Tooltip | Description |
|---|---|---|
|
|
Autoscroll to Source | Clicking an element in the Structure tool window will scroll the editor window to the location of the corresponding source. |
|
|
Autoscroll from Source | When moving the cursor in the editor window, the selected element in the Structure tool window will change to the corresponding element. |
The Time icons indicate whether the element is usable at compile time or runtime.
| Icon | Tooltip | Description |
|---|---|---|
|
|
Compile Time | The element is used or checked at compile time and (may) not even be accessible at run time, such as macros. |
|
|
Runtime | The element is usable at runtime, such as a function. |
The Visibility icons indicated whether the element is usable outside its defining Module.
| Icon | Tooltip | Description |
|---|---|---|
|
|
Public | Public elements are accessible outside their defining Module. |
|
|
Private |
Private elements are only accessible in their defining Module. The macros that define private elements usually
end in p.
|
| Call | Icons | Text | Description | ||||||
|---|---|---|---|---|---|---|---|---|---|
| Macro Type | Time | Visibility | Function | Module Local | Overridable | Override | |||
def
|
|
|
|
NAME/ARITY
|
Groups together def with the same name and arity.
|
||||
|
|
|
|
|
NAME[(][ARGUMENTS][)][when ...]
|
The function head for function clause, including the name, arguments, and when if present
|
||||
defdelegate
|
|
|
defdelegate append_first: false|true, to: ALIAS|ATOM
|
Groups together all the delegated functions for a single defdelegate call.
|
|||||
defdelegate func(arg), to: ALIAS
|
|
|
|
NAME/ARITY
|
Groups together implied def and any explicit @spec for the given function head
(func(arg))
|
||||
defdelegate func(arg), to: ALIAS
|
|
|
|
|
func(arg)
|
The function head implied by the defdelegate list of function heads.
|
|||
defexception
|
|
RELATIVE_ALIAS
|
The exception has the same name as the parent Module, but will display with only the relative name (the last
Alias without a .) with its location as the qualifying Alias.
|
||||||
defexception
|
|
%RELATIVE_ALIAS{}
|
Exceptions are defined as structs, so any defexception |
||||||
defexception list_or_keywords
|
|
NAME: DEFAULT_VALUE
|
The fields and default values (or nil if a list is used instead of a keyword list) for the struct
as passed in the first argument to defexception.
|
||||||
defimpl PROTOCOL, for: MODULE
|
|
|
MODULE (PROTOCOL)
|
defimpl defines a protocol implementation that defines a Module that concatenates the
PROTOCOL name and the MODULE name. If no :for is given, then the outer
Module is used.
|
|||||
defmacro
|
|
|
|
NAME/ARITY
|
Groups together defmacro with the same name and arity.
|
||||
|
|
|
|
|
NAME[(][ARGUMENTS][)][when ...]
|
The macro head for macro clause, including the name, arguments, and when if present
|
||||
defmacrop
|
|
|
|
NAME/ARITY
|
Groups together defmacrop with the same name and arity.
|
||||
|
|
|
|
|
NAME[(][ARGUMENTS][)][when ...]
|
The macro head for macro clause, including the name, arguments, and when if present
|
||||
defmacro AND defmacrop
|
|
|
|
NAME/ARITY
|
Groups together defmacro AND defmacrop with the same name and arity. This will be a
compile error, but is represented with
|
||||
defmodule ALIAS
|
|
RELATIVE_ALIAS (QUALIFIER)
|
Top-level Modules show only the ALIAS with no location, while qualified Aliases or nested Modules
show the RELATIVE_ALIAS and the QUALIFIER as the location.
|
||||||
defoverridable
|
|
Mark previously declared functions as overridable. Overridable functions are listed as children of this element. | |||||||
defoverridable NAME: ARITY, ...
|
|
|
|
|
NAME/ARITY
|
The NAME and ARITY of the function that is overridable. Matches the icon and text
for def, but with the addition of
|
|||
defp
|
|
|
|
NAME/ARITY
|
Groups together def with the same name and arity.
|
||||
|
|
|
|
|
NAME[(][ARGUMENTS][)][when ...]
|
The function head for function clause, including the name, arguments, and when if present
|
||||
def AND defp
|
|
|
|
NAME/ARITY
|
Groups together def AND defp with the same name and arity. This will be a
compile error, but is represented with
|
||||
defprotocol PROTOCOL
|
|
|
PROTOCOL
|
The protocol name. Functions required by the protocol are children of this element.
|
|||||
defstruct
|
|
%RELATIVE_ALIAS{}
|
Structs have the same RELATIVE_ALIAS |
||||||
defstruct NAME: DEFAULT_VALUE, ...
|
|
NAME: DEFAULT_VALUE
|
The fields and default values (or nil if a list is used instead of a keyword list) for the struct.
|
||||||
There is currently no direct support for Embedded Elixir (*.eex) templates.
However, because the Elixir syntax is so similar to Ruby, you can use
the Ruby language support for RHTML/ERB to get some syntax highlighting support
in *.eex views.
Note that this involves disabling some of the support for Ruby, but if you don't write Ruby, or if you write it in a different IDE (e.g. RubyMine), it won't matter.
Here's the steps in Preferences (for OSX, other platforms may differ):
- Install the standard Jetbrains Ruby plugin
- Editor -> File Types -> RHTML: Add "
*.eex" as type - Editor -> Inspections -> Ruby -> Unresolved Ruby Reference: Uncheck
- Editor -> Inspections -> Ruby -> Double Quoted String: Uncheck
Some non-Ruby syntax (e.g. -> or do) will still show as an
error, and of course none of the native Elixir support works, but most
things will highlight reasonably well. Unfortunately it's not
possible to disable all error highlighting, but you can
vote for this issue
to try and get that fixed (click the "thumbs up" next to "Voters").
You can disable the errors on a per-file basis, though, with the following steps:
- Open the
*.eexfile which is showing a Ruby syntax error inspection - From the menu pick
Analyze -> Configure Current File Analysis - Move the "ruby" Highlighting Level slider to "None"
- Preferences
- Plugins
- Browse Repositories
- Select Elixir
- Install plugin
- Apply
- Restart the IDE
- Go to releases.
- Download the lastest zip.
- Preferences
- Plugins
- Install plugin from disk...
- Select the downloaded zip.
- Apply
- Restart the IDE.


If the plugin encounters an error, there is a custom error handler registered, so you can open a pre-populated issue in your browser.
- Click the red error notification in bottom right corner of the IDE window.

- Fill in a description of what you were doing when the error occurred.
- Click "Open Issue against https://github.com/KronicDeth/intellij-elixir"
- The IDE will open your browser to https://github.com/KronicDeth/intellij-elixir/issues/new

- The title will be filled as
[auto-generated], but if you can summarize the issue, change the title. - If the "Fatal IDE Errors" dialog has Attachments, copy their contents to the
Attachmentssection of the issue body. - Review for IP disclosures. This will be public, so use your best judgement of how much of your code to post in the issue.
- Click the "Preview" tab to ensure the Markdown formatting looks correct.
- Click "Submit new issue".
If you would like to make a donation you can use Paypal:

If you'd like to use a different donation mechanism (such as Patreon), please open an issue.
I'd like to thank those who have donated to help support this project.
- Adrian Philipp (@adri)
- Artem Hordynskyi
- Bjorgvin Reynisson
- Garrett Hart (@https://github.com/thirdshift)
- Gerard de Brieder (@smeevil) of govannon.nl
- Jeremy Jackson (@jejacks0n)
- Josh Taylor (@joshuataylor)
- Maximilian Buschner
- Nguyen Le
- Percy Grunwald (@pgrunwald)
- Purelogic Apps
- Raúl Vázquez González (@rvazquezglez)
- Robin Hillard (@robinhillard) of rocketboots.com
- Ryan Scheel (@Havvy)
- Tynes Consulting
- William De Melo Gueiros (williamgueiros)
- Yicheng Dong
- TreasureData