The goals / steps of this project are the following:
- Use the simulator to collect data of good driving behavior
- Build, a convolution neural network in Keras that predicts steering angles from images
- Train and validate the model with a training and validation set
- Test that the model successfully drives around track one without leaving the road
- Summarize the results with a written report
This lab requires:
The lab enviroment can be created with CarND Term1 Starter Kit. Click here for the details.
The following resources can be found in this github repository:
- drive.py
- video.py
- writeup_template.md
The simulator can be downloaded from the classroom. In the classroom, we have also provided sample data that you can optionally use to help train your model.
Usage of drive.py requires you have saved the trained model as an h5 file, i.e. model.h5. See the Keras documentation for how to create this file using the following command:
model.save(filepath)Once the model has been saved, it can be used with drive.py using this command:
python drive.py model.h5The above command will load the trained model and use the model to make predictions on individual images in real-time and send the predicted angle back to the server via a websocket connection.
Note: There is known local system's setting issue with replacing "," with "." when using drive.py. When this happens it can make predicted steering values clipped to max/min values. If this occurs, a known fix for this is to add "export LANG=en_US.utf8" to the bashrc file.
python drive.py model.h5 run1The fourth argument run1 is the directory to save the images seen by the agent to. If the directory already exists it'll be overwritten.
ls run1

[2017-01-09 16:10:23 EST]  12KiB 2017_01_09_21_10_23_424.jpg
[2017-01-09 16:10:23 EST]  12KiB 2017_01_09_21_10_23_451.jpg
[2017-01-09 16:10:23 EST]  12KiB 2017_01_09_21_10_23_477.jpg
[2017-01-09 16:10:23 EST]  12KiB 2017_01_09_21_10_23_528.jpg
...
The image file name is a timestamp when the image image was seen. This information is used by video.py to create a chronological video of the agent driving.
python video.py run1Create a video based on images found in the run1 directory. The name of the video will be name of the directory following by '.mp4', so, in this case the video will be run1.mp4.
Optionally one can specify the FPS (frames per second) of the video:
python video.py run1 --fps 48The video will run at 48 FPS. The default FPS is 60.
Project includes the following files:
model.pyfile contains the code for training and saving the convnet.Behavioral_Cloning_v1.ipynbnotebook shows how the model was created, along with additional commentary and data exploration.drive.pyfor driving the car in autonomous modem — modified to drive with16as the speed setting and convert camera images to HSV colorspace.model.h5contains a trained convolution neural network.writeup_report.mdsummarizes the results.run1.mp4video shows car driving autonomously around track one.
The model uses a convolution neural network with 8x8 and 5x5 filter sizes and depths ranging from 16 - 64 (model.py lines 78-104)
- The data is normalized using a
Lambdalayer (model.py lines 81-83). - The model includes a
Cropping2Dlayer to reduce the image size and focus on the road portion (model.py lines 88). - The model uses 3 convolution layers and 2 fully connected layers.
- The model includes
ELUlayers to introduce nonlinearity andDropoutlayers to prevent overfitting. - The model outputs a single value that corresponds to the vehicle's steering angle.
The model contains dropout layers in order to reduce overfitting (model.py lines 98, 102).
The model was trained and validated on sample data provided by Udacity (code line 57-61).
The model was tested by running it through the simulator and ensuring that the vehicle could stay on the track. (see run1.mp4 video file)
The model used an adam optimizer, so the learning rate was not tuned manually (model.py line 108).
Various network architectures were trained with numbers of epochs ranging from 2-10. The final network was trained with 10 epochs (model.py line 107), using early stopping (model.py line 109).
After some experimentation with generating my own training data, the sample data provided by Udacity proved to be sufficient for the final implementation.
The overall strategy for deriving a model architecture was to use the CommAI architecture and experiment with adding layers if results were not satisfactory.
In order to gauge how well the model was working, I split my image & steering angle data into training and validation sets. The below plot shows the loss from the final trained model.
To combat any overfitting, I also included early stopping so that the training was terminated if the validation loss didn't improve after a certain number of epochs. (final model used patience=1)
The final step was to run the simulator to see how well the car was driving around track one. Early versions of the model resulted in the vehicle falling off the track, so to improve the driving behavior these steps were experimented with:
- generate additional data of "recovery driving" from edges of the track
- adjust number of training epochs
- adding layers to the network
- adjusting rate of dropout
- adjusting image cropping
- randomly skip training of images with low or "zero" steering angle
- augment data with flipped images
- adjust image colorspace
- use left and right camera views instead of center view
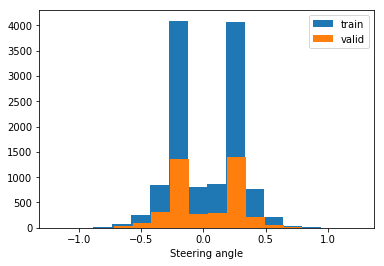
Ultimately, using the left and right camera views to train the network (rather than using just the center camera view) proved to be the final improvement needed to generate a model that can drive the vehicle autonomously around the track without leaving the road.
The final model architecture is from CommaAI (model.py lines 78-104) and consists of the following layers and layer sizes...
Layer (type)                     Output Shape          Param #     Connected to
====================================================================================================
lambda_1 (Lambda)                (None, 160, 320, 3)   0           lambda_input_1[0][0]
____________________________________________________________________________________________________
cropping2d_1 (Cropping2D)        (None, 80, 320, 3)    0           lambda_1[0][0]
____________________________________________________________________________________________________
convolution2d_1 (Convolution2D)  (None, 20, 80, 16)    3088        cropping2d_1[0][0]
____________________________________________________________________________________________________
elu_1 (ELU)                      (None, 20, 80, 16)    0           convolution2d_1[0][0]
____________________________________________________________________________________________________
convolution2d_2 (Convolution2D)  (None, 10, 40, 32)    12832       elu_1[0][0]
____________________________________________________________________________________________________
elu_2 (ELU)                      (None, 10, 40, 32)    0           convolution2d_2[0][0]
____________________________________________________________________________________________________
convolution2d_3 (Convolution2D)  (None, 5, 20, 64)     51264       elu_2[0][0]
____________________________________________________________________________________________________
flatten_1 (Flatten)              (None, 6400)          0           convolution2d_3[0][0]
____________________________________________________________________________________________________
dropout_1 (Dropout)              (None, 6400)          0           flatten_1[0][0]
____________________________________________________________________________________________________
elu_3 (ELU)                      (None, 6400)          0           dropout_1[0][0]
____________________________________________________________________________________________________
dense_1 (Dense)                  (None, 512)           3277312     elu_3[0][0]
____________________________________________________________________________________________________
dropout_2 (Dropout)              (None, 512)           0           dense_1[0][0]
____________________________________________________________________________________________________
elu_4 (ELU)                      (None, 512)           0           dropout_2[0][0]
____________________________________________________________________________________________________
dense_2 (Dense)                  (None, 1)             513         elu_4[0][0]
====================================================================================================
Total params: 3,345,009
Trainable params: 3,345,009
Non-trainable params: 0
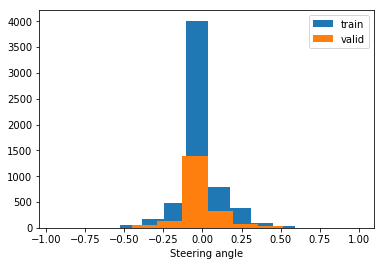
The model was trained with sample data provided by Udacity, containing ~8000 car positions with 3 captured images per position (center, right, left).
Below is a histogram of steering angles found in the dataset.
I experimented with flipping images and angles to augment the training data, but eventually just used the left and right camera images without any data augmentation. As an example, here is an image that has been flipped:
I shuffled the data set and put 25% of the data into a validation set. Using both the left and right camera images resulted in ~12000 iamges for training, and ~4000 for validation.
I preprocessed the data by converting to HSV colorspace and normalizing to range -1.0 to 1.0.
Images were also cropped to size (80, 320, 3). Here's an example:
Notes on the training process:
-
I used the training data for the network to learn how to steer. The validation set helped determine if the model was over or under fitting. Training with 10 epochs was sufficient to produce a good result, after experimentation with training between 2-10 epochs with various model architectures.
-
I used an adam optimizer so that manually training the learning rate wasn't necessary.
-
I didn't do any training on track two, so it's likely that the model won't generalize well to other road types and is simply "memorizing" track one.
-
As a final note, near the completion of the project I realized that by using keras with Theano backend resulted in my
Cropping2dimplementation to actually crop the width of the input images (i.e., columns) rather than the top & bottom rows of the images. Interestingly, the model was still able to learn how to drive autonomously around track one, perhaps by "memorizing" the sky or background objects near the top of the image.Switching to TensorFlow backend required some additional tuning of the steering angle adjustments and training with more epochs to achieve a robust model.


