Learn-Webpack 阅读中文
- Clone to local project and enter the file
$ git clone https://github.com/SilenceHVK/learn-webpack.git && cd learn-webpack- Installation project depends
$ npm install- Modify the run file script in package.json,for example
	{
        scripts: {
            "build": "webpack --config demo1/webpack.config.js --progress --display-modules --colors"
        }
}- Run with commands
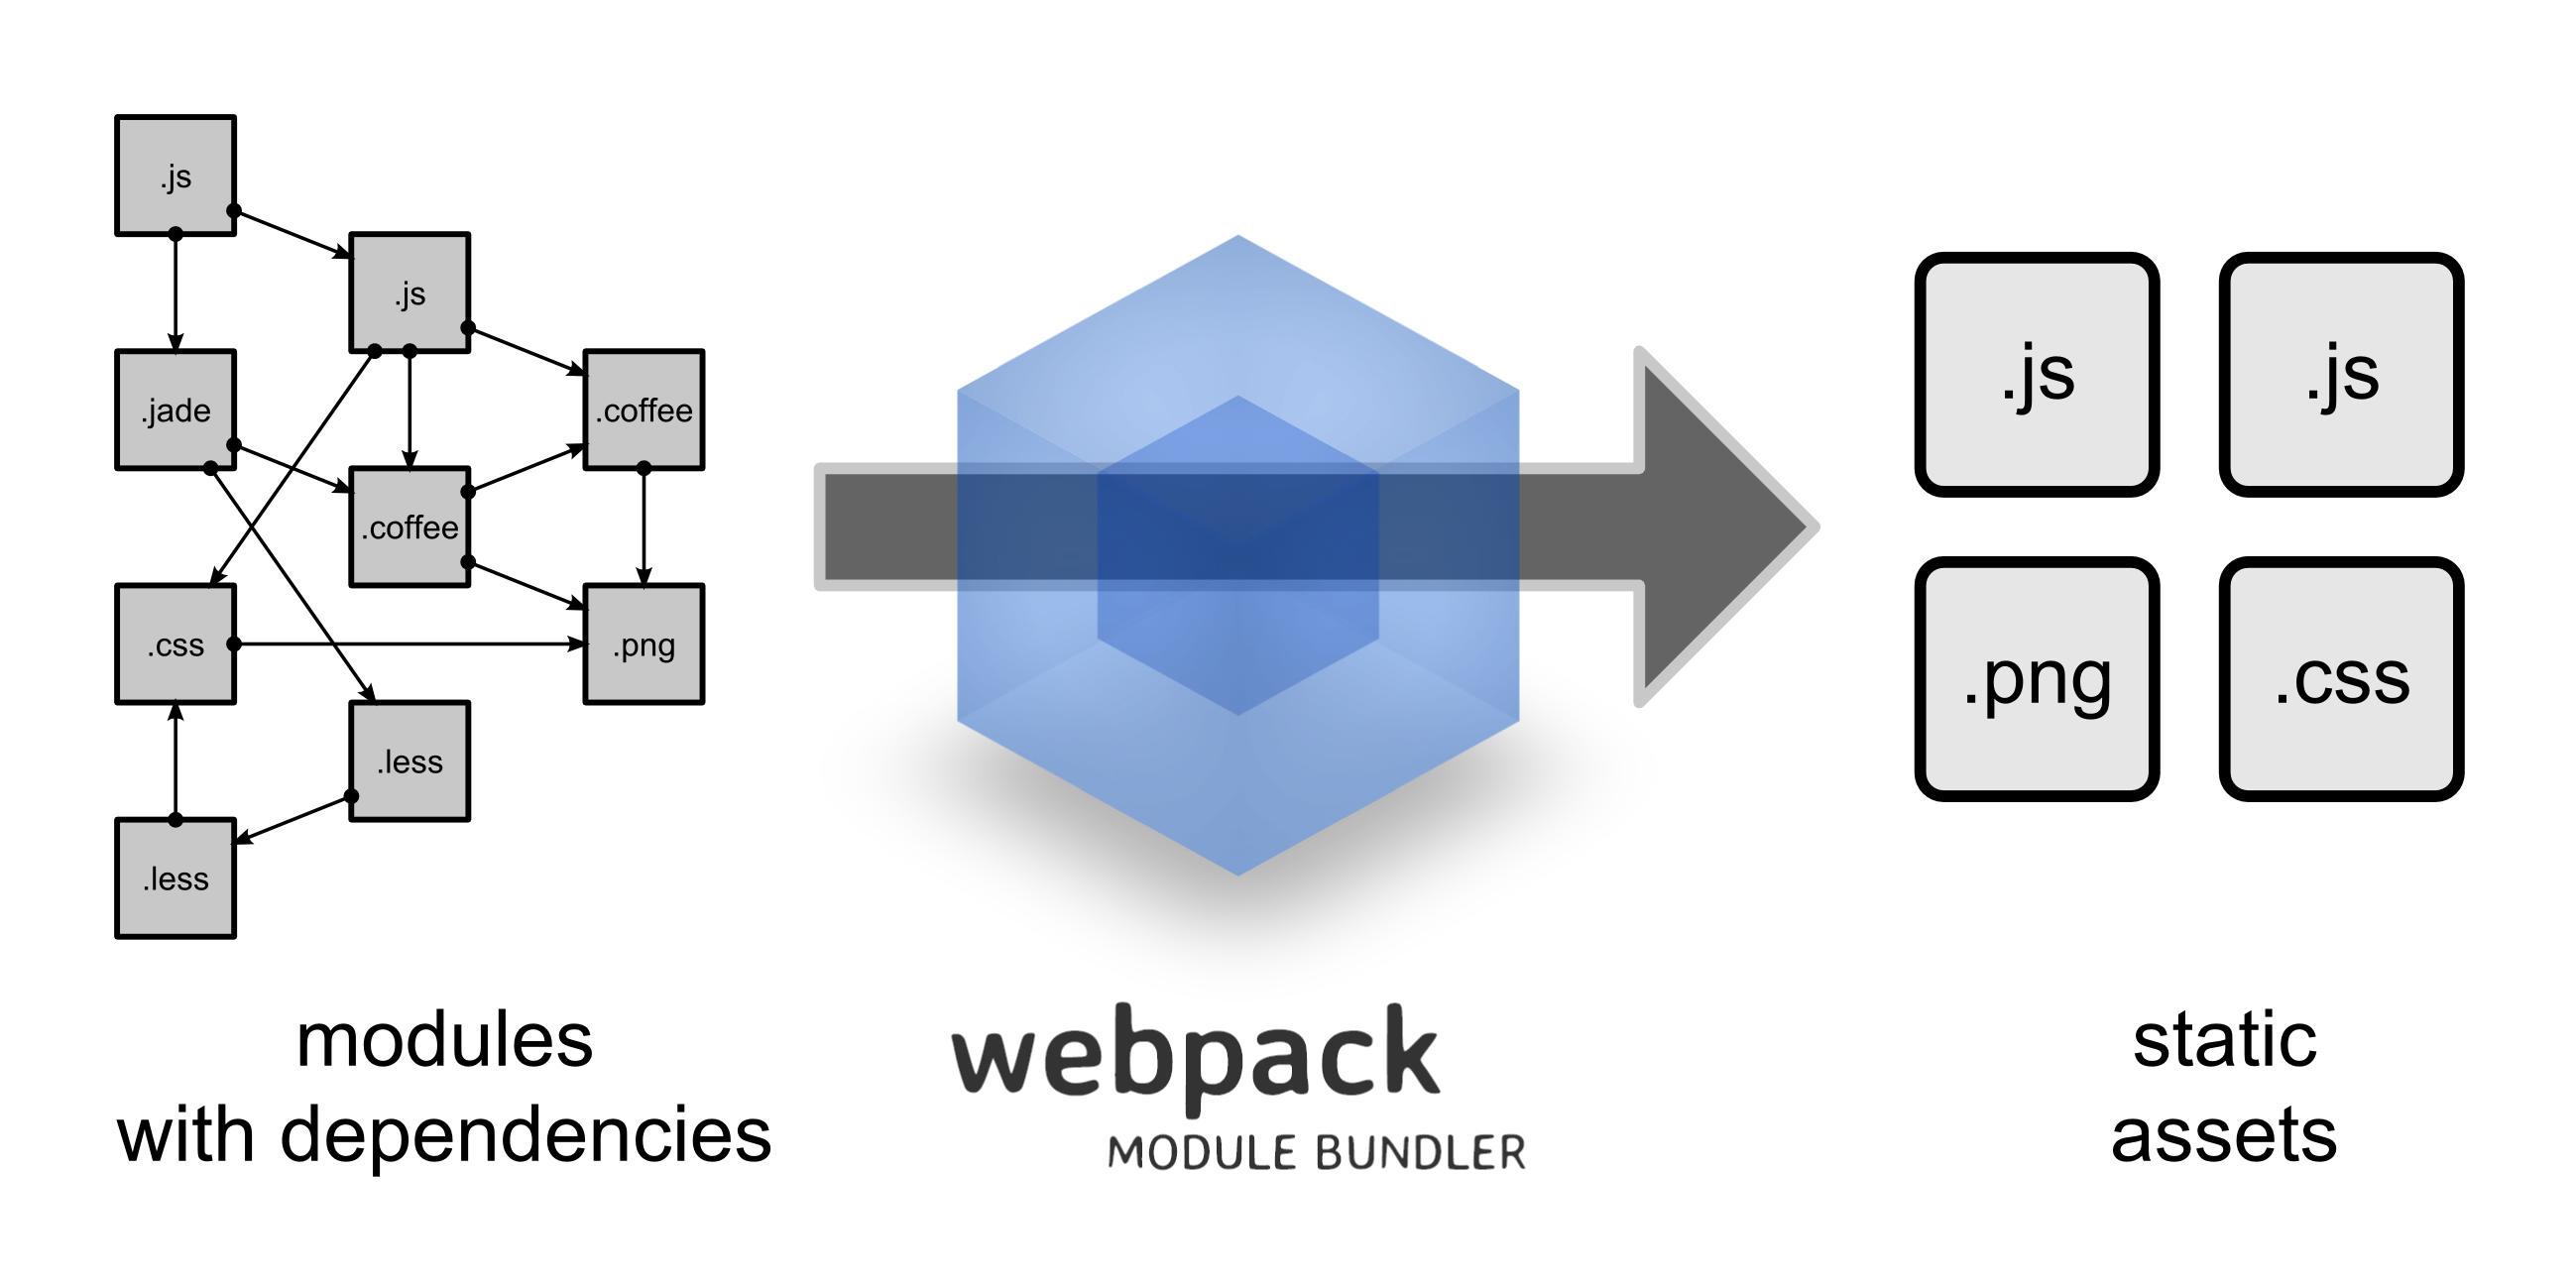
$ npm run buildWebpack is module loader developed by German developer Tobias Koppers.
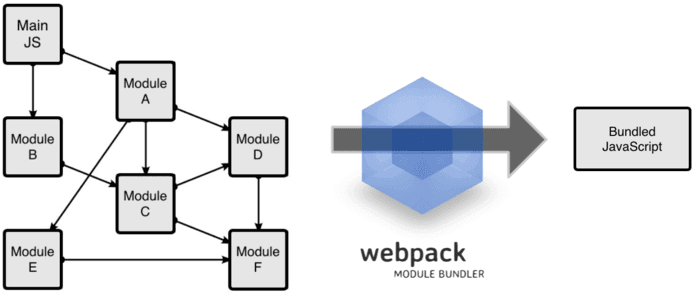
All files in webpack will be used as modules. When webpack processes an application, it recursively builds a dependency graph that contains every module the application needs, and then packages all those modules into one or more bundles.
Webpack is not comparable to Gupl/Grunt because Gupl/Grunt is a tool that optimizes the front-end development process and webpack is a modular solution. However, the advantages of webpack make webpack in many scenarios can replace Gulp/Grunt category of tools.
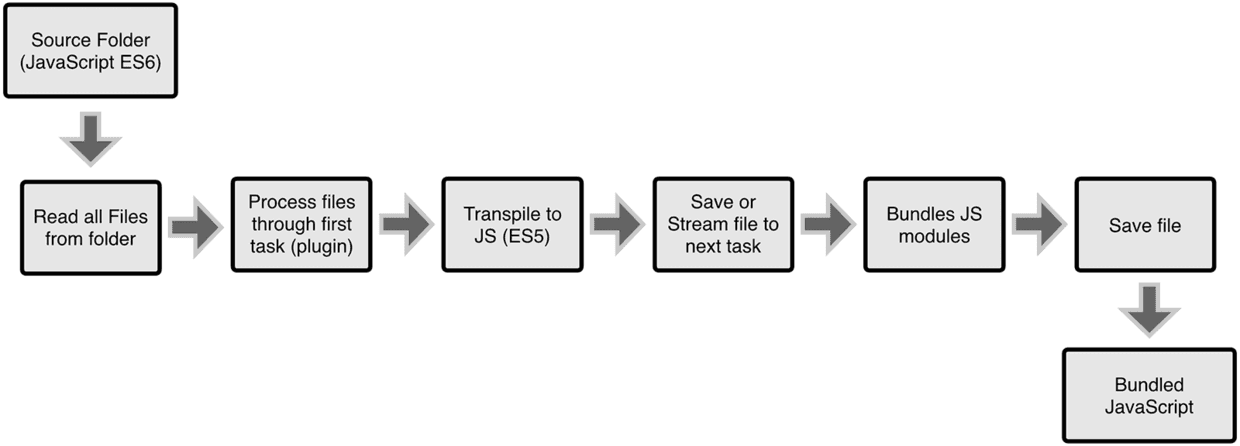
Grunt and Gulp work in the following ways: In a configuration file,you specify the specific steps to perform similar tasks such as compiling, assembling, and compressing certain files taht the tool can then automate for you.
Webpack work in the following ways: Think of your project as a whole, and through a given master file (eg,index.js), Webpack will find all the dependencies for your project from this file, process them with loaders, and finally package it into on (or more) browser-aware JavaScript file.
webpack installation and use (Demo1 Source)
- Install webpack golbally via npm.
$ npm install -g webpack- Create the project and initialize the package.json file.
    $ mkdir demo1 && cd demo1
$ npm init- Install webpack in the project.
$ npm install webpack --save-dev--save-dev is dependent on the development time, - save is also dependent on the release of things.
- Create the following file structure in the project.
.
├── index.html  // Web page display
├── main.js    // Webpack entrance
└── bundle.js // Files generated by the webpack command do not need to be created
- Package the js files dependent on the project with the command.
    # webpack Js file name to be packaged. Generated after the package js file name.
    $ webpack main.js bundle.js
Following the webpackage command can also add the following parameters.
--watchReal-time packaging.--progressDisplay package progress.--display-modulesDisplay the packaged modules.--display-reasonsDisplay reasons about module inclusion in the output.
More parameters can be viewd by the command webpack --help .
Four core cocnepts in webpack(Demo2 Source)
The default configuration file name in webpack is webpack.config.json,so we need to create the following file in the project:
.
├── index.html            // Web page display
├── main.js              // Webpack entrance
├── webpack.config.js   // The default configuration file in webpack
└── bundle.js          //  Files generated by the webpack command do not need to be created
The entry point indicates which module webpack should use as the start of building its internal dependency graph.
You can configure the entry property in webpack.config.js to specify an entry of multiple entry points as follows:
    module.exports = {
        entry: './path/entryFile.js'
};The output property tells webpack where to emit the bundles it creates and how to name these files. You can configure this part of the process by specifying an output field in your configuration:
    const path = require('path');

    module.exports = {
        entry: './path/entryFile.js',
        output: {
            path: path.resolve(__dirname,'dist'),
            filename: 'my-webpack.bundle.js'
        }
    };
The output.path property is used to specify the path to the generated file, and output.filename is used to specify the name of the generated file.
Loaders enable webpack to process more than just JavaScript files (webpack itself only understands JavaScript). They give you the ability to leverage webpack's bundling capabilities for all kinds of files by converting them to valid modules that webpack can process.
At a high level, loaders have two purposes in your webpack config. They work to:
- Identify which file or files should be transformed by a certain loader (with the test property).
- Transform those files so that they can be added to your dependency graph (and eventually your bundle). (use property)
Before we start the following code,we need to install the style-loader and css-loader.
$ npm install --save-dev style-loader css-loaderAnd Create the style.css style file in the project:
h1{ color: red; }Then enter the following code in webpack.config.js
    const path = require('path');

    module.exports = {
        entry: "./main.js",
        output: {
            path: path.resolve(__dirname,'dist'),
            filename: 'bundle.js'
        },
        model: {
           rules: [
               {
                   test: /\.css$/,
                   use:[
                       { loader: 'style-loader' },
                       { loader: 'css-loader' }
                   ]
               }
           ]
        }
}While loaders are used to transform certain types of modules, plugins can be leveraged to perform a wider range of tasks. Plugins range from bundle optimization and minification all the way to defining environment-like variables. The plugin interface is extremely powerful and can be used to tackle a wide variety of tasks.
In order to use a plugin, you need to require() it and add it to the plugins array. Most plugins are customizable through options. Since you can use a plugin multiple times in a config for different purposes, you need to create an instance of it by calling it with the new operator.
Before we start the following code,we need to install the html-webpack-plugin :
$ npm install html-webpack-plugin --save-devThis is a webpack plugin that simplifies creation of HTML files to serve your webpack bundles.
Then enter the following code in webpack.config.js.
    const HtmlWebpackPlugin = require('html-webpack-plugin');
    const path = require('path');

    const config = {
        entry: './main.js',
        output: {
            path: path.resolve(__dirname,'dist'),
            filename: 'bundle.js'
        },
        module: {
            rules: [
                {
                    test: /\.css$/,
                    use: [
                        { loader: 'style-loader'},
                        { loader: 'css-loader' }
                    ]
                }
            ]
        },
        plugins: [
            new HtmlWebpackPlugin({ template: './index.html' })
        ]
    };

module.exports = config;Finally,we can compile and pack directly through the webpack command.If you want to add parameters after its command, you can configure script properties in package.json.
    {
        scripts: {
            "build": "webpack --config webpack.config.js --progress --display-modules"
        }
    }
Of course,if you want to change the default configuration file name, --config webpack.config.js configuration file name changed to your custom name.
Through the following command executio:
$ npm run buildMultiple entry settings and html-webpack-pugin details(Demo3 Source)
We can specify multiple entries for the entry. Before we start the code, we need to create the following directory deconstructio.
.
├── index.html            // 显示的页面
├── main1.js             // webpack 入口1
├── main1.js            // webpack 入口2
├── style.css          // 样式文件
└── webpack.config.js // webpack 中默认的配置文件
index.html
    <!DOCTYPE html>
    <html lang="en">
    <head>
        <meta charset="UTF-8">
        <meta name="viewport" content="width=device-width, initial-scale=1.0">
        <meta http-equiv="X-UA-Compatible" content="ie=edge">
        <title>demo3</title>
    </head>
    <body>

    </body>
    </html>
main1.js
    import './style.css'

    var h1 = document.createElement('h1');
    h1.innerText = 'This is the main1.js content';
    document.body.appendChild(h1);
main2.js
    import './style.css'

    var h2 = document.createElement('h2');
    h2.innerText = 'This is the main2.js content';
    document.body.appendChild(h2);
webpack.config.js
    const HtmlWebpackPlugin = require('html-webpack-plugin');
    const path = require('path');

    const config = {
        entry: {
            bundle1: './main1.js',
            bundle2: './main2.js',
        },
        output: {
            path: path.resolve(__dirname,'dist'),
            filename: '[name].js'
        },
        module: {
            rules: [
                { test: /\.css$/, loader: 'style-loader!css-loader' }
            ]
        },
        pugins: [
            new HtmlWebpackPlugin({ template: './index.html' })
        ]
    };

    module.exports = config;
After completing the above code work, run the webapck command, and we open index.html in the dist file.

The result of the run is not what we expected to show the contents of h1 before, h2 after the content, open the generated index.html source:
    <!DOCTYPE html>
    <html lang="en">
    <head>
        <meta charset="UTF-8">
        <meta name="viewport" content="width=device-width, initial-scale=1.0">
        <meta http-equiv="X-UA-Compatible" content="ie=edge">
        <title>demo3</title>
    </head>
    <body>
        <script type="text/javascript" src="bundle2.js"></script>
        <script type="text/javascript" src="bundle1.js"></script>
    </body>
    </html>
From the source can be learned, first introduced bundle2.js file, which is main2.js content, after the introduction of bundle1.js file, That is main1.js content.
We did not enter any code in the index.html to import JavaScript files, so how to import the generated files using webpack is how to import JavaScript files. In fact, the index.html generated for us via html-webpack-plugin.
Through the introduction of npm, html-webpack-plugin is a webpack plug-in that simplifies the creation of HTML files for our webpack package Service that contains a parameter that changes the name of each compiled file. Use lodash templates to provide our own templates or use our own loader.
You can pass a hash of configuration options to HtmlWebpackPlugin. Allowed values are as follows:
- title: The title to use for the generated HTML document.
- filename: The file to write the HTML to. Defaults to index.html. You can specify a subdirectory here too (eg: assets/admin.html).
- template: Webpack require path to the template. Please see the docs for details.
- inject: true | 'head' | 'body' | false Inject all assets into the given template or templateContent - When passing true or 'body' all javascript resources will be placed at the bottom of the body element. 'head' will place the scripts in the head element.
- favicon: Adds the given favicon path to the output html.
- minify: {...} | false Pass html-minifier's options as object to minify the output.
- hash: true | false if true then append a unique webpack compilation hash to all included scripts and CSS files. This is useful for cache busting.
- cache: true | false if true (default) try to emit the file only if it was changed.
- showErrors: true | false if true (default) errors details will be written into the HTML page.
- chunks: Allows you to add only some chunks (e.g. only the unit-test chunk)
- chunksSortMode: Allows to control how chunks should be sorted before they are included to the html. Allowed values: 'none' | 'auto' | 'dependency' |'manual' | {function} - default: 'auto',Please see the docs
- excludeChunks: Allows you to skip some chunks (e.g. don't add the unit-test chunk)
- xhtml: true | false If true render the link tags as self-closing, XHTML compliant. Default is false
Now that we know the parameters in html-webpack-plugin, let's modify the contents of webpack.config.js:
    const HtmlWebpackPlugin = require('html-webpack-plugin');
    const path = require('path');

    const config = {
        entry: {
            bundle1: path.resolve(__dirname,'main1.js'),
            bundle2: path.resolve(__dirname,'main2.js')
        },
        output: {
            path: path.resolve(__dirname, 'dist'),
            filename: '[name].js'
        },
        module: {
            rules: [
                { test: /\.css$/, loader: 'style-loader!css-loader' }
            ]
        },
        plugins: [
            new HtmlWebpackPlugin({
                title: 'multiple entry',
                filename: 'index.html',
                template: path.resolve(__dirname,'index.html'),
                inject: true,
                favicon: path.resolve(__dirname,'favicon.ico'),
                minify: {
                    caseSensitive: false,
                    collapseBooleanAttributes: true,
                    collapseWhitespace: true
                },
                hash: true,
                cache: true,
                showErrors: true,
                chunks: [ 'bundle1', 'bundle2' ],
                // excludeChunks:[ 'bundle1' ],
                chunksSortMode: function(chunk1,chunk2){
                    var orders = [ 'bundle1' , 'bundle2' ];
                    var order1 = orders.indexOf(chunk1.names[0]);
                    var order2 = orders.indexOf(chunk2.names[0]);
                    return order1 - order2;
                },
                xhtml: false
            })
        ]
    };

    module.exports = config;
After completing the above code work, run the webapck command, and we open index.html in the dist file.

Nice! Is consistent with our expectation. In the introduction to html-webpack-plugin, I mentioned the lodash template, so how do you use it? We modify the contents of webpack.config.js again, passing the Date parameter to HtmlWebpackPlugin:
    const HtmlWebpackPlugin = require('html-webpack-plugin');
    const path = require('path');

    const config = {
        entry: {
            bundle1: path.resolve(__dirname,'main1.js'),
            bundle2: path.resolve(__dirname,'main2.js')
        },
        output: {
            path: path.resolve(__dirname, 'dist'),
            filename: '[name].js'
        },
        module: {
            rules: [
                { test: /\.css$/, loader: 'style-loader!css-loader' }
            ]
        },
        plugins: [
            new HtmlWebpackPlugin({
                date: new Date(),
                title: 'multiple entry',
                filename: 'index.html',
                template: path.resolve(__dirname,'index.html'),
                inject: true,
                favicon: path.resolve(__dirname,'favicon.ico'),
                minify: {
                    caseSensitive: false,
                    collapseBooleanAttributes: true,
                    collapseWhitespace: true
                },
                hash: true,
                cache: true,
                showErrors: true,
                chunks: [ 'bundle1', 'bundle2' ],
                // excludeChunks:[ 'bundle1' ],
                chunksSortMode: function(chunk1,chunk2){
                    var orders = [ 'bundle1' , 'bundle2' ];
                    var order1 = orders.indexOf(chunk1.names[0]);
                    var order2 = orders.indexOf(chunk2.names[0]);
                    return order1 - order2;
                },
                xhtml: false
            })
        ]
    };

    module.exports = config;
Change the content of index.html, lodash The default template support is the syntax of ejs template:
    <!DOCTYPE html>
    <html lang="en">
    <head>
        <meta charset="UTF-8">
        <meta name="viewport" content="width=device-width, initial-scale=1.0">
        <meta http-equiv="X-UA-Compatible" content="ie=edge">
        <title>demo3</title>
    </head>
    <body>
        <%= htmlWebpackPlugin.options.date %>
    </body>
    </html>
After completing the above code work, run the webapck command, and we open index.html in the dist file.

By running the results, we can find the output of the current time at the top, which is the HtmlWebpackPlugin incoming parameters, in fact, the parameters in the HtmlWebpackPlugin htmlWebpackPlugin.options. Parameter name output, I will not list them all.
Webpack-dev-server is a simple web server officially provided by webpack. It can reload pages in real time.
Use the following command to install webpack-dev-server
$ npm install --save-dev webpack-dev-server