Starting a journey to build a cost-effective system for running large language models (LLMs) using Ollama led me to discover Nvidia Tesla cards. These older cards, designed for server farms, boast substantial VRAM and are now available at affordable prices on eBay. After finding out that the Nvidia Tesla M60 supports Ollama and purchasing one, I realized these cards lack active cooling, necessitating a DIY solution for effective cooling.
The first solution I encountered was a 3D printable shroud designed for the M40 card, which could be paired with a Dell radial fan. However, the shroud didn't fit my M60 due to dimensional differences and PSU connector placement. Modifying the Fusion 360 file, I created a shroud specifically for the M60. This design still required repinning the fan, which wasn't ideal as I lacked spare fan headers on my motherboard.

The next project, Tesla Cooler, used a PiPico and several small fans to cool the card. This setup controlled fan speed based on estimated temperatures derived from the nvidia-smi tool and a ds18b20 temperature sensor. While innovative, I wanted a more accurate method for obtaining temperature readings and integrating them into Home Assistant.
Sensors2mqtt provided a solution by scraping nvidia-smi data and posting it to an MQTT server, creating entities in Home Assistant. This approach offered the accuracy I needed without extensive coding, setting the foundation for my custom project.
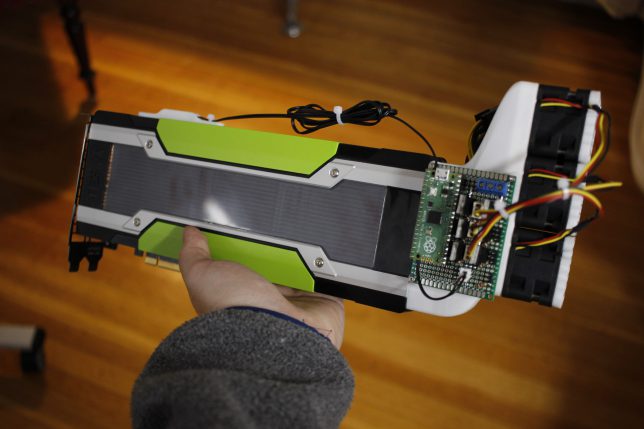
Integrating the best elements of these projects, I developed a comprehensive cooling system for the Tesla M60:
- 3D Printed Shroud: Custom-designed to fit the M60, avoiding the need for repinning the fan.
- Dell Fan: Purchased from eBay, requiring no repinning.
- ESP8266 Microcontroller: Utilized for controlling the fan and connecting to Wi-Fi.
- Nvidia SMI Data: Used for accurate temperature readings.
- DS18b20 Sensor: Added as a fallback.
- PID Controller Logic: Maintains GPU temperature at 70°C, adjustable via Home Assistant.
- Single 12V Line from ATX PSU: Powers the 12V fan.
- Custom PCB Design: Designed a custom PCB for the ESP-12e to simplify the setup and ensure robust connections.
- 3D Printer: To print the custom shroud.
- Dell Radial Fan: For active cooling.
- ESP8266 (D1 Mini and ESP-12e): For microcontroller-based control.
- Home Assistant: For integration and control.
- MQTT Server: For data communication.
- Nvidia SMI Tool: For accurate temperature readings.
- DS18b20 Temperature Sensor: As a fallback option.
- Custom PCB for ESP-12e: To ensure reliable connections and ease of setup.
Using ESPHome, the ESP8266 microcontroller is configured to:
- Connect to Wi-Fi: Ensuring stable network communication.
- Subscribe to MQTT Topics: Receiving GPU temperature data.
- Monitor Temperatures: From both the GPU and DS18b20 sensor.
- Control Fan Speed: Based on temperature readings with predefined thresholds.
- Integrate with Home Assistant: Allowing manual override and monitoring.
The ESPHome YAML configuration includes several key components and functionalities:
- ESP8266 Microcontroller: Configured for Wi-Fi connectivity and microcontroller operations.
- Logger: Enabled for logging events and debugging.
- API and OTA: Configured for Home Assistant API integration and over-the-air firmware updates.
- Captive Portal: Provides an interface for configuring Wi-Fi settings if needed.
- Wi-Fi Setup: Configures the ESP8266 to connect to the specified Wi-Fi network with static IP settings. An access point (AP) mode is also defined for initial setup or fallback.
- Manual IP Configuration: Ensures the ESP8266 has a stable IP address for communication.
- MQTT Integration: Connects to the MQTT broker for sending and receiving data.
- On Disconnect: Sets the fan speed to 100% if the MQTT connection is lost, ensuring the GPU is always cooled.
- Dallas Sensor: Configured on GPIO05 to provide fallback temperature readings.
- MQTT Sensors: Subscribes to MQTT topics for GPU temperature data provided by sensors2mqtt.
- Global States: Maintains the state of fan speed percentage, temperature source (GPU or Dallas sensor), maximum GPU temperature, and manual override status.
- Use GPU Temperature Switch: Toggles between using GPU temperature or Dallas sensor for controlling the fan. Disables manual override when switched.
- Manual Fan Override Switch: Allows manual control of the fan speed, overriding automatic temperature-based control.
- Wi-Fi Signal Strength: Monitors Wi-Fi connection quality.
- Template Sensors: For current fan speed, GPU maximum temperature, and uptime.
- Pulse Counter: Measures fan RPM via pulses on GPIO0.
- PWM Output: Controls fan speed using a PWM signal on GPIO02, with frequency set to 25 kHz.
- Fan Speed Override: Slider in Home Assistant for manual fan speed control, activates manual override when adjusted.
- Intervals: Regularly update GPU temperatures, calculate maximum temperature, and adjust fan speed accordingly.
- Adjust Fan Speed Script: Implements the logic for fan speed adjustment based on the selected temperature sensor and current temperatures.

- Below 50°C (GPU) / 40°C (Dallas): Fan runs at the minimum speed of 10%.
- 50°C to 65°C (GPU) / 40°C to 55°C (Dallas): Fan speed scales linearly between 10% to 80%.
- Above 65°C (GPU) / 60°C (Dallas): Fan runs at maximum speed of 100%.

In Home Assistant, the following functionalities are implemented:
- Device Monitoring: Displays real-time sensor data, fan speed, and other relevant metrics.
- Control Switches: Provides interface to toggle temperature source and manual override.
- Fan Speed Adjustment: Allows manual control through a slider interface.
- OTA Updates: Simplifies firmware upgrades to add features or fix issues without physical access to the device.
 The custom PCB design for the ESP-12e simplifies the setup and ensures robust connections for the cooling system. Here's a breakdown of the components and their connections:
-
Power Supply:
- The circuit is powered by a 12V power supply connected to a header (HDR-F-2.54_1x2).
- The 12V is stepped down to 3.3V using an LD1117V33C voltage regulator (U2).
-
Voltage Regulator (U2 - LD1117V33C):
- Input (VIN) connected to the 12V supply.
- Ground (GND) connected to the common ground.
- Output (VOUT) providing 3.3V to power the ESP8266 and other components.
-
ESP-12E (ESP8266-12E):
- The 3.3V supply from the voltage regulator is connected to the VCC pin of the ESP8266.
- Various GPIO pins are connected to other components in the circuit:
- GPIO2 is connected to the DQ pin of the DS18B20 temperature sensor through a 4.7kΩ pull-up resistor (R1).
- GPIO4 and GPIO5 are connected to a fan through a 10kΩ resistor (R2).
-
DS18B20 Temperature Sensor (U1):
- VDD connected to 3.3V.
- GND connected to ground.
- DQ (Data) line connected to GPIO2 of the ESP8266 through a 4.7kΩ pull-up resistor (R1).
-
Fan:
- Connected to GPIO4 and GPIO5 of the ESP8266 through a 10kΩ resistor (R2).
- Unpopulated PCB

- Populated and running PCB

This circuit is designed for temperature monitoring using the DS18B20 sensor, with the ESP8266 controlling a fan based on the temperature readings. The ESP8266 can also provide Wi-Fi connectivity to send data to a server or a cloud service for remote monitoring.
TeslaGPUFan provides a robust solution for controlling a GPU fan using an ESP8266 microcontroller. It combines the accuracy of nvidia-smi temperature readings with the fallback reliability of a DS18b20 sensor. The integration with Home Assistant and MQTT allows for advanced automation and manual control, ensuring efficient cooling under varying conditions. This project showcases the potential of DIY solutions in enhancing the functionality of affordable, high-performance hardware like the Nvidia Tesla M60.