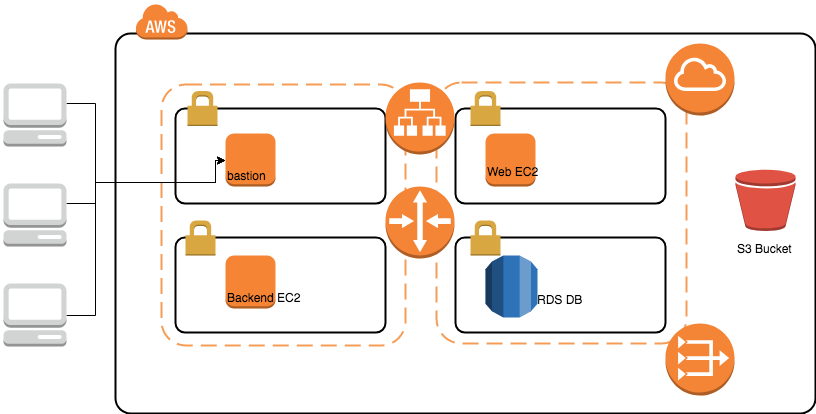
Today we are going to practice a full end to end scenario, create VPC with different network topology, include public subnet and private subnet. And we will create bastion machine, Application Load Balancer with Web server, a backend machine inside the private subnet, a RDS server and also a S3 bucket.
Looks complicated, but it is designed to be a very wide usage sample for most general scenario.
For this workshop, we support 3 different region:
- N. Viginia(us-east-1)
- N. California(us-west-1)
- Tokyo(ap-northeast-1)
- Sydney(ap-southeast-2)
- Frankfurt(eu-central-1)
- London(eu-west-2)
Switch Region on the AWS console, a drag down menu near right-up corner. For example, we pick N. Viginia(us-east-1) for our lab practice.
- Create a new IAM User
- AWS Console > IAM > Create User
- Create a user, with proper user name, with password, choose both programmic and console usage.
- Attach existing policies directly, and pick AmazonEC2FullAccess and AmazonS3FullAccess
- After review, then create the user
- At the last page, please remeber to download the credential csv, or copy the Access Key ID and Secrect Access Key on the page.
- Make sure you set each account with MFA
- AWS console > IAM > users, and click the user name you just created
- Pick the Security credentials tab, you can see the link Assigned MFA device
- Click and pick A virtual MFA device, with download mobile app, you could enable the Multi-Factor-Authentication to protect your account. For more detail, please check the document (https://aws.amazon.com/iam/details/mfa/)
-
Check if you already have a EC2 Key pair in your selected region.
-
If not, create one through AWS Console > EC2 > Key Pairs > Create Key Pair.
-
Remember to download the private key(.pem) and well saved.
-
In usual, we will move it into ~/.ssh/ sub-folder in your home directory.
-
To make it secure, remeber to change the privilege with command
chmod 0400 XXXXX.pem -
If you are windows user, and you should download putty.exe and puttygen.exe from Here. And also check the document Here if you don't know how to convert .pem to .ppk
- Create cloudformation stack: AWS Console > Cloudformation > Create Stack > from S3 template > https://s3-ap-northeast-1.amazonaws.com/workshop-data-public/cloudformation-workshop-20180731-vpc-bastion-rds.cfn.yml
- All the step will be the same with our pervious workshop (https://github.com/juntinyeh/AWSWorkshop-20180731-VPC-EC2-S3-RDS)
- Check your web service stack
- You will find an Application Load Balancer, A web server and a backend server, and also a S3 bucket.
- In this practice, you can see how to create resource for our basic practice. You can try to understand how we design the network topology, how we devide AZ and subnet.
- Also, we talked about the security group. By default, all the network routing rule has been pre-defined, you don't need to do anything. In this empty stack, you can see what we showed in the first diagram.
- If you want to ssh into those machine, please refer to (https://aws.amazon.com/blogs/security/securely-connect-to-linux-instances-running-in-a-private-amazon-vpc/) for further configurations.
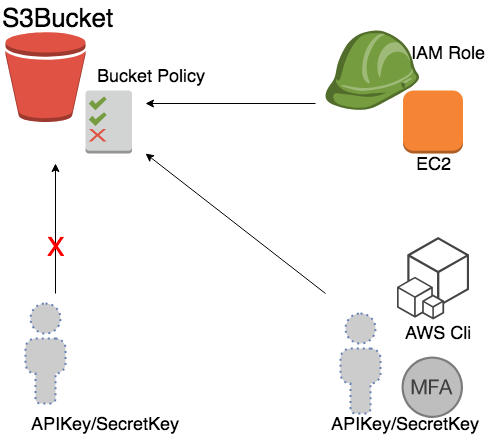
- Now find the bucket policy file in (AWSWorkshop-20180823-IAM-Role-S3-CW-SNS/policies/bucket-policy.json)
- Copy it, and paste to your S3 bucket policy: AWS Console > S3 >
YOURBUCKET> Permission > bucket policy - Paste it and save.
- Now compare with different access method, try to use
awsclifrom bastion, on your laptop.
- Try to access the bucket, with and without MFA.
- The command with MFA delete will like
aws s3api delete-object --bucket nctu-aws-workshop --key test.py --mfa "arn:aws:iam::111111111111:mfa/$YOURUSER 123456"
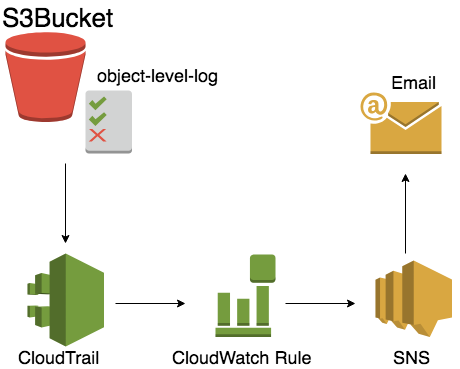
- Now we are going to do several manual configuration for more secure setting - Change bucket policy and log configurations.
- Create a web servers and backend server stack: AWS Console > Cloudformation > Create Stack > from S3 template > https://s3-ap-northeast-1.amazonaws.com/workshop-data-public/cloudformation-workshop-20180823-sns-ct.json
- This will Activate CloudTrail Service, and create a new Trail, new SNS, and also put the email address into subscription
- Now we go back to S3 bucket you created in
Step 5> Properties > Object-level logging
- select the Trail you just create, and check the read/write event, to make sure you send out all the log to CloudTrail.
- Now we goto Cloudwatch, and create a new rule AWS Console > CloudWatch > Rules > Create Rule
- Check Event Pattern
- Build event pattern to match events by service
- Service Name will be
S3 - Event Type will be
All Events - And Add Target, pick
SNS topic, and make sure you send it to the right topic. - After you give it a name, it's done now.
- Now, try to put some file into your bucket, modify and delete, you will get email notification.
s3-obj-ct-cw-sns-email
- Go to Cloudformation, select your stack and delete stack.
- Remember to delete all the stack above with reversed sequence. (step 7 > step 5)