Oracle Container Engine for Kubernetes (OKE) is the Oracle-managed Kubernetes service on Oracle Cloud Infrastructure (OCI).
⚠️ Kubeflow 1.5.0 is not compatible with Kubernetes version 1.22 and onwards. To install Kubeflow 1.5.0 or older, set the Kubernetes version of your OKE cluster to v1.21.5.
This guide explains how to install Kubeflow 1.6.0 on OKE using Kubernetes versions 1.22.5, 1.23.4 and 1.24.1 running on Oracle Linux 7.
This guide describes how to create a Kubernetes cluster using OKE, access OKE, install Kubeflow and expose Kubeflow Dashboard.
This guide can be run in many different ways, but in all cases, you will need to be signed into an Oracle Cloud Infrastructure tenancy.
This guide uses the Cloud Shell built into the Oracle Cloud Console but can also be run from your local workstation.
-
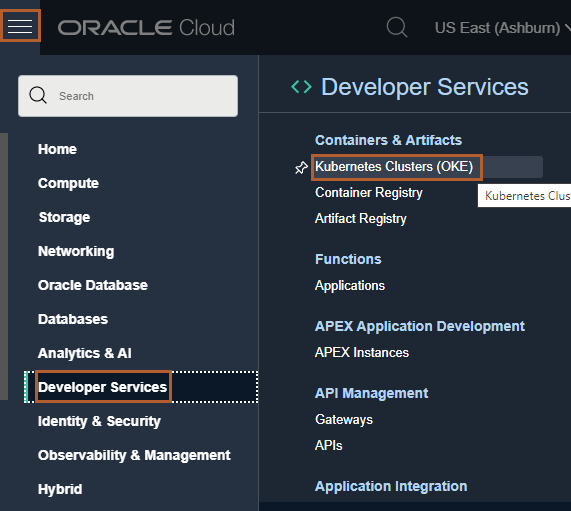
In the Console, open the navigation menu and click Developer Services. Under Containers & Artifacts, click Kubernetes Clusters (OKE).
-
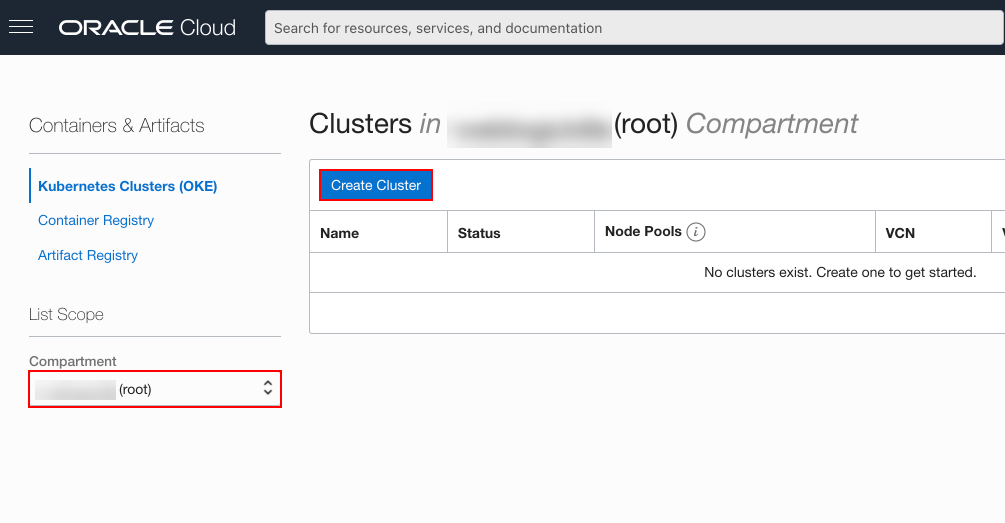
On the Cluster List dialog, select the Compartment where you are allowed to create a cluster and then click Create Cluster.
You must select a compartment that allows you to create a cluster and a repository inside the Oracle Container Registry.
-
On the Create Cluster dialog, click Quick Create and click Launch Workflow.
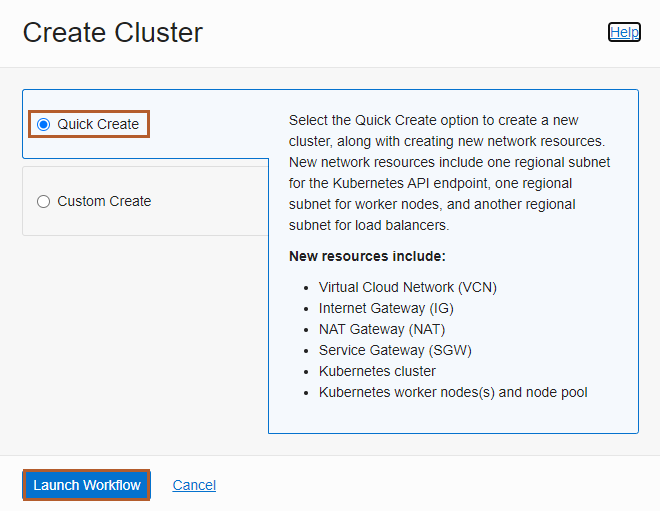
Quick Create will automatically create a new cluster with the default settings and new network resources for the new cluster.
-
Specify the following configuration details on the Cluster Creation dialog paying close attention to the value you use in the Shape field:
- Name: The name of the cluster. Accept the default value or provide your own.
- Compartment: The name of the compartment. Accept the default value or provide your own.
- Kubernetes Version: The version of Kubernetes. Select the v1.23.4 version.
- Kubernetes API Endpoint: Determines if the cluster control plane nodes will be directly accessible from external sources. Select the Public Endpoint value.
- Kubernetes Worker Nodes: Determines if the cluster worker nodes will be directly accessible from external sources. Accept the default value Private Workers.
- Shape: The shape to use for each node in the node pool. The shape determines the number of OCPUs and the amount of memory allocated to each node. The list shows only those shapes available in your tenancy that are supported by OKE.
- Number of nodes: The number of worker nodes to create. Accept the default value 3.
Caution: VM.Standard.E4.Flex is the recommended shape but is not available to Always Free tenancies. You should adjust the shape based on your requirements and location.


-
Click Next to review the details you entered for the new cluster.
-
On the Review page, click Create Cluster to create the new network resources and the new cluster.
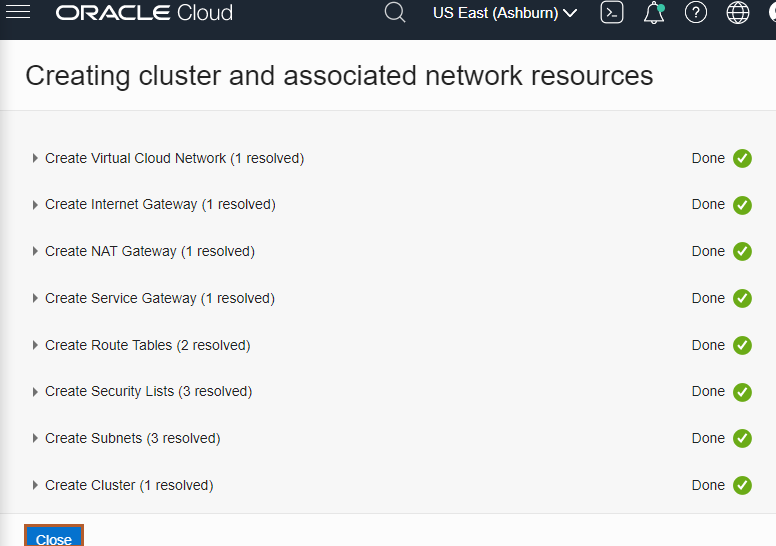
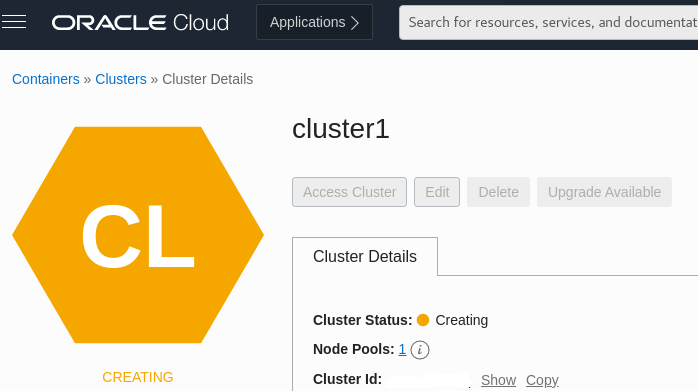
You see the network resources being created for you. Wait until the request to create the node pool is initiated and then click Close.
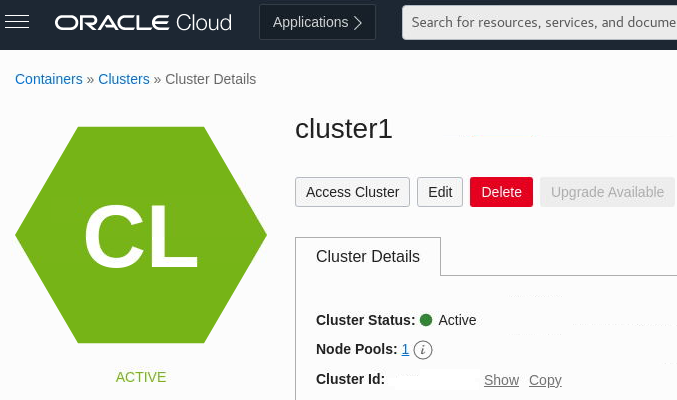
The new cluster is shown on the Cluster Details page. When the control plane nodes are created, the status of new cluster becomes Active. This usually takes around 10 minutes.
Now that your OKE cluster is ready, we can move on to the Kubeflow installation.


The following utilities are required to install Kubeflow:
These tools are installed by default in your Cloud Shell instance.
Warning: use Kustomize v3.2.0 as Kubeflow 1.6.0 is not compatible with the later versions of Kustomize.
-
Install Kustomize in Cloud Shell
-
Open Cloud Shell
-
Make sure you are in your home directory
cd ~ -
Download Kustomize v3.2.0 and install it in your Cloud Shell environment.
  curl -sfL https://github.com/kubernetes-sigs/kustomize/releases/download/v3.2.0/kustomize_3.2.0_linux_amd64 -o kustomize
  chmod +x ./kustomize
-
-
Clone the v1.6.0 branch of the Kubeflow manifests repository to your Cloud Shell environment
git clone -b v1.6-branch https://github.com/kubeflow/manifests.git kubeflow-1.6 cd kubeflow-1.6 -
Replace the default email address and password used by Kubeflow with a randomly generated one:
PASSWD=$(cat /dev/urandom | tr -dc 'a-zA-Z0-9' | fold -w 16 | head -n 1)
KF_PASSWD=$(htpasswd -nbBC 12 USER $PASSWD| sed -r 's/^.{5}//')
sed -i.orig "s|hash:.*|hash: $KF_PASSWD|" common/dex/base/config-map.yaml
echo "Random password is: $PASSWD"
- To access your OKE cluster, click Access Cluster on the cluster detail page. Accept the default Cloud Shell Access and click Copy to copy the
oci ce cluster create-kubeconfig ...command. Next, paste it into your Cloud Shell session and hit Enter.

Verify that the kubectl is working by using the get nodes command. You may need to repeat this command several times until all three nodes show Ready in the STATUS column.
  $ kubectl get nodes
  NAME          STATUS   ROLES   AGE   VERSION
  10.0.10.176   Ready    node    19m   v1.23.4
  10.0.10.203   Ready    node    19m   v1.23.4
  10.0.10.48    Ready    node    19m   v1.23.4
When all three nodes are Ready, your OKE install has finished successfully.
-
Install Kubeflow with a single command
cd $HOME/kubeflow-1.6
while ! $HOME/kustomize build example | kubectl apply -f -; do echo "Retrying to apply resources"; sleep 10; done
Installation usually takes between 10 to 15 minutes.
Use the following commands to check if all the pods related to Kubeflow are ready:
kubectl get pods -n cert-manager
kubectl get pods -n istio-system
kubectl get pods -n auth
kubectl get pods -n knative-eventing
kubectl get pods -n knative-serving
kubectl get pods -n kubeflow
kubectl get pods -n kubeflow-user-example-com
It usually takes about 15 minutes for all the pods to start successfully.
To enable access to the Kubeflow Dashboard from the internet, we first need to change the default istio-ingressgateway service created by Kubeflow into a LoadBalancer service using the following commands:
cat <<EOF | tee $HOME/kubeflow-1.6/patchservice_lb.yaml
  spec:
    type: LoadBalancer
  metadata:
    annotations:
      oci.oraclecloud.com/load-balancer-type: "lb"
      service.beta.kubernetes.io/oci-load-balancer-shape: "flexible"
      service.beta.kubernetes.io/oci-load-balancer-shape-flex-min: "10"
      service.beta.kubernetes.io/oci-load-balancer-shape-flex-max: "100"
EOF
kubectl patch svc istio-ingressgateway -n istio-system -p "$(cat $HOME/kubeflow-1.6/patchservice_lb.yaml)"
To enable HTTPS for the Istio ingress gateway you need to generate a SSL certificate.
- Generate SSL certificate
To generate a SSL certificate, you can use OCI Certificates, your own provider, or create a self-signed certificate using the generate-kubeflow-cert.sh script or by following the steps below.
Click for details on creating a self-signed certificate
The following steps are designed to work without any editing but will use default values for C (country), ST (state), L (location), O (organization) and OU (organizational unit) fields. Feel free to edit these default values.
Note: The
Cfield must contain a valid Alpha-2 ISO country code.
-
Create a directory to save your certificates and change to that directory
mkdir $HOME/kubeflow-ssl
cd $HOME/kubeflow-ssl
-
Store the external IP address of the load balancer and an auto-generated nip.io domain name as environment variables
IP_ADDR=$(kubectl get svc istio-ingressgateway -n istio-system -o=jsonpath="{.status.loadBalancer.ingress[0].ip}")
DOMAIN="${IP_ADDR}.nip.io"
-
Create root CA private and public key pair
openssl req -x509 \ -sha256 -days 356 \ -nodes \ -newkey rsa:2048 \ -subj "/CN=${DOMAIN}/C=US/L=San Fransisco" \ -keyout rootCA.key -out rootCA.crt -
Create a certificate signing request (CSR) configuration file
cat > csr.conf <<EOF
[ req ]
default_bits = 2048
prompt = no
default_md = sha256
req_extensions = req_ext
distinguished_name = dn

[ dn ]
C = US
ST = California
L = San Fransisco
O = Kubeflow
OU = Kubeflow
CN = ${DOMAIN}

[ req_ext ]
subjectAltName = @alt_names

[ alt_names ]
DNS.1 = ${DOMAIN}
IP.1 = ${IP_ADDR}
EOF
-
Create a private key
openssl genrsa -out "${DOMAIN}.key" 2048 -
Create a certificate signing request using the private key and the certificate signing request configuration file created in step 4
openssl req -new -key "${DOMAIN}.key" -out "${DOMAIN}.csr" -config csr.conf
-
Create a certificate signature configuration file
cat > cert.conf <<EOF
authorityKeyIdentifier=keyid,issuer
basicConstraints=CA:FALSE
keyUsage = digitalSignature, nonRepudiation, keyEncipherment, dataEncipherment
subjectAltName = @alt_names

[alt_names]
DNS.1 = ${DOMAIN}
IP.1 = ${IP_ADDR}
EOF
-
Sign the certificate request generated in step 6 with the CA created in step 1 using the certificate signature configuration file created in step 7
openssl x509 -req \
    -in "${DOMAIN}.csr" \
    -CA rootCA.crt -CAkey rootCA.key \
    -CAcreateserial -out "${DOMAIN}.crt" \
    -days 365 \
    -sha256 -extfile cert.conf
- Create a Kubernetes secret to store the certificate
Store the certificate as a Kubernetes TLS secret in the istio-system namespace.
cd $HOME/kubeflow-ssl
kubectl create secret tls kubeflow-tls-cert --key=$DOMAIN.key --cert=$DOMAIN.crt -n istio-system
-
Update the Kubeflow API Gateway definition
Create API Gateway
  cat <<EOF | tee $HOME/kubeflow-1.6/sslenableingress.yaml
  apiVersion: v1
  items:
  - apiVersion: networking.istio.io/v1beta1
    kind: Gateway
    metadata:
      annotations:
      name: kubeflow-gateway
      namespace: kubeflow
    spec:
      selector:
        istio: ingressgateway
      servers:
      - hosts:
        - "*"
        port:
          name: https
          number: 443
          protocol: HTTPS
        tls:
          mode: SIMPLE
          credentialName: kubeflow-tls-cert
      - hosts:
        - "*"
        port:
          name: http
          number: 80
          protocol: HTTP
        tls:
          httpsRedirect: true
  kind: List
  metadata:
    resourceVersion: ""
    selfLink: ""
  EOF

  kubectl apply -f $HOME/kubeflow-1.6/sslenableingress.yaml
  kubectl get gateway -n kubeflow
Congratulations! You have successfully installed Kubeflow on your OKE cluster.
Visit https://.nip.io to access the Kubeflow Dashboard.

Kubeflow: https://www.kubeflow.org/
Oracle appreciates any contributions that are made by the community. Please submit your contributions by forking this repository and submitting a pull request. Opening an issue to discuss your contribution beforehand, especially if it's a new feature, would be appreciated.
Copyright (c) 2022 Oracle and/or its affiliates.
Licensed under the Universal Permissive License (UPL), Version 1.0 as shown at https://opensource.oracle.com/licenses/upl/
See LICENSE for more details.
ORACLE AND ITS AFFILIATES DO NOT PROVIDE ANY WARRANTY WHATSOEVER, EXPRESS OR IMPLIED, FOR ANY SOFTWARE, MATERIAL OR CONTENT OF ANY KIND CONTAINED OR PRODUCED WITHIN THIS REPOSITORY, AND IN PARTICULAR SPECIFICALLY DISCLAIM ANY AND ALL IMPLIED WARRANTIES OF TITLE, NON-INFRINGEMENT, MERCHANTABILITY, AND FITNESS FOR A PARTICULAR PURPOSE. FURTHERMORE, ORACLE AND ITS AFFILIATES DO NOT REPRESENT THAT ANY CUSTOMARY SECURITY REVIEW HAS BEEN PERFORMED WITH RESPECT TO ANY SOFTWARE, MATERIAL OR CONTENT CONTAINED OR PRODUCED WITHIN THIS REPOSITORY. IN ADDITION, AND WITHOUT LIMITING THE FOREGOING, THIRD PARTIES MAY HAVE POSTED SOFTWARE, MATERIAL OR CONTENT TO THIS REPOSITORY WITHOUT ANY REVIEW. USE AT YOUR OWN RISK.