This is a script to upload a Let's Encrypt (or any other valid certificate for that matter) SSL/TLS certificate to a Mikrotik router and activate it on SSL Webfig and SSL API services. The certificate can then also be used for SSTP or other VPN requiring a certificate. It losely based on https://github.com/gitpel/letsencrypt-routeros with a focus on simplicity.
This version was changed from the original to acommodate the usage on Kubernetes cluster. The goal is to have container image that can run multiple times in a cronjob and install cerficates (or a wildcard certificate) to N number of Mikrotik units. The diffrences from original are highlighted below.
What you will need to do manually is:
- Generate a Let's Encrypt certificate (not if using Kubernetes with cert-manager)
- Create an user to SSH to your Mikrotik
- Run the script to transfer and activate the certificate (done by kubernetes cronjob)
(On a kubernetes with cert-manager, just change the deployment.yml to suit your needs)
To generate a valid (not auto-signed) SSL/TLS certificate we can either buy one or generate a free certificate using Let's Encrypt. Generating a Let's Encrypt certificate is out of the scope of this readme and all the documnetation and examples are available on https://certbot.eff.org/
The easiest way is to have an existing Web Server and generate a certificate there, adding a second domain to an already existing certificate for our Mikrotik. In this example, on a CentOS 8 Stream Web Server, I m'm adding "mikrotik.mydomain.com" to the certificate for "www.mydomain.com". Here is a certificate generation example using the HTTP-01 challenge; it creates a challenge in /var/www/www.mydomain.com/, which is the root directory of the www.mydomain.com domain:
certbot certonly --webroot --webroot-path /var/www/www.mydomain.com/ --domain www.mydomain.com --domain mikrotik.amydomain.com --email webmaster@mydomain.comThis generates a valid certificate in /etc/letsencrypt/live/www.mydomain.com/fullchain.pem and the private key in /etc/letsencrypt/live/www.mydomain.com/privkey.pem and it's time to automate the transfer to our Mikrotik router as we don't want to manually do this every 90 days or so when it is renewed.
It's simple, clone this repository
cd /opt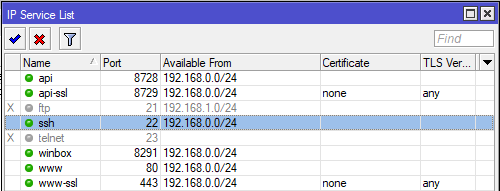
git clone https://github.com/smoix/letsencrypt-mikrotik-certGo to the Mikrotik, and using Winbox/WebFig enable the SSH service under IP > Services. Enable it only on your local network for security reasons (remember that the web server where we generated the SSL/TLS certificate is on the same local network). Don't forget to create a firewall rule for port 22 in the "Input" chain.
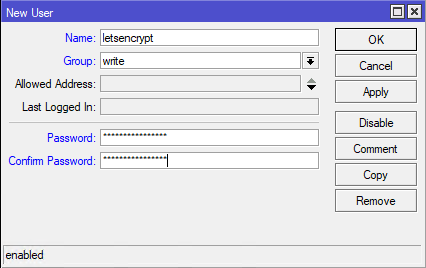
Then create an user under System > Users > Users. Mine is called "letsencrypt", has full privileges and a long password we will only use once. (write group did not work in my scenario because it lacks "change configuration" permission, just add this permission to a group)
From our Web Server, we then need to create an SSH RSA certificate so we can login to our Mikrotik server remotely using the user we just created, to create and upload this key to our Mikrotik (which has IP 192.168.0.1)
ssh-keygen -f /opt/letsencrypt-mikrotik-cert/id_rsa_letsencrypt -N ""
scp /opt/letsencrypt-mikrotik-cert/id_rsa_letsencrypt.pub letsencrypt@192.168.0.1:id_rsa_letsencrypt.pub
And import the newly uploaded certificate in Mikrotik, under System > Users > SSH Keys. You can now safely delete the certificate we uploaded previously in the "Files"

After that you should be able to login without password to your server:
ssh letsencrypt@192.168.0.1 -i /opt/letsencrypt-mikrotik-cert/id_rsa_letsencryptOn a Kubernetes, the SSH key needs to be stored as a secret to be mounted inside the container:
kubectl -n mtk-certificate create secret generic user-ssh-key --from-file=id_rsa_letsencrypt=/opt/letsencrypt-mikrotik-cert/id_rsa_letsencryptOnce its done, the file can be delete.
Start by editing the script and setup the 5 following variables accordong to your environment:
MIKROTIK_HOST=192.168.0.1
MIKROTIK_PORT=22
MIKROTIK_USER=letsencrypt
MIKROTIK_SSH_KEY=/opt/letsencrypt-mikrotik-cert/id_rsa_letsencrypt
LE_DOMAIN=www.mydomain.com (this is the first domain listed in your certificate creation command)
On Kubernetes environment, change the configmap section of deployment.yaml, do not need to change the script. The section below isn't necessary.
Make the script executable and run it:
chmod +x letsencrypt-mikrotik-cert.sh
./letsencrypt-mikrotik-cert.sh
That's pretty much it, you should be able to access your router wia a secure conenction on https://mikrotik.mydomain.com/
Let's Encrypt certificates are valid only for 90 days and need to be renewed regularly. Continuing with our Web Server, we can simply create a cron job that renews the certificate, restarts Apache and uploads the new certo to Mikrotik
crontab -e
0 0,12 * * * /usr/bin/python3 -c 'import random; import time; time.sleep(random.random() * 3600)' && /usr/local/bin/certbot renew --post-hook 'systemctl reload httpd; /opt/letsencrypt-mikrotik-cert/letsencrypt-mikrotik-cert.sh' > /dev/null 2>&1
On a Kubernetes environment this is done through deployment.yaml, no need to alter cronjob.
For multiple Mikrotik units, duplicate the container spec and configmap sections of the deployment.yaml. This will create multiple jobs with different configurations. If possible, use the same SSH key and username for simplicity, although it can be all different.
That's all there is to it