Use Deep Learning to Clone Driving Behavior by building a convolution neural network in Keras that predicts steering angles from images, and is trained, validated and tested with the appropriate data sets. In the end the trained model should be able to drive the simulation around track one (optionally track two). The work is reported in this README.
The following checklist needs to be implemented in order for the project to succeed.
-
1. The submission includes a
model.pyfile,drive.py,model.h5a writeup report (README.md) andvideo.mp4. -
2. The model provided can be used to successfully operate the simulation.
-
3. The code in
model.pyuses a Python generator, if needed, to generate data for training rather than storing the training data in memory. Themodel.pycode is clearly organized and comments are included where needed.
- 1. The neural network uses convolution layers with appropriate filter sizes. Layers exist to introduce nonlinearity into the model. The data is normalized in the model.
- 2. Train/validation/test splits have been used, and the model uses dropout layers or other methods to reduce overfitting.
- 3. Learning rate parameters are chosen with explanation, or an Adam optimizer is used.
- 4. Training data has been chosen to induce the desired behavior in the simulation (i.e. keeping the car on the track).
- 1. The
READMEthoroughly discusses the approach taken for deriving and designing a model architecture fit for solving the given problem. - 2. The
READMEprovides sufficient details of the characteristics and qualities of the architecture, such as the type of model used, the number of layers, the size of each layer. Visualizations emphasizing particular qualities of the architecture are encouraged. Here is one such tool for visualization. - 3. The
READMEdescribes how the model was trained and what the characteristics of the dataset are. Information such as how the dataset was generated and examples of images from the dataset must be included.
- No tire may leave the drivable portion of the track surface. The car may not pop up onto ledges or roll over any surfaces that would otherwise be considered unsafe (if humans were in the vehicle).
- The simulator contains two tracks. To meet specifications, the car must successfully drive around track one. Track two is more difficult. See if you can get the car to stay on the road for track two as well.
Two clones of the project should exist, one in the Udacity workspace and the other on a local machine which both point to the main repository. Collection of training data was done on a local MacBook Pro (2013) and training of the model is done on the GPU enabled workspace. Other tasks which do not require a GPU, such as major coding tasks, documenting, graphing and the writeup were done locally as to not waste GPU time.
Collection of data is done via a simulator, one needs to drive the car around the track using several driving tactics while recording. This data then has been uploaded as a compressed zip file to the GPU enabled workspace. On the workspace, this file can been unpacked in the /opt directory. When the compressed zip file is not to big in size (> 300mb) it is advised to upload it to the workspace directory to then unpack it with unzip <samples_file>.zip -d /opt/ this removes the need of having to upload the samples each time when the workspace is restarted.
Each newly trained model is saved as ./models/model.h5and as to not overwrite older models the previous files are backed up with their modification timestamp in the file name e.g model_1607426211.5h. With big models that have many parameters, this can lead to getting out of disk space thus it is advised to not store a great number of backups and keep the important models in some other storage such as e.g Dropbox or Google Drive.
Versions used:
$ python --version
Python 3.6.3
$ python -c "import keras; print(keras.__version__)"
2.0.9
$ python -c "import tensorflow; print(tensorflow.__version__)"
1.3.0
$ pip install pydot # Needs to be installed (v 1.4.1) for plotting certain graphs with keras.My project includes the following required files:
./src/model.pycontaining the script to create and train the model./tools/drive.pyfor driving the car in autonomous mode (unmodified)- model04 stored on Dropbox containing a trained convolution neural network trained with the final setup.
README.mdsummarizing the results (this is what you are reading right now)./assets/video.mp4showcasing the simulation conquer track one, counter-clockwise.
The major structure of my project files summarized:
.
├── .gitignore 						# configured as to not upload huge amount of unnecessary data
├── LICENSE
├── Makefile							# helper targets for the make utility
├── assets								# contains trained models
│   ├── plots							# plots of training results
│   └── cameras						# camera img examples for writeup
├── data									# this is not committed to this repo but compressed and uploaded to /opt
│   ├── IMG								# camera images
│   └── driving_log.csv		# sensor log
├── models								# contains trained models temporarily before moving to e.g Dropbox
│   └── .gitkeep
├── src										# Code to train and create models
│   ├── augmentation.py
│   ├── data.py
│   ├── plotter.py
│   ├── predict.py
│   └── model.py
└── tools									# the original provided tools for simulation and recording
    ├── drive.py
└── video.pyUsing the Udacity provided simulator in an appropriate workspace and the ./tools/drive.py file, the car can be driven autonomously around the track by executing
$ python drive.py model.h5or
$ make simulationThe car in the simulator will then start driving and attempt to navigate around the track without leaving the road.
If no model.h5 file is available it can be either generated anew by running
$ python ./src/model.pyor by downloading from the provided DropBox link above.
$ make trainingThis may take several minutes on a GPU enabled workspace.
If training fails, due to not being able to find the samples in /opt folder then these need to be uploaded to the workspace and unzipped first.
The ./scr/model.py file contains the code for training and saving the convolution neural network. The file shows the pipeline used for training and validating the model and it contains comments to explain how the code works. Secondary functionality such as loading data, saving the models and generating test data has been split up into independent files and imported into ./scr/model.py accordingly. These files are also extensively commented and documented, here a quick rundown on the auxiliary files:
./src/augmentation.py- contains a custom Sequence to augment sample data./src/data.py- source for handling file system operations to store plots and models./src/model.py- as described above./src/plotter.py-utilities for plotting training and architecture graphs./src/predict.py- utility to inspect predictions
My final model consists of several convolution layers with 5x5 and 3x3 filter sizes all having the same depth of 32. Which are connected to several Fully Connected layers through a Flatten layer.
The model includes softsign activation functions to introduce nonlinearity and the input data is normalized and preprocessed in the model using a Keras lambda layer. See ./src/model.py for details.
The model contains dropout layers between each Fully Connected layer in order to reduce overfitting and was trained with 70% of the sample data and validated with the remaining 30% fo the data through randomized batch sets to. The model was tested by running it through the simulator and ensuring that the vehicle could stay on the track.
The model uses the Adam optimizer, in which the learning rate does not need to be tuned manually and this optimizer will start learning with a rate of 0.001. Hyperparameters and additional information about the resulting network is covered in the Final Model Architecture section.
The training data consists solely of samples taken during three uninterrupted laps on track one. Each sample is expanded by using all three images with steering angle corrected for each left and right camera based on the original angle. Improving generalisation of the model was done by once more extending sample size by generation of horizontally flipped images of the left and right camera and the steering angle.
For details about how I created the training data, see the next section.
The overall strategy for deriving a model architecture was to incrementally build, train and validate a model and subsequently test the model with the simulator whenever there was significant improvement in driving behaviour. Looking at the accuracy of both training and validation has no real value in this case as we are not solving a classification problem.
The first step was to create a basic project setup for loading the sample data, preparing and preprocessing the data and then train a simple network which only consisted of only a few layers.
# ... omitted
model = Sequential()
# Preprocess
model.add(Lambda(lambda x: x/127.5 - 1.,
                 input_shape=input_shape, output_shape=input_shape))
# Layers
model.add(Flatten())
model.add(Dense(1))
model.compile(loss='mse', optimizer='adam')
# ... omitted
The produced model can be found under repository tag model01 as well ass the accompanying source code. The model did not do well in the simulator, after about 10 seconds the car drove of track into the woods and the model was driving very unsure, steering all over the place however, while building this simple network we created a project structure and tooling to support further research.
Secondly, a LeNet like network was build and trained with the original data. This model was conciderable more certain in steering and drove more stable for about 20 seconds. It started aiming for the red and white borders and got stuck on the right side 'concrete' ledge. Not a success either.
Before trying out a new neural network model, additional data was pulled into the training data in the form of the left and right camera feeds and their adjusted steering angles. Training on this data, which was tripled in size, did not reduce loss (around 1.1055 mostly) and thus a dropout layer was added between each dense layer, each with a dropout rate of 0.5, to reduce overfitting. The training result output can be seen below.
112/112 [==============================] - 50s 443ms/step - loss: 0.0538 - val_loss: 0.0036
Epoch 2/10
112/112 [==============================] - 46s 414ms/step - loss: 0.0065 - val_loss: 0.0027
Epoch 3/10
112/112 [==============================] - 46s 412ms/step - loss: 0.0049 - val_loss: 0.0028
Epoch 4/10
112/112 [==============================] - 46s 412ms/step - loss: 0.0041 - val_loss: 0.0024
Epoch 5/10
112/112 [==============================] - 46s 412ms/step - loss: 0.0039 - val_loss: 0.0023
Epoch 6/10
112/112 [==============================] - 46s 413ms/step - loss: 0.0035 - val_loss: 0.0022
Epoch 7/10
112/112 [==============================] - 46s 412ms/step - loss: 0.0032 - val_loss: 0.0021
Epoch 8/10
112/112 [==============================] - 46s 413ms/step - loss: 0.0033 - val_loss: 0.0024
Epoch 9/10
112/112 [==============================] - 46s 412ms/step - loss: 0.0029 - val_loss: 0.0022
Epoch 10/10
112/112 [==============================] - 46s 412ms/step - loss: 0.0027 - val_loss: 0.0022
These look like good training results but again the simulator just drove on center for a while to then start tracking the road along the outside of the left bank. One more step to the data processing was added to crop the images such that the horizon above the road surface and the hood of the car were cropped from each image. The results of the training were similar to the training applied above, however the simulator still ran off track pretty soon.
Epoch 1/10
112/112 [==============================] - 35s 310ms/step - loss: 0.0404 - val_loss: 0.0113
Epoch 2/10
112/112 [==============================] - 30s 267ms/step - loss: 0.0129 - val_loss: 0.0097
Epoch 3/10
112/112 [==============================] - 30s 268ms/step - loss: 0.0113 - val_loss: 0.0087
Epoch 4/10
112/112 [==============================] - 30s 268ms/step - loss: 0.0103 - val_loss: 0.0086
Epoch 5/10
112/112 [==============================] - 30s 268ms/step - loss: 0.0098 - val_loss: 0.0081
Epoch 6/10
112/112 [==============================] - 30s 267ms/step - loss: 0.0091 - val_loss: 0.0078
Epoch 7/10
112/112 [==============================] - 30s 268ms/step - loss: 0.0087 - val_loss: 0.0078
Epoch 8/10
112/112 [==============================] - 30s 270ms/step - loss: 0.0084 - val_loss: 0.0079
Epoch 9/10
112/112 [==============================] - 30s 270ms/step - loss: 0.0082 - val_loss: 0.0074
Epoch 10/10
112/112 [==============================] - 30s 270ms/step - loss: 0.0079 - val_loss: 0.0075
These previous results made me start to inspect the data more closely. Predictions (steering angles) were inspected for the outputs for center, left and right images, the results are were as follows
# Center cam
CENTER:  [0.32672474]
LEFT:      [0.20746137]
RIGHT:     [0.35259765]

# Left cam
CENTER:  [0.09711259]
LEFT:      [-0.06863123]
RIGHT:     [0.09685086]

# Right cam
CENTER:  [0.2572524]
LEFT:      [0.22326781]
RIGHT:     [0.20886575]
Which look ok at a first glance. Next I created a plot of the training data to better visualize the training performance. The output below also depicts accuracies during the training but these values can be discarded as they have no real value in checking the performance of this particular model.
Epoch 1/10
25/25 [==============================] - 42s 2s/step - loss: 0.1602 - acc: 0.0112 - val_loss: 0.0295 - val_acc: 0.0139
Epoch 2/10
25/25 [==============================] - 31s 1s/step - loss: 0.0308 - acc: 0.0138 - val_loss: 0.0239 - val_acc: 0.0139
Epoch 3/10
25/25 [==============================] - 34s 1s/step - loss: 0.0256 - acc: 0.0138 - val_loss: 0.0224 - val_acc: 0.0139
Epoch 4/10
25/25 [==============================] - 33s 1s/step - loss: 0.0239 - acc: 0.0138 - val_loss: 0.0201 - val_acc: 0.0139
Epoch 5/10
25/25 [==============================] - 33s 1s/step - loss: 0.0216 - acc: 0.0138 - val_loss: 0.0190 - val_acc: 0.0139
Epoch 6/10
25/25 [==============================] - 32s 1s/step - loss: 0.0204 - acc: 0.0138 - val_loss: 0.0186 - val_acc: 0.0139
Epoch 7/10
25/25 [==============================] - 33s 1s/step - loss: 0.0203 - acc: 0.0138 - val_loss: 0.0181 - val_acc: 0.0139
Epoch 8/10
25/25 [==============================] - 32s 1s/step - loss: 0.0195 - acc: 0.0138 - val_loss: 0.0189 - val_acc: 0.0139
Epoch 9/10
25/25 [==============================] - 32s 1s/step - loss: 0.0189 - acc: 0.0138 - val_loss: 0.0175 - val_acc: 0.0139
Epoch 10/10
25/25 [==============================] - 32s 1s/step - loss: 0.0183 - acc: 0.0138 - val_loss: 0.0176 - val_acc: 0.0139
The plot of these values can be found from figure 1 below. As mentioned accuracy is not a good metric in a non-classification problem as we try to solve here, thus these values can be discarded.
| Figure 1. Loss and Accuracy plotted over epochs for LeNet based model |
|---|
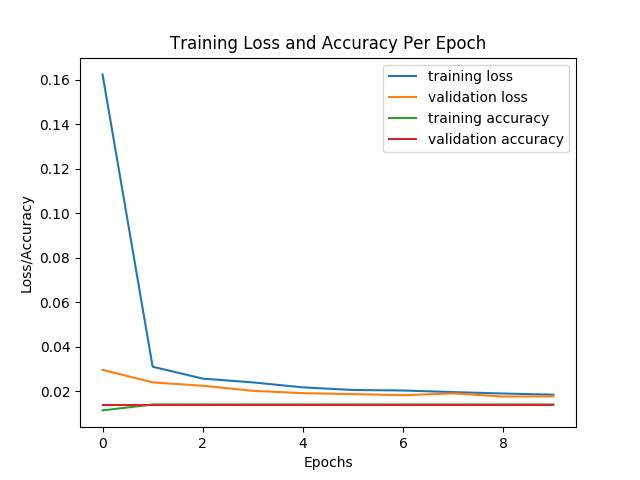 |
Training loss goes down very steep while the validation loss stays approximately the same. It does not look like a great learning curve.
The produced model can be found under epository tag model02 as well as the accompanying source code.
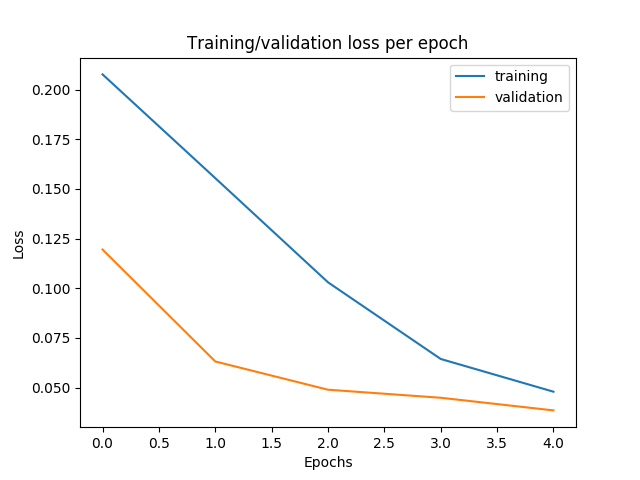
As an experiment I removed most pooling layers, added one dropout with low rate (0.1) between the convolutional layers, and together with changes to the batch size (32) and steering angle correction (0.3) the loss went down each epoch. Result was that loss was kept relatively high this kept the smiulator from aiming for the sides of the road, of course quality of sampling has to do with this as well. However the car now was able to drive till just after the bridge in the first track. The epochs are numbered off by one in this plot but the learning curves look much better now.
| Fig 2. Training and validation Loss, model 03 |
|---|
 |
For this model, I started focussing on the proper handling of sample data. There was already a generator in place to do more efficient handling but according to the keras docs: Sequence [keras.utils.Sequence()] are a safer way to do multiprocessing. This structure guarantees that the network will only train once on each sample per epoch which is not the case with generators. Therefore I wrote a custom batch handling class based on keras.utils.Sequence, named CustomDataGenerator
Also, to be able to let the model generalize better, we need to think about augmenting the data. The CustomDataGenerator's __create_batch method was refactored to include generation of flipped verisons of both left and right camera images (and their adjusted labels). This made the size of each sample approximately five times bigger, which we need to keep in mind when we try to handle batches effeciently memory wise to avoid Out Of Memory (OOM) errors. Augmenting the samples by adding flipped left and right images, improved the driving experience somewhat in length as it went trough the bend after the bridge, albeit with some near death experiences for the virtual driver, the success ended in the lake in the second right bend after the bridge.
By now I also experimented so much that one thing I noticed is that when the loss is kept around ~0.050 to ~0.040 in this particular model the car manages to follow the track for the longest periods without changing current hyperparams.
Last, the model.h5 files saved for previous models became bigger and bigger in file size (~1Gb) because no scaling down was happening between convolutional layers apart from one dropout layer with a very low 0.1 dropout rate and a MaxPool. Model 3 architecture wasn changed to include an AveragePooling2D layer between all Convolutional layers instead to create model 4. The driving behaviour did not improve after these changes so I opted to add an extra Fully Connected layer with dimension 50 right before the output layer. Together with changes to dropout (0.7), epochs (10), batches (64) I finally got the simulator do at least one round on track 1!
The raw output of the training and a plot of the same data is shown below.
Epoch 1/10
49/49 [==============================] - 57s 1s/step - loss: 0.2567 - val_loss: 0.1330
Epoch 2/10
49/49 [==============================] - 53s 1s/step - loss: 0.2184 - val_loss: 0.1126
Epoch 3/10
49/49 [==============================] - 53s 1s/step - loss: 0.1847 - val_loss: 0.0946
Epoch 4/10
49/49 [==============================] - 53s 1s/step - loss: 0.1432 - val_loss: 0.0775
Epoch 5/10
49/49 [==============================] - 53s 1s/step - loss: 0.1083 - val_loss: 0.0665
Epoch 6/10
49/49 [==============================] - 52s 1s/step - loss: 0.0785 - val_loss: 0.0575
Epoch 7/10
49/49 [==============================] - 52s 1s/step - loss: 0.0644 - val_loss: 0.0526
Epoch 8/10
49/49 [==============================] - 53s 1s/step - loss: 0.0566 - val_loss: 0.0500
Epoch 9/10
49/49 [==============================] - 53s 1s/step - loss: 0.0524 - val_loss: 0.0458
Epoch 10/10
49/49 [==============================] - 52s 1s/step - loss: 0.0485 - val_loss: 0.0463
The plot in figure 3 shows both training and validation losses smoothly converging towards the tenth epoch.
| Figure 3. Loss plotted over epochs for model 04. |
|---|
 |
At the end of this process, the vehicle is able to drive autonomously around track one without leaving the road.
The final model architecture consisted of a convolution neural network with the following layers and layer sizes:
Layer (type)                 Output Shape              Param #
=================================================================
cropping2d_1 (Cropping2D)    (None, 90, 320, 3)        0
_________________________________________________________________
lambda_1 (Lambda)            (None, 90, 320, 3)        0
_________________________________________________________________
conv2d_1 (Conv2D)            (None, 86, 316, 32)       2432
_________________________________________________________________
average_pooling2d_1 (Average (None, 43, 158, 32)       0
_________________________________________________________________
conv2d_2 (Conv2D)            (None, 39, 154, 32)       25632
_________________________________________________________________
average_pooling2d_2 (Average (None, 19, 77, 32)        0
_________________________________________________________________
conv2d_3 (Conv2D)            (None, 17, 75, 32)        9248
_________________________________________________________________
flatten_1 (Flatten)          (None, 40800)             0
_________________________________________________________________
dense_1 (Dense)              (None, 512)               20890112
_________________________________________________________________
dropout_1 (Dropout)          (None, 512)               0
_________________________________________________________________
dense_2 (Dense)              (None, 256)               131328
_________________________________________________________________
dropout_2 (Dropout)          (None, 256)               0
_________________________________________________________________
dense_3 (Dense)              (None, 50)                12850
_________________________________________________________________
dropout_3 (Dropout)          (None, 50)                0
_________________________________________________________________
dense_4 (Dense)              (None, 1)                 51
=================================================================
Total params: 21,071,653
Trainable params: 21,071,653
Non-trainable params: 0
Here is a visualization of the architecture created with Keras' plotting utilities
The video of one round on track 1, counter-clockwise, can be found from the assets folder. The activation function used for all the layers was softsign as the output is a smooth curve between -1 and 1 which matches the desired steering angle output. With a batch size of 64 the model behaved the best, more was not possible due to OOM (Out Of Memory) errors. The dropout of 0.7 was sufficient to keep the model from overfitting. Around epoch 10 we got a desired loss of around 0.050 which seemed to keep the car in line. An Adam optimizer was chosen as this automatically keeps the learning rate in check.
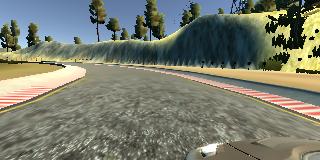
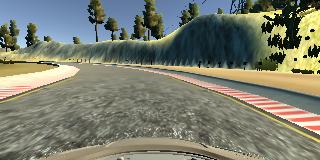
To capture good driving behavior, I first recorded approximately three counter-clockwise laps on track one using center lane driving, as good as my driving skills and simulator lag let me. Here are example image captures of center lane driving where left, right and center are images from the same moment in time (2020-12-08 at 10:46:19.361 CET) from each camera. The position is where the simulator drops the car at the start.
| Left Camera | Center Camera | Right Camera |
|---|---|---|
 |
 |
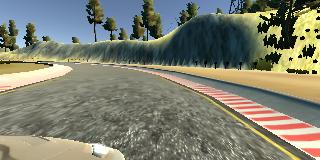 |
This resulted in a total of 13443 images, 4481 images per camera. The capturing rate in my environment seemed to be around 15 images per second. This means we have 4481/15/60, aproximately 5 minutes of driving. These images we then normalized and preprocessed during the fitting operations, by flipping the left and rigth images and their steering angles. This was enough to train the model for driving at least one full round counter-clockwise on track one.
Testing the model 04 by reversing direction and starting the simulator showed that the model was not generalised enough to drive in the reverse direction. I then recorded one lap driving clock-wise on track one and merged these externally with the help of the command line and bundled them in one zip file to be able to upload them easily to the workspace
# Example: appending two plain csv files
$ cat ~/<collection_one>/data/driving_log.csv >> ~/<all>/data/driving_log.csv
$ cat ~/<collection_two>/data/driving_log.csv >> ~/<all>/data/driving_log.csv

# Example: Syncing all images
rsync -a ~/<collection_one>/data/IMG/ ~<all>/data/IMG/ --ignore-existing
rsync -a ~/<collection_two>/data/IMG/ ~<all>/data/IMG/ --ignore-existing

# Exampe: Compressing all
This works as each sample is logged in the csv on different rows and each image has a unique timestamp.
The result is a total of 6089 samples and three times as much (18267) images which we then used to retrain model 04 with the same preprocessing. Note that the first set was sampled by driving by mouse and the second with the keyboard. Unfortunately training on this dat worsened the driving behaviour of model 04.
This project is challenging and resource intensive as a lot of data inspection, by plotting, and training experiments need to be done. To reduce usage of valueable GPU time it is best to modularize and test that code that can easily be run on a CPU before starting to train. It was very challenging to do the proper sampling as the simulator was very unresponsive on both workspace and local developer machine. Nevertheless one model was trained to drive counter-clockwise for at least one round.
- https://github.com/udacity/CarND-Behavioral-Cloning-P3
- https://github.com/udacity/CarND-Term1-Starter-Kit
- http://images.nvidia.com/content/tegra/automotive/images/2016/solutions/pdf/end-to-end-dl-using-px.pdf
- https://developer.nvidia.com/blog/deep-learning-self-driving-cars/ (web version of above)
- https://stanford.edu/~shervine/blog/keras-how-to-generate-data-on-the-fly Custom Data Generator example based on https://keras.io/api/utils/python_utils/#sequence-class
- https://keras.io/guides/
- https://keras.io/api/utils/
- https://keras.io/api/utils/python_utils/#sequence-class
