Example project showing how to build a scalable microservice architecture using Spring Boot & RabbitMQ
We´re using RabbitMQ Docker image here. So if you fire it up with docker-compose up -d, you can easily login to the management gui at http://localhost:15672 using guest & guest as credentials.
Although we could also use docker-compose.yml right here in the weatherbackend test classes, this could lead to errors - because testcontainers would also try to spin up a weatherbackend Docker container, which we don´t have at build time of the weatherbackend itself (cause the Spring Boot jar isn´t ready right then).
But there´s something like the org.testcontainers.containers.GenericContainer we can use to spin up a RabbitMQ without a docker-compose.yml. Just have a look into the test class SendAndReceiveTest:
...
import org.junit.ClassRule;
import org.junit.Rule;
...
import org.junit.runner.RunWith;
import org.springframework.beans.factory.annotation.Autowired;
import org.springframework.boot.test.context.SpringBootTest;
import org.springframework.boot.test.util.TestPropertyValues;
import org.springframework.context.ApplicationContextInitializer;
import org.springframework.context.ConfigurableApplicationContext;
import org.springframework.test.context.ContextConfiguration;
import org.springframework.test.context.junit4.SpringRunner;
import org.testcontainers.containers.GenericContainer;
import org.testcontainers.containers.wait.strategy.Wait;
...

@RunWith(SpringRunner.class)
@SpringBootTest(classes = WeatherBackendApplication.class)
@ContextConfiguration(initializers = {SendAndReceiveTest.Initializer.class})
public class SendAndReceiveTest {

    static class Initializer implements ApplicationContextInitializer<ConfigurableApplicationContext> {

        @Override
        public void initialize(ConfigurableApplicationContext configurableApplicationContext) {

            TestPropertyValues.of(
                    "spring.rabbitmq.host=" + rabbitMq.getContainerIpAddress(),
                    "spring.rabbitmq.port=" + rabbitMq.getMappedPort(5672))
                    .applyTo(configurableApplicationContext.getEnvironment());
        }
    }

    @ClassRule
    public static GenericContainer rabbitMq = new GenericContainer("rabbitmq:management")
            .withExposedPorts(5672)
            .waitingFor(Wait.forListeningPort());
As Testcontainers doesn´t guarantee that the RabbitMQ container is reachable under the host name localhost (see testcontainers/testcontainers-java#669 (comment)) and therefore the test execution leads to ConnectionRefused Exceptions from the Spring Boot Autoconfiguraiton trying to reach RabbitMQ on this host, we need to go a different path.
But since we need to configure the RabbitMQ host url and port in the early stage of SpringBootTest initialization, we need the help of a org.springframework.context.ConfigurableApplicationContext to dynamically set our spring.rabbitmq.host property. Togehter with TestPropertyValues this could be done easily as seen in the code.
At the weatherservice we´re also using testcontainers to fully instanciate every microservice needed to test the whole interaction with RabbitMQ:
Therefore the sequence of module build inside our pom.xml here is crucial:
	<modules>
		<module>weathermodel</module>
		<module>weatherbackend</module>
		<module>weatherservice</module>
	</modules>
First the shared domain & event classes are packaged into a .jar file, so that every service is able to use it.
Then the weatherbackend is build and tested - which does everything in the context of one microservice.
The final weatherservice build then uses the successful build output of the weatherbackend inside the corresponding Dockerfile:
...
# Add Spring Boot app.jar to Container
ADD "target/weatherbackend-0.0.1-SNAPSHOT.jar" app.jar
...
Now the service definition inside the docker-compose.yml again uses that Dockerfile to spin up a microservice Docker container containing the weatherbackend:
version: '3.7'

services:

 rabbitmq:
  image: rabbitmq:management
  ports:
    - "5672:5672"
    - "15672:15672"
  tty:
    true

 weatherbackend:
  build: ./weatherbackend
  ports:
    - "8090"
  environment:
    - "SPRING.RABBITMQ.HOST=rabbitmq"
  tty:
    true
  restart:
    unless-stopped
Note the definition of the environment variable spring.rabbitmq.host, since the RabbitMQ containers´ host inside the weatherbackend´s Docker Container isn´t localhost but instead Docker DNS style rabbitmq!
The Test class WeatherServiceSendAndReceiveTest uses org.testcontainers.containers.DockerComposeContainer to leverage to real docker-compose.yml:
package de.jonashackt;

import com.fasterxml.jackson.core.JsonProcessingException;
import de.jonashackt.messaging.MessageSender;
import org.junit.ClassRule;
import org.junit.Rule;
import org.junit.Test;
import org.junit.contrib.java.lang.system.SystemOutRule;
import org.junit.runner.RunWith;
import org.springframework.beans.factory.annotation.Autowired;
import org.springframework.boot.test.context.SpringBootTest;
import org.springframework.test.context.junit4.SpringRunner;
import org.testcontainers.containers.DockerComposeContainer;
import org.testcontainers.containers.wait.strategy.Wait;

import java.io.File;

import static de.jonashackt.common.ModelUtil.exampleEventGetOutlook;
import static de.jonashackt.messaging.Queues.QUEUE_WEATHER_BACKEND;
import static org.hamcrest.Matchers.containsString;
import static org.junit.Assert.assertThat;

@RunWith(SpringRunner.class)
@SpringBootTest(classes = WeatherServiceApplication.class)
public class WeatherServiceSendAndReceiveTest {

    @ClassRule
    public static DockerComposeContainer services =
            new DockerComposeContainer(new File("../docker-compose.yml"))
                    .withExposedService("rabbitmq", 5672, Wait.forListeningPort())
                    .withExposedService("weatherbackend", 8090, Wait.forListeningPort());

    @Rule
    public final SystemOutRule systemOutRule = new SystemOutRule().enableLog();

    @Autowired
    private MessageSender messageSender;

    @Test
    public void is_EventGetOutlook_send_and_EventGeneralOutlook_received() throws JsonProcessingException, InterruptedException {

        messageSender.sendMessage(QUEUE_WEATHER_BACKEND, exampleEventGetOutlook());

        Thread.sleep(5000); // We have to wait a bit here, since our Backend needs 3+ seconds to calculate the outlook

        assertThat(systemOutRule.getLog(), containsString("EventGeneralOutlook received in weatherservice."));
    }
}
To scale the weatherbackend Docker Containers, we can easily facilitate Docker Compose services scaling:
docker-compose up -d --scale weatherbackend=3
Now we have 3 weatherbackends, as the original architecture diagram suggests:
If we fire up our weatherservice now, we can send events that one of the weatherbackends will retrieve. But which is retrieving which event? We need to use log correlation like with the Elastic stack for that. The easiest way to do so, is to use https://github.com/jonashackt/docker-elk. Just clone this repo and do another docker-compose up -d.
To connect our microservices to the Elastic stack, there are multiple possibilties. An easy way is to use the logstash-logback-encoder and configure it via a logback-spring.xml inside the resources directory in each app:
<?xml version="1.0" encoding="UTF-8"?>
<configuration>
    <include resource="org/springframework/boot/logging/logback/base.xml"/>
    <logger name="org.springframework" level="WARN"/>
	<logger name="de.jonashackt" level="DEBUG"/>

    <!-- Logstash-Configuration -->
	<!-- For details see https://github.com/logstash/logstash-logback-encoder -->
	<appender name="logstash" class="net.logstash.logback.appender.LogstashTcpSocketAppender">
		<destination>localhost:5000</destination>
		<!-- encoder is required -->
	   <encoder class="net.logstash.logback.encoder.LogstashEncoder">
	   	<includeCallerData>true</includeCallerData>
	   	<customFields>{"service_name":"weatherservice"}</customFields>
	   	<fieldNames>
	   		<message>log-msg</message>
	   	</fieldNames>
	   </encoder>
	   <keepAliveDuration>5 minutes</keepAliveDuration>
	</appender>

	<root level="INFO">
	    <appender-ref ref="logstash" />
	</root>

</configuration>
Now with everything in place, fire a request to weatherservice with ``.
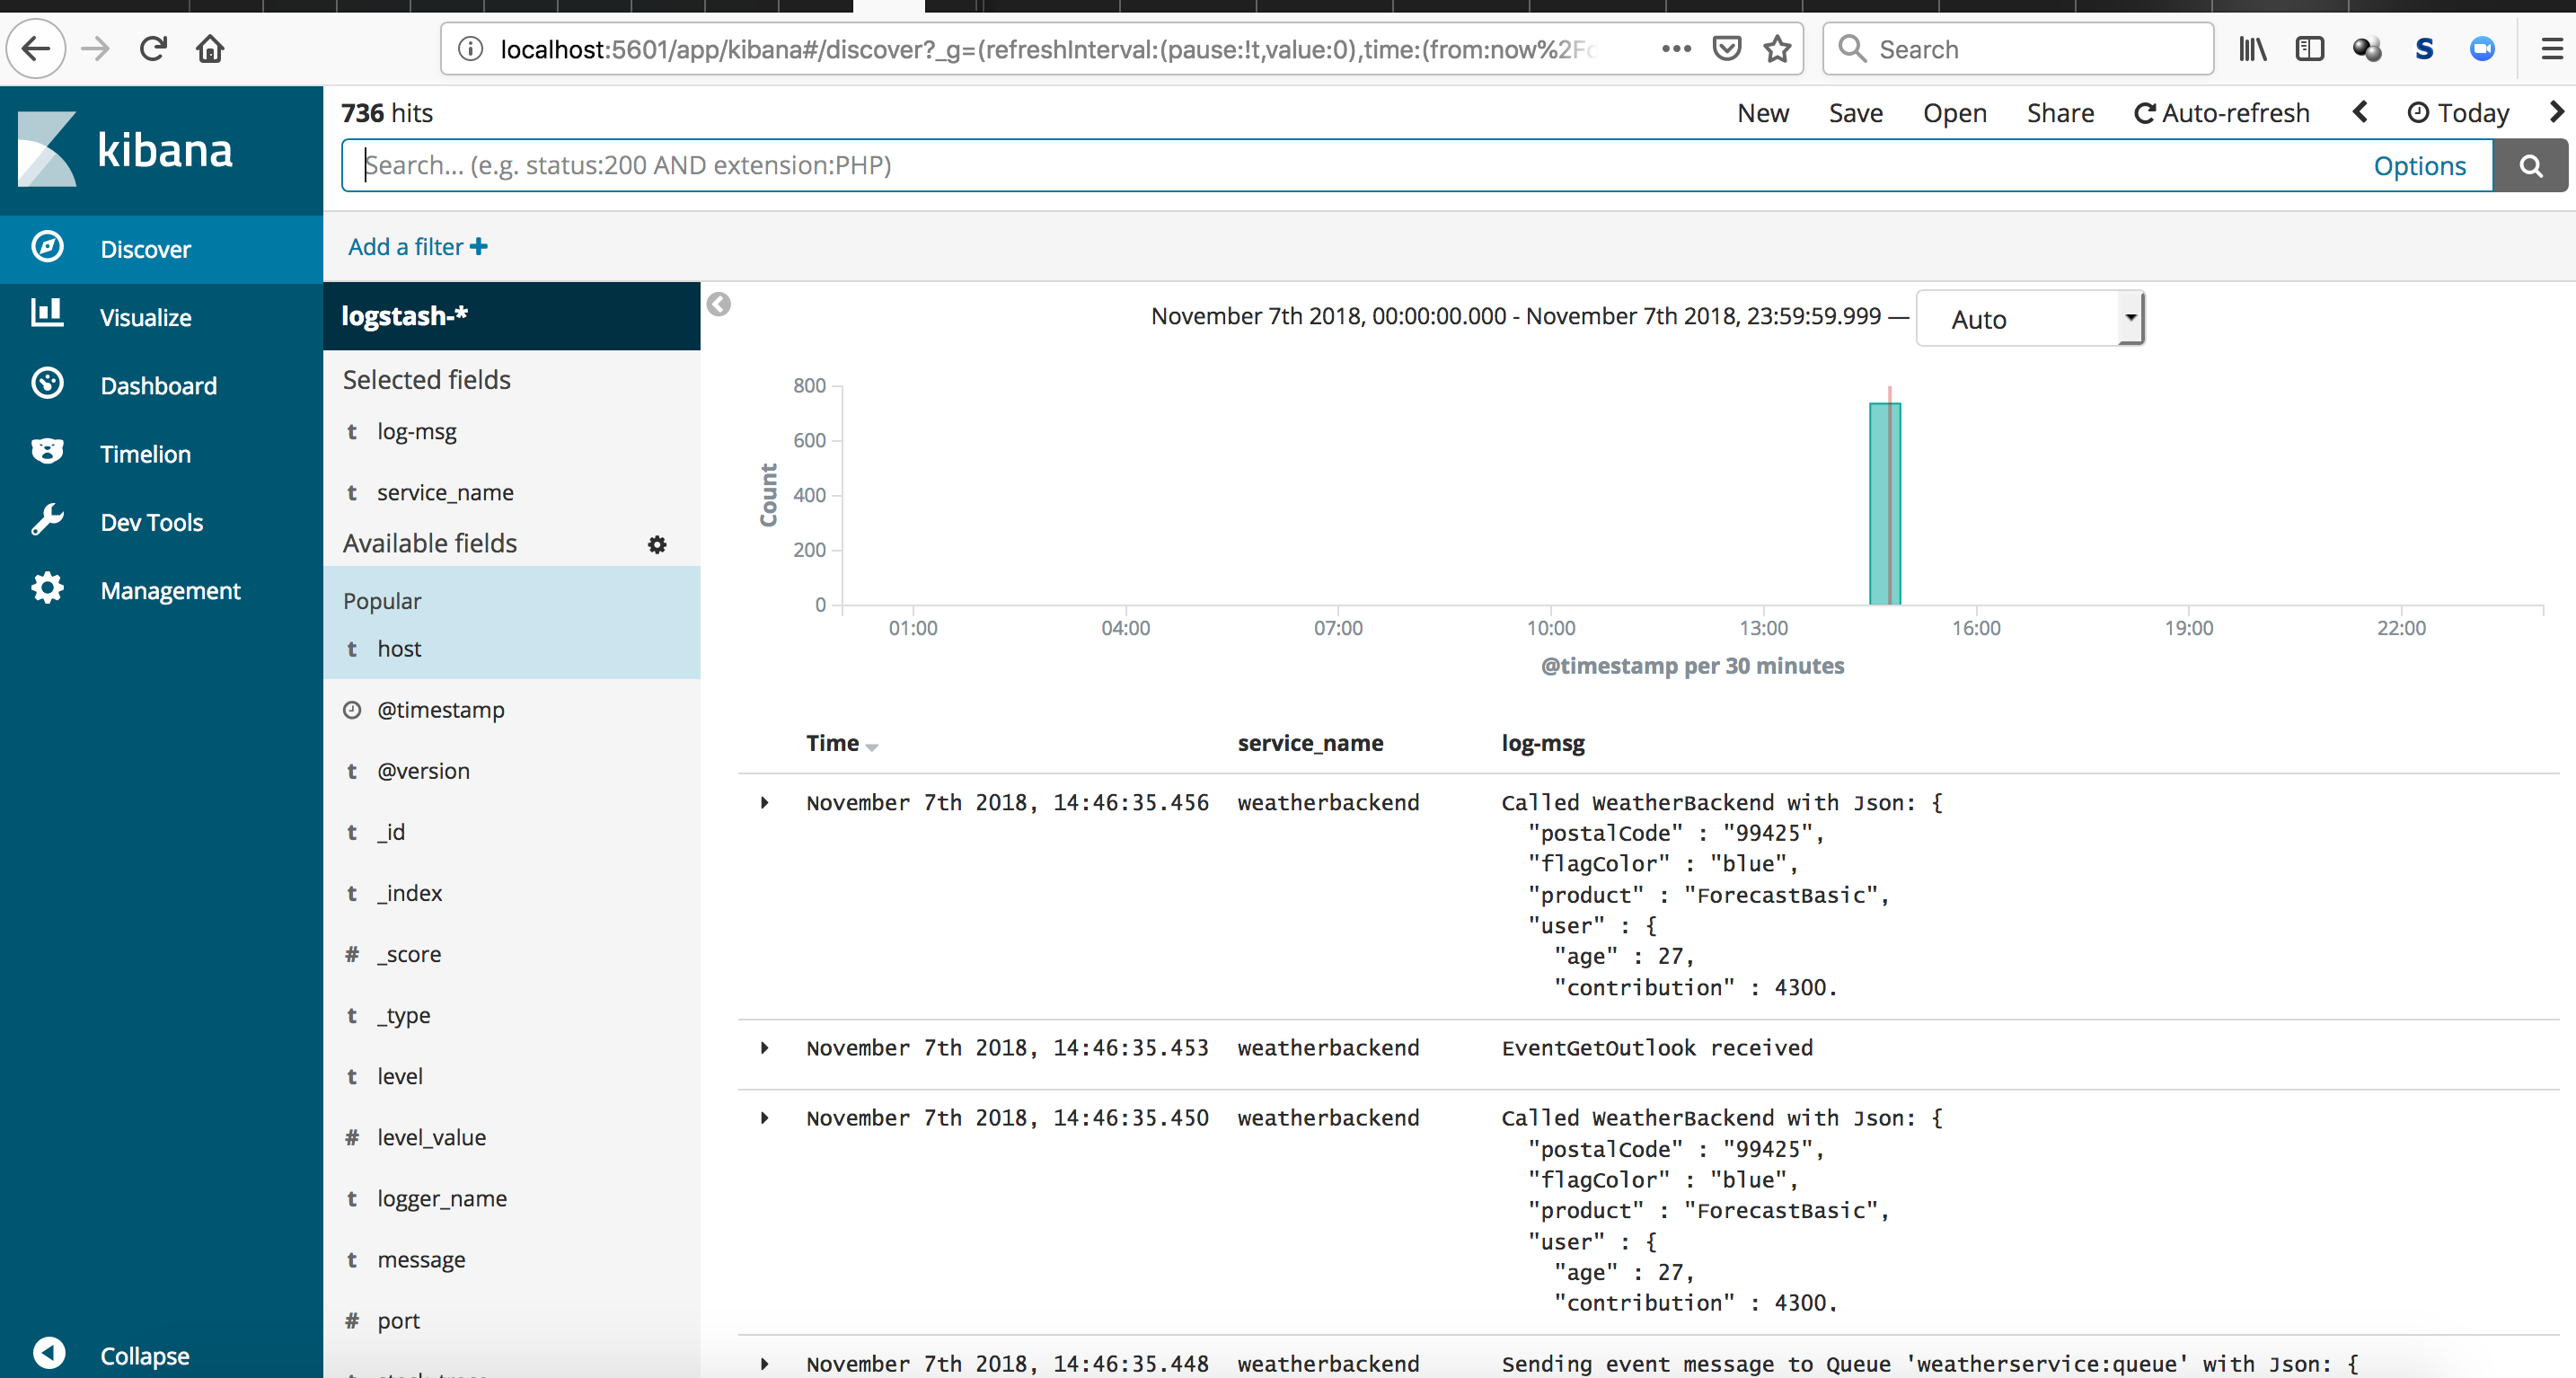
Open up Kibana after successful startup at http://localhost:5601/app/kibana and first create an index pattern after in Management/Index Patterns called: logstash-*. Then click Next step and choose @timestamp from the dropdown. Finally click Create index pattern. Then head over to Discover. Now fire up some events after starting weatherservice:
curl -v localhost:8095/event
# or 100 events like this
curl -v localhost:8095/events/100
Now we should see our services working:
Initialize local Swarm mode:
docker swarm init
Now deploy our application as Docker Stack
docker stack deploy --compose-file docker-stack.yml {{ application_stack_name }}
Should be easy right?! I tried: https://yuml.me/diagram/scruffy/class/samples and there´s also a nice editor:

