AC3.2 Stackview and Scrollview: Part I
Your best companions in Autolayout
Readings (Required)
Scroll View- Apple UIKit Catalog- Working with Scroll Views - Apple
- Understanding UIScrollView - Ole Begemann (just sections "Coordinate System", "Bounds" & "Frame)
- Scrolling Stack Views - Use Your Loaf
Reference (Optional)
Vocabulary
TODO
0. Objectives
TODO
1. Background
As the name would imply, a UIScrollview is a view that allows for scrolling: vertically, horizontally, or both. It also allows for zooming in and out of its content. It's nearly impossible to come across an app that doesn't make use of a scroll view or one of it's subclasses (ie. UITableView, UICollectionView, UITextView). And for good reason: space is extremely limited on an iPhone screen, so in order to be able to see content there needs to be a way to move through a view with dimensions larger than the screen.
Scroll views can be somewhat tricky to work with however, as they have one very important nuance to them regarding the interaction between a scrollview's frame, bounds and content. Ole Begemann's blog post explains this topic extremely well, and if you need I would suggest to refer to that blog's reading sections and animated gif.
From the "Working with Scroll Views" link, this section is of particular importance to keep in mind:
To support scroll views, the system interprets constraints differently, depending on where the constraints are located.
- Any constraints between the scroll view and objects outside the scroll view attach to the scroll view’s frame, just as with any other view.
- For constraints between the scroll view and its content, the behavior varies depending on the attributes being constrained:
- Constraints between the edges or margins of the scroll view and its content attach to the scroll view’s content area.
- Constraints between the height, width, or centers attach to the scroll view’s frame.
- You can also use constraints between the scroll view’s content and objects outside the scroll view to provide a fixed position for the scroll view’s content, making that content appear to float over the scroll view.
That excerpt will become more relevant as we work with scroll views since making sure that our contentSize is being set correctly will be one of the more difficult things faced with using scroll views. Interface builder simplifies this a bit, to its credit.
2. Simple Scrolling
- In
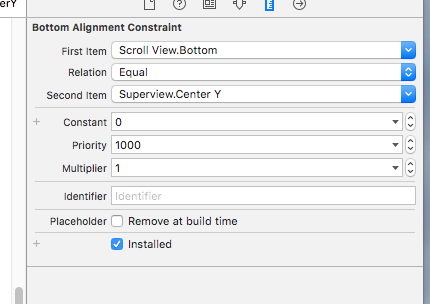
Main.storyboard, drag in aUIScrollViewonto theMainViewControllerprovided. Set it's constraints as: 0 pton the top, left, and right (do not constrain to margins).- Set the scroll view's
.bottomto be equal to the view's.centerY -
- Drag in 3
UIViews into the scroll view. For each view, set it's background color to something other than white (so we can visually identify them). After that, add the following constraints (you may want to have all three views selected for this): -
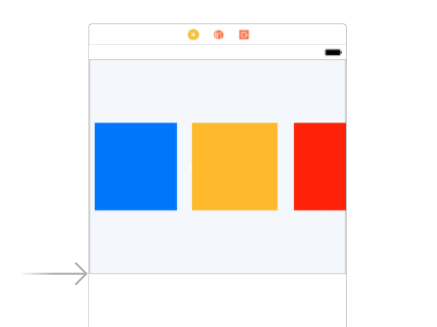
width&height:400 ptleading&trailing:20 pttop&bottom:100 pt- Then name each view based on it's background color.
- Note: For the demo, the left-to-right order of views are:
blueView,orangeView,redView -
- Run the project at this point and observe the scroll view's behavior


What exactly is going on? Note: You should be observing scrolling in both the x and y axis
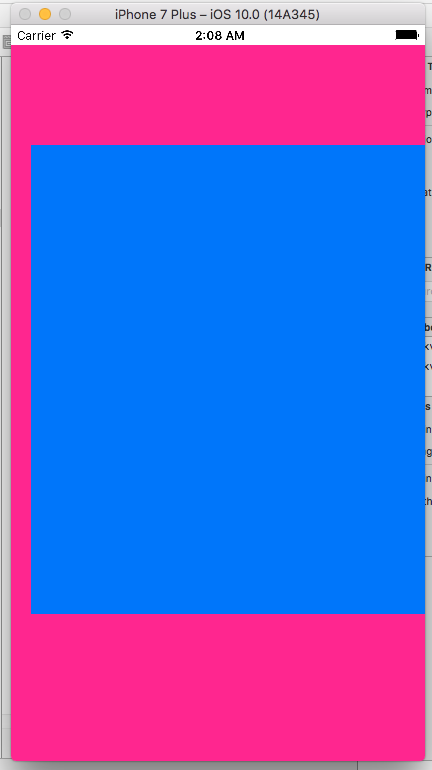
We defined the frame of the scroll view to be the top half of the screen (top, left, right margins pinned, bottom pinned to the view's centerY). Since we gave an unbroken chain of constraints to the UIViews inside of the scroll view, the scrollview is able to calculate it's contentSize based on that. Since the contentSize will exceed the size of the frame we gave it, it extends further in both the x and y axis. The result, is a scroll view that has both horizontal and vertical scrolling.
Debug and Discuss What would happen if we move the scroll view's bottom constraint to be equal to its superview's bottom constraint? Go ahead and make that change now.
- Add an outlet from the scroll view to the
MainViewControllernamedscrollView - Note that the background for the scroll view has been changed to a different color to better visualize it
-
- In
viewDidAppear, add the following and take note of the differences between the values when you run the project:

  override func viewDidAppear(_ animated: Bool) {
    super.viewDidAppear(animated)

    print("Content Size: \(self.scrollView.contentSize)")
    print("ScrollView Bounds: \(self.scrollView.bounds)")
    print("ScrollView Frame: \(self.scrollView.frame)")

    print("View Frame: \(self.view.frame)")
    print("View Bounds: \(self.view.bounds)")
}- Back in storyboard, remove the
heightconstraints of all three scroll view subviews. - You will now get an error about needing constraints for Y position or height.
- You may think of this as a mistake, after all you still have constraints to define the distance of the views to the top of the scrollview, the spacing between the views, the view widths, and the distance of the bottom of the views to the scroll view bottom which in turn is pinned to the bottom of it's view. Shouldn't the height of the views now just expand to accomodate the vertical set of constraints?
- This is where that excerpt from before starts to make sense:
- For constraints between the scroll view and its content, the behavior varies depending on the attributes being constrained: - Constraints between the edges or margins of the scroll view and its content attach to the scroll view’s content area. - Constraints between the height, width, or centers attach to the scroll view’s frame.
We defined our three view's top and bottom edges relative to the top and bottom edges of the scroll view, which then get attached to it's content area. The problem is that the content area has a CGSize of (0, 0), and it stays that way until it's content gives it a defined size!
In order to resolve, set the view's top/bottom margin relative to a view other than the scroll view. Since the only other view is the MainViewController's view, let use that.
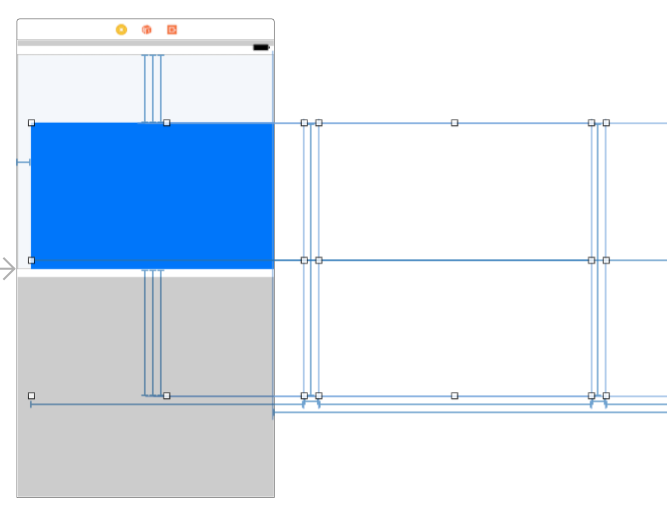
- Select left-most view in the scroll view's subviews (in my case
blueView), and CTRL+Drag toMainViewController's view, creating a vertical constraint to the top layout guide, and another one to it's bottom layout guide. This is all you should need. Rerun the project at this point.

Here's a breakdown of why this works:
- The
blueViewexplicitly sets it'sheightwhen you create the constraints relative toMainViewController.view's top and bottom layout guides - This is what creates the vertical unbroken chain of constraints needed
- The
blueViewalso has constraints relative to the scroll view (100ptmargins on top and bottom.) - Since the
blueViewexplicitly has its height now, the scroll view uses that value to determine theheightof itscontentSize: 5. (100pts to top +blueView.height+ 100pts to bottom) - Now that the
contentSize.heightis determined, the other two views (redView&orangeView) use that information to lay themselves out 7. Both those views end up with the same height asblueViewbecause it wasblueViewthat was used to determine thecontentSize.height. And sinceredViewandorangeViewhave the same top/bottom constraints relative to the scroll view's content area asblueView, they all end up the same.
Exercises 🏋️♂️ 🏋️♀️
1. Removing Explicit Constraints
Remove the explicit width constraints of all three subviews. Instead, add constraints to each view so that they are relative to the MainViewController.view. For an extra challenge, set only 1 of the view's width relative to MainViewController.view and the others set relative to that view. (You can use the multiplier value of the constraints to make the width some multiple of the first, or you can use a constant value)
Note: It doesn't matter what size(s) for the width you choose, just make sure that the scroll view still scrolls horizontally.
2. More Scrolling Samples 🍦
Start off by first adding in a UITabBarController to be able to navigate between several view controllers:
- Select
MainViewControllerand embed in aUITabBarController - Add a new view controller to the storyboard and set up the segue for it from the tab bar.
2a. Three Vertically Scrolling Views
Recreate this lesson, but this time creating a vertically scrolling scroll view with three subviews. Again, it doesn't matter what sizes you make the views so long as the scroll view only scrolls vertically*.


2b. Half-n-Half
Add another view controller, and set its segue to the tab bar. On this one, Add two scroll views such that each one takes up half of the screen (top half and bottom half).
- The top scroll view should have 3 subviews and scroll vertically
- The bottom scroll view should have 3 subviews and scroll horizontally.


2c. Nested Scrolls 🐦
Add one last view controller because now you're doing a nested scroll view!
- Add a scroll view to the new view controller and pin its edges.
- Add 3
UIViewso that the scroll view scrolls vertically and the views are centered on the x-axis - Now, add a second scroll view pinned below the 3rd
UIView. You can set the height of this scroll view to be whatever you'd like, but I suggest over100.0 pt - To this second scroll view, add 5 views and set up constraints so that this nested scroll view scrolls only horizontally to display these 5 views.
The project also includes some image assets if you'd like to practice using UIImageView instead of just a UIView with a random background color.
*Hint: If you're having trouble with the nested scroll views, check out this


