This solution helps you deploy ETL processes on data lake using AWS CDK Pipelines. This is based on AWS blog Deploy data lake ETL jobs using CDK Pipelines. We recommend you to read the blog before you proceed with the solution.
CDK Pipelines is a construct library module for painless continuous delivery of CDK applications. CDK stands for Cloud Development Kit. It is an open source software development framework to define your cloud application resources using familiar programming languages.
This solution helps you to:
- deploy ETL jobs on data lake
- build CDK applications for your ETL workloads
- deploy ETL jobs from a central deployment account to multiple AWS environments such as dev, test, and prod
- leverage the benefit of self-mutating feature of CDK Pipelines. For example, whenever you check your CDK app's source code in to your version control system, CDK Pipelines can automatically build, test, and deploy your new version
- increase the speed of prototyping, testing, and deployment of new ETL jobs
In this section we talk about Data lake architecture and its infrastructure.
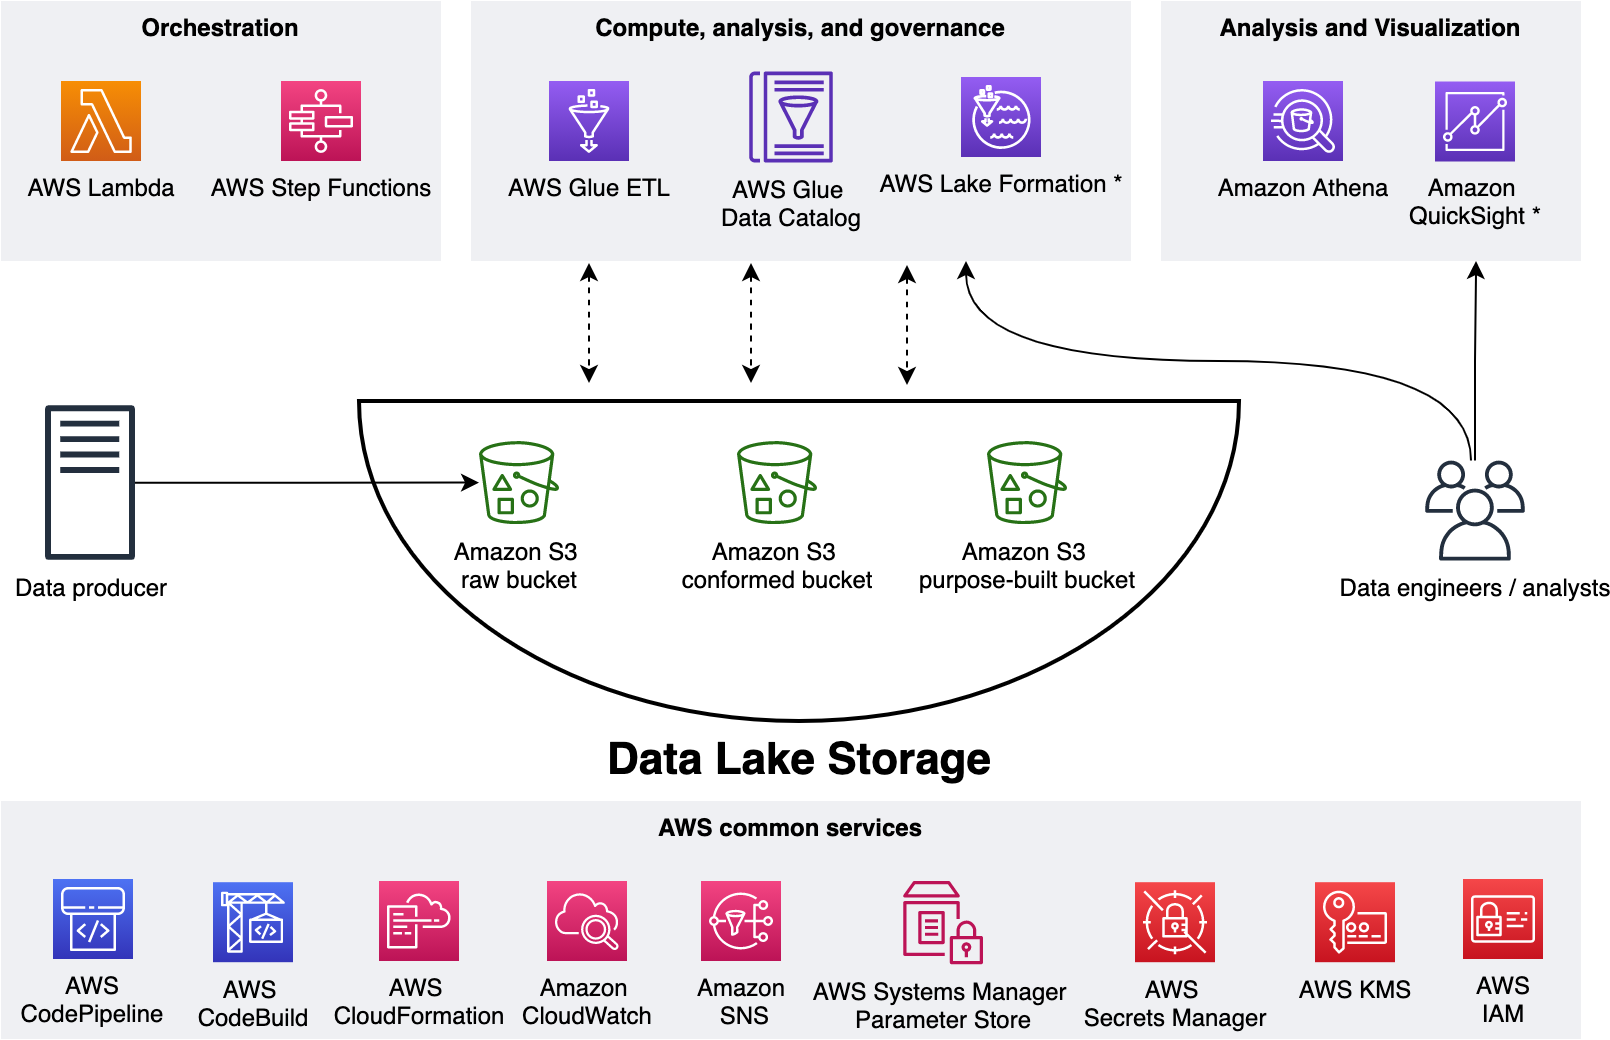
To level set, let us design a data lake. As shown in the figure below, we use Amazon S3 for storage. We use three S3 buckets - 1) raw bucket to store raw data in its original format 2) conformed bucket to store the data that meets the quality requirements of the lake 3) purpose-built data that is used by analysts and data consumers of the lake.
The Data Lake has one producer which ingests files into the raw bucket. We use AWS Lambda and AWS Step Functions for orchestration and scheduling of ETL workloads.
We use AWS Glue for ETL and data cataloging, Amazon Athena for interactive queries and analysis. We use various AWS services for logging, monitoring, security, authentication, authorization, notification, build, and deployment.
Note: AWS Lake Formation is a service that makes it easy to set up a secure data lake in days. Amazon QuickSight is a scalable, serverless, embeddable, machine learning-powered business intelligence (BI) service built for the cloud. These two services are not used in this solution.
Now we have the Data Lake design, let's deploy its infrastructure. You can use AWS CDK Pipelines for Data Lake Infrastructure Deployment for this purpose.
To demonstrate the above benefits, we will use NYC Taxi and Limousine Commission Data and build a sample ETL process for this. In our Data Lake, we have three S3 buckets - Raw, Conformed, and Purpose-built.
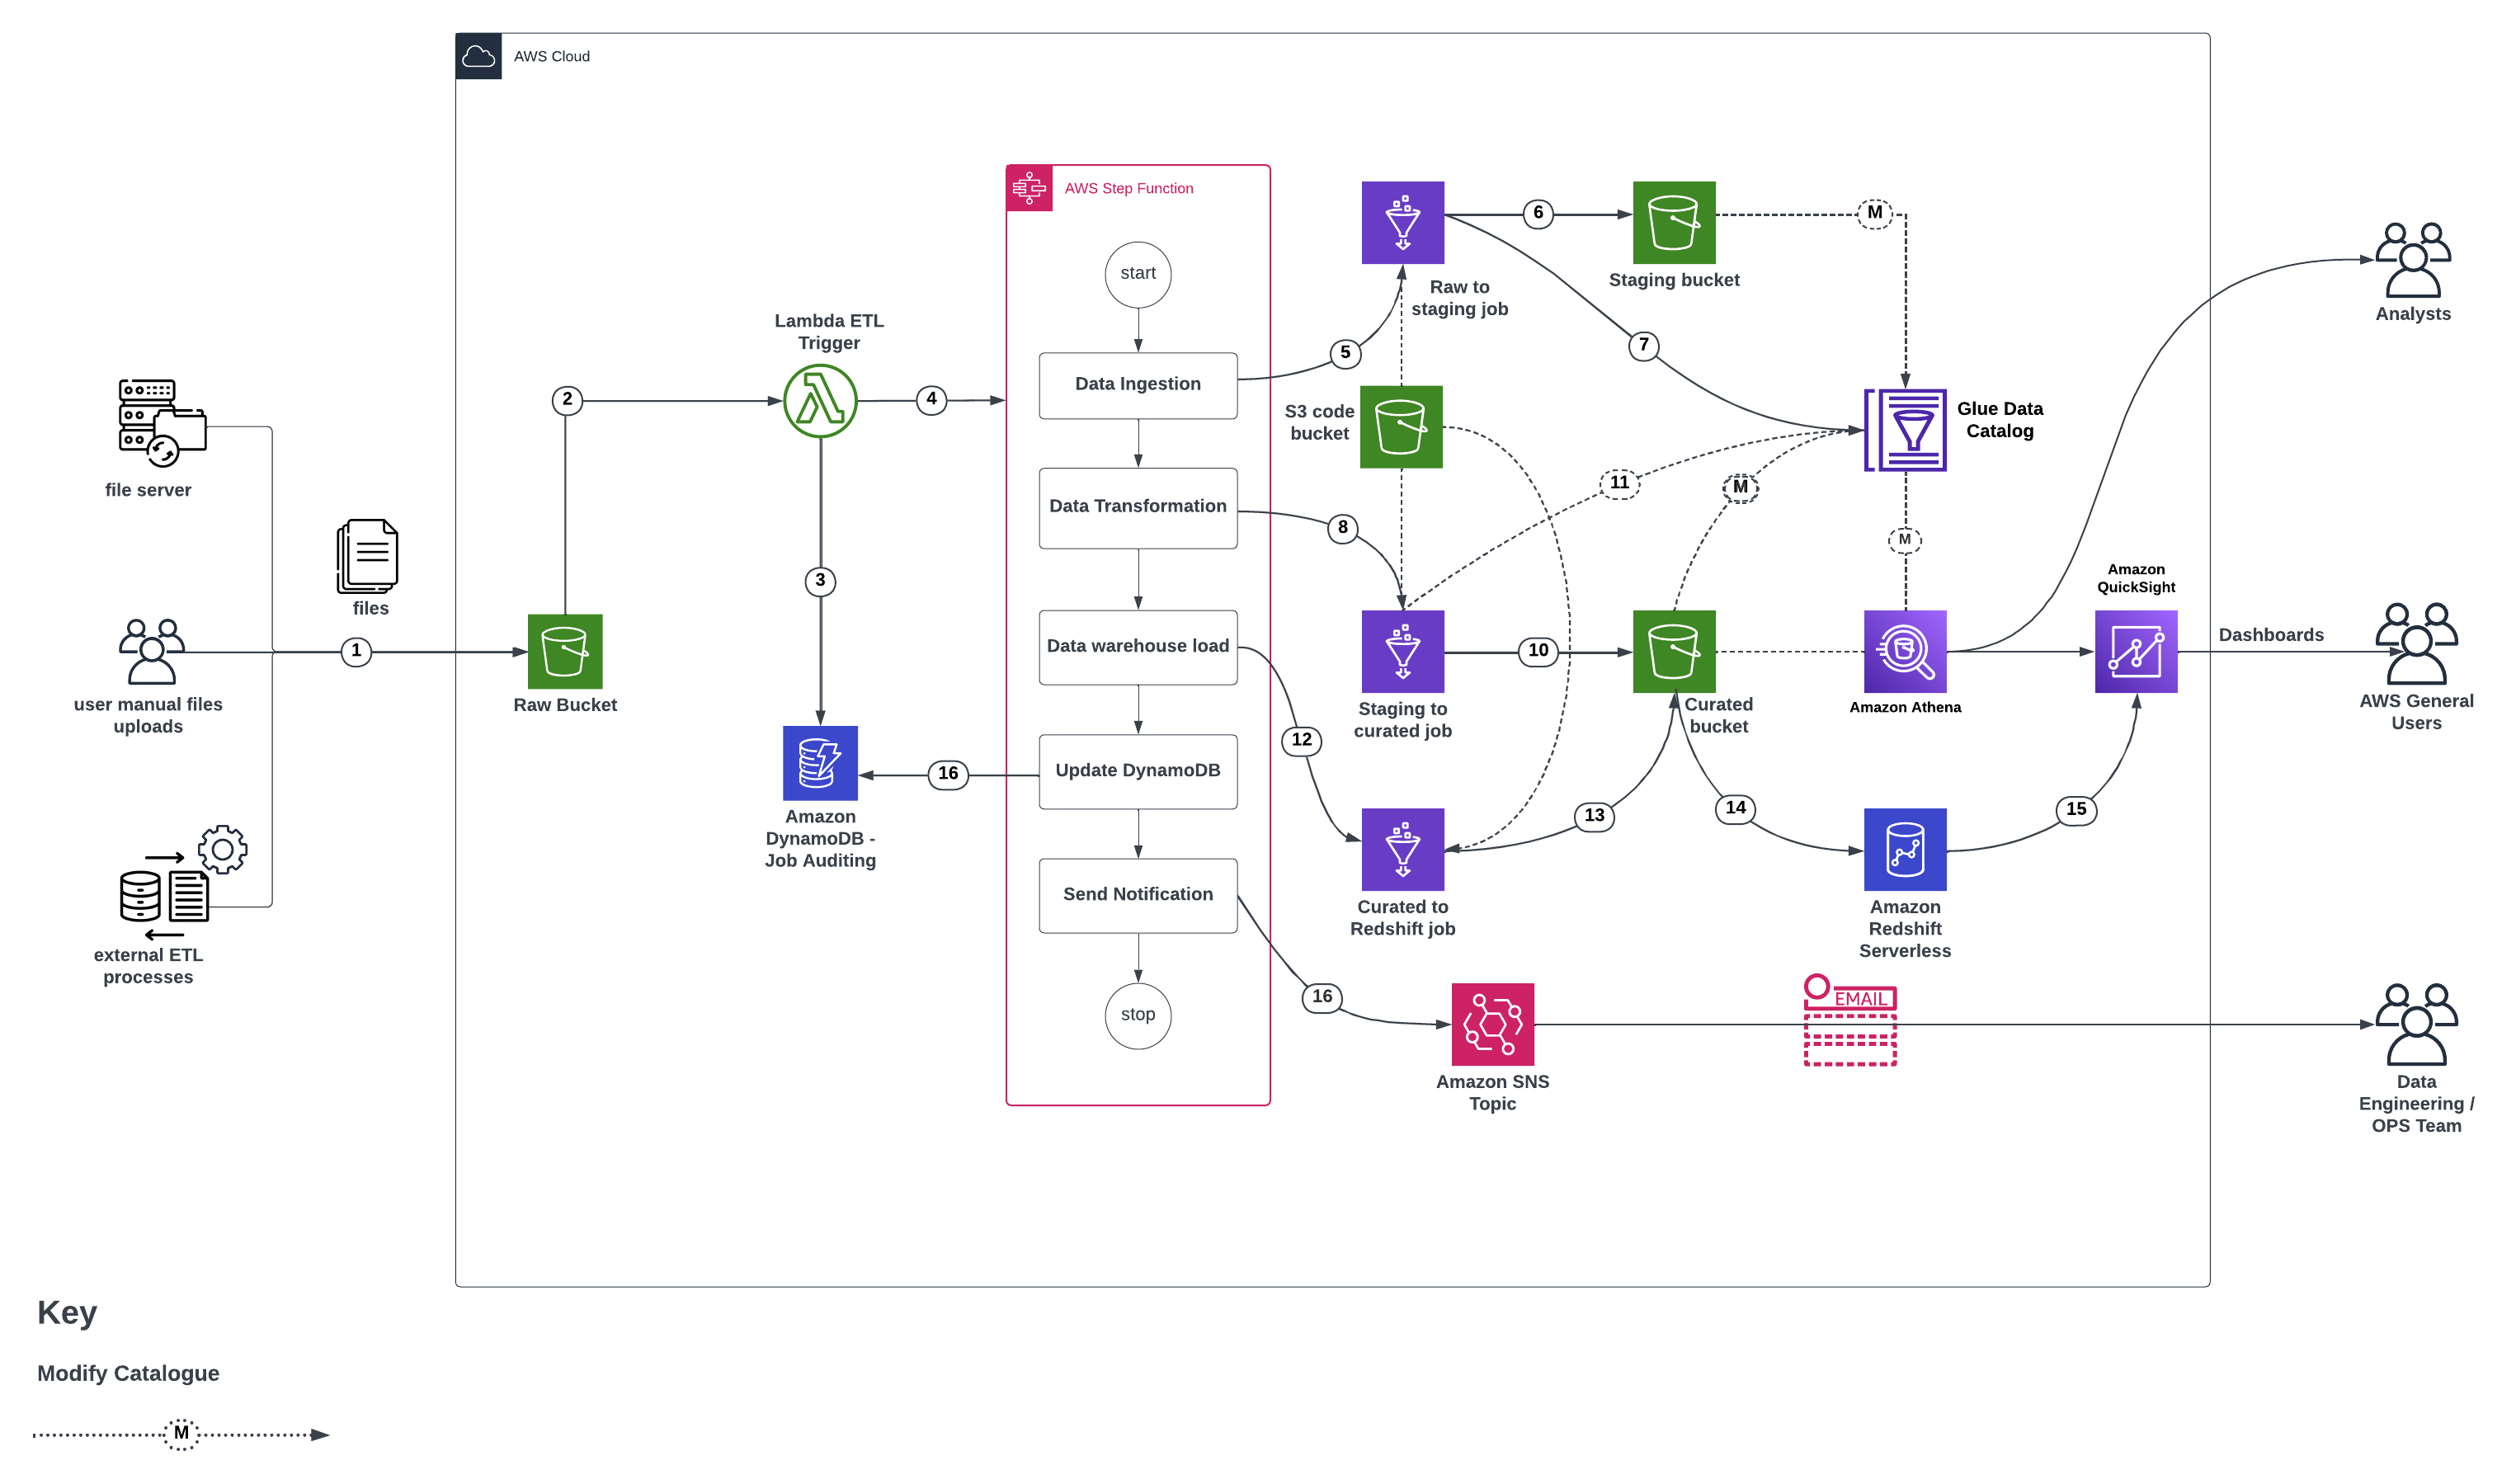
Figure below represents the infrastructure resources we provision for Data Lake.
- Data in json(via S3 put method), csv, etc. is uploaded to the raw S3 bucket from a data producer/source. The data producer could be a file server, ETL processes integrating data from external sources, manual files uploads, etc.
- S3 event-notification(via S3 put event) triggers a lambda function.
- The AWS Lambda function inserts an item in DynamoDB table.
- AWS Lambda function Starts an execution of AWS Step Functions State machine
- Step functions intiates the
raw_to_staging_jobwhich converts the uploaded data into parquet format – Initiate glue job in sync mode - The
raw_to_staging_jobloads the formatted data into the respective S3 bucket. - The
raw_to_staging_jobupdates the data catalogue with the new data - Step functions intiates the
staging_to_curated_jobwhich transforms the parquet data using the SQL scripts provided for that dataset - The
staging_to_curated_jobwrites to S3 with the tranformed data - The
staging_to_curated_jobupdates the catalogue with the details about the transformed data - Step functions intiates the
curated_to_redshift_jobwhich is responsible for loading the curated data into AWS redshift - The
curated_to_redshift_jobreads the S3 bucket via the updated catalogue - The
curated_to_redshift_jobloads data into redshift after deduplicating it first - Dynamo DB is updated with the results of the step function run
- Quicksight can be connected directly to the warehouse and visualisations done.
- An SNS notification via email is sent to the data engineering team channel on the status of the data pipeline
We use a centralized deployment model to deploy data lake infrastructure across dev, test, and prod environments.
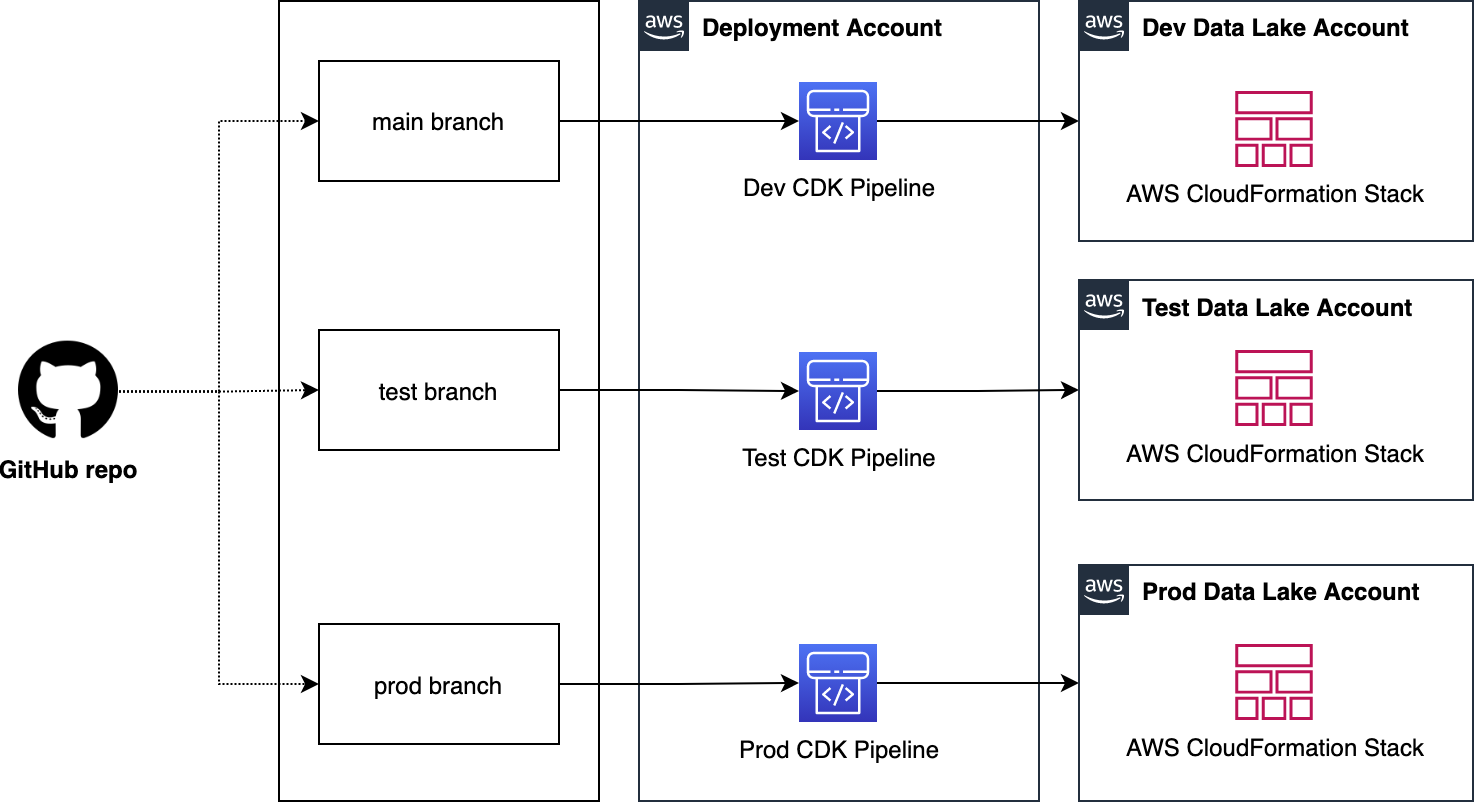
Let us see how we deploy data lake ETL workloads from a central deployment account to multiple AWS environments such as dev, test, and prod. As shown in the figure below, we organize Data Lake ETL source code into three branches - dev, test, and production. We use a dedicated AWS account to create CDK Pipelines. Each branch is mapped to a CDK pipeline and it turn mapped to a target environment. This way, code changes made to the branches are deployed iteratively to their respective target environment.
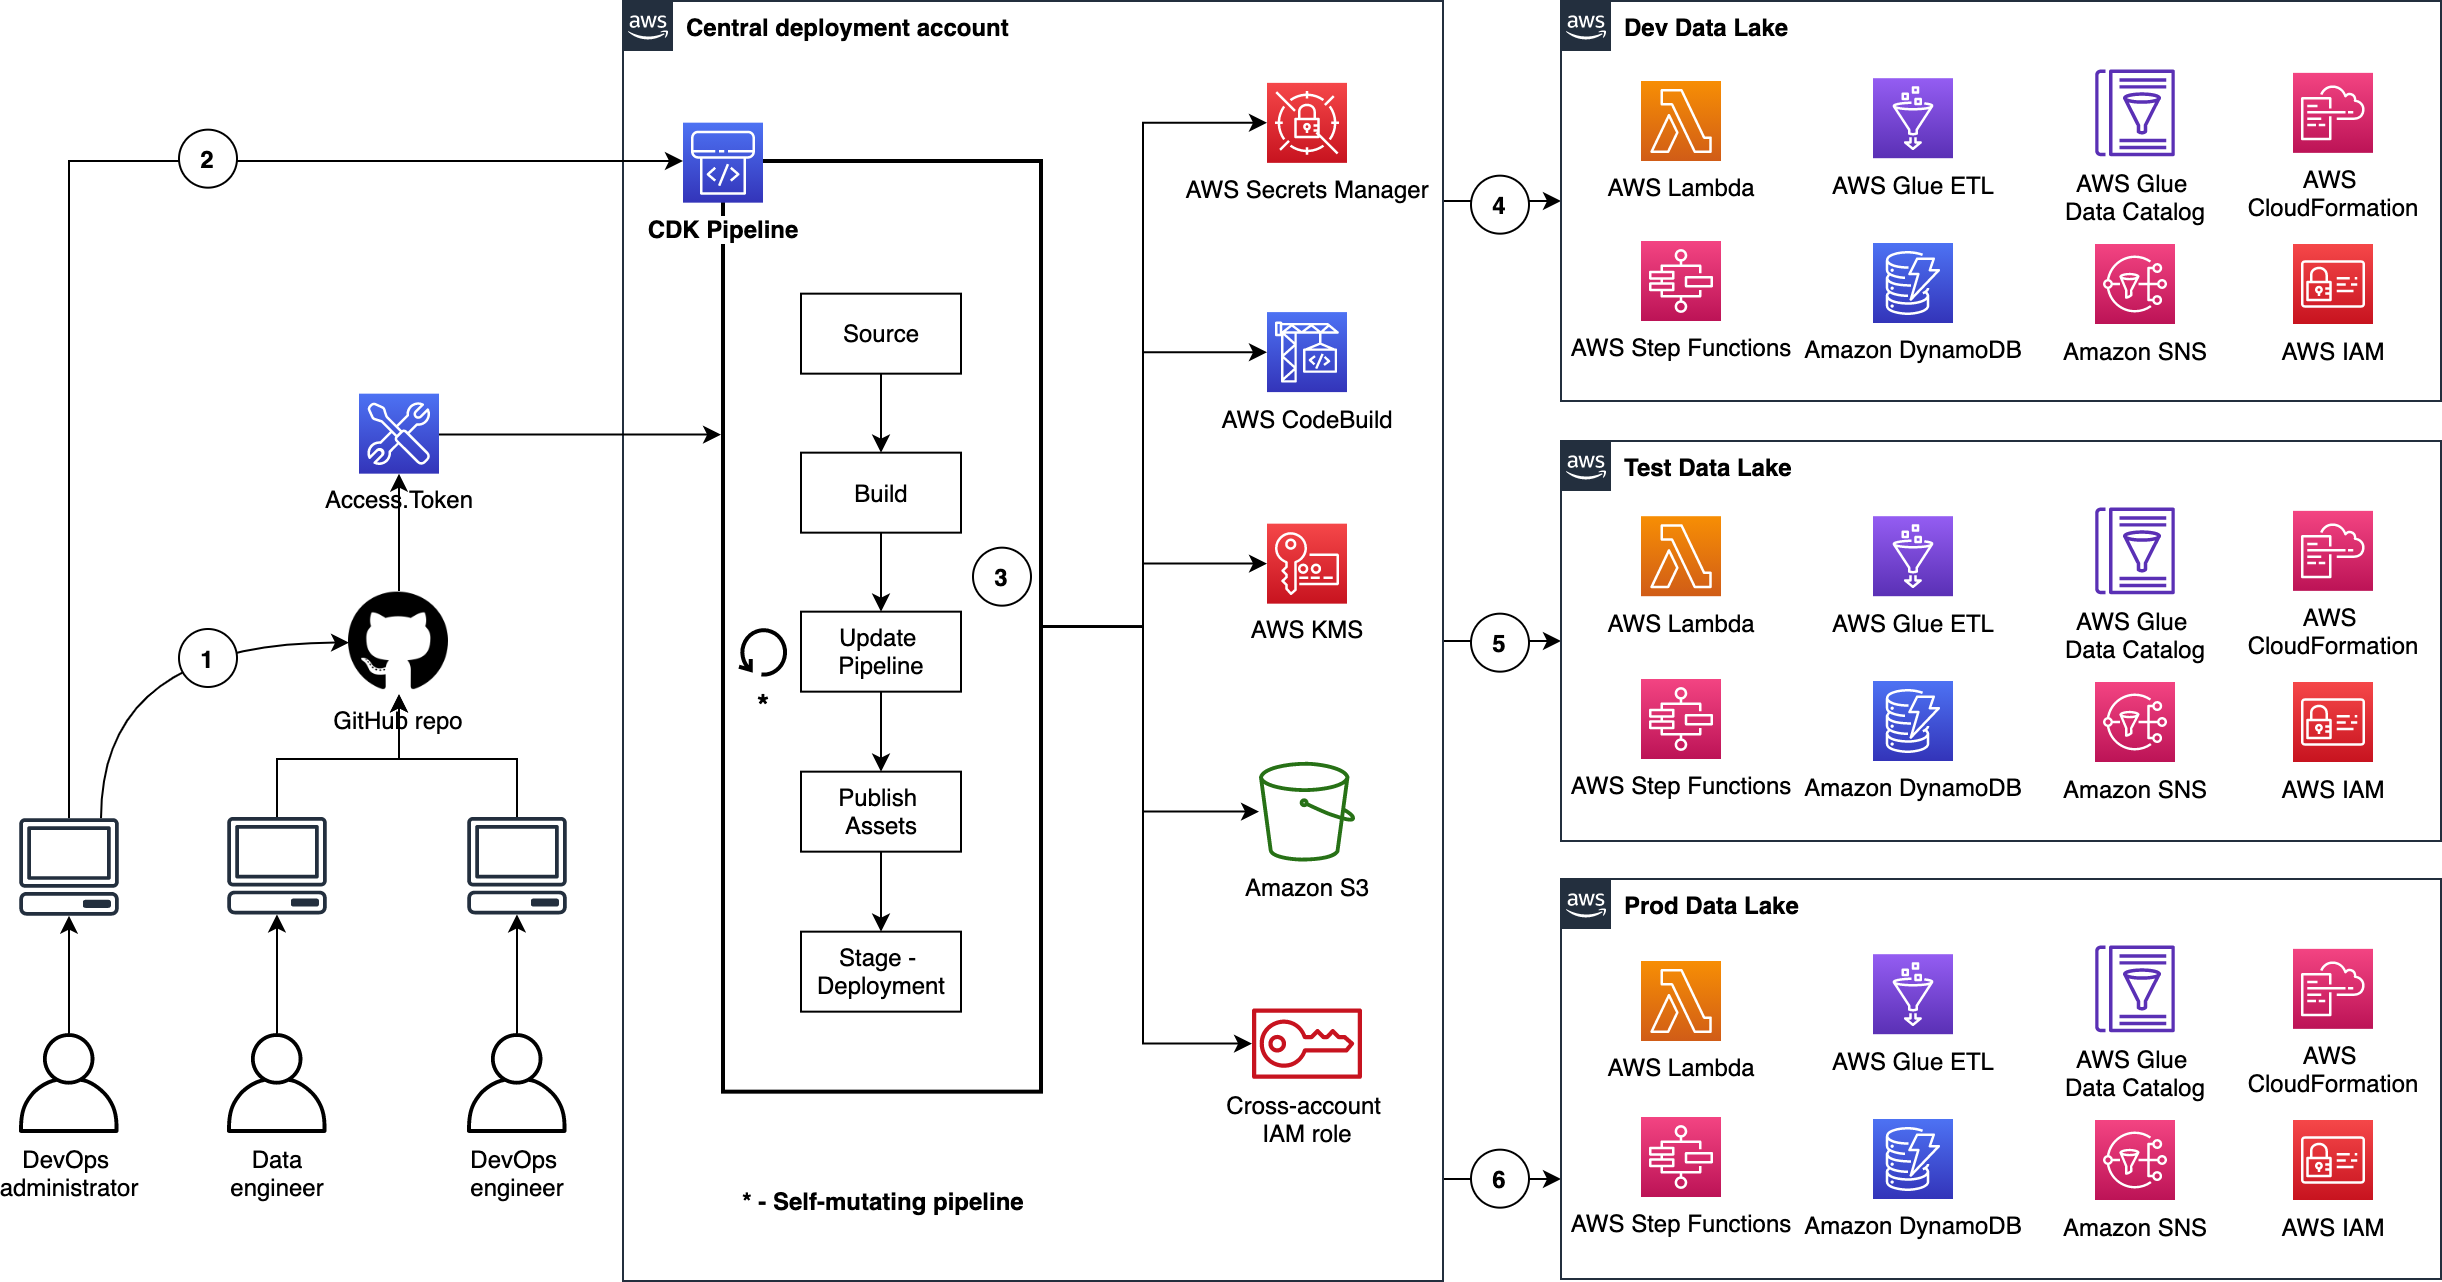
Figure below illustrates the continuous delivery of ETL jobs on Data Lake.
There are few interesting details to point out here:
- The DevOps administrator checks in the code to the repository.
- The DevOps administrator (with elevated access) facilitates a one-time manual deployment on a target environment. Elevated access includes administrative privileges on the central deployment account and target AWS environments.
- CodePipeline periodically listens to commit events on the source code repositories. This is the self-mutating nature of CodePipeline. It’s configured to work with and is able to update itself according to the provided definition.
- Code changes made to the main branch of the repo are automatically deployed to the dev environment of the data lake.
- Code changes to the test branch of the repo are automatically deployed to the test environment.
- Code changes to the prod branch of the repo are automatically deployed to the prod environment.
Table below explains how this source ode structured:
| File / Folder | Description |
|---|---|
| app.py | Application entry point |
| pipeline_stack | Pipeline stack entry point |
| pipeline_deploy_stage | Pipeline deploy stage entry point |
| glue_stack | Stack creates Glue Jobs and supporting resources such as Connections, S3 Buckets - script and temporary - and an IAM execution Role |
| step_functions_stack | Stack creates an ETL State machine which invokes Glue Jobs and supporting Lambdas - state machine trigger and status notification. |
| dynamodb_stack | Stack creates DynamoDB Tables for Job Auditing and ETL transformation rules. |
| Glue Scripts | Glue spark job data processing logic for conform and purpose built layers |
| ETL Job Auditor | lambda script to update dynamodb in case of glue job success or failure |
| ETL Trigger | lambda script to trigger step function and initiate dynamodb |
| ETL Transformation SQL | Transformation logic to be used for data processing from conformed to purpose-built |
| Resources | This folder has architecture and process flow diagrams |
This section provides deployment instructions.
This project is dependent on the AWS CDK Pipelines for Data Lake Infrastructure Deployment. Please reference the Prerequisites section in README.
Configure your AWS profile to target the central Deployment account as an Administrator and perform the following steps:
-
Open command line (terminal)
-
Go to project root directory where
cdk.jsonandapp.pyexist -
Run the command
cdk ls -
Expected output. You will see the following CloudFormation stack names listed on your terminal
DevDataLakeCDKBlogEtlPipeline
ProdDataLakeCDKBlogEtlPipeline
TestDataLakeCDKBlogEtlPipeline
DevDataLakeCDKBlogEtlPipeline/Dev/DevDataLakeCDKBlogEtlDynamoDb
DevDataLakeCDKBlogEtlPipeline/Dev/DevDataLakeCDKBlogEtlGlue
DevDataLakeCDKBlogEtlPipeline/Dev/DevDataLakeCDKBlogEtlStepFunctions
ProdDataLakeCDKBlogEtlPipeline/Prod/ProdDataLakeCDKBlogEtlDynamoDb
ProdDataLakeCDKBlogEtlPipeline/Prod/ProdDataLakeCDKBlogEtlGlue
ProdDataLakeCDKBlogEtlPipeline/Prod/ProdDataLakeCDKBlogEtlStepFunctions
TestDataLakeCDKBlogEtlPipeline/Test/TestDataLakeCDKBlogEtlDynamoDb
TestDataLakeCDKBlogEtlPipeline/Test/TestDataLakeCDKBlogEtlGlue
TestDataLakeCDKBlogEtlPipeline/Test/TestDataLakeCDKBlogEtlStepFunctions
-
Before you bootstrap central deployment account account, set environment variable
export AWS_PROFILE=replace_it_with_deployment_account_profile_name_b4_running -
Run the command
cdk deploy --all -
Expected outputs:
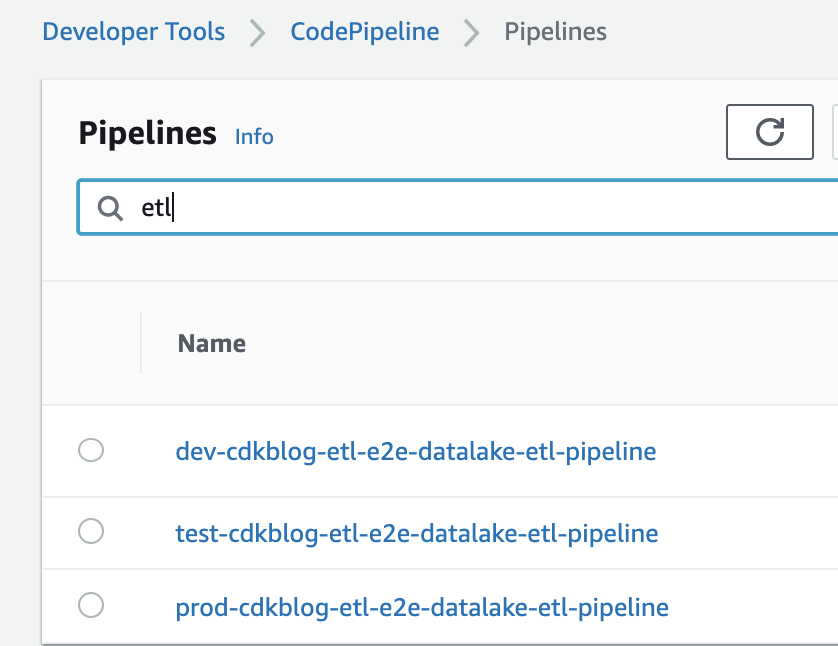
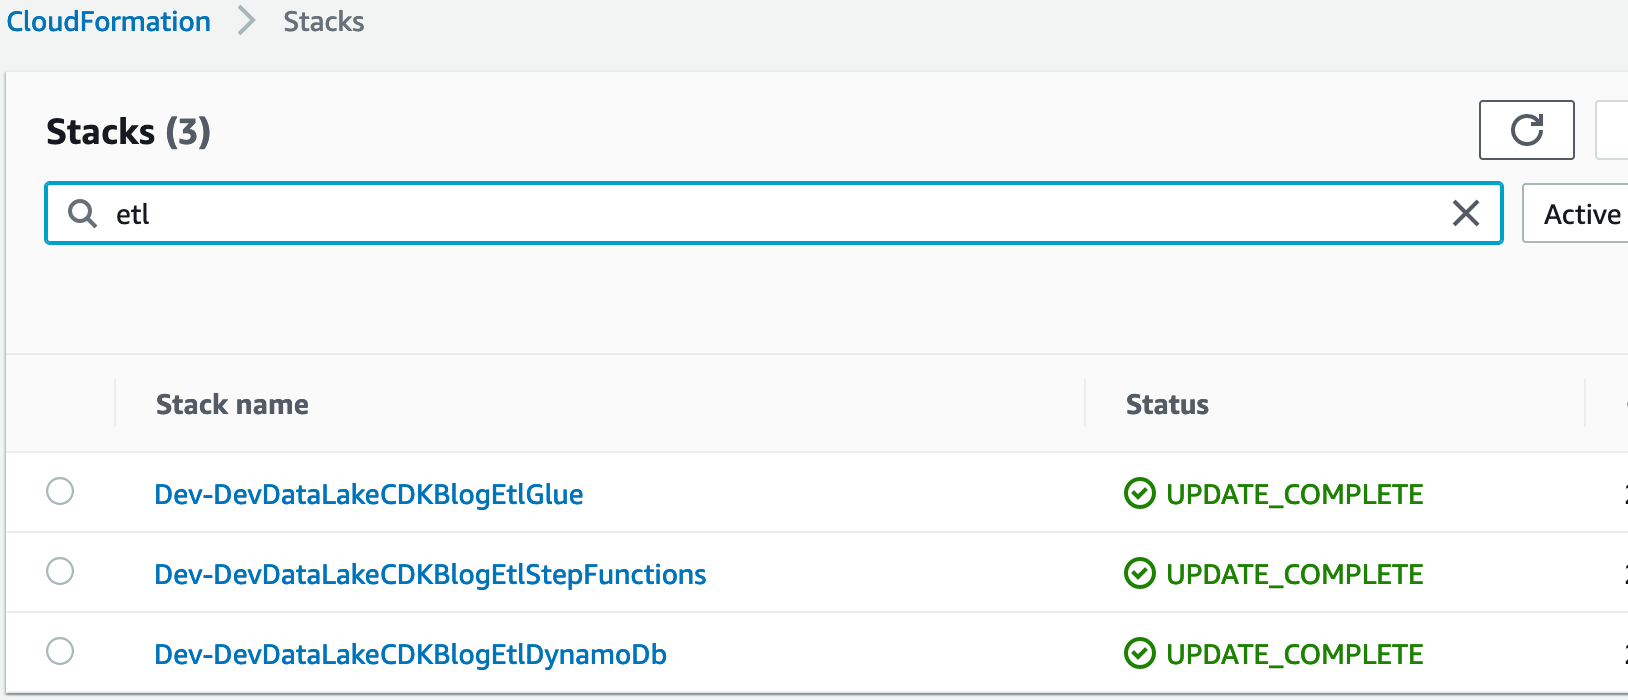
Pipeline you have created using CDK Pipelines module is self mutating. That means, code checked to GitHub repository branch will kick off CDK Pipeline mapped to that branch.
This section provides testing instructions.
Below lists steps are required before starting the job testing:
-
Note: We use New York City TLC Trip Record Data.
-
Download Yellow Taxi Trip Records for August-2020
-
Make sure the transformation logic is entered in dynamodb for <> table. As part of job creation mentioned transformation logic will be used to transform data from raw to conform:
SELECT count(*) count, coalesce(vendorid,-1) vendorid, day, month, year, pulocationid, dolocationid, payment_type, sum(passenger_count) passenger_count, sum(trip_distance) total_trip_distance, sum(fare_amount) total_fare_amount, sum(extra) total_extra, sum(tip_amount) total_tip_amount, sum(tolls_amount) total_tolls_amount, sum(total_amount) total_amount
FROM datalake_raw_source.yellow_taxi_trip_record
GROUP BY vendorid, day, month, year, day, month, year, pulocationid, dolocationid, payment_type;
-
Create a folder under raw bucket
{target_environment.lower()}-{resource_name_prefix}-{self.account}-{self.region}-rawroot path, this folder name will be used as source_system_name. You can usetlc_taxi_dataor name of your choice. -
Go to the created folder and create child folder named
yellow_taxi_trip_recordor you can name it per your choice -
Configure Athena workgroup before you run queries via Amazon Athena. For more details, refer Setting up Athena Workgroups.
-
Go to raw S3 bucket and perform the following steps:
- create a folder with name
tlc_taxi_dataand go to it - create a folder with name
yellow_taxi_trip_recordand go to it - upload the file
yellow_tripdata_2020-01.csv
- create a folder with name
-
Upon successful load of file S3 event notification will trigger the lambda
-
Lambda will insert record into the dynamodb table
{target_environment.lower()}-{resource_name_prefix}-etl-job-auditto track job start status -
Lambda function will trigger the step function. Step function name will be
<filename>-<YYYYMMDDHHMMSSxxxxxx>and provided the required metadata input -
Step functions state machine will trigger the Glue job for Raw to Conformed data processing.
-
Glue job will load the data into conformed bucket using the provided metadata and data will be loaded to
s3://{target_environment.lower()}-{resource_name_prefix}-{self.account}-{self.region}-conformed/tlc_taxi_data/yellow_taxi_trip_record/year=YYYY/month=MM/day=DDin parquet format -
Glue job will create/update the catalog table using the tablename passed as parameter based on folder name
yellow_taxi_trip_recordas being mentioned in prerequisites -
After raw to conform job completion purpose-built glue job will get triggered in step function
-
Purpose built glue job will use the transformation logic being provided in dynamodb as part of prerequisites for data transformation
-
Purpose built glue job will store the result set in S3 bucket under
s3://{target_environment.lower()}-{resource_name_prefix}-{self.account}-{self.region}-purposebuilt/tlc_taxi_data/yellow_taxi_trip_record/year=YYYY/month=MM/day=DD -
Purpose built glue job will create/update the catalog table
-
After completion of glue job lambda will get triggered in step function to update the dynamodb table
{target_environment.lower()}-{resource_name_prefix}-etl-job-auditwith latest status -
SNS notification will be sent to the subscribed users
-
To validate the data, please open Athena service and execute query. For testing purpose below mentioned query is being used
SELECT * FROM "datablog_arg"."yellow_taxi_trip_record" limit 20;
-
For testing of
second data source, Download Green Taxi Trip Records for August-2020 -
Perform the prerequisites for second source, where create child folder
yellow_taxi_trip_recordunder could betlc_taxi_datains3://{target_environment.lower()}-{resource_name_prefix}-{self.account}-{self.region}-raw -
For dynamodb transformation logic you can use the below mentioned query:
SELECT count(*) count, coalesce(vendorid,-1) vendorid, day, month, year, pulocationid, dolocationid, payment_type, sum(passenger_count) passenger_count, sum(trip_distance) total_trip_distance, sum(fare_amount) total_fare_amount, sum(extra) total_extra, sum(tip_amount) total_tip_amount, sum(tolls_amount) total_tolls_amount, sum(total_amount) total_amount
FROM datalake_raw_source.green_taxi_record_data
GROUP BY vendorid, day, month, year, day, month, year, pulocationid, dolocationid, payment_type
In this section, we provide some additional resources.
-
Delete stacks using the command
cdk destroy --all. When you see the following text, enter y, and press enter/return.Are you sure you want to delete: TestDataLakeCDKBlogEtlPipeline, ProdDataLakeCDKBlogEtlPipeline, DevDataLakeCDKBlogEtlPipeline (y/n)?Note: This operation deletes stacks only in central deployment account
-
To delete stacks in development account, log onto Dev account, go to AWS CloudFormation console and delete the following stacks:
- Dev-DevDataLakeCDKBlogEtlDynamoDb
- Dev-DevDataLakeCDKBlogEtlGlue
- Dev-DevDataLakeCDKBlogEtlStepFunctions
-
To delete stacks in test account, log onto Dev account, go to AWS CloudFormation console and delete the following stacks:
- Test-TestDataLakeCDKBlogEtlDynamoDb
- Test-TestDataLakeCDKBlogEtlGlue
- Test-TestDataLakeCDKBlogEtlStepFunctions
-
To delete stacks in prod account, log onto Dev account, go to AWS CloudFormation console and delete the following stacks:
- Prod-ProdDataLakeCDKBlogEtlDynamoDb
- Prod-ProdDataLakeCDKBlogEtlGlue
- Prod-ProdDataLakeCDKBlogEtlStepFunctions
-
For more details refer to AWS CDK Toolkit
Refer to cdk_instructions.md for detailed instructions
Refer to Developer Guide for more information on this project
The following people are involved in the design, architecture, development, and testing of this solution:
- Isaiah Grant, Cloud Consultant, 2nd Watch, Inc.
- Muhammad Zahid Ali, Data Architect, Amazon Web Services
- Ravi Itha, Senior Data Architect, Amazon Web Services
This sample code is made available under the MIT-0 license. See the LICENSE file.
