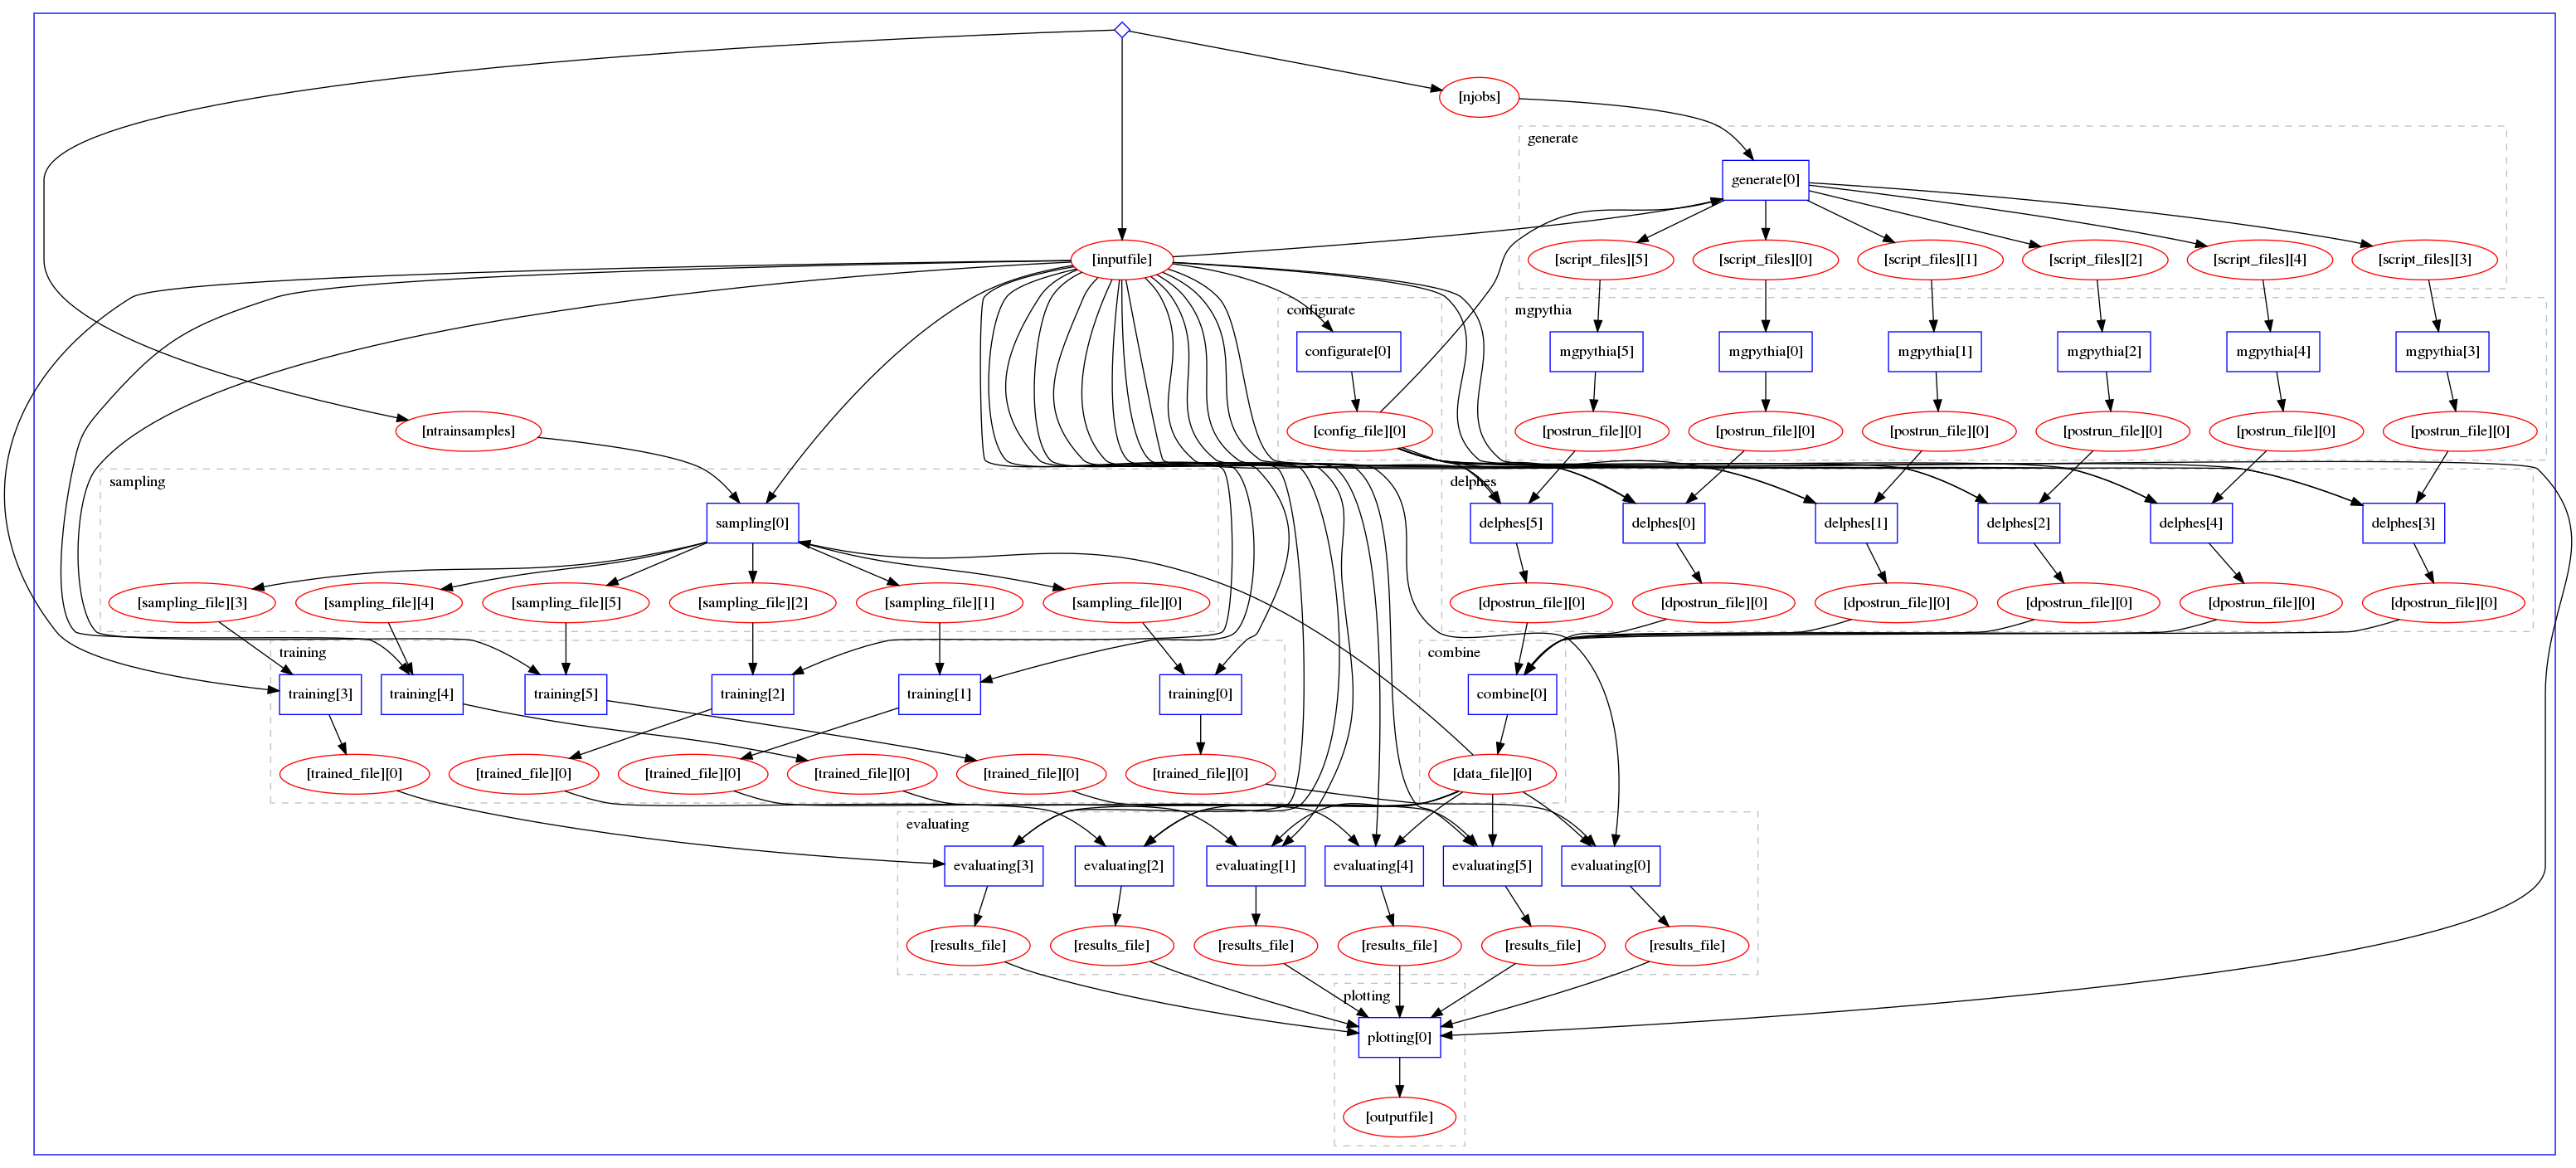
This repository intends to create a full deployment of MadMiner (by Johann Brehmer, Felix Kling, and Kyle Cranmer) that parallelizes its bottlenecks, is reproducible and facilitates the use of the tool in the community.
To achieve this we have generated a workflow using yadage (by Lukas Heinrich) and a containerization of the software dependencies in several docker images. The pipeline can be run with REANA, a data analysis platform.
This repo includes the workflow for the physics processing (config, generation of events with MadGraph, Delphes) and the machine learning processing (configuration, sampling, training) in a modular way. This means that each of this parts has its own workflow setup so that the user can mix-match. For instance, once the physics processes are run, one can play with different hyperparameters or samplings in the machine learning part, without having to re-run MadGraph again.
Please, refer to the links for more information and tutorials about MadMiner (tutorial) and yadage (tutorial)
MadMiner is a set of complex tools with many steps. For that reason, we considered better to split the software dependencies and workflow code in two Docker images, plus another one containing the latest MadMiner library version. All of the official images are hosted in the madminertool DockerHub.
- madminertool/docker-madminer: contains only latest version of MadMiner.
- madminertool/docker-madminer-physics:
contains the code necessary to configure, generate and process events according to MadMiner.
You will also find the software dependencies in the directory
/home/software. Dockerfile. - madminertool/docker-madminer-ml: contains the code necessary to configure, train and evaluate in the MadMiner framework. Dockerfile.
To pull any of the images and see its content:
docker pull madminertool/<image-name>
docker run -it madminertool/<image-name> bash
<container-id>#/home $ ls
If you want to check the Dockerfile for the last two images go to worklow-madminer/docker.
The point of this repository is to make the life easier for the users so they won't need
to figure out themselves the arguments of the scripts on /home/code/ nor how to input new observables.
The whole pipeline will be automatically generated when they follow the steps in the sections below.
Also they will have the chance to input their own parameters, observables, cuts etc.
without even needing to pull the Docker images.
Dependency installation depends on how you want to run the workflow: using a REANA cluster, or locally using yadage.
To deploy Madminer locally using REANA, use Minikube as emulator for a cluster. Please refer to the REANA-Cluster documentation for more details. If you have access to a REANA cluster, then you will only need to introduce the credentials as shown below, to generate the following combined-workflow:
To introduce the credentials, go to the example-full/ directory and run:
$ virtualenv ~/.virtualenvs/myreana
$ source ~/.virtualenvs/myreana/bin/activate
(myreana) $ pip install reana-client==0.5.0
# enter credentials for REANA-cluster
(myreana) $ export REANA_ACCESS_TOKEN = [..]
(myreana) $ export REANA_SERVER_URL = [..]
# or for minikube deployment
(myreana) $ eval $(reana-cluster env --include-admin-token)
# check connectivity to `reana-cluster`
(myreana) $ reana-client ping
# create the analysis
(myreana) $ reana-client create -n my-analysis
(myreana) $ export REANA_WORKON=my-analysis.1
(myreana) $ reana-client upload ./inputs/input.yml
(myreana) $ reana-client start
(myreana) $ reana-client status
It might take some time to finish depending on the job and the cluster. Once it does, list and download the files:
(myreana) $ reana-client ls
(myreana) $ reana-client download <path/to/file/on/reana/workon>
The command reana-client ls will display the folders containing the results from each step.
You can download any intermediate result you are interested in (for example combine/combined_delphes.h5,
evaluating_0/Results.tar.gz or all the plots available in plotting/).
Install Yadage and its dependencies to visualize workflows:
pip install yadage[viz]Also, you would need the graphviz package. Check it was successfully installed by running:
yadage-run -t from-github/testing/local-helloworld workdir workflow.yml -p par=WorldIt should see a log entry like the following. Refer to the Yadage links above for more details:
2019-01-11 09:51:51,601 | yadage.utils | INFO | setting up backend multiproc:auto with opts {}
For the first run, we recommend using our default input.yml files, decreasing both njobs and ntrainsamples for speed.
Finally, move to the directory of the example and run:
sudo rm -rf workdir && yadage-run workdir workflow.yml \
    -p inputfile='"inputs/input.yml"' \
    -p njobs="6" \
    -p ntrainsamples="2" \
    -d initdir=$PWD \
    --visualize
To run again the command you must first remove the workdir folder:
rm -rf workdir/What is every element in the command?
workdir: specifies the new directory where all the intermediate and output files will be saved.workflow.yml: file connecting the different stages of the workflow. It must be placed in the working directory.-p <param>: all the parameters. In this case:inputfilehas a configuration of all the parameters and options.njobs: number of maps in the Physics workflow.ntrainsamplesnumber to scale the training sample process.
-d initdir: specifies the directory where the the workflow is initiated.--visualize: specifies the creation of a workflow image.
In the Physics case:
-
configurate.py: initializes MadMiner, add parameters, add benchmarks and set morphing benchmarks.python code/configurate.py
-
generate.py: prepares MadGraph scripts for background and signal events based on previous optimization. Run it with:{njobs}as the initial parameternjobs.{h5_file}as the MadMiner configuration file (from the previousconfigurate.pyexecution).
python code/generate.py {njobs} {h5_file} -
delphes.py: runs Delphes by passing the inputs, adding observables, adding cuts and saving. Run it with:{h5_file}as the MadMiner configuration file.{event_file}astag_1_pythia8_events.hepmc.gz.{input_file}as the initialinput_delphes.ymlfile.
python code/delphes.py {h5_file} {event_file} {input_file}
Without taking into account the inputs and the map-reduce, the general workflow structure is the following:
            +--------------+
            |  Configurate |
            +--------------+
                    |
                    |
                    v
            +--------------+
            |   Generate   |
            +--------------+
                    |
                    |
                    v
            +--------------+
            |   MG+Pythia  |
            +--------------+
                    |
                    |
                    v
            +--------------+
            |   Delphes    |
            +--------------+
                    |
                    |
                    v
            +--------------+
            |   Sampling   |
            +--------------+
                    |
                    |
                    v
            +--------------+
            |   Training   |
            +--------------+
                    |
                    |
                    v
            +--------------+
            |    Testing   |
            +--------------+
