This repository implements a bot that listens to a Slack channel and when appropriate, responds with one of Brian Eno and Peter Schmidt's Oblique Strategies.
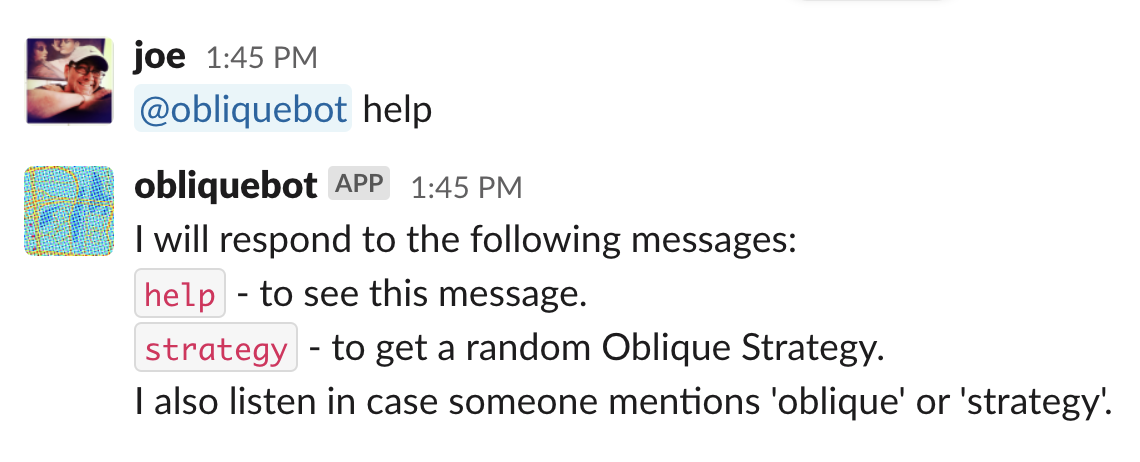
The bot will listen, in any channel where it has been invited, for "strategy", "strategies", and "oblique". If
it sees amy of those words, it will respond with a random strategy from the strategies.yml file.
It can also be directly addressed with any text other than 'help' to receive a strategy in return.
This bot has been converted to run at Heroku in a hobby dyno. It uses the Slapp library, and takes advantage of the Slack Events API.
Click this button and you'll get obliquebot in your Slack, no extra work required. See the Connect your bot to Slack section below, starting at step 3. You won't need to enter the bot page's URL.
If you want to create your own bot based on obliquebot:
- Create a new Slack app. The instructions at https://slack.dev/bolt-js/tutorial/getting-started will walk you through this.
Follow the steps laid out in the wizard. You'll want to enable Event Subscriptions on your Slack App using the URL provided and add subscriptions for the following Bot Events:
im_createdmessage.channelsmessage.groupsmessage.immessage.mpim
You'll need to record the following to set up your environment on Heroku:
- Slack Signing Secret
- Slack Bot Token
- Bot User OAuth Access Token
The bot needs to store the basic authentication information for the various Slacks it will be added to. We use Firebase to store this data.
- Log in to your Google account. You'll need to do this to be able to create a new Firebase database.
- Go to Firebase and click "Go to Console".
- Click the big "Add Project" button to set up a new database, and walk through the wizard to finish setting it up.
- Enter a project name (if you're just cloning obliquebot to test things out, that's a reasonable name).
- Enable analytics if you like; you'll need a Google Analytics account to connect to if so.
- Otherwise, say no, and click "Create project".
- When the screen says "your new project is ready", click through to see the new database.
- We will be using the Realtime Database. Under "Build" in the left-hand sidebar, click "Realtime Database".
- In the main page, click the "Create Database" button. Just choose the defaults in the wizard that pops up.
- We will start by defining access rules to prevent anyone who doesn't have the obliquebot credentials from reading or writing the database. In the main pane, click the "Rules" tab, and replace the existing rule definition with the one below.
    {
      "rules": {
        "teams": {
          ".read": "auth != null",
          ".write": "auth != null"
        }
      }
    }
You've now set up the database; the server code will take care of putting the data in it. Now we need to provide access to
the database for the bot. Click the gear icon next to Project overview in the left sidebar, then select Project settings in the popup.
In the main pane, click the Service Accounts tab, then the Generate new private key button. Read the popup, which reminds you that this is a database key, like a password. Make sure you don't commit it to Git! Then click the Generate key button.
This will generate and download a JSON file containig the credentials needed for your bot to access this new Firebase database.
-
Fork this repo.
git clone git@githib.com:joemcmahon/obliquebot
-
Log in to Heroku. On the Dashboard, click the
Newbutton and selectCreate new app. -
Type in the app name (this will be the name in the app's
herokuapp.comURL) and clickCreate app. -
You'll be on the deploy page; in the
Deployment methodsection, click theConnect to Githubbutton. This will go through the Github process to authenticate Heroku access to your account. -
It will now ask you to
search for a repository to connect toin your account. Since you forkedobliquebot, choose that one and clickSearch. It will find that repo and show aConnectbutton. Click it. -
Click the
Overviewtab, then clickConfigure dynos. -
You should see
Free dynos, andweb yarn run startand a switch control in theoffposition. Click the pencil icon to edit this setup, and switch the dyno on, then clickConfirmto enable the dyno. You will now be able to run your code. (If you don't do this step, Heroku will happily build your code, but never start it running!) -
Set up the app configuration. Click the
Settingstab and scroll down toConfig vars, then clickReveal config vars. -
You will need to set all of the following:
| KEY | VALUE |
|---|---|
| FIREBASE_DB_URL | https://yourdatabasename.firebaseio.com/ |
| FIREBASE_SERVICE_ACCOUNT_BASE64 | Base64-encoded Firebase access JSON |
| PORT | 8080 |
| SLACK_CLIENT_ID | xxxxxxxxxx.xxxxxxxxxx |
| SLACK_CLIENT_SECRET | ... |
| SLACK_VERIFY_TOKEN | ... |
- Let's assume you want to just deploy the obliquebot code as is. Go back to the
Deploytab and scroll down toManual Deploy. - The default branch will be selected (it's
masterfor now, butmainis supported too). ClickDeploy branch.
Heroku will build the service and ready it for execution. Once the build completes, scroll back to the top and click More and select View logs in the popup. If everything is set up properly here on Heroku, you should see log entries like this:
... heroku[web.1]: State changed from down to starting
... heroku[web.1]: Starting process with command `yarn run start`
... app[web.1]: [heroku-exec] Starting
... app[web.1]: yarn run v1.22.10
... app[web.1]: $ node server.js
... app[web.1]: undefined
... app[web.1]: loading team info
... heroku[web.1]: State changed from starting to up
... app[web.1]: Launching bot
... app[web.1]: attaching to database at  https://obliquebot-xxxxx.firebaseio.com/
... app[web.1]: account info loaded
... app[web.1]: app initialized
... app[web.1]: have database
... app[web.1]: initializing Slapp
... app[web.1]: (Organic) machinery
... app[web.1]: http server started on port 9120
While testing, I strongly suggest creating a test Slack for just yourself; you can show off your bot in public once you're sure it's working as you desire.
- Log in to the Slack you want to add the bot to, then click on the Slack name at the top of the Slack left sidebar.
- Mouse down to
Settings and administration, and thenManage appsin the submenu. Your browser should open atapp.slack.com. - Now type
https://yourherokuappsname.herokuapp.cominto the URL bar and hit enter. You should see the obliquebot logo and anAdd to Slackbutton. Click theAdd to Slackbutton. - You should, if the app is running correctly, see a new page with the text
obliquebot is requesting permission to access the [some name] Slack workspaceand anAllowbutton. ClickAllowto proceed.ot- - The wait indicator should circle for a second, then you should see
This Slack App has been successfully added to the [some name] team. - Go back to Slack, and you should now see
obliquebotin theAppssection of the left sidebar. Click onobliquebotand you'll be in a private conversation with the bot. Type anything, and you should get a strategy. - Add
obliquebotto any channels where you'd like it to be listening; when it hears its keywords, or it's included in a message, it will respond with a strategy.