![]()


Mender MCU client is an open source over-the-air (OTA) library updater for MCU devices. This demonstration project runs on ESP32 hardware.
This project is used with an ESP32-WROOM-32D module with 4MB flash. It should be compatible with other ESP32 modules with no modification.
The project is built using ESP-IDF framework. There is no other dependencies. Important note: the project has been tested with ESP-IDF v4.4.x and v5.0.x successfully. There is no support for older releases.
This project is developed under VSCode and using ESP-IDF Extension. If you need support to use the development environnement, you can refer to the "ESP-IDF Extension help" section below.
To start using Mender, we recommend that you begin with the Getting started section in the Mender documentation.
Clone the project and retrieve submodules using git submodule update --init --recursive.
Then open the project with VSCode.
The example application should first be configured to set at least:
CONFIG_MENDER_SERVER_TENANT_TOKENto set the Tenant Token of your account on "https://hosted.mender.io" server;CONFIG_EXAMPLE_WIFI_SSIDandCONFIG_EXAMPLE_WIFI_PASSWORDto connect the device to your own WiFi access point.
You may want to customize few interesting settings:
CONFIG_MENDER_SERVER_HOSTif using your own Mender server instance. Tenant Token is not required in this case.CONFIG_MENDER_CLIENT_AUTHENTICATION_POLL_INTERVALis the interval to retry authentication on the mender server.CONFIG_MENDER_CLIENT_UPDATE_POLL_INTERVALis the interval to check for new deployments.CONFIG_MENDER_CLIENT_INVENTORY_REFRESH_INTERVALis the interval to publish inventory data.CONFIG_MENDER_CLIENT_CONFIGURE_REFRESH_INTERVALis the interval to refresh device configuration.
Other settings are available in the Kconfig. You can also refer to the mender-mcu-client API and configuration keys.
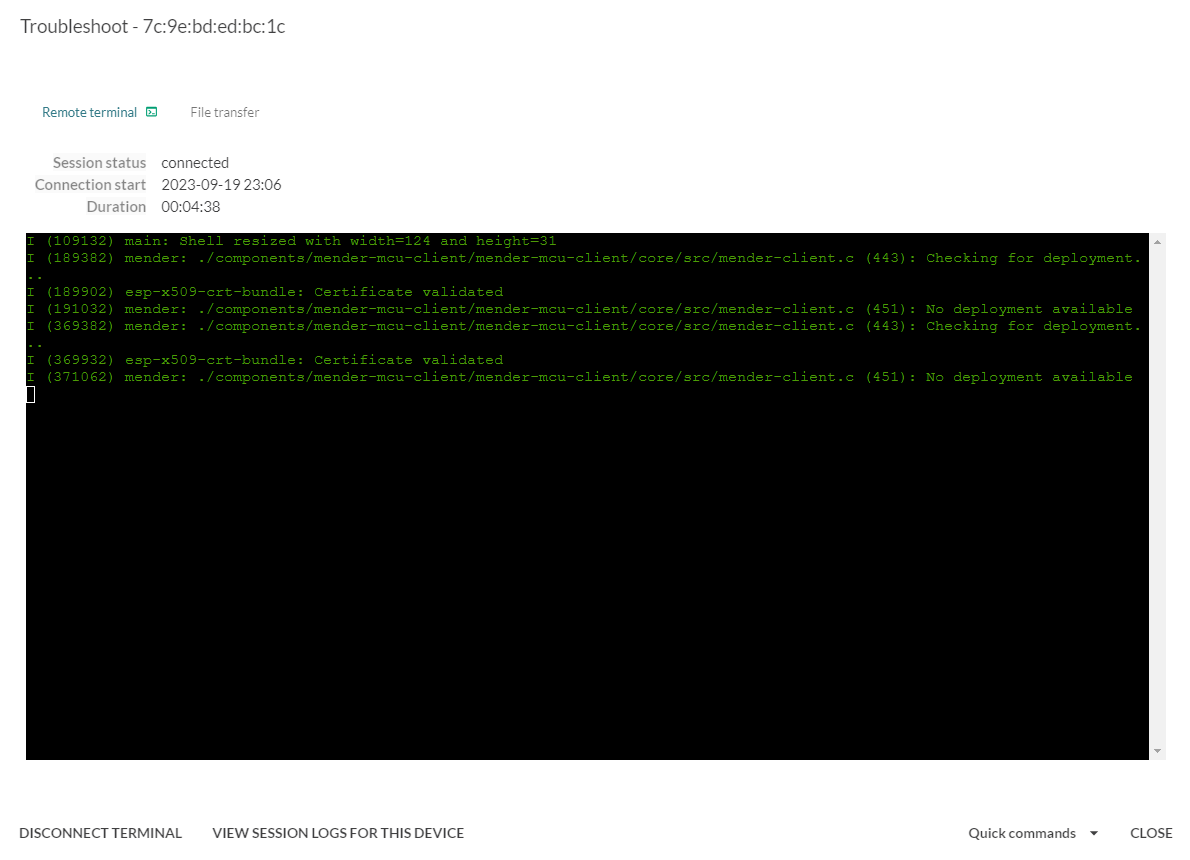
Particularly, it is possible to activate the Device Troubleshoot add-on that will permit to display the logs of the ESP32 directly on the Mender interface as shown on the following screenshot.
Note this also constraints to download esp_websocket_client in vscode, which is compatible with ESP-IDF v5.0 and later only.
After flashing the application on the ESP32 module and displaying logs, you should be able to see the following:
I (6546) main: MAC address of the device '7c:9e:bd:ed:bc:1c'
I (6556) main: Running project 'mender-esp32-example' version '0.1'
I (6576) mender: ./components/mender-mcu-client/mender-mcu-client/platform/storage/esp-idf/nvs/src/mender-storage.c (90): Authentication keys are not available
I (6576) mender: ./components/mender-mcu-client/mender-mcu-client/platform/tls/generic/mbedtls/src/mender-tls.c (126): Generating authentication keys...
I (8306) main: Mender client initialized
I (8306) main: Mender inventory initialized
I (10766) wifi:<ba-add>idx:0 (ifx:0, 1a:18:cb:a8:e5:12), tid:0, ssn:1, winSize:64
I (11056) mender: ./components/mender-mcu-client/mender-mcu-client/platform/storage/esp-idf/nvs/src/mender-storage.c (169): OTA ID or artifact name not available
I (13116) esp-x509-crt-bundle: Certificate validated
I (14256) HTTP_CLIENT: Body received in fetch header state, 0x3ffc8681, 86
E (14256) mender: ./components/mender-mcu-client/mender-mcu-client/core/src/mender-api.c (854): [401] Unauthorized: dev auth: unauthorized
I (14266) main: Mender client authentication failed (1/3)
Which means you now have generated authentication keys on the device. Authentication keys are stored in NVS partition of the ESP32. You now have to accept your device on the mender interface. Once it is accepted on the mender interface the following will be displayed:
I (68626) esp-x509-crt-bundle: Certificate validated
I (69956) HTTP_CLIENT: Body received in fetch header state, 0x3ffc8d39, 139
I (69966) main: Mender client authenticated
I (69966) mender: ./components/mender-mcu-client/mender-mcu-client/core/src/mender-client.c (433): Checking for deployment...
I (70466) esp-x509-crt-bundle: Certificate validated
I (71396) mender: ./components/mender-mcu-client/mender-mcu-client/core/src/mender-client.c (441): No deployment available
I (71896) esp-x509-crt-bundle: Certificate validated
Congratulation! Your device is connected to the mender server. Device type is mender-esp32-example and the current software version is displayed.
First retrieve mender-artifact tool.
Change VERSION.txt file to 0.2 and rebuild the firmware. Then create a new artifact using the following command line:
path/to/mender-artifact write rootfs-image --compression none --device-type mender-esp32-example --artifact-name mender-esp32-example-v$(head -n1 path/to/mender-esp32-example/VERSION.txt) --output-path path/to/mender-esp32-example/build/mender-esp32-example-v$(head -n1 path/to/mender-esp32-example/VERSION.txt).mender --file path/to/mender-esp32-example/build/mender-esp32-example.bin
Upload the artifact mender-esp32-example-v0.2.mender to the mender server and create a new deployment.
The device checks for the new deployment, downloads the artifact and installs it on the next ota partition. Then it reboots to apply the update:
I (249966) mender: ./components/mender-mcu-client/mender-mcu-client/core/src/mender-client.c (433): Checking for deployment...
I (250696) esp-x509-crt-bundle: Certificate validated
I (251626) HTTP_CLIENT: Body received in fetch header state, 0x3ffc7c88, 140
I (251626) mender: ./components/mender-mcu-client/mender-mcu-client/core/src/mender-client.c (453): Downloading deployment artifact with id '895ce47b-566a-472e-b72e-9300c40c8cc9', artifact name 'mender-esp32-example-v0.2' and uri 'https://hosted-mender-artifacts.s3.amazonaws.com/6370b06a7f0deaedb279fb6a/7a463d2a-8078-4f51-bbad-9560201e80af?X-Amz-Algorit
I (252126) esp-x509-crt-bundle: Certificate validated
I (253266) main: Deployment status is 'downloading'
I (253776) esp-x509-crt-bundle: Certificate validated
I (254906) mender: ./components/mender-mcu-client/mender-mcu-client/core/src/mender-artifact.c (380): Artifact has valid version
I (254906) mender: ./components/mender-mcu-client/mender-mcu-client/platform/ota/esp-idf/src/mender-ota.c (48): Start flashing OTA artifact 'mender-esp32-example.bin' with size 1009936
I (254926) mender: ./components/mender-mcu-client/mender-mcu-client/platform/ota/esp-idf/src/mender-ota.c (61): Next update partition is 'ota_1', subtype 17 at offset 0x210000 and with size 2031616
I (313976) esp_image: segment 0: paddr=00210020 vaddr=3f400020 size=3ac18h (240664) map
I (314046) esp_image: segment 1: paddr=0024ac40 vaddr=3ffb0000 size=033cch ( 13260)
I (314056) esp_image: segment 2: paddr=0024e014 vaddr=40080000 size=02004h (  8196)
I (314056) esp_image: segment 3: paddr=00250020 vaddr=400d0020 size=a3564h (669028) map
I (314256) esp_image: segment 4: paddr=002f358c vaddr=40082004 size=13358h ( 78680)
I (314296) mender: ./components/mender-mcu-client/mender-mcu-client/core/src/mender-client.c (463): Download done, installing artifact
I (314796) esp-x509-crt-bundle: Certificate validated
I (315936) main: Deployment status is 'installing'
I (315936) esp_image: segment 0: paddr=00210020 vaddr=3f400020 size=3ac18h (240664) map
I (316006) esp_image: segment 1: paddr=0024ac40 vaddr=3ffb0000 size=033cch ( 13260)
I (316016) esp_image: segment 2: paddr=0024e014 vaddr=40080000 size=02004h (  8196)
I (316016) esp_image: segment 3: paddr=00250020 vaddr=400d0020 size=a3564h (669028) map
I (316216) esp_image: segment 4: paddr=002f358c vaddr=40082004 size=13358h ( 78680)
I (316856) esp-x509-crt-bundle: Certificate validated
I (317986) main: Deployment status is 'rebooting'
I (317996) main: Restarting system

...

I (5751) main: MAC address of the device '7c:9e:bd:ed:bc:1c'
I (5761) main: Running project 'mender-esp32-example' version '0.2'
I (5781) main: Mender client initialized
I (5791) main: Mender inventory initialized
I (7831) esp-x509-crt-bundle: Certificate validated
I (8991) HTTP_CLIENT: Body received in fetch header state, 0x3ffcb00d, 139
I (8991) main: Mender client authenticated
I (9061) mender: ./components/mender-mcu-client/mender-mcu-client/platform/ota/esp-idf/src/mender-ota.c (176): Application has been mark valid and rollback canceled
I (9491) esp-x509-crt-bundle: Certificate validated
I (10631) main: Deployment status is 'success'
I (10651) mender: ./components/mender-mcu-client/mender-mcu-client/core/src/mender-client.c (433): Checking for deployment...
I (11131) esp-x509-crt-bundle: Certificate validated
I (12061) mender: ./components/mender-mcu-client/mender-mcu-client/core/src/mender-client.c (441): No deployment available
Congratulation! You have updated the device. Mender server displays the success of the deployment.
In case of failure to connect and authenticate to the server the current example application performs a rollback to the previous release. You can customize the behavior of the example application to add your own checks and perform the rollback in case the tests fail.
The main requirement is the size of the flash that should be 4MB or more. You can increase the ota partitions in partitions.csv file if your module has more memory.
Using VSCode, first open the directory of the project.
Then go to Command Palette (Ctrl+Shift+P) and execute the ESP-IDF: Set Espressif device target command to select select an Espressif target. Choose esp32, then select Custom board.
Next execute the ESP-IDF: SDK Configuration editor command (Ctrl+E then G) to generate sdkconfig and optionally modify project settings. After all changes are made, click save and close this window.
Now build the project with the ESP-IDF: Build your project command (Ctrl+E then B). Progress is displayed in the terminal.
Binary is generated in the build directory.
You may optionally want to display the size of the executable with ESP-IDF: Size analysis of the binaries command (Ctrl+E then S).
First select the wanted serial port corresponding to the target with the ESP-IDF: Select port to use command (Ctrl+E then P).
Then invoke the ESP-IDF: Flash your project command (Ctrl+E then F) to flash the target. Choose UART option.
Logs are displayed using the ESP-IDF: Monitor your device command (Ctrl+E then M).