This repo may help to adapt LIO_SAM to your own sensors! It has some changes comparing with the origin system.
- support with a 6-axis IMU, since the orientation information of IMU is not used in state estimation module.
- support normal GNSS, we do not need to adapt for the robot_localization node.
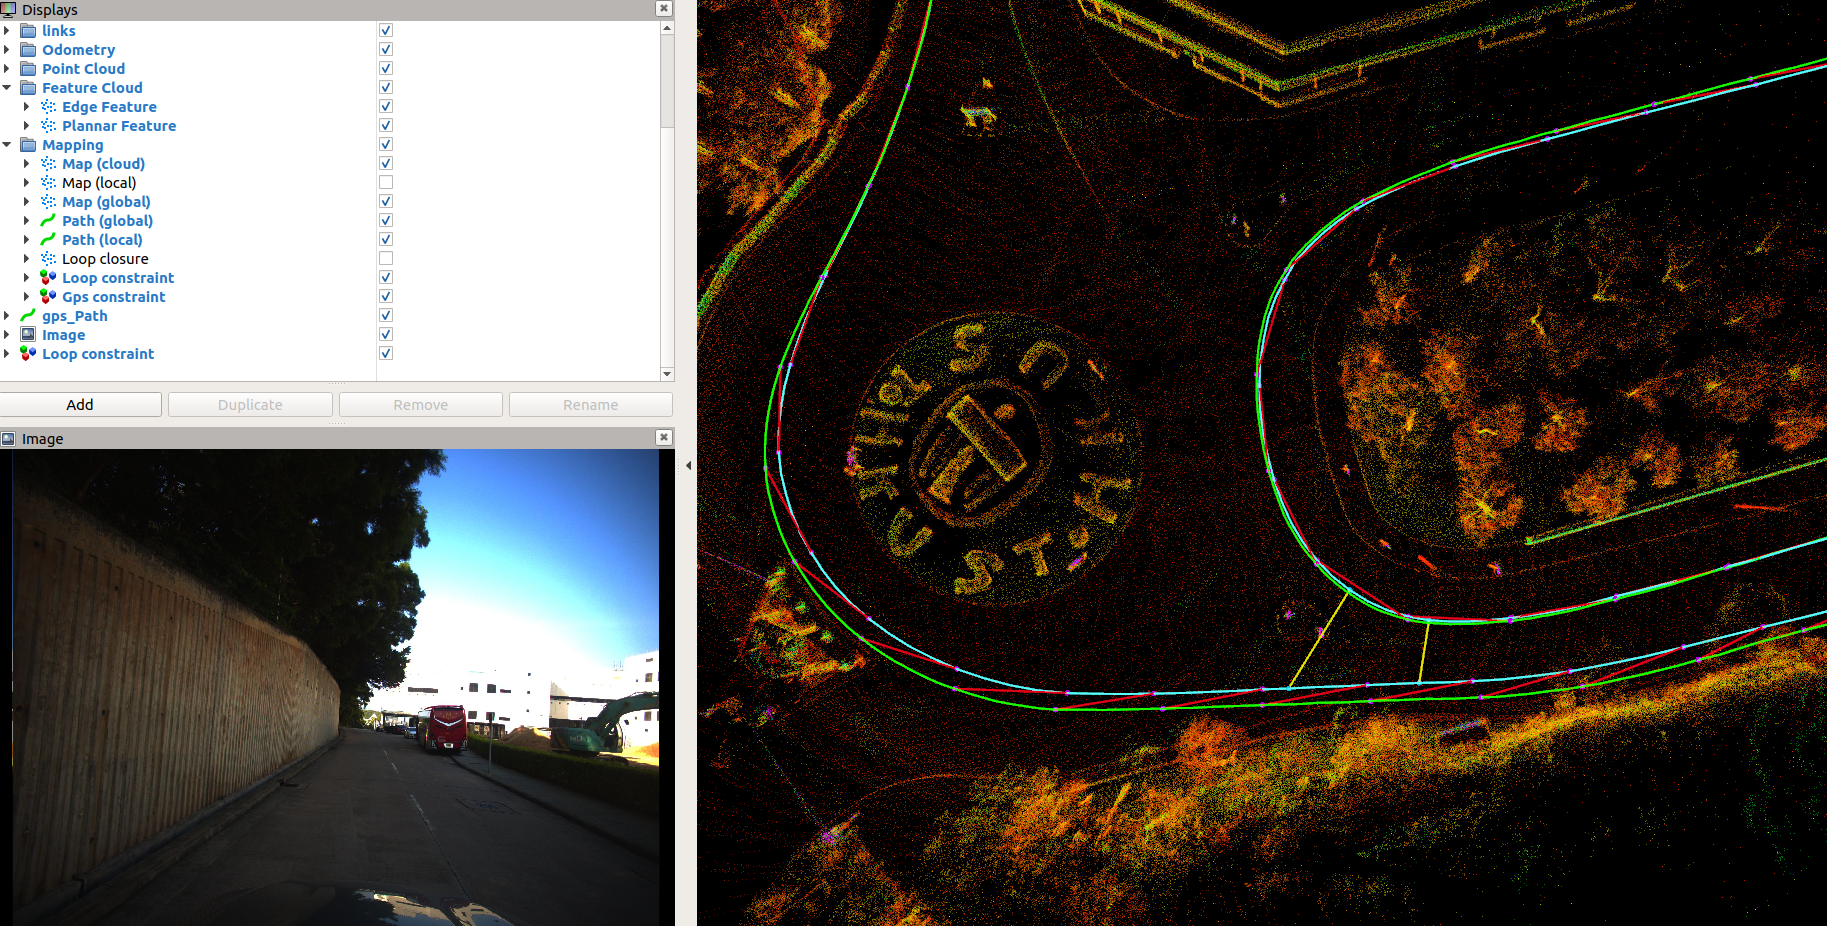
- support the gps constraint visualization module to help debugging the normal GNSS.(the following picture)
LIO_SAM is only suitable for 9-axis IMU, for the following reasons.
- the initialization module need absolute orientation to initialize the LIO system.
- the back-end GNSS-based optimization relies on the robot_localization node, and also requires a 9-axis IMU.
Therefore, only minor changes to the original code are required. which can directly use GPS points of good quality for optimization. Finally, we also made some explanations for some common lidars, as well as coordinate system adaptation and extrinsics between lidars and IMUs, such as Hesai.
we add the gps constraint visualization module to help debugging the normal gps(red lines represents for gps constraint).
-
velodyne+stim300(6 axis)+gpscodes and data are available, but only for test! we will update the new version of codes later. I haven't released the node ofGPS_ODOM, because this part of the code is poorly written, I will organize and update it later. You can first setuseGPSto false.The test data is a section of campus of more than 10km. It was collected on a mountain road. The elevation changes greatly, the GPS data is unstable, and there is a tunnel, which is very challenging. LIO_SAM will be difficult to close the loop or may crash directly in the later downhill road. You can test it yourself and find the reason.
-
ouster/pandar lidar + 6-aixs IMU are all ok, we will release the test data.
Please note that some people have different ways of modifying the timestamps in the driver module when using ouster. Remember to modify the unit of time in the timestamps.
-
I am looking for the stable GPS odom information to initialize the LIO system in the
updateInitialGuessfunction of themapOptmizationnode. Although this method works, it is not the best choice.
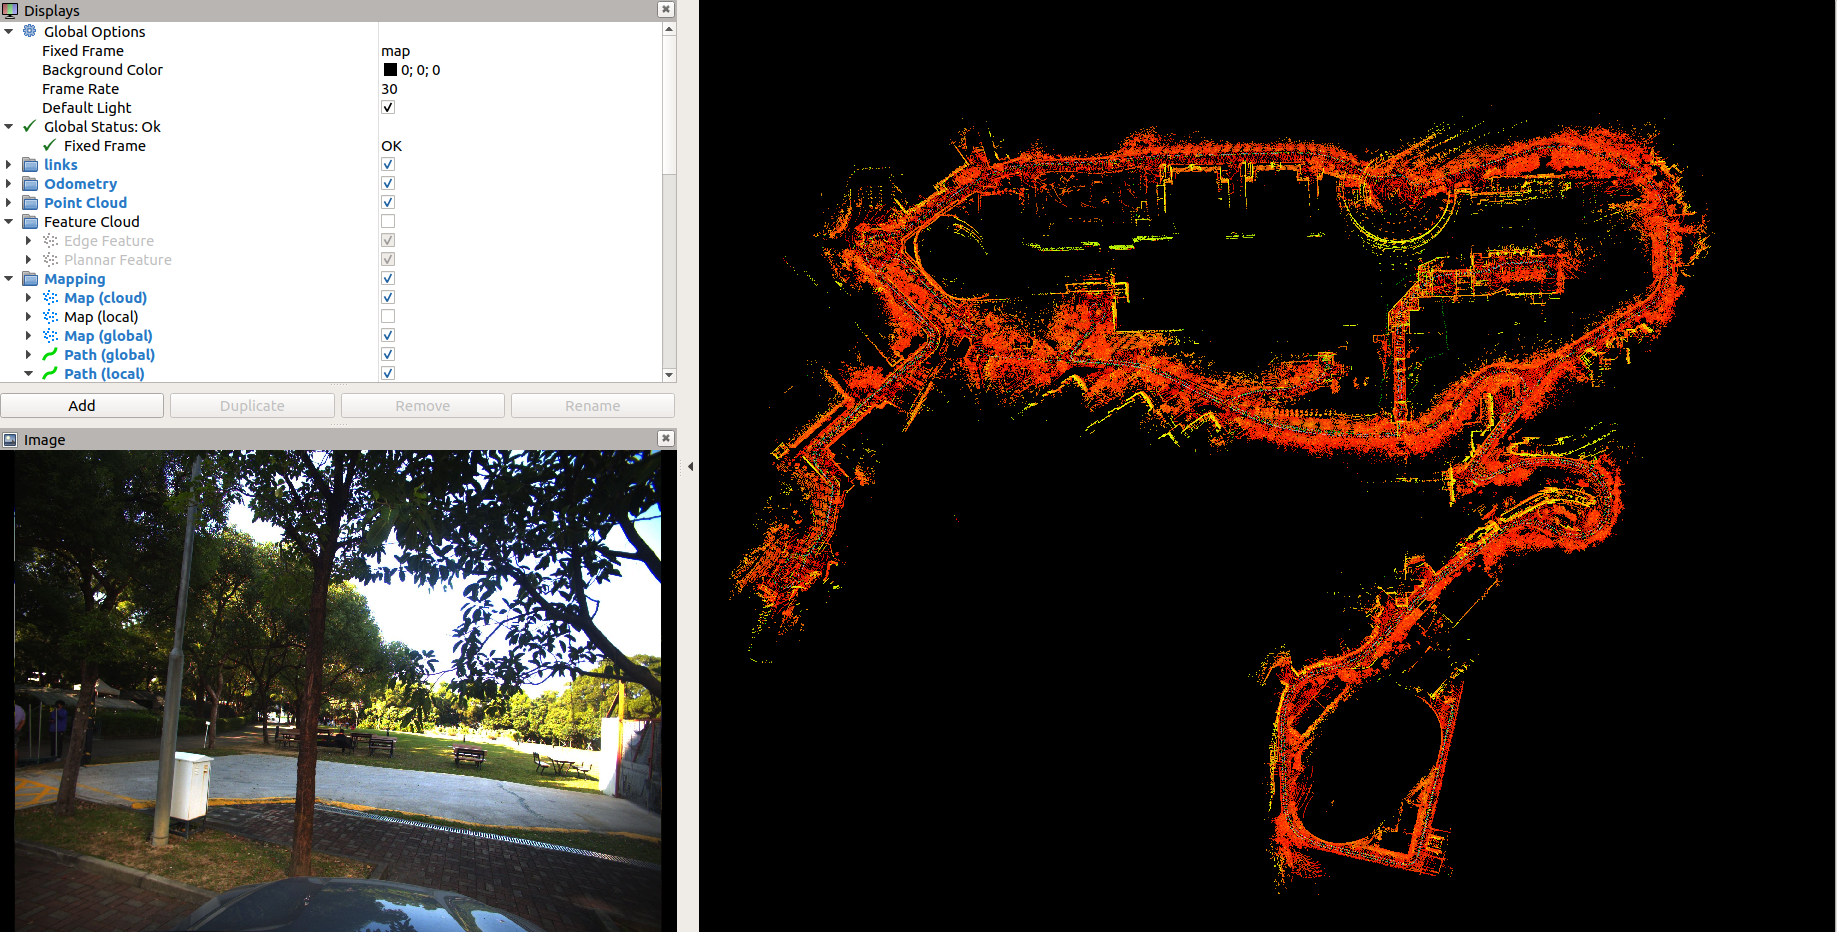
We provided a very challenging long-distance vehicle data collection. There is a tunnel scene collected in the mountain campus. The initial GPS data quality is poor, and there are large and small closed loops.
You can get the campus data in dropbox or BaiduNetdisk (password: m8g4).
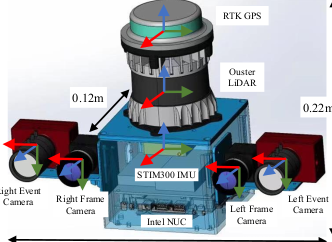
We ensure that the coordinate systems of the lidar and IMU are consistent, and it is easy to set the external parameter matrix.
when you set useGPS as true, remember to test the params gpsCovThreshold. Just make sure your vehicles are in a good position at the first beginning of the sequence where the status of GNSS is stable encough, or you can not initialize your system successfully!
roslaunch lio_sam_6axis run.launch
- you can get the test video
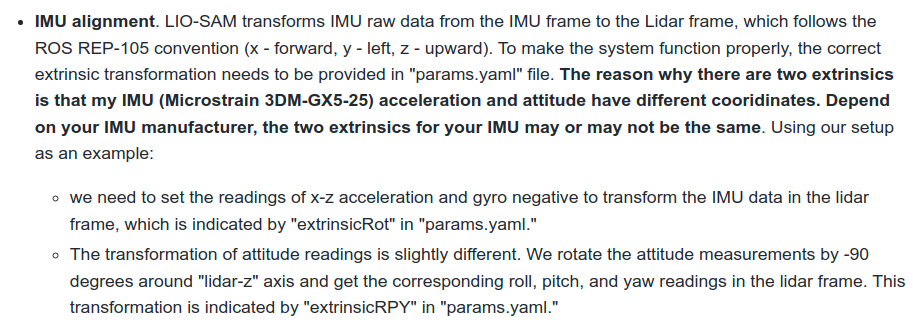
Before we align the coordinate systems of the IMU and lidar, that is, set the three parameters extrinsicTrans, extrinsicRot and extrinsicRPY in the LIO-SAM-6AXIS/config/params.yaml file. Many people have questions about the latter two rotation extrinsic parameters, why There will be two different values for the external participation of the lidar to the IMU. The author's reply is directly posted below.
In short, the lidar coordinate system should comply with the REP105 standard, that is, to ensure that the lidar coordinate system xyz represents the direction, front、left and upper. The following will take the Hesai radar coordinate system as an example to illustrate.
Because LIO_SAM only uses the acceleration and angular velocity in the IMU data to estimate the system state, and its orientation data only initializes the orientation of the system in the back-end optimization module, it is very simple to adapt to the 6-axis IMU. On the premise that the IMU coordinate system and the lidar coordinate system are aligned, it is only necessary to modify the imuConverter function. The specific method is to modify the imuConverter function in the LIO-SAM-6AXIS/include/utility.h file, as follows.
  sensor_msgs::Imu imuConverter(const sensor_msgs::Imu &imu_in) {
    sensor_msgs::Imu imu_out = imu_in;
    // rotate acceleration
    Eigen::Vector3d acc(imu_in.linear_acceleration.x, imu_in.linear_acceleration.y, imu_in.linear_acceleration.z);
    acc = extRot * acc;
    imu_out.linear_acceleration.x = acc.x();
    imu_out.linear_acceleration.y = acc.y();
    imu_out.linear_acceleration.z = acc.z();
    // rotate gyroscope
    Eigen::Vector3d gyr(imu_in.angular_velocity.x, imu_in.angular_velocity.y, imu_in.angular_velocity.z);
    gyr = extRot * gyr;
    imu_out.angular_velocity.x = gyr.x();
    imu_out.angular_velocity.y = gyr.y();
    imu_out.angular_velocity.z = gyr.z();
    // rotate roll pitch yaw
    Eigen::Quaterniond q_from(imu_in.orientation.w, imu_in.orientation.x, imu_in.orientation.y, imu_in.orientation.z);
    // we only need to align the coordinate system.
    // Eigen::Quaterniond q_final = q_from * extQRPY;
    Eigen::Quaterniond q_final = extQRPY;
    q_final.normalize();
    imu_out.orientation.x = q_final.x();
    imu_out.orientation.y = q_final.y();
    imu_out.orientation.z = q_final.z();
    imu_out.orientation.w = q_final.w();

    if (sqrt(
        q_final.x() * q_final.x() + q_final.y() * q_final.y() + q_final.z() * q_final.z() + q_final.w() * q_final.w())
        < 0.1) {
      ROS_ERROR("Invalid quaternion, please use a 9-axis IMU!");
      ros::shutdown();
    }

    return imu_out;
  }
q_final represents the orientation result taken from the IMU data. For the 6-axis IMU, we generally integrate our own in the SLAM system instead of directly adopting this result. But in the 9-axis IMU, the orentation part is the global attitude, that is, the result of the fusion with the magnetometer, which represents the angle between the IMU and the magnetic north pole. So here we only need to align the coordinate axis of the orentation data with the base_link, that is, multiply the lidar to the extrinsic of the IMU.
Make sure the point cloud timestamp, ring channel is ok. In addition, the lidar coordinate system should meet the REP105 standard, that is, xyz represents the front and upper right direction. Note that the structure of the point cloud is related to your lidar driver, and may not be exactly the same. The format below is for reference only.
You need to add some specific point cloud struct for your own lidar in the imageProjection.cpp.
The coordinate system of Hesai LiDAR is different from that of the traditional REP105, and its xyz represent the left 、back and top respectively.
struct PandarPointXYZIRT {
  PCL_ADD_POINT4D
  float intensity;
  double timestamp;
  uint16_t ring;                      ///< laser ring number
  EIGEN_MAKE_ALIGNED_OPERATOR_NEW // make sure our new allocators are aligned
} EIGEN_ALIGN16;

POINT_CLOUD_REGISTER_POINT_STRUCT(PandarPointXYZIRT,
(float, x, x)
(float, y, y)
(float, z, z)
(float, intensity, intensity)
(double, timestamp, timestamp)
(uint16_t, ring, ring)
)The point cloud timestamp of ouster lidar is not necessarily ustc time。
struct OusterPointXYZIRT {
  PCL_ADD_POINT4D;
  float intensity;
//  uint32_t time;
  uint16_t reflectivity;
  uint8_t ring;
  std::uint16_t ambient;  // additional property of p.ouster
  float time;
  uint16_t noise;
  uint32_t range;
  EIGEN_MAKE_ALIGNED_OPERATOR_NEW
} EIGEN_ALIGN16;

POINT_CLOUD_REGISTER_POINT_STRUCT(OusterPointXYZIRT,
(float, x, x) (float, y, y) (float, z, z) (float, intensity, intensity)
(uint16_t, reflectivity, reflectivity)
(uint8_t, ring, ring)
(std::uint16_t, ambient, ambient)
(float, time, time)
(uint16_t, noise, noise)
(uint32_t, range, range)
)Then you can set the debugLidarTimestamp to debug the timestamp of each points. Please note that the point cloud timestamp unit output by the terminal is seconds, and the value is between 0.0-0.1s. Since the time for mechanical lidar to scan a circle to obtain a point cloud is usually 0.1s.
if (debugLidarTimestamp) {
  std::cout << std::fixed << std::setprecision(12) << "end time from pcd and size: "
            << laserCloudIn->points.back().time
            << ", " << laserCloudIn->points.size() << std::endl;
}
Thanks for Guoqing Zhang, Jianhao Jiao.
Thanks for LIO_SAM.


