This tool provides end to end support for generating datasets and validating object detection models from video and image assets. The generated output data would be further the input into the CNTK.

The tool supports the following features:
- The ability to tag and annotate Image Directories or Stand alone videos.
- Computer-assisted tagging and tracking of objects in videos using the Camshift tracking algorithm.
- Exporting tags and assets to CNTK or YOLO format for training an object detection model.
- Running and validating a trained CNTK object detection model on new videos to generate stronger models.
The origin VoTT created by Microsoft team is refered to https://github.com/Microsoft/VoTT . The fork version is 1.0.8.
The variation version takes nodejs as the core and add some others info to the output file for different purposes.
- V1.0.0 - 2018-02-13
- add labeler tag
- automatically generating image filename
- Installation
- Tagging a Video
- Tagging an Image Directory
- Reviewing and Improving an Object Detection Model
- Supporting additonal object detection Export and Review formats
- Upcoming Features
- How to Contribute
- Install the Nodejs.
- Clone the app.
git clone https://github.com/jiankaiwang/vott.git- Run the app.
cd vott
npm install
npm startPlease note that installation of CNTK and FAST-RCNN dependencies are optional for tagging and are only required for CNTK model review and training.
-
Install CNTK (Note: currently the tool only supports the full installation method (non pip) of CNTK).
-
Follow the setup instructions of the CNTK Fast-RCNN tutorial (Note: Fast-RCNN currently only supports Linux python version 3.4 and not 3.5).
-
Configure
CNTK-Config.json(which resides in the '\resources\app' directory of the tagging tool) with the following properties to enable the model review feature:
{
    "cntkPath" : "{CNTK Path default is c:/local/cntk}",
}- Select the option to tag a video.

- Load an MP4 video file either by dragging it into the app or clicking on and selecting it.

- Configure the tagging job and specify the settings in the screenshot below:

Frame Extraction Rate: number of frames to tag per second of video
Tagging Region Type: type of bounding box for tagging regions
- Rectangle: tag bounding boxes of any dimension
- Square: tag bounding boxes of auto-fixed dimensions
Suggested Region Method: how to suggest regions for next frame
- Tracking: Use camshift to track tagged regions in next frame
- Copy Last Frame: Copy all regions to the next frame.
Enable Scene Change Detection: Detect scene changes to prevent false positives when tracking. (Note this option is slightly slower)
Labels: labels of the tagged regions (e.g. Cat, Dog, Horse, Person)
Type the name in abbreviation: labeler name (optional)
- Tag the video frame by frame

Tagging: click and drag a bounding box around the desired area, then move or resize the region until it fits the object
- Selected regions appear as red
and unselected regions will appear as blue
.
- Assign a tag to a region by clicking on it and selecting the desired tag from the labeling toolbar at the bottom of the tagging control
- Click the
 button to clear all tags on a given frame

Navigation: users can navigate between video frames by using the  buttons, the left/right arrow keys, or the video skip bar
- Tags are auto-saved each time a frame is changed
Tracking: new regions are tracked by default until a given scene changes.
- Since the camshift algorithm has some known limitations, you can disable tracking for certain sets of frames. To toggle tracking on and off use the file menu setting, or the keyboard shortcut Ctrl/Cmd + T.
- Export video Tags using the Object Detection Menu or Ctrl/Cmd + E

Note on exporting: the tool reserves a random 20% sample of the tagged frames as a test set.
Specify the following export configuration settings:

- Export Format: What framework to export to defaults to CNTK
- Export Frames Until: how far into the video the export operation will proceed
- Last Tagged Region: exports frames up until the last frame containing tags - Last Visited Frame: exports frames up until the last frame that the user explicitly visited - Last Frame: exports all video frames
- Output directory: directory path for exporting training data
- Output directory: directory path for exporting training data
- Select the option to tag an image directory

- Load an image directory by selecting it.

- Configure the tagging job and specify the settings in the screenshot below:

Frame Extraction Rate: number of frames to tag per second of video
Tagging Region Type: type of bounding box for tagging regions
* Rectangle: tag bounding boxes of any dimension
* Square: tag bounding boxes of auto-fixed dimensions
* Labels: labels of the tagged regions (e.g. Cat, Dog, Horse, Person)
Type the name in abbreviation: labeler name (optional)
- Tag each Image

**Tagging**: click and drag a bounding box around the desired area, then move or resize the region until it fits the object
- Selected regions appear as red  and unselected regions will appear as blue .
- Assign a tag to a region by clicking on it and selecting the desired tag from the labeling toolbar at the bottom of the tagging control
- Click the  button to clear all tags on a given frame
**Navigation**: users can navigate between video frames by using the  buttons, the left/right arrow keys, or the video skip bar
- Tags are auto-saved each time a frame is changed
- Export Image directory tags Tags using the Object Detection Menu or Ctrl/Cmd + E

*Note on exporting: the tool reserves a random 20% sample of the tagged frames as a test set.*
Specify the following export configuration settings:

-
Export Format: What framework to export to defaults to CNTK
-
Export Frames Until: how far into the video the export operation will proceed
- Last Tagged Region: exports frames up until the last frame containing tags
- Last Visited Frame: exports frames up until the last frame that the user explicitly visited
- Last Frame: exports all video frames
- Output directory: directory path for exporting training data
- Train model with Object Detection using FastRCNN
Note: the data is already in CNTK format, so you do not have to runC1_DrawBboxesOnImages.pyorC2_AssignLabelsToBboxes.py - Since CNTK does not embed the names of the classes in the model, on default, the module returns non descriptive names for the classes, e.g. "class_1", "class_2".Place a JSON file named "model.json" in the same directory of the Fast-RCNN model file with the the correct tag labels. Format the json file as follows with your own class names:
{
    "classes" : {
        "background" : 0,
        "human" : 1,
  "cat" : 2,
  "dog" : 3
    }
}- Load a new asset that the model has not been trained on
- Configure a new or load a previous tagging job
- Apply model to new asset using Ctrl/Cmd + R
- Specify a model path and temporary output directory
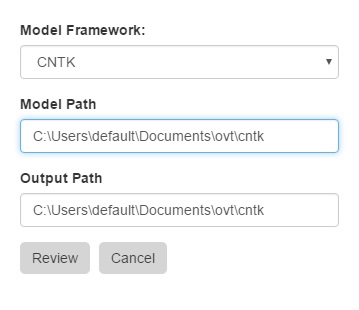
- When the model finishes processing, validate tags, re-export and retrain it
- Repeat step 1 on new assets until the model performance is satisfactory

In the latest release we provide support for Export and Review formats. To add a new object detection format, copy the interface folder and use the Yolo and CNTK implementations as reference.
- Tagging project management
You are welcome to send us any bugs you may find, suggestions, or any other comments.
Before sending anything, please go over the repository issues list, just to make sure that it isn't already there.
You are more than welcome to fork this repository and send us a pull request if you feel that what you've done should be included.