- Set up your local environment for deploying with Render.
- Deploy a basic Flask application to Render.
- Deployment: the processes that make an application available for its intended use. For web applications, this means moving the application to a platform that supports requests from the internet.
- Developer Operations (DevOps): the practices and tools that improve a team's ability to develop and deploy applications quickly.
- PostgreSQL: an open-source relational database system that provides more SQL functionality than SQLite. Unlike SQLite, its data is stored on a server rather than in files.
- Platform as a Service (PaaS): a development and deployment platform that exists on a wide range of servers with different functionality. PaaS solutions reduce maintenance time for a software development team, but can increase cost. Some PaaS solutions, such as Render, provide free tiers for small applications.
In this lesson, we'll be deploying a basic, standalone Flask API application to Render. We'll give instructions to generate the application from scratch and talk through the steps to get the code running on a Render server.
In coming lessons, we'll learn how to add more complexity to the application with a React frontend. Since the setup for a Flask-React application is a bit trickier, it'll be beneficial to see the setup for Flask alone first. Let's get started!
To make sure you're able to deploy your application, you'll need to do the following:
You can sign up at for a free account at https://dashboard.render.com/. We recommend signing up using your GitHub account- this will streamline the process of connecting your applications to Render later on. The instructions below assume you've done that.
Once you've completed the signup process, you will be taken to the Render dashboard:

In order to connect Render to your GitHub account, you'll need to click the "New Web Service" button in the "Web Services" box.
You'll then click the "Build and deploy from a Git repository" button.

On the next page, you will see a GitHub heading on the right side and below that a link labeled "Configure account". (If you didn't sign up using GitHub, it will say "Connect account" instead.)
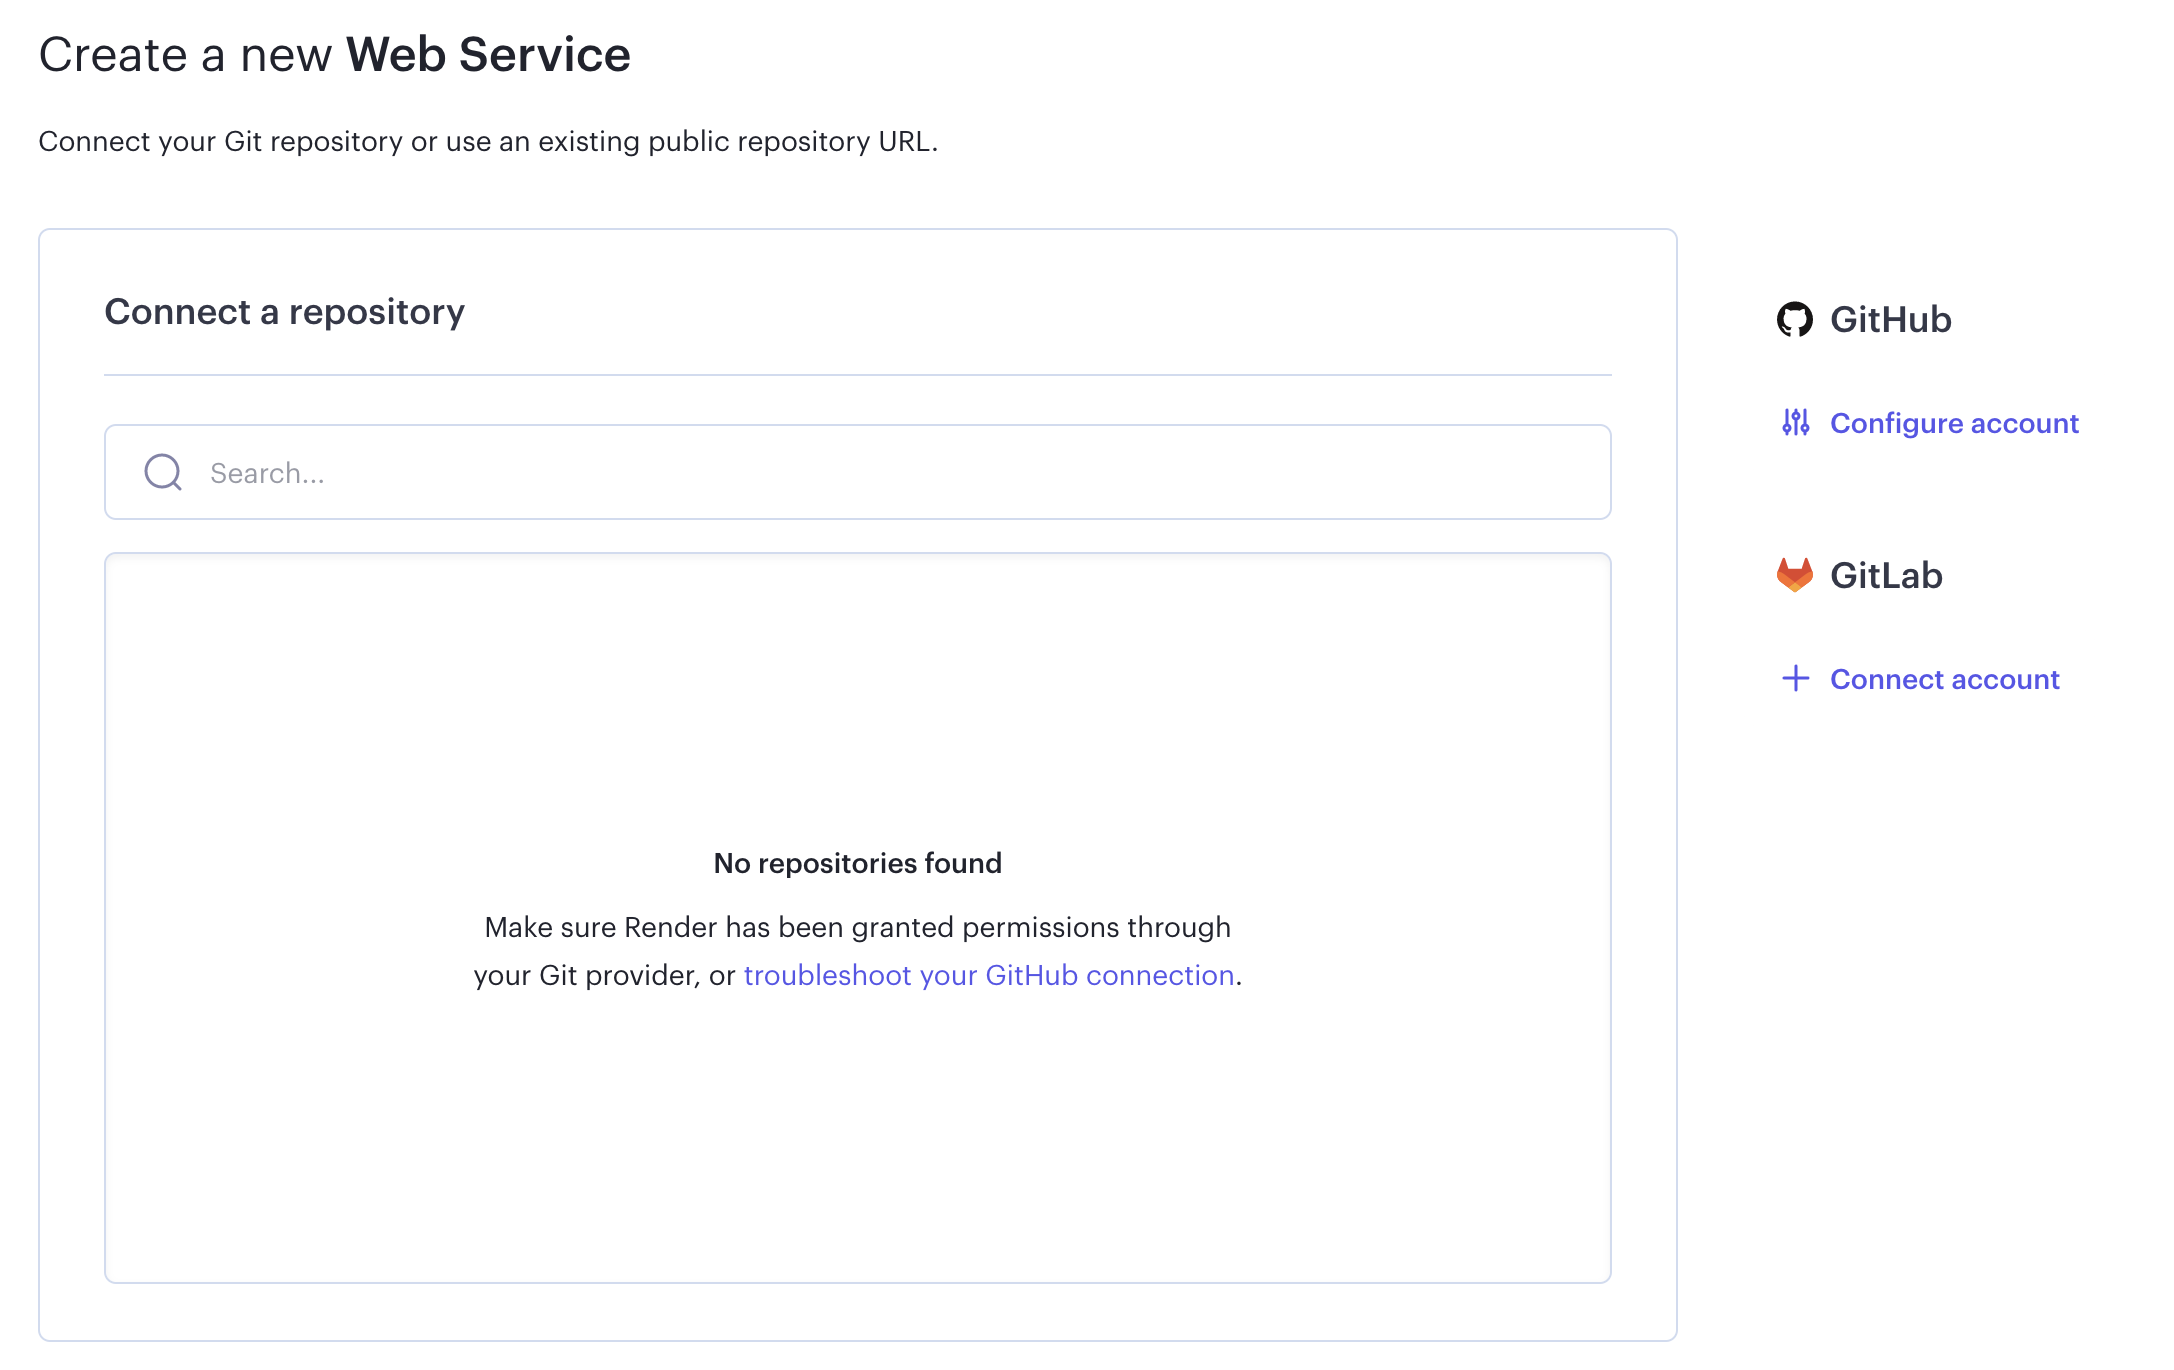
Click that link; a modal will appear asking you for permission to install Render on your GitHub account:

Click "Install." You should then be taken back to the "Create a New Web Service" page, which should now show a list of your GitHub repos. We won't create a web service just yet so you are free to navigate back to the Render dashboard.
Render requires that you use PostgreSQL for your database instead of SQLite. PostgreSQL (or just Postgres for short) is an advanced database management system with more features than SQLite. If you don't already have it installed, you'll need to set it up.
To install Postgres for WSL, run the following commands from your Ubuntu terminal:
$ sudo apt update
$ sudo apt install postgresql postgresql-contrib libpq-dev
Then confirm that Postgres was installed successfully:
$ psql --versionRun this command to start the Postgres service:
$ sudo service postgresql startFinally, you'll also need to create a database user so that you are able to connect to the database from Flask. First, check what your operating system username is:
$ whoamiIf your username is "ian", for example, you'd need to create a Postgres user with that same name. To do so, run this command to open the Postgres CLI:
$ sudo -u postgres -iFrom the Postgres CLI, run this command (replacing "ian" with your username):
$ createuser -sr ianThen enter control + d or type logout to exit.
This guide has more info on setting up Postgres on WSL if you get stuck.
To install Postgres for OSX, you can use Homebrew:
$ brew install postgresqlOnce Postgres has been installed, run this command to start the Postgres service:
$ brew services start postgresqlCheck your Postgres version:
$ psql --versionOne limitation of Render is that it only allows one PostgreSQL instance to be created per user account. With this instance, we can create an app, give it some seed data, and deploy it, storing the data in the PostgreSQL instance's database. But then what happens if you want to deploy additional apps to Render? You can probably see how using a single database for multiple apps could get complicated very quickly and potentially cause problems. Fortunately, Render allows users to create multiple databases within a single PostgreSQL instance so you can have a separate database for each app you deploy.
Let's start by creating the PostgreSQL instance, then we'll create the bird database.
You need to check which version of Postgresql you have on your local machine.
Run psql --version in your terminal. The output should look something like
this, but with your version instead:
$ psql --version
psql (PostgreSQL) 15.x
Go to the Render dashboard, click the "New +" button and select
"PostgreSQL". Enter a name for your database. This can be whatever you like —
we're using my_database.

Note: Hyphens may not be used in the database names; you should use
underscores instead (e.g., my_db, not my-db).
Select the Postgresql version you have from the dropdown.
Render will randomly generate identifiers for the "Database" and "User" fields, or you can create those yourself if you prefer.
For "Region", you can either select the location closest to you or you can use the default selection. Make sure you use the same region when you are creating the web service later in this lesson.
Scroll to the bottom of the page and click "Create Database". It may take a few minutes to create the database. Leave the database page open — you'll need to copy information from it as we proceed.
Next, let's create a database specifically for our bird app. We'll do this using
the PostgreSQL interactive terminal, psql.
The command to launch the interactive terminal is provided in the Render database page. Scroll down to the "Connections" section and copy the PSQL command.

Paste it into your terminal window and press enter. This command connects you to
the remote database. You should now see the psql command prompt,
my_database=> (there may be some numbers appended to the database name).
Type "help" for help.

my_database=>
If you type the \l command to list the databases, you'll see a table that
includes my_database.
Type "help" for help.

my_database=> \l
You will need to hit the enter key to exit the database listing and return to the PSQL prompt.
To create the database for our bird app, we'll run the CREATE DATABASE SQL
command. Again, you can name your database whatever you like; we're using
bird_app_db. Be sure to include the semi-colon at the end of the command:
my_database=> CREATE DATABASE bird_app_db;Now if you run the \l command again, you should see that bird_app_db has
been added to the list of databases.
You can now exit psql using the \q command.
Note: The Render dashboard will not show the information about the
bird_app_dbdatabase; it will only show the name you assigned when you created the PostgreSQL instance on Render (my_database). To see any other databases you have on your PostgreSQL instance, you'll need to usepsql. For now, be sure to make a note of your new database's name as we'll need to use it in the next step.
We'll be following the steps in Render's "Deploy a Flask App" guide, so if you get stuck and are looking for more assistance, check that guide.
The first thing we'll need to do is create our new Flask application. Make sure you're in a non-lab directory, then run:
$ mkdir bird-app && cd $_
$ pipenv install Flask gunicorn psycopg2-binary Flask-SQLAlchemy Flask-Migrate SQLAlchemy-Serializer Flask-RESTful
**NOTE: You may want to specify versions for these packages when you work on your Phase 4 and Phase 5 projects. This will prevent updates to these modules from breaking your code. You can check all versions with the command
pipenv requirements.
This will set create an application directory and install some valuable
libraries for building a RESTful API. Let's also run the following command to
generate a requirements.txt file:
$ pipenv requirements > requirements.txtrequirements.txt is very similar to a Pipfile- the primary difference here is
that instead of supporting a local virtual environment through pipenv, it
supports the creation of an application environment on a PaaS platform. (There
are some different tools that use this file as well.)
To test our Flask app locally, we need to assign the DATABASE_URI environment
variable to reference the bird database we created on Render. Return to the
Render dashboard and click on the "my_database" link (or whatever you named
the Postgresql instance). Scroll down to Connections and copy the "External
Database URL".

You will assign this string to the DATABASE_URI environment variable, but you
need to make two modifications to the external database URL string:

- Modify the protocol at the beginning of the string to say
postgresqlinstead ofpostgres. - Modify the database name at the end of the string to say
bird_app_dbinstead ofmy_database.
Do not modify any other part of the string. Assign the environment variable by typing the following in a terminal:
$ export DATABASE_URI=<Modified External Database URL goes here>Let's set up our app, models, and migrations to get things started. You can
create the files directly within the bird-app folder since we won't be
needing a server sub-folder.
# app.py

import os

from flask import Flask, jsonify, make_response
from flask_migrate import Migrate
from flask_restful import Api, Resource

from models import db, Bird

app = Flask(__name__)
app.config['SQLALCHEMY_DATABASE_URI'] = os.environ.get('DATABASE_URI')
app.config['SQLALCHEMY_TRACK_MODIFICATIONS'] = False
app.json.compact = False

migrate = Migrate(app, db)
db.init_app(app)

api = Api(app)

class Birds(Resource):

    def get(self):
        birds = [bird.to_dict() for bird in Bird.query.all()]
        return make_response(jsonify(birds), 200)

api.add_resource(Birds, '/birds')
# models.py
from flask_sqlalchemy import SQLAlchemy
from sqlalchemy_serializer import SerializerMixin
db = SQLAlchemy()
class Bird(db.Model, SerializerMixin):
__tablename__ = 'birds'
id = db.Column(db.Integer, primary_key=True)
name = db.Column(db.String)
species = db.Column(db.String)
def __repr__(self):
return f'<Bird {self.name} | Species: {self.species}>'Add this data to the seed.py file:
# seed.py

from app import app
from models import db, Bird

with app.app_context():

    print('Deleting existing birds...')
    Bird.query.delete()

    print('Creating bird objects...')
    chickadee = Bird(name='Black-Capped Chickadee', species='Poecile Atricapillus')
    grackle = Bird(name='Grackle', species='Quiscalus Quiscula')
    starling = Bird(name='Common Starling', species='Sturnus Vulgaris')
    dove = Bird(name='Mourning Dove', species='Zenaida Macroura')

    print('Adding bird objects to transaction...')
    db.session.add_all([chickadee, grackle, starling, dove])

    print('Committing transaction...')
    db.session.commit()

    print('Complete.')
Then run these commands to generate the database and run the migrations and seed file:
$ flask db init
# => ...
$ flask db revision --autogenerate -m'create table birds'
# => ...
$ flask db upgrade
# => ...
$ python seed.py
# => Deleting existing birds...
# => Creating bird objects...
# => Adding bird objects to transaction...
# => Committing transaction...
# => Complete.
flask db upgradecreates a new PostgreSQL database to be associated with your application based on the configuration on Render and inmodels.py. Unlike with SQLite, the actual database file isn't created in the application's folder; it lives on Render's servers and will not show up in your directory structure at all.
To make sure the app works locally before deploying, run gunicorn app:app.
$ gunicorn app:appNavigate to http://localhost:8000/birds and confirm the app displays the bird data:
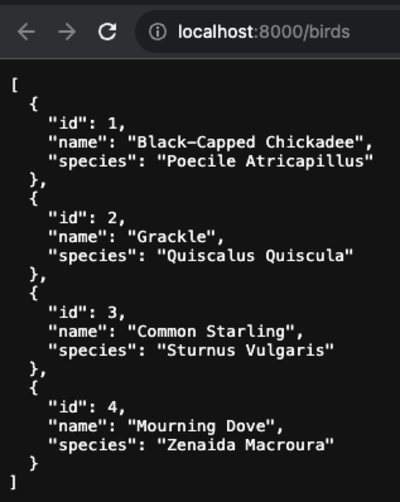
NOTE: gunicorn runs on port 8000 by default. Because this does not conflict with any system ports on MacOS, Windows, or Linux, we won't change it here.
Now that we've got some working code, it's time to get that code to run on a Render server! The process of uploading our code to Render is managed by Git. This makes it easy to deploy new versions using a tool most developers, including yourself, are already familiar with.
Make a commit to save your changes, then push them to a remote repo:
$ git init
$ git add .
$ git commit -m 'Initial commit'
Next, you'll need to create a repository in GitHub:

...and push your work to the new repo:
$ git remote add <remote_name> <remote_repo_url>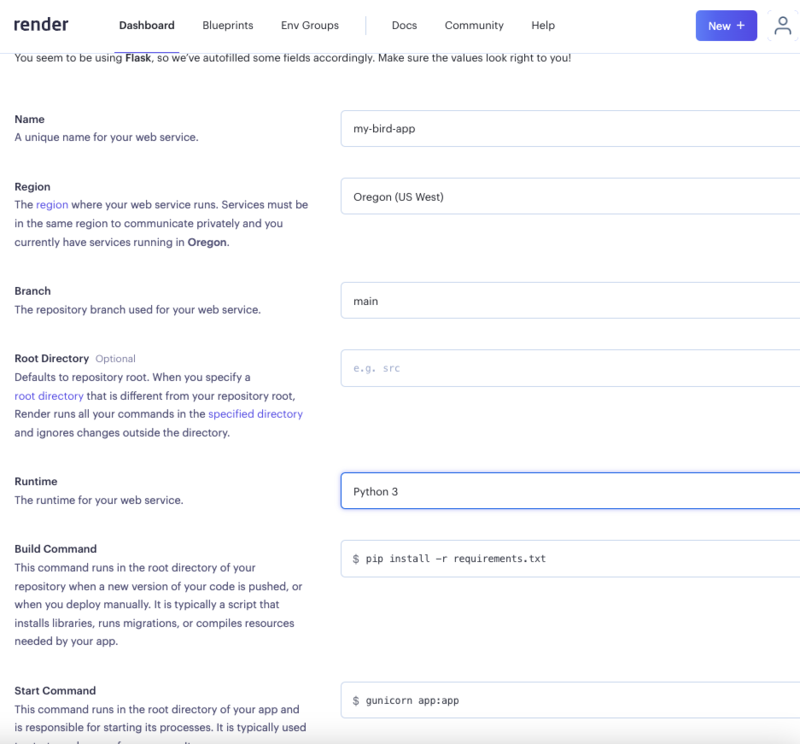
$ git push -u <remote_name> <local_branch_name>Head back to the Render dashboard and click "New+" to make a new Web Service. If you connected to GitHub when you signed up, you should see a list of all your repos! Find your bird API and click "Connect".
Give your application a name. Render should be able to figure out the github repo is for a Flask application and will fill in the Runtime, Build Command, and Start Command. If not, configure the application as seen below. Try to specify the same region as the database instance.
Before our first successful deployment, we need to click on the "Advanced" button, then add two environment variables:
PYTHON_VERSION is 3.8.13.
DATABASE_URI is the Internal Database URL from your PostgreSQL database
(not External Database URL). Don't forget to change the protocol to postgresql
and the database name to bird_app_db! It should look something like this:
postgresql://my_database_user:#################################################/bird_app_db
NOTE: If your database instance and web service are in different regions, you may need to use the External Database URL for the connection.
Scroll to the bottom of the page and click the "Create Web Service" button. It may take a few minutes to build and deploy your application.
Your URL is located under your app name at the top of the screen.
Click on the link, navigate to /birds, and view your work in all its glory!
[
  {
    "id": 1,
    "name": "Black-Capped Chickadee",
    "species": "Poecile Atricapillus"
  },
  {
    "id": 2,
    "name": "Grackle",
    "species": "Quiscalus Quiscula"
  },
  {
    "id": 3,
    "name": "Common Starling",
    "species": "Sturnus Vulgaris"
  },
  {
    "id": 4,
    "name": "Mourning Dove",
    "species": "Zenaida Macroura"
  }
]Since Render integrates the deploying process with Git, it's straightforward to
add new features to your code and deploy them. Let's start by adding a new route
in app.py:
class BirdByID(Resource):
    def get(self, id):
        bird = Bird.query.filter_by(id=id).first().to_dict()
        return make_response(jsonify(bird), 200)

api.add_resource(BirdByID, '/birds/<int:id>')
Test your code locally by running gunicorn app:app and visiting
https://localhost:8000/birds/1.
After adding this code, make a commit:
$ git add app.py
$ git commit -m 'Added get by ID route'
Then, to deploy the changes, push the new code up to GitHub:
$ git pushAfter pushing new code, Render will run through the build process again and deploy your changes. This may take a few minutes. Test to make sure the new route works once the deployment is complete.
Note, you don't have to run your migrations again since the database already exists on the server. You would have to run the migrations if you created a new migration file.
According to Render's documentation on its Free Web Services:
Render spins down a Free web service that goes 15 minutes without receiving inbound traffic. Render spins the service back up whenever it next receives a request to process.
Spinning up a service takes a few seconds, which causes a noticeable delay for incoming requests until the service is back up and running. For example, a browser page load will hang momentarily.
This means that, when you try to navigate to your app in the browser, it might take a while to load.
With Render's free tier, databases expire after 90 days. This means that, before the end of the 90 days, you will need to back up your databases, delete the PostgreSQL instance from Render, create a new PostgreSQL instance, and populate it from the database backups. Render should send an email warning you that your database will be expiring soon.
We will go over the process for backing up and recreating your database — along with some other tips for using databases with Render — in the next lesson.
Congrats on deploying your first Flask app to the world wide web! Understanding the deployment process and what it takes to run your application on another computer is an important step toward becoming a full-stack developer. Like anything new, this process can be daunting the first time you try it, but with practice and exposure, you'll build confidence over time.
In the next lesson, we'll work on deploying a more complex application with a Flask API backend and a React frontend, and talk through some of the challenges of running these two applications together.
Before you move on, make sure you can answer the following questions:
What familiar process is used for deploying code to Render?
Render integrates natively with GitHub and GitLab. Your application needs to be added manually at first, but syncs automatically upon every new push.