In this lesson, we'll be working with and retrieving 3rd party information from external sources. These are typically referred to as APIs or Application Programming Interfaces.
Students will be able to:
- Basic differences between clients and servers
- Introduce the concept of HTTP GET requests
- Introduction to APIs
- Introduction to axios
- Intro to async / await
- Make our first GET request with axios
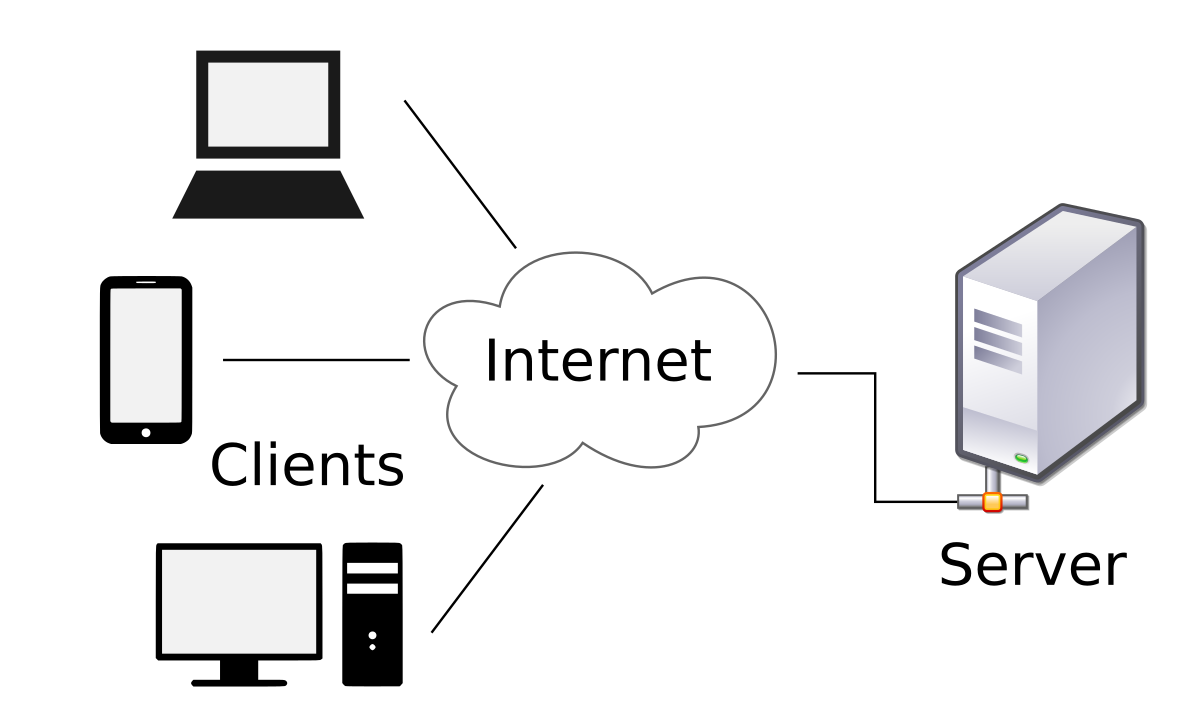
The world wide web is basically just an interconnected network of client devices and servers.
We use the word "client" to refer to a computer connected to the internet that is being used by a human. Clients would include your laptop, your smart phone, your Apple TV, etc.
A "server" is a computer who's primary purpose is just to store data. Humans don't normally interact with a server directly, so they have almost no interface. They often kind of ook like a VCR:
You may be more familiar seeing them stacked in a cluster, like this:
Client computers have interfaces with which humans can interact. When people are using such a device to interact with an app, these interactions can be boiled down to four core actions:
- Creating new data
- Reading existing data
- Updating existing data
- Deleting existing data
Apps that allow users to do these four actions are known as CRUD apps.
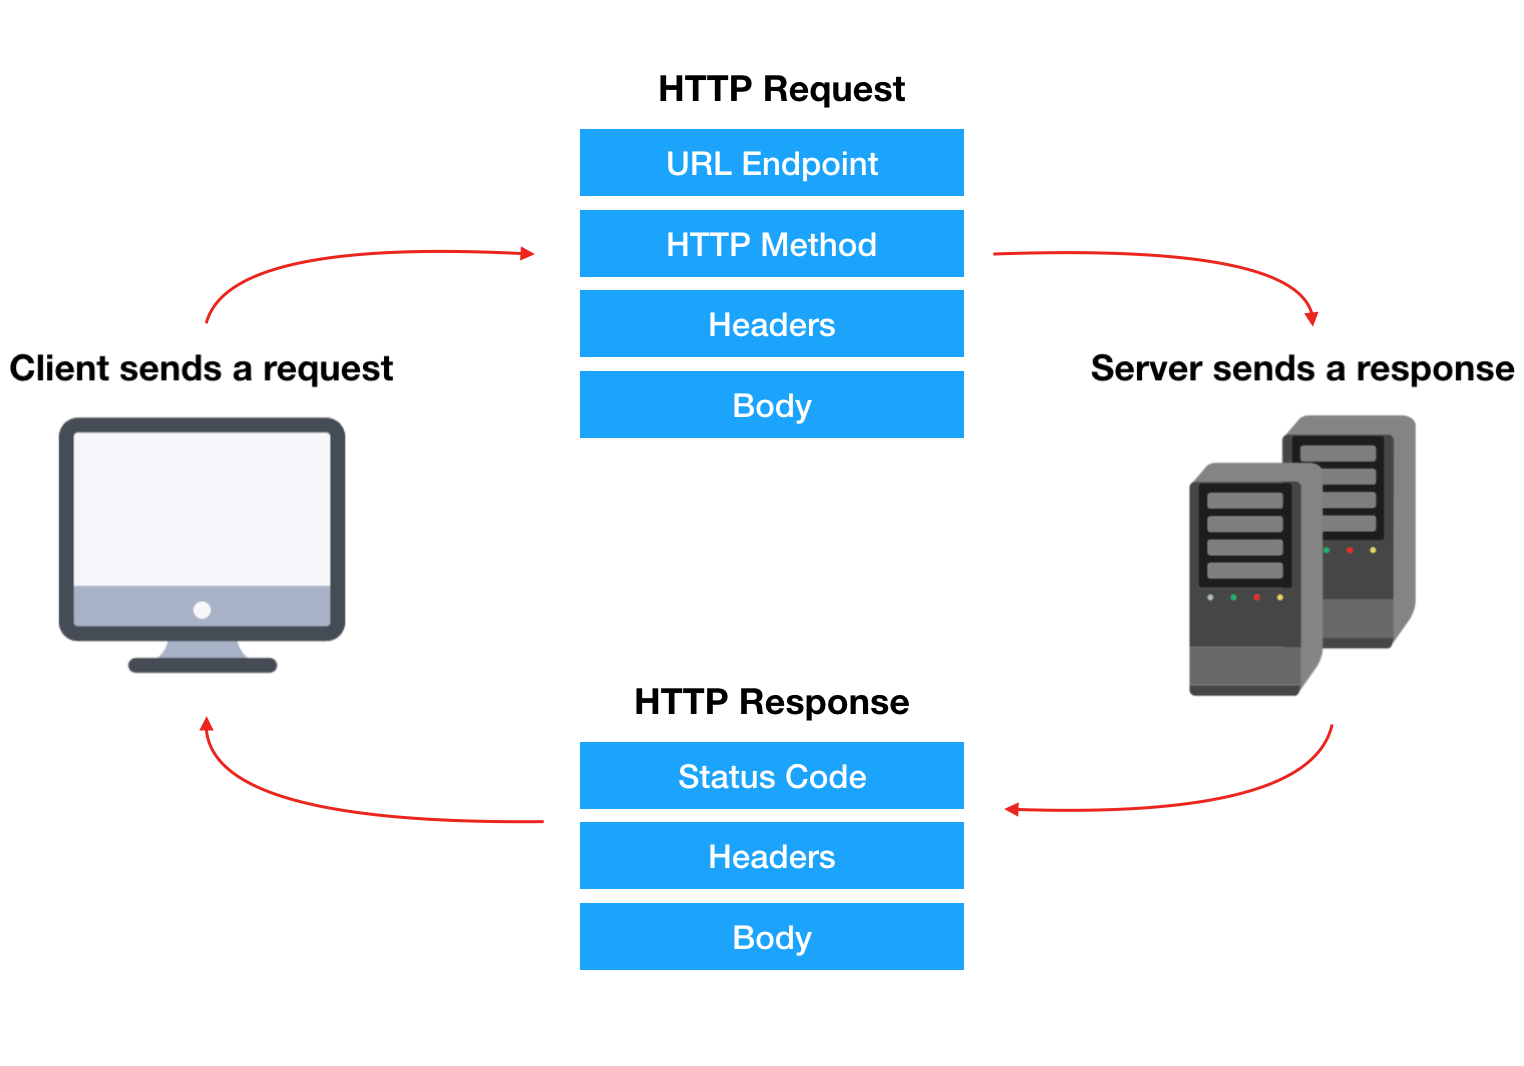
When we perform one of these four CRUD actions, we're making a an HTTP request to a server to fulfill our specified action. HTTP stands for HyperText Transfer Protocol. You can think of HTTP as a set of rules for transferring data over the web. There are four types of HTTP requests that connect with our four user interactions:
- POST request == Create data
- GET request == Read data
- PUT request == Update data
- DELETE request == Delete data (whoa! who knew!?!)
When a user makes one of these requests, the server will "respond" with either a success or error message and by either doing or not doing the action requested. There are a number of factors affecting success that we will discuss at greater length in the future.
We'll need to wait until we learn backend database languages before we can Create, Update, or Delete data from a database; however, fortunately, we can Read existing data with just JavaScript, so for now, we'll focus on how we can us JS to request data from servers that our users can read, watch, and listen to.
APIs are basically databases hosted on web servers that have data that is available for public use. This may not sound particularly exciting at first, but APIs are actually one of the most useful tools in web development.
Imagine you're building a hiking app. You might want to have information about the weather available when your users are planning when and where they're going to hike. Without access to a weather database, providing this information to your users would be nearly impossible.
Fortunately, we have the Weather API. When you send an HTTP GET request to this API, it will respond back to you with whatever weather data you requested, allowing you to display that information in your app for your users.
There are LOADS of APIs on the web, ranging from those containing extremely helpful information like the weather, financial data, and government data to those containing really fun info like a database of Jeopardy questions or breweries or Star Wars info.
Axios is a very popular JavaScript library you can use to perform HTTP requests.
Because axios is a library, you have to first add it to your project. You can link to the axios library in the head section of your HTML page with...
<script src="https://unpkg.com/axios/dist/axios.min.js"></script>Make sure to place the link to axios before the link to your main JS document or it won't work. We also need to defer the loading of our JS document, like this...
<script defer src="script.js"></script>Once you've added axios to your project, you'll have access to the axios object. The basic version of an axios HTTP request looks something like the following:
axios({
  url: 'http://www.yourserver.com/api/neat_stuff',
  method: 'post',
  headers: {
    'content-type': 'multipart/form-data'
  },
  data: form
})
The pieces we're seeing here are:
- URL Endpoint
- HTTP Method
- Headers
- Body
Depending on the HTTP method we're using and what data we're trying to send or receive, we don't necessarily have to use all four of these pieces in our axios call.
Once you've gained some familiarity with axios, you may want to try the shorthand syntax. Axios has shorthand methods for all four of our CRUD actions / HTTP request methods:
- you can CREATE with
axios.post() - you can READ with
axios.get()//<-- we'll be focusing on this one for now - you can UPDATE with
axios.put() - you can DELETE with
axios.delete()
When using these shorthand axios methods, you'll enter the endpoint URL and the header / body data as arguments. For example:
axios.get('http://www.url.com/api/endpoint', {
  params: {
    id: 1,
    name: Brian
  }
})So far, most of the javascript we've been writing is synchronous. In programming, we can simplify the definition of synchronous code as “a bunch of statements in sequence”; so each statement in your code is executed one after the other. This means each statement has to wait for the previous one to finish executing. For example, if we had the following code:
const myFunction = () => {
  console.log('First')
  console.log('Second')
  console.log('Third')
}
The console would print “First”, “Second”, “Third”. However, there are some javascript actions that can potentially take a long time, and it may not make sense for the entire app to wait for that action to be completed.
Thus, when we use javascript that takes a long time to execute, such as setTimeout() or setInterval() or, of course, axios API calls, they run asynchronously by default. That means the following code will print “First”, “Third”, “Second”.
const myFunction = () => {
  console.log('first')
  axios.get('https://dog.ceo/api/breeds/list/all').then(function () {
    console.log('second')
  })
  console.log('third')
}
_NOTE: It is SO important that you put https at the beginning of your URL for this API. If you do not put the "S", the call may fail. _
Sometimes, however, you actually want your app to wait. Fortunately, for those cases, we have async and await.
The keyword await makes JavaScript wait until a line of code completely finishes executing. However, you can only use await inside of an async function. How do we turn a function into an async function?
Easy! We just put the word "async" in front of the word "function". With arrow functions, we just write "async" before the parenthesis, like this: async () => { etc...}. So, if we use async and await on our previous example, the console will once again print “First”, “Second”, “Third” in proper order.
const myFunction = async () => {
  console.log('first')
  await axios.get('https://dog.ceo/api/breeds/list/all').then(function () {
    console.log('second')
  })
  console.log('third')
}
Usually the way that we'll use this in real life is to await while we store the value of an axios call to a variable. This lets us get rid of the .then part from above, resulting in a cleaner syntax. For example:
const getBreeds = async () => {
  const dogbreeds = await axios.get('https://dog.ceo/api/breeds/list/all')
  console.log(dogbreeds)
}Let's build a simple app that let's us enter a dog breed and uses The Dog API to return a random image of that breed. Ready? Let's go!
- First,
touchanindex.htmland ascript.jsin this lesson's folder. - Set up your HTML boilerplate. Inside of the
<body>, enter the following code and save yourindex.htmlpage:
<header>
  <input type="text" />
  <button>Dog Me</button>
</header>
<div></div>- Cool! Now let's do some Javascript :). Create a
script.jsfile and attach it to your HTML,<script defer src='./script.js'></script>. We'll start by assigning our<button>,<input>, and<div>elements to variables.
const button = document.querySelector('button')
const breedInput = document.querySelector('input')
const imageDiv = document.querySelector('div')- Next, let's add a click event listener to the button, with an anonymous arrow function:
button.addEventListener('click', async () => {})- Inside our click event's function, let's first grab the value of the
breedInput.
let breed = breedInput.value- Great! Now let's make an
axioscall to The Dog API and save it to a variable calledresponse. We're going to hit the Browse breed lists endpoint. Our goal is to get a link to a random image of a dog of the breed the user entered.
let response = await axios.get(
  `https://dog.ceo/api/breed/${breed}/images/random`
)- If you
console.log(response)and dig through the data, you'll find the image link you need inside of response > data > message. Let's save that to a variable.
let dogPic = response.data.message- Finally, let's update the DOM with our new image link by changing the inner HTML of our image div:
imageDiv.innerHTML = `<img src=${dogPic}>`At the end, our JS should look something like this:
const button = document.querySelector('button')
const breedInput = document.querySelector('input')
const imageDiv = document.querySelector('div')

//pulls all breeds and logs to the console
const getBreeds = async () => {
    const dogbreeds = await axios.get('https://dog.ceo/api/breeds/list/all')
    console.log(dogbreeds.data.message)
  }

  getBreeds()


//reads our Input value and makes the interactive API call
button.addEventListener('click', async ()=> {
    let breed = breedInput.value
    let response = await axios.get(
        `https://dog.ceo/api/breed/${breed}/images/random`
      )
      //drilling our data response
      let dogPic = response.data.message
      //setting our DOM image
      imageDiv.innerHTML = `<img src=${dogPic}>`
})If you're feeling confused about anything, don't worry! This is just our introduction to APIs. We'll be exploring them at much further length very soon. APIs can be difficult and some are more tricky to use than others, but we hope this helps you feel like you have a basic understanding of the pieces necessary for a successful axios API call.


