    ███╗   ██╗ ██████╗  █████╗ ██╗     ██████╗ ███████╗
    ████╗  ██║██╔═══██╗██╔══██╗██║     ██╔══██╗██╔════╝
    ██╔██╗ ██║██║   ██║███████║██║     ██████╔╝███████╗
    ██║╚██╗██║██║   ██║██╔══██║██║     ██╔══██╗╚════██║
    ██║ ╚████║╚██████╔╝██║  ██║███████╗██████╔╝███████║
    ╚═╝  ╚═══╝ ╚═════╝ ╚═╝  ╚═╝╚══════╝╚═════╝ ╚══════╝
nginx-obs-automatic-low-bitrate-switching
Simple app to automatically switch scenes in OBS Studio/OBS.Live based on the current bitrate fetched from the server stats.
NOALBS is used as a DIY tool to have your OBS Studio/OBS.Live auto switch scenes when you are either in a LOW bitrate situation or if your source disconnects completely.
Upsides to using NOALBS:
- You did it yourself so be proud of what you have accomplished.
- You're using a computer, internet and power you are already paying for.
- There is literally NO COST to you when you setup and use NOALBS using the equipment you already own and pay for.
Downsides to using NOALBS:
- It's DIY, meaning you have to do it all yourself, of course you can always contact us on discord @ b3ck#3517 or 715209#0600 and we'll do our best to help out.
- If you lose power or internet where you run NOALBS there is no redundancy.
- It takes a bit to setup, it is not for the faint of heart when it comes to installing and configuring advanced programs to get it running.
(Watch video below for help)
If you're okay with all of that then all I can say is if you can't figure it out, reach out to us or the community if you need help, we're here for you.
How to video (WINDOWS):

Similar Solutions / Paid Services:
Don't feel like setting this all up by yourself? Check out these links for similar solutions/paid services:
- IRLToolkit
- psynapticmedia.com
- norip.io
- Do you offer a similar solution or paid service? Want your link here? Message me on Discord b3ck#3517
Table of Contents:
- Build Prerequisities
- Installation from Source
- Configuring the CONFIG and Setting up Roles
- How to run from source
- Chat Commands
- How to pull RTMP stream into OBS
- Running with other servers (not NGINX)
- Help it won't change scenes
Build Prerequisities
This script uses OBS plugin "obs-websocket" in conjunction with "OBS-Studio". For monitoring "NGINX-RTMP" (see links below).
NOALBS supports monitoring streams on either NGINX-RTMP server, Node-Media-Server, Nimble Server, and even SLS (SRT-Live-Server). Node-Media-Server is also built into NOALBS for an easy all-in-one streaming solution.
Installation from Source and NGINX Setup
git clone <repository-url>or download from RELEASES- Change into the new directory.
npm install --production
If you already have NGINX-RTMP server
- Replace your
nginx.confwith the one given here. - Put
stat.xslin your nginxhtmlfolder.
Otherwise here is a Windows version of NGINX+RTMP Server
- Hosted on Github
- Everything is ready to go inside this zip, just extract and click on the
nginx_start.batfile to start NGINX, you can usenginx_stop.batto stop NGINX. HTTP server runs on Port80, RTMP server runs on1935, if you need to edit the config file it's in the/conffolder, namednginx.conf.
Configuring the CONFIG and Setting up Roles
Edit config.json to your own settings.
Here is an example config with comments (click to enlarge):
PLEASE NOTE CONFIG ARCHITECTURE MAY NOT REPRESENT CURRENT CONFIG ARCHITECTURE
")
- Use https://twitchapps.com/tmi to get your oauth from Twitch for use with chat commands.
We recommend using your main Twitch BOT account for this, but if you do not have a Twitch Bot account just use your Main Twitch Account.
Also if you are going to be using your Twitch BOT Account please make sure it is an 'Editor' of your channel, see example;
Go to this URL: Twitch User Roles, Find your bot on the list, add checkmark to 'Editor', done.

How to run from source
Run the node app by running: npm start. Then stream to rtmp://IPHERE/publish/live
Chat Commands
This script gives you the option to enable some simple chat commands to help you manage your stream from your own Twitch chat, here is how to use them:
Please note: Admins are all the users in the "adminUsers" array in the config, MODs (if enabled in the config) are all of your MODs, and Public (if enabled in the config) is anyone in your chat.
Default Role Command Description Example Admins !host (channelname) hosts said channel, and stops streaming in OBS if enabled in config. !host 715209 Admins !unhost unhosts whoever you are currently hosting. !unhost Admins !raid (channelname) raids said channel and stops streaming in OBS if enabled in config. !raid 715209 Admins !start on-demand command to start streaming in OBS. !start Admins !stop on-demand command to stop streaming in OBS. !stop Admins !rec (on/off) on-demand command to start/stop recording in OBS. !rec on Admins !switch (scene) switches to the provided SCENE (fuzzy match). !switch INTRO Admins !alias (add/remove) (alias) (command) add an alias for a command !alias add ss switch MODs !refresh changes to the REFRESH scene for the set interval. !refresh MODs !fix tries to fix the stream. (ONLY works with NGINX-RTMP server type.) !fix MODs !trigger (value) changes the low bitrate threshold to the defined value. !trigger 1000 MODs !sourceinfo gives you details about the SOURCE in chat. !sourceinfo MODs !obsinfo gives you details about OBS in chat. !obsinfo Public !bitrate returns current BITRATE !bitrate
You can also enable/disable certain features from chat, see below:
Default Role Command Description Example Admins !public (on/off) enables/disables the use of Public commands. !public off Admins !mod (on/off) enables/disables the use of MOD commands. !mod on Admins !notify (on/off) enables/disables the notifications in chat. !notify off Admins !autostop (on/off) enables/disables the auto stop feature when you host/raid. !autostop on
How to pull RTMP stream into OBS
Update your OBS to v26+ and follow the steps below:
1.) In OBS create the following scenes:
LIVE,LOW,BRB,REFRESH- I highly recommend creating a
STARTUP&PRIVACYscene, theSTARTUPscene can contain whatever you want to start your stream on and then switch toLIVEwhen you're ready, thePRIVACYscene can be whatever you want to put the stream on when you need privacy, the main thing is that it's out of NOALBS scope and won't automatically switch scenes. - The normal flow is to have your OBS on
STARTUPwhen you start stream and when you're ready either you or an instructed MOD can !switch LIVE, when you need privacy use !switch PRIVACY.
2.) In your LIVE scene, add a 'Media Source', match the image below:
- Right click on the 'Media Source' > Transform > Stretch to screen (this will stretch the video source no matter the resolution, ex; 480p, 720p, 1080p etc.)
3.) Copy and Paste(Reference) the 'Media Source' from the LIVE scene into your LOW scene.
- Do the same transformation procedure from step (2).
4.) Go over all of your scenes and make them your own.
Running with other servers (not NGINX):
Using the built-in Node-Media-Server
Defining a nodeMediaServer block in config.json will enable a fully functional node-media-server RTMP server to accept incoming streams:
    "rtmp": {
        "application": "publish",
        "key": "live"
    },
    "nodeMediaServer": {
        "rtmp": {
            "port": 1935,
            "chunk_size": 60000,
            "gop_cache": true,
            "ping": 30,
            "ping_timeout": 60
        },
        "http": {
            "port": 8000
        }
    },
The
nodeMediaServerobject is passed directly as the node-media-server configuration, more details here. It will also automatically fill out the rtmp server type and stats fields.
Note: This is probably best for local connections and testing only unless you enable authentication
Using an external Node-Media-Server
Modify the RTMP section in config.json like this to connect to a node-media-server running externally:
    "rtmp": {
        "server": "node-media-server",
        "stats": "http://localhost:8000/api/streams",
        "application": "publish",
        "key": "live"
},Using Nimble Streamer Server (with SRT protocol)
Nimble must have API access enabled and be configured as a SRT receiver - see "Set up receiving of SRT" and have an outgoing stream ("Add outgoing stream" on same page)
Modify the RTMP section in config.json to this:
    "rtmp": {
        "server": "nimble",
        "stats": "http://nimble:8082",
        "id": "0.0.0.0:1234",
        "application": "live",
        "key": "srt"
},stats: URL to nimble APIid: UDP listener ID (Usually IP:Port)application: Outgoing stream "Application Name"key: Outgoing stream "Stream Name"
Switches on low bitrate or high RTT (high RTT seems to be a more accurate way of determining if the stream is bad with this)
You can change the high RTT trigger value inside config.json:
    "obs": {
        ...
        "highRttTrigger": 2500,
},Using SLS (SRT-LIVE-SERVER)
Big Thanks to oozebrood, matthewwb2, and kyle___d for all of the hard work they've put into getting SRT to the masses!
If you're using Matt's modified version of SLS then follow this section;
You MUST Modify the ENTIRE RTMP section in NOALBS config.json file to match this:
(And yes we know calling this configuration block the 'RTMP section' is rather dumb at this point, but it is what it is until it is changed.)
    "rtmp": {
        "server": "srt-live-server",
        "stats": "http://127.0.0.1:8181/stats",
        "publisher": "publish/live/feed1"
},-
server: Type of streaming server. (ex; nginx, nms, nimble or srt-live-server ) -
stats: URL to SLS stats page (ex; http://127.0.0.1:8181/stats ) -
publisher: StreamID of the where you are publishing the feed. (ex; publish/live/feed1 )- Publisher, what is a publisher? it's a combination of
domain_publisher/app_publisher/<whatever-you-want>. - So if your
domain_publisherwas "uplive.sls.com", and yourapp_publisherwas "live", it would beuplive.sls.com/live/<whatever-you-want>. - You could literally call you domain_publisher 'billy', app_publisher 'bob', and then set your streamid (publisher) to 'billy/bob/thorton' if you wanted to.
- Publisher is also what you entered in the config under
default_sid. Unless you are streaming to a different 'StreamID' of course, ex;publish/live/tinkerbell.
- Publisher, what is a publisher? it's a combination of
See Example Below from the sls.conf file in the SLS main directory:
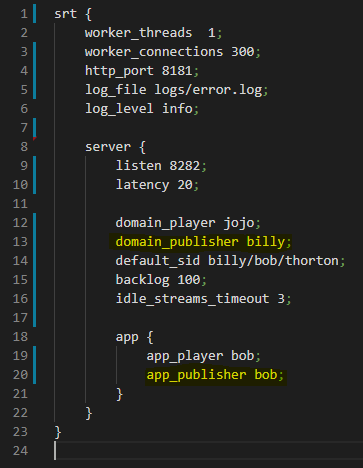
So in actuality your 'publisher' is your default StreamID, like in the example above it's billy/bob/thorton.
Switches on low bitrate or high RTT (high RTT seems to be a more accurate way of determining if the stream is bad with this)
You can change the high RTT trigger value inside config.json:
    "obs": {
        ...
        "highRttTrigger": 2500,
    },
==== How do I publish to the SLS Server? see HERE
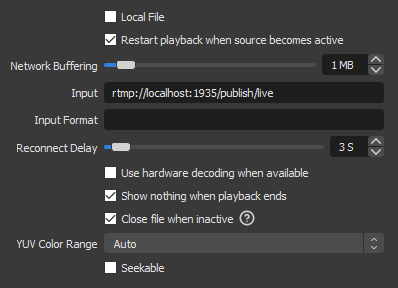
How do I pull the SRT feed into OBS?
- Add Media Source
- Uncheck Local File
- In the "Input" field enter in:
srt://<SERVER-IP>:<PORT>/?streamid=<PUBLISHER>- Using the example from the above image, it would be
srt://<SERVER-IP>:<PORT>/?streamid=jojo/bob/thorton
- Using the example from the above image, it would be
- In the "Input Format" field enter in:
mpegts - Check
Seekablethen clickOK
Help it won't change scenes
It will only change scenes when OBS is set on a scene that's in the config.
(This is so that it wont change when you are on for example your 'intro' or 'locked-brb' scene)