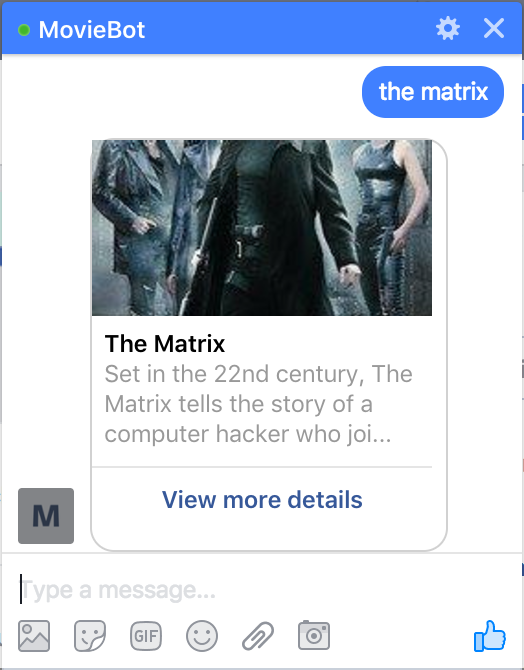
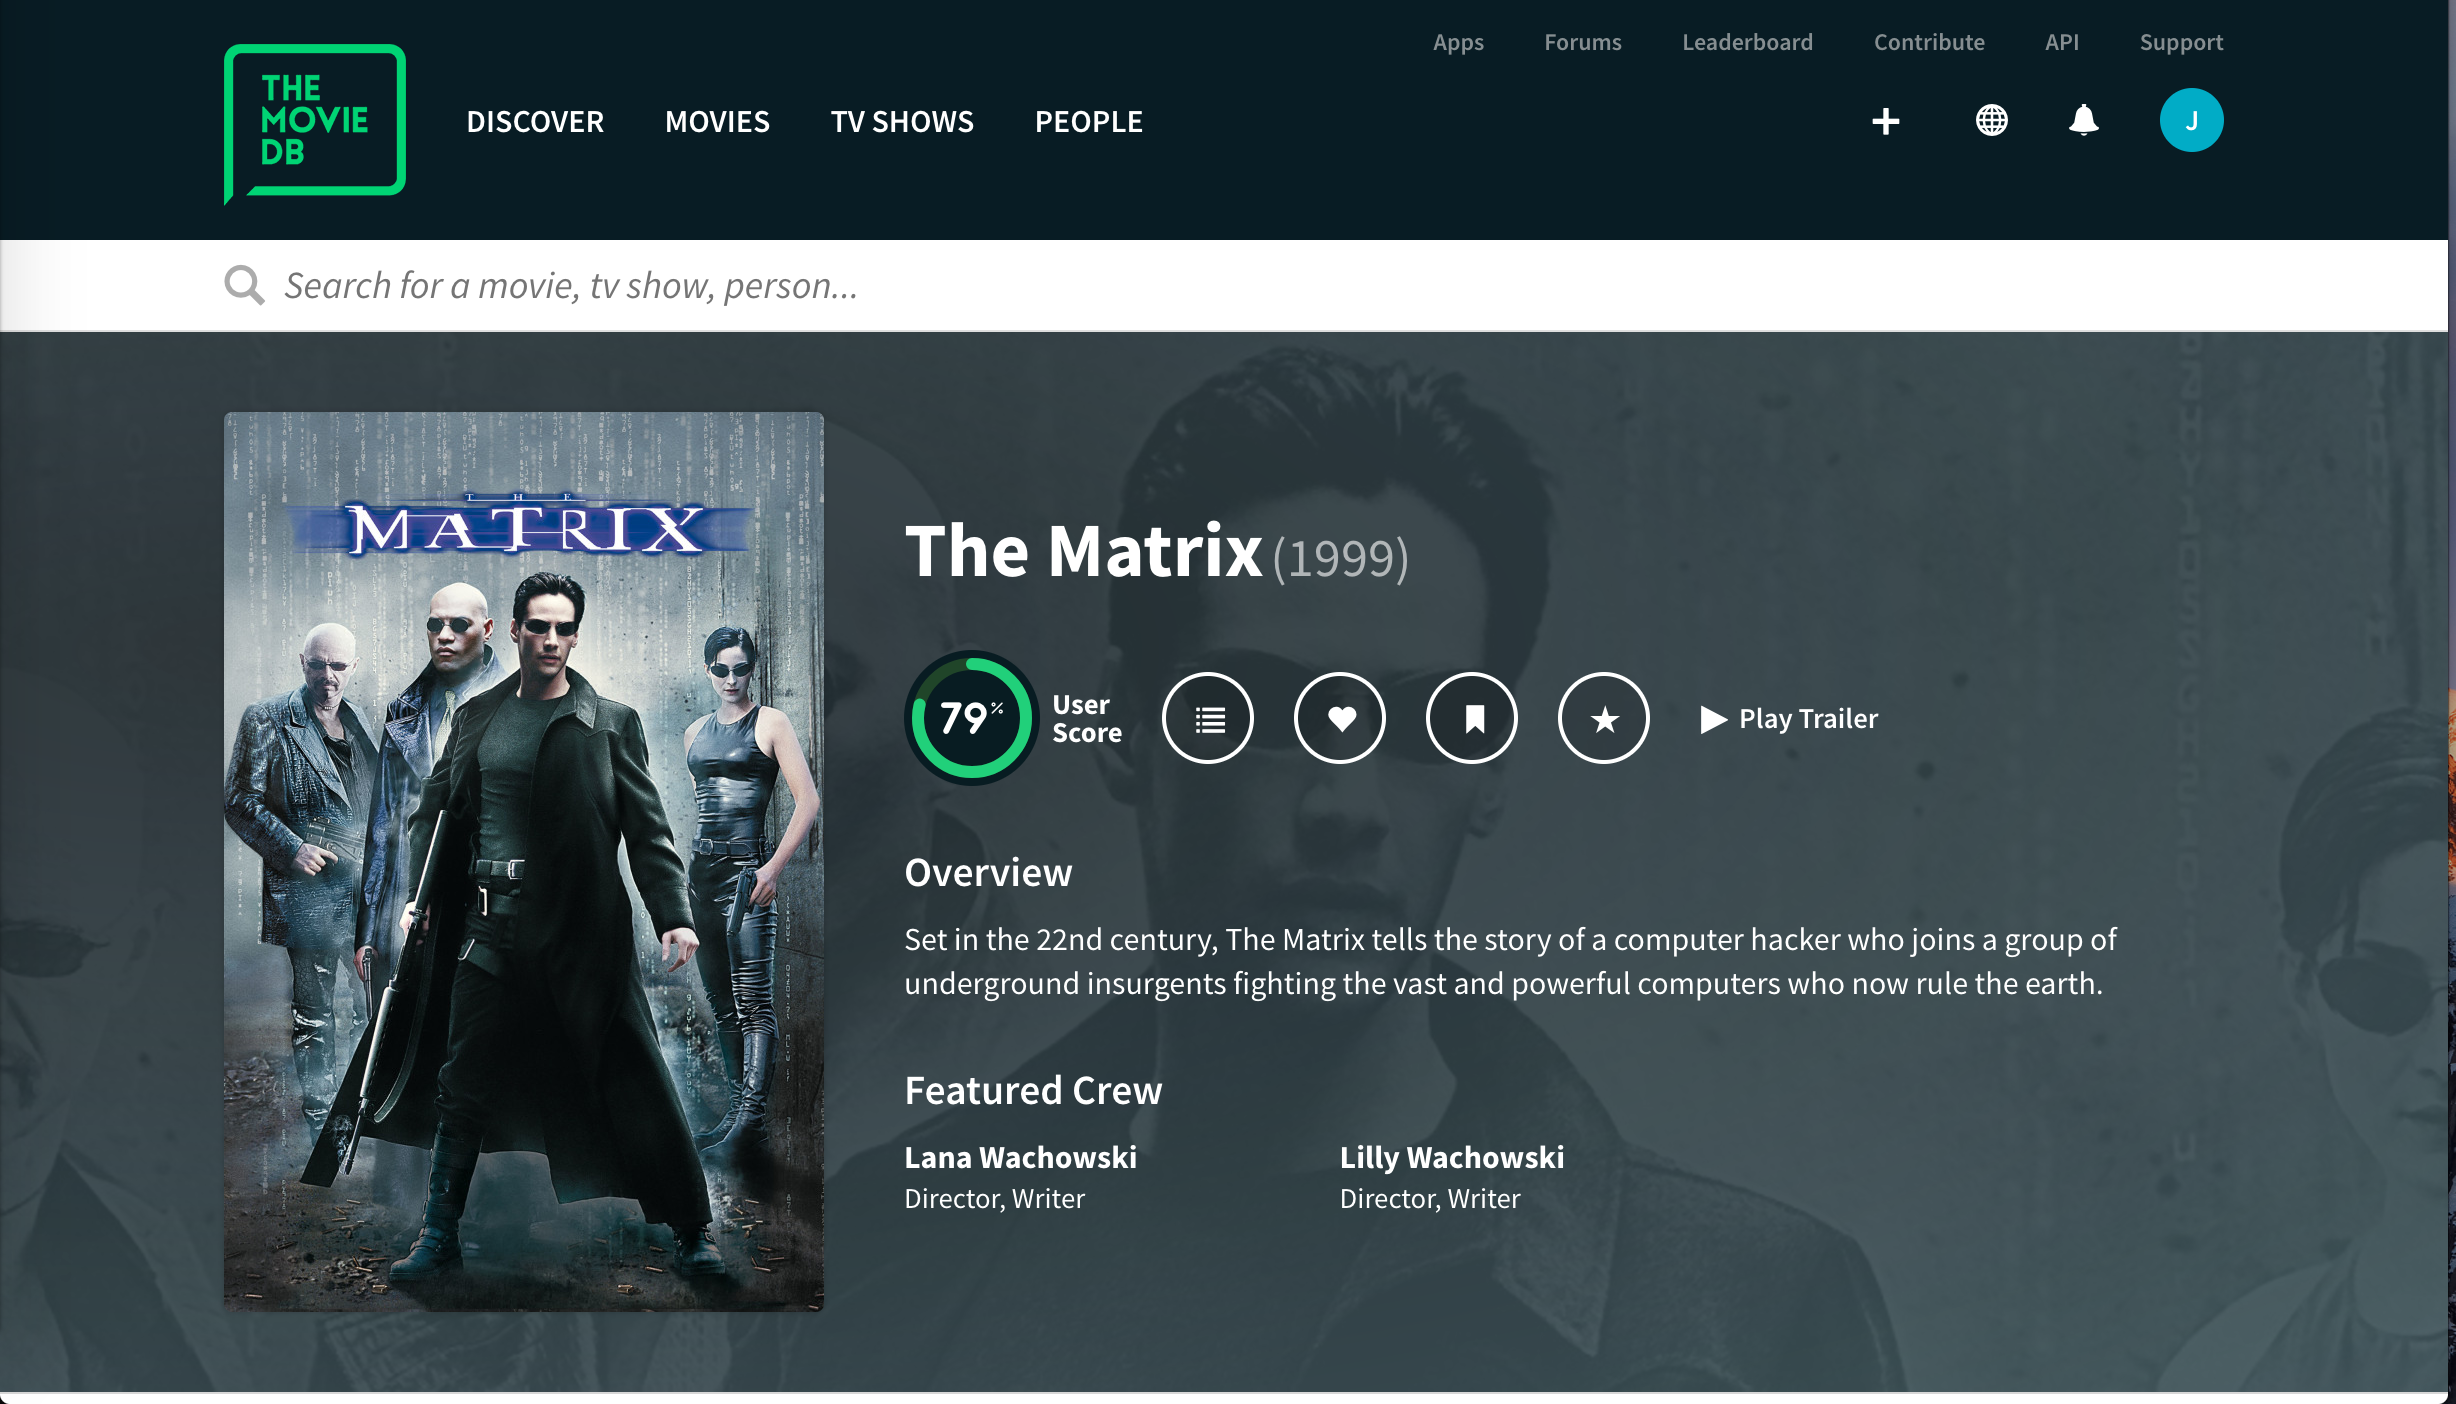
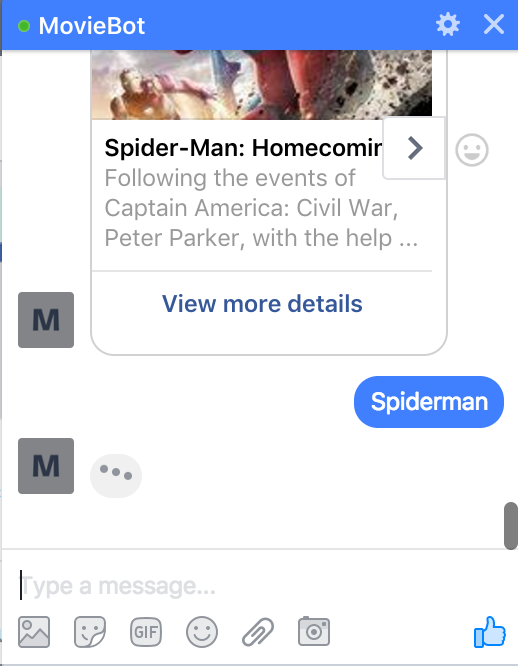
This tutorial consists of a simple facebook messenger bot which, when given a movie name replies back with details about the movie along with a poster image as well as a More Details button. Clicking this button redirects the user to a page with more details on the movie.
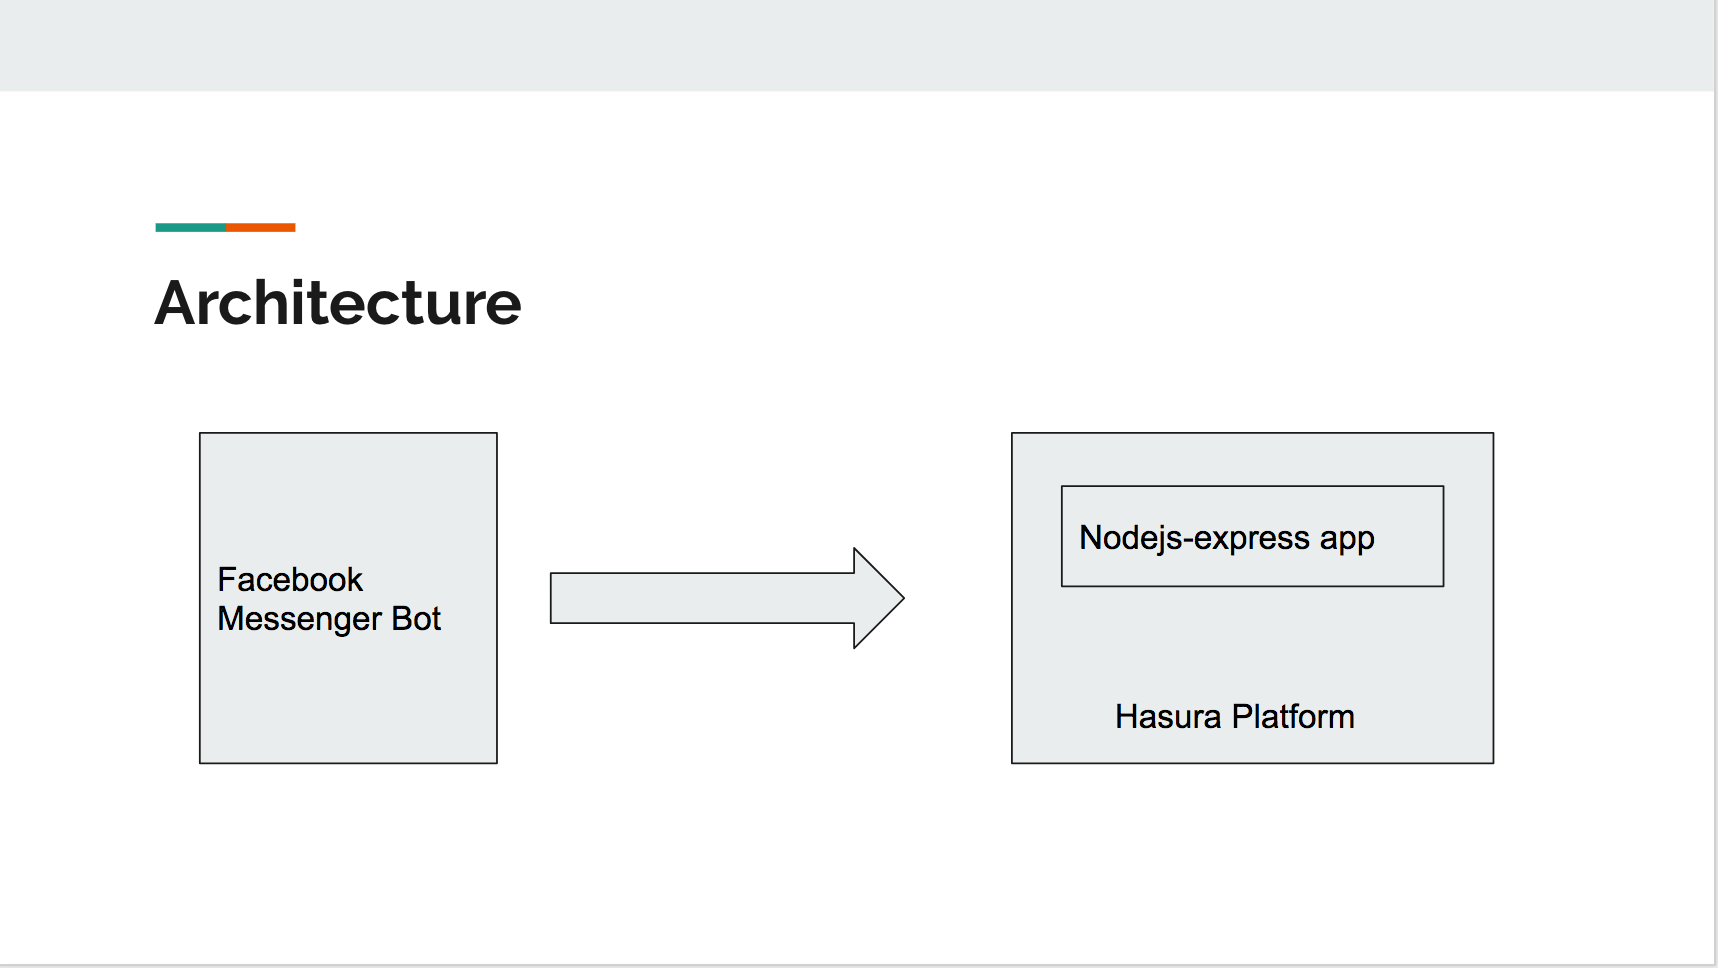
For the chat bot to function we'll need a server that will receive the messages sent by the Facebook users, process this message and respond back to the user. To send messages back to the server we will use the graph API provided by Facebook. For the Facebook servers to talk to our server, the endpoint URL of our server should be accessible to the Facebook server and should use a secure HTTPS URL. For this reason, running our server locally will not work and instead we need to host our server online. In this tutorial, we are going to deploy our server on Hasura which automatically provides SSL-enabled domains.
-
We will use Node.js along with the express framework to build our server. Ensure that you have Node installed on your computer, do this by running
node-vin the terminal. If you do not have Node installed you can get it from https://nodejs.org -
Before you begin, ensure that you have the latest version of the
hasura cliinstalled. You can find instructions to download thehasura clifrom here
If you want to skip the tutorial and see this bot in action asap. Follow the instructions below:
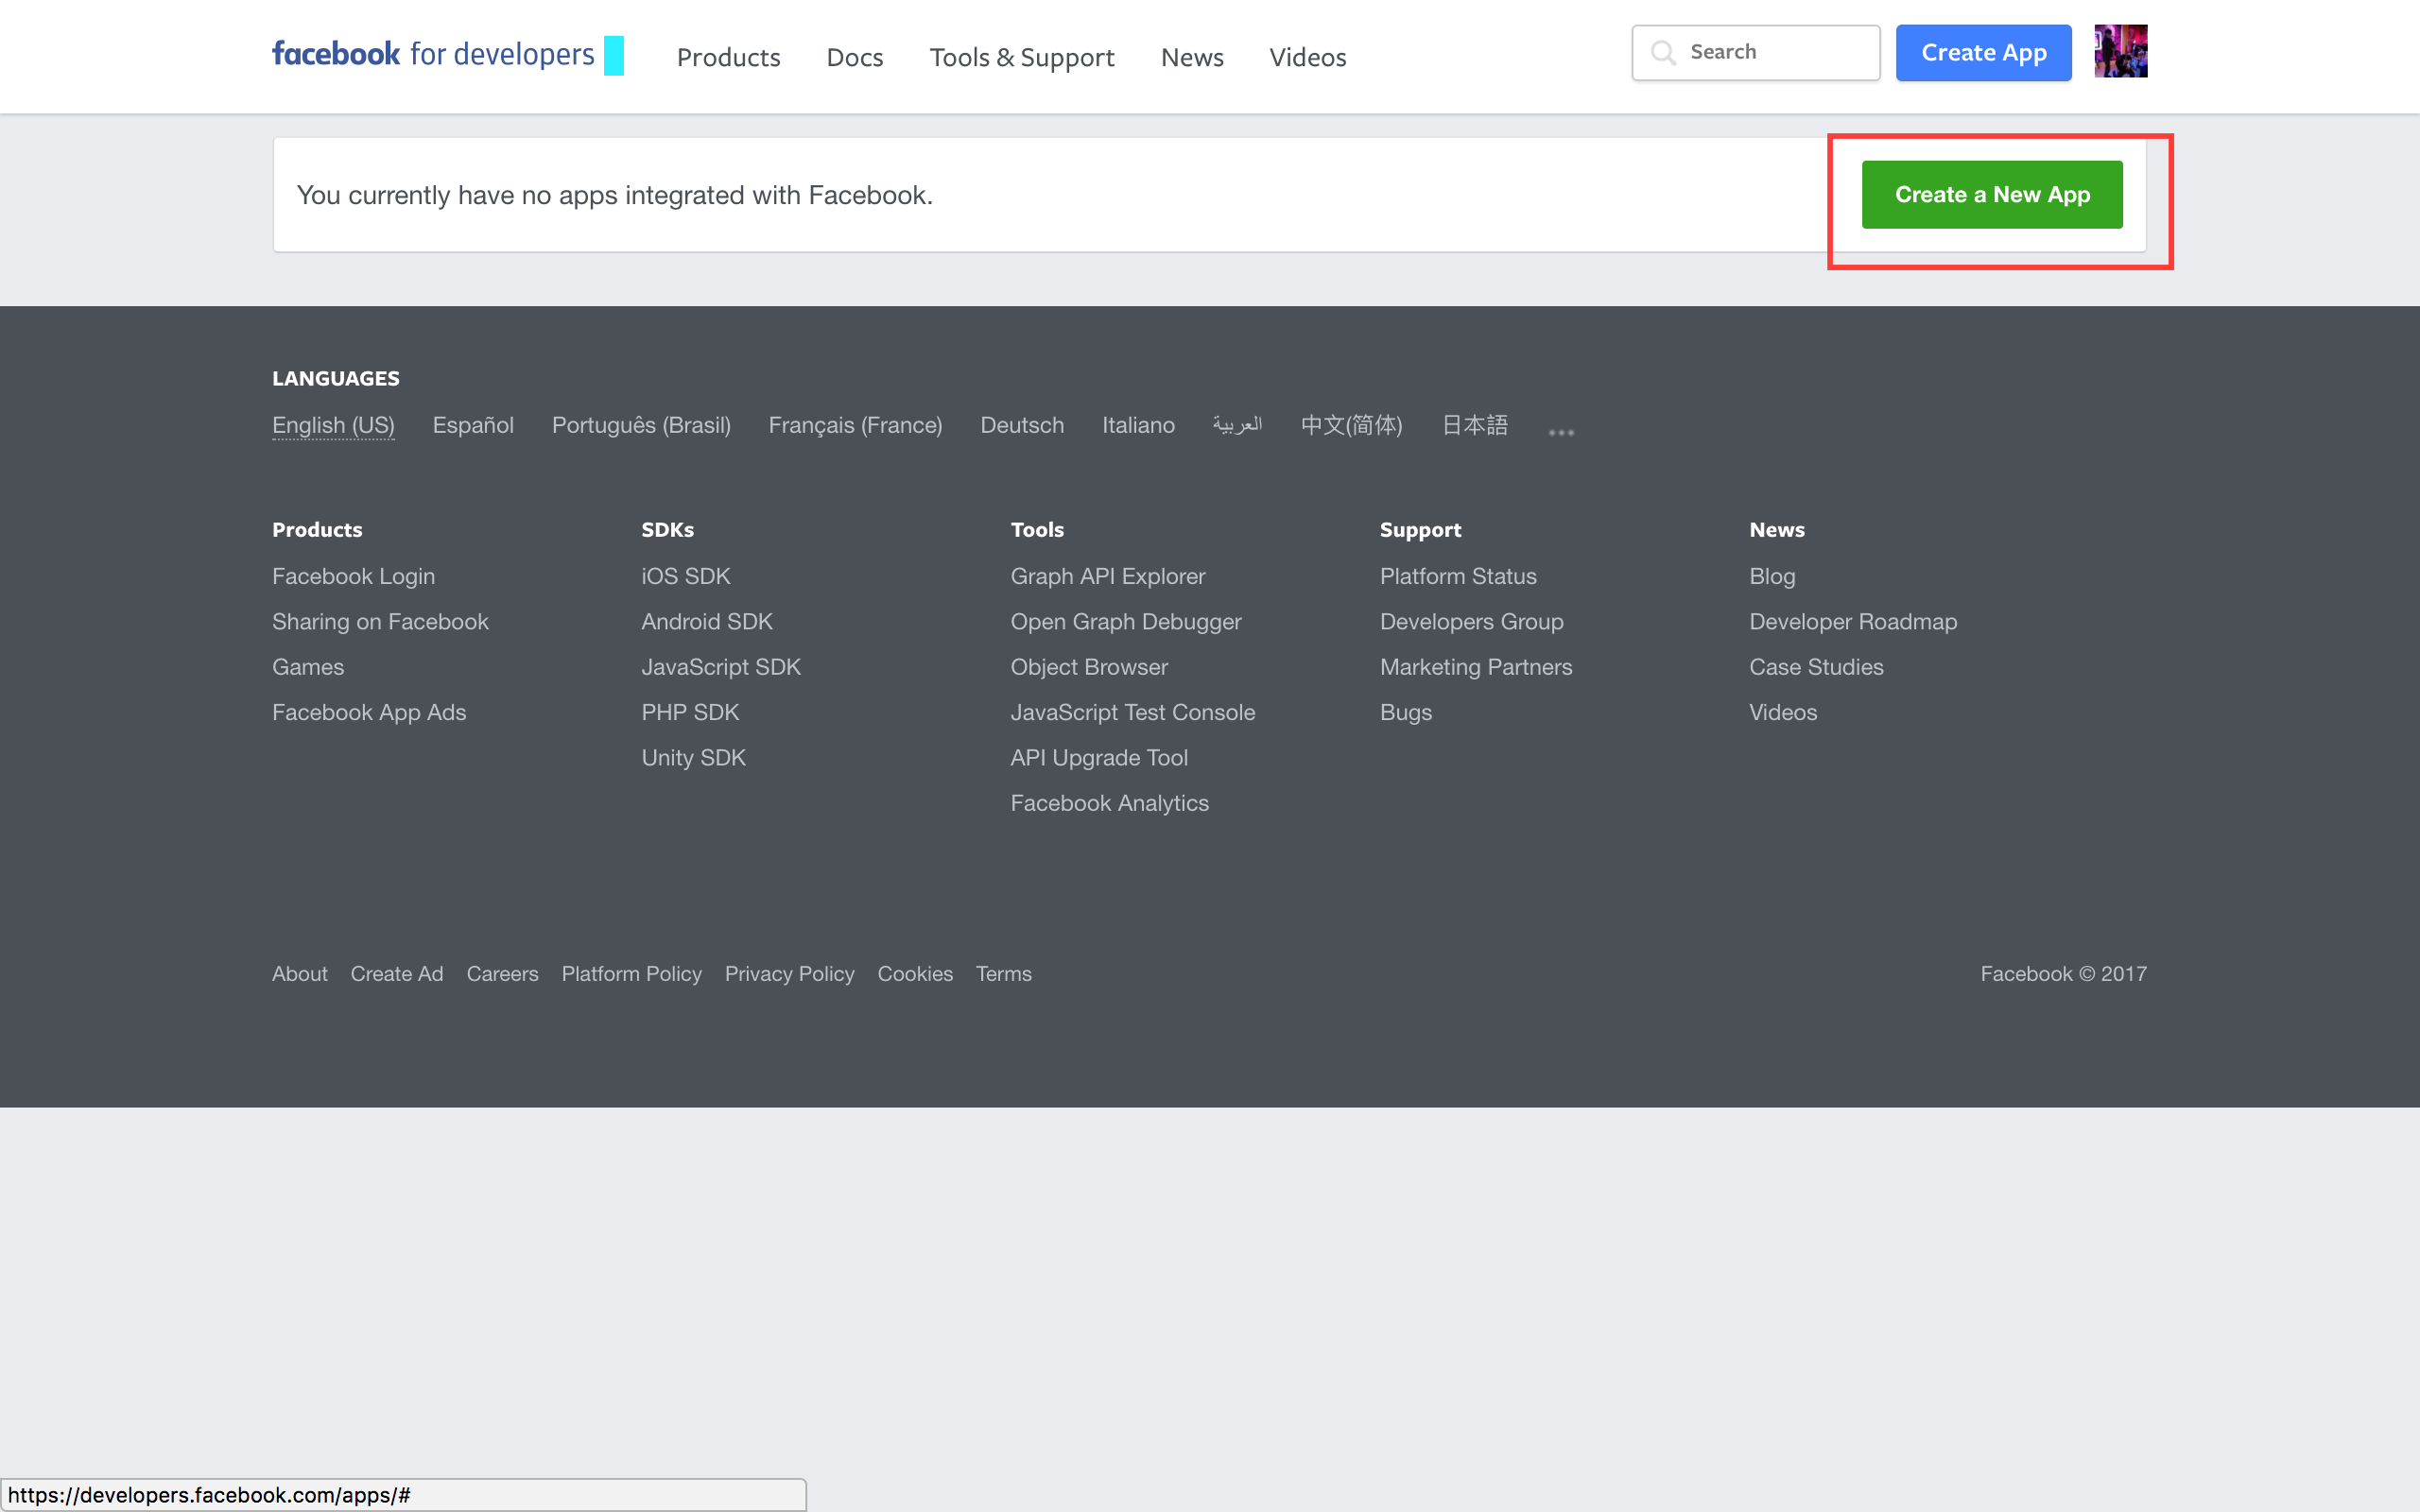
- Navigate to https://developers.facebook.com/apps/
- Click on '+ Create a new app’.
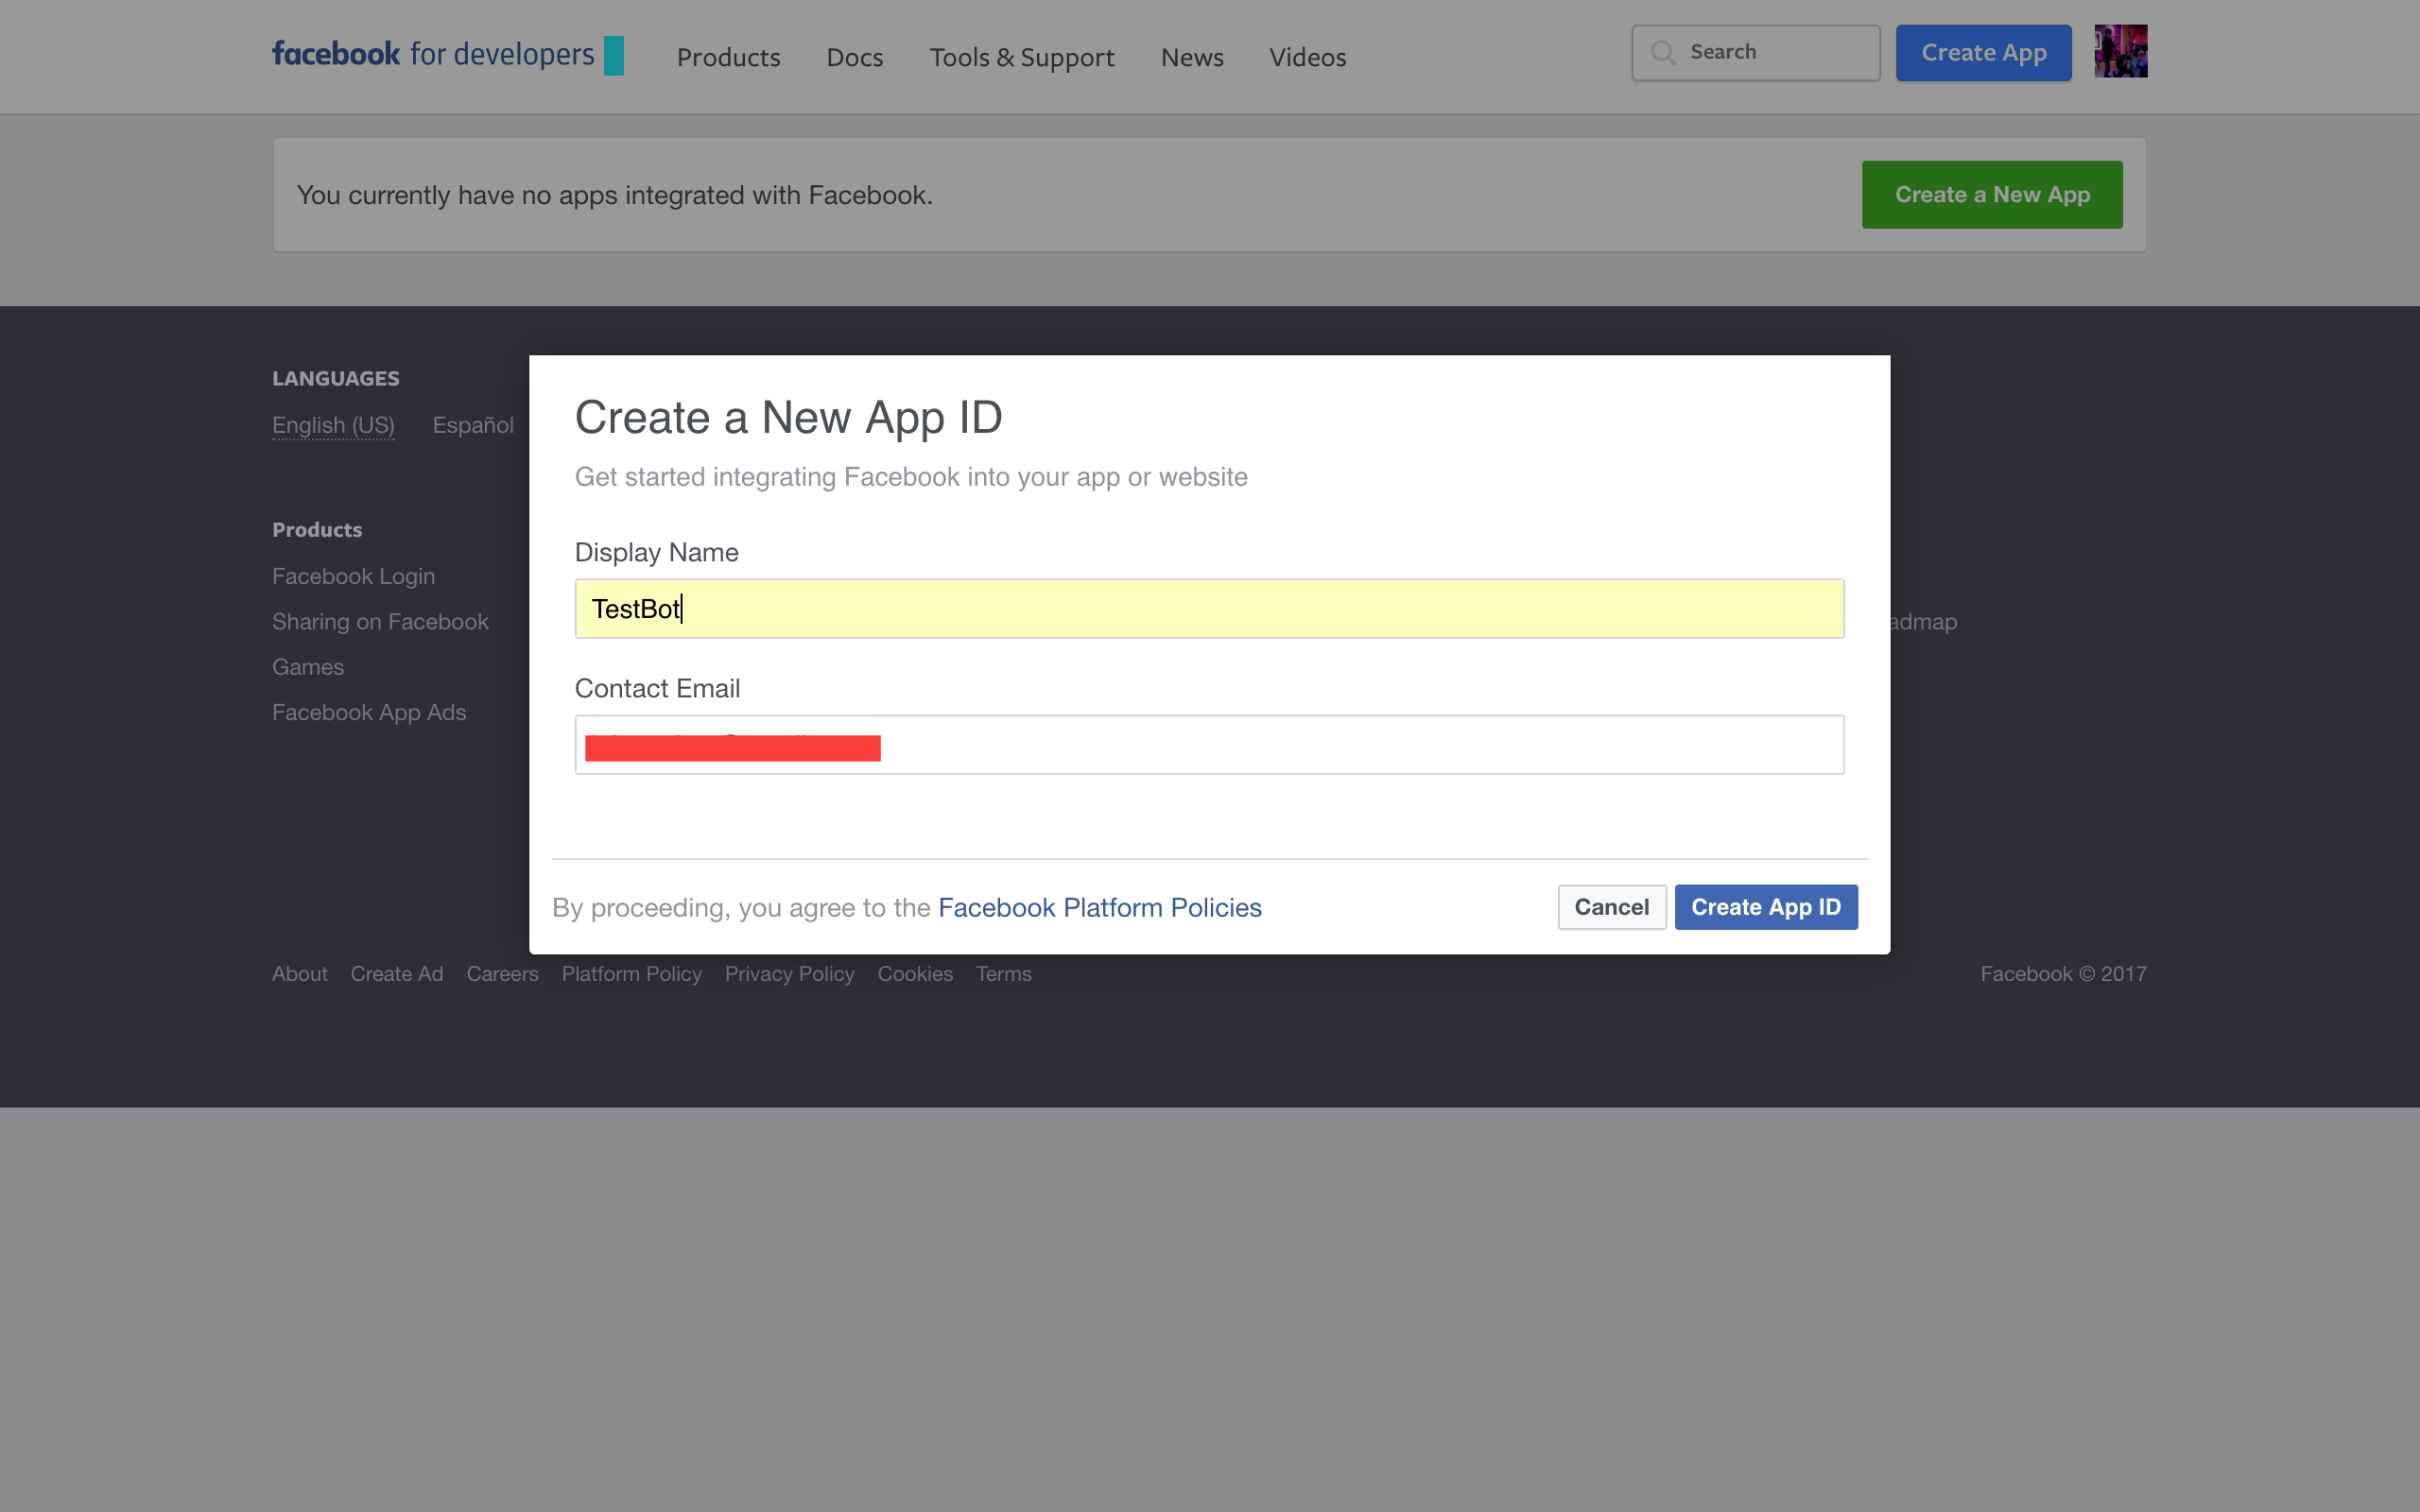
- Give a display name for your app and a contact email.
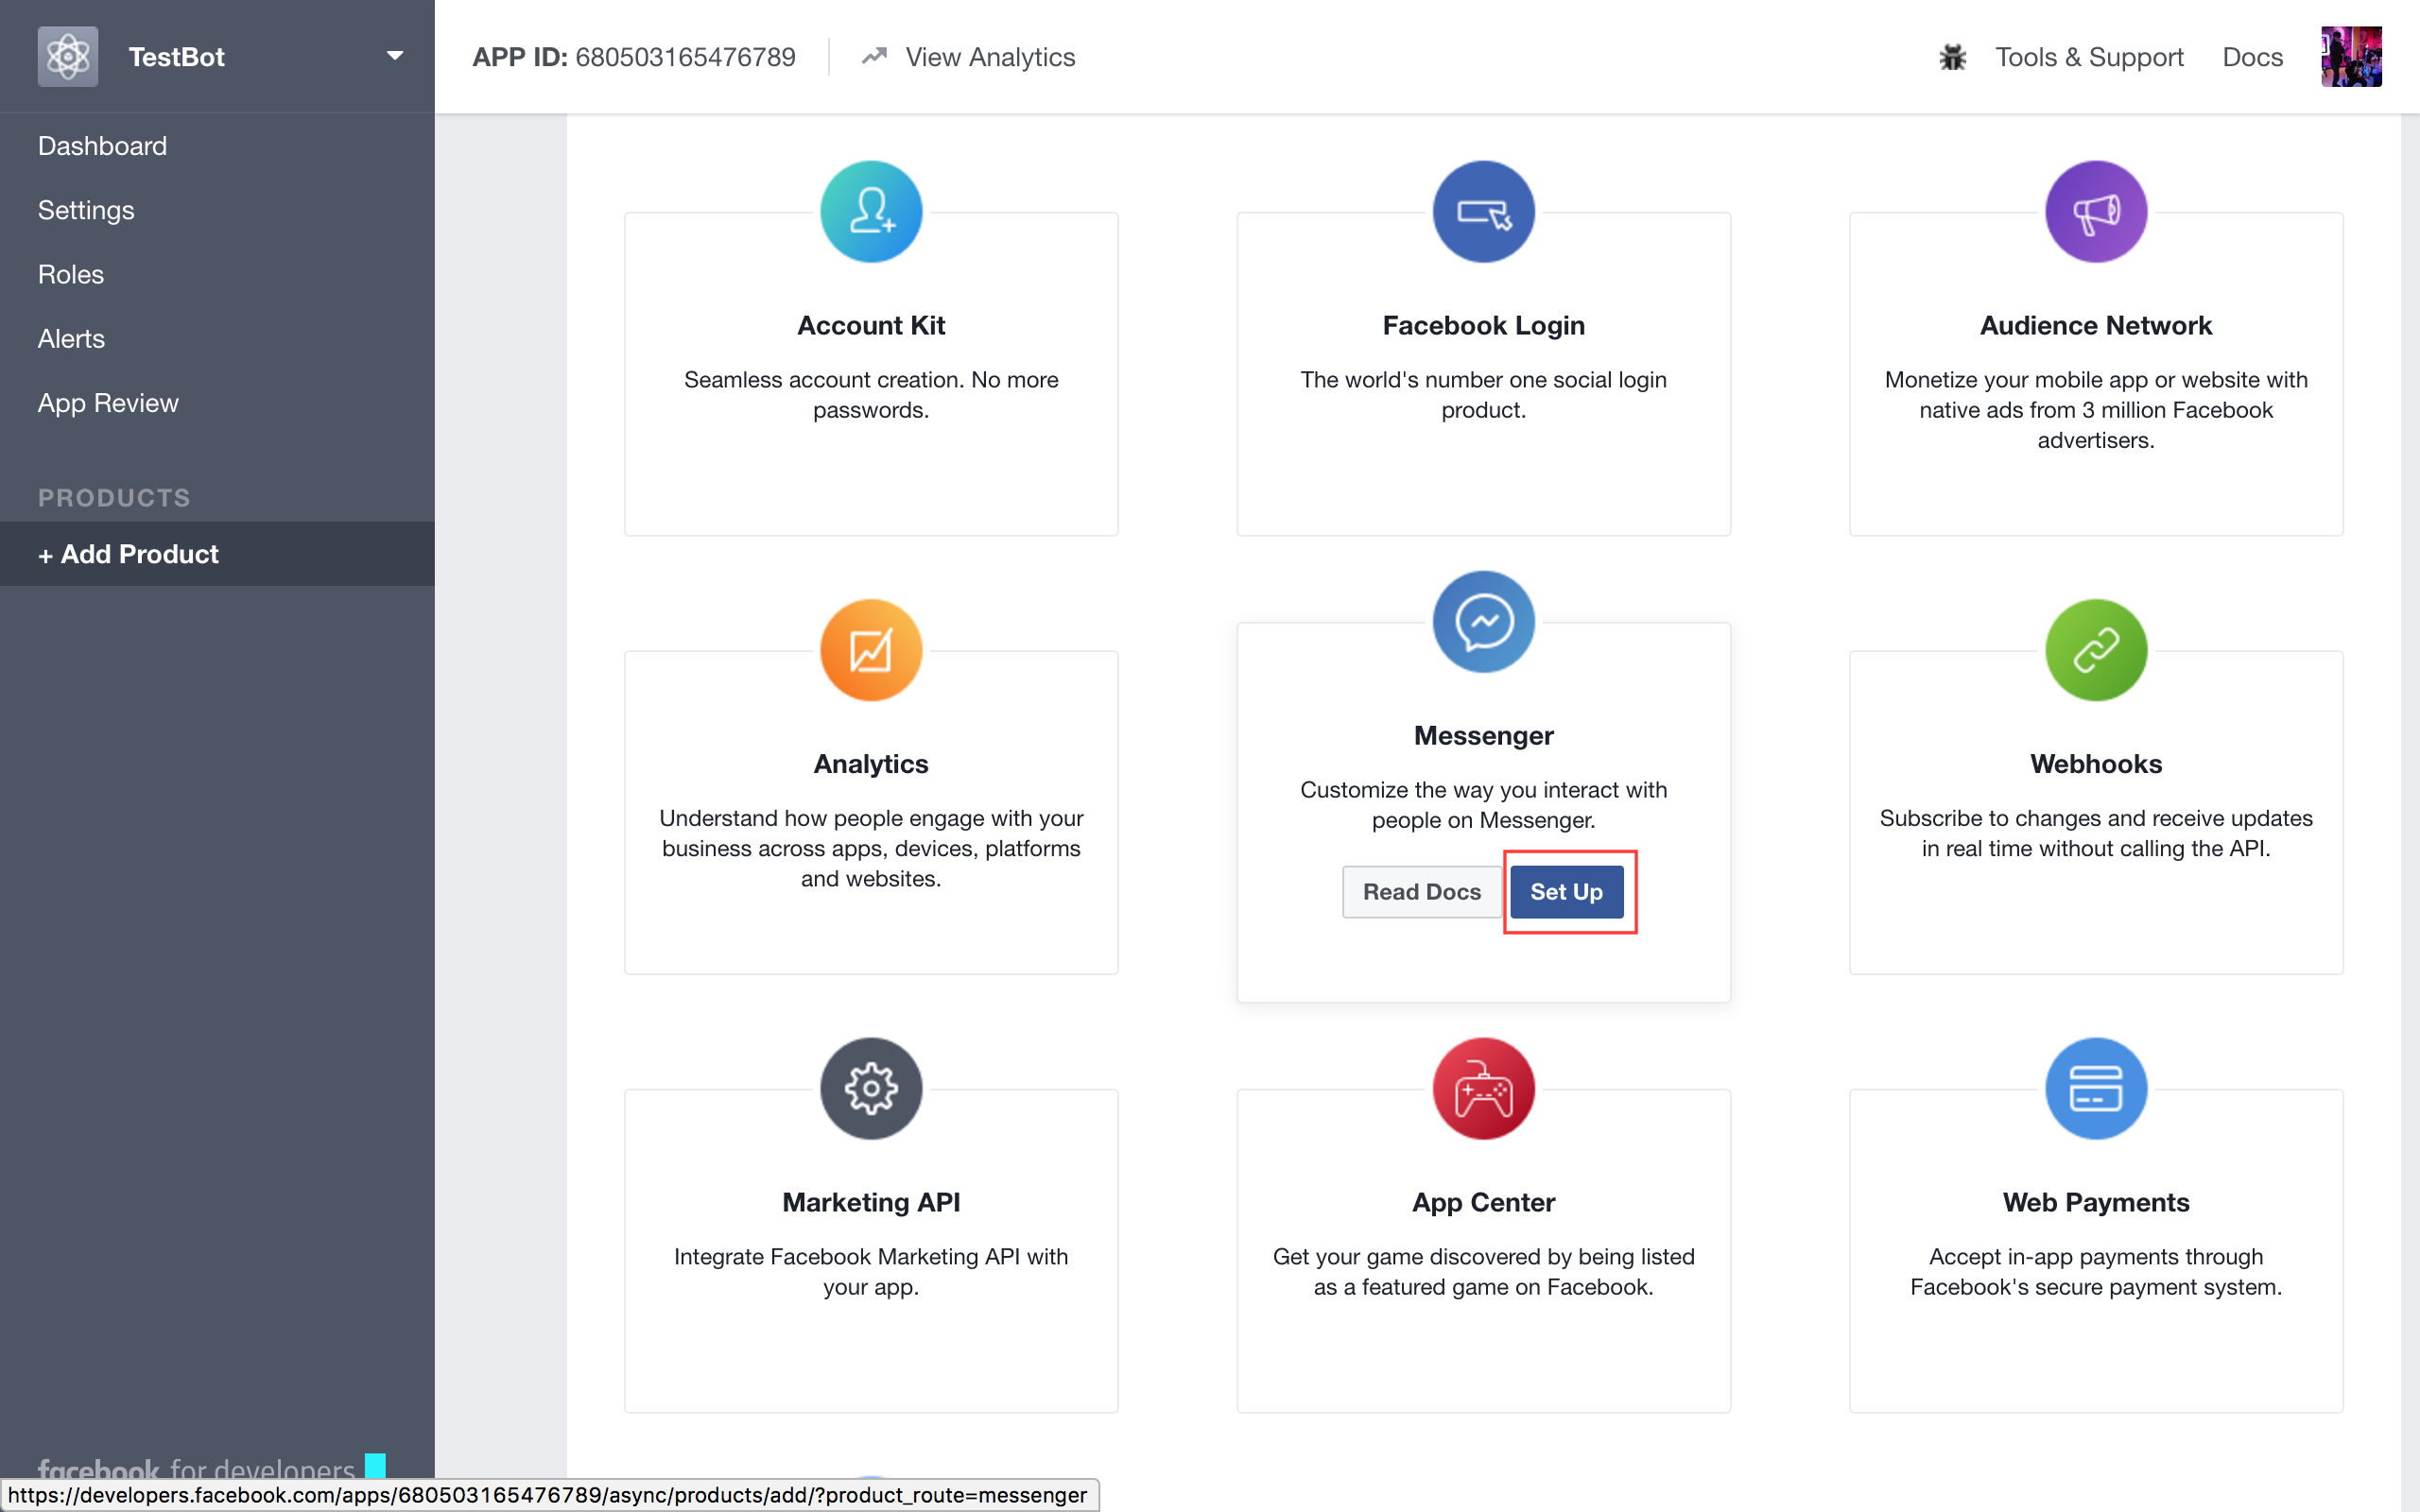
- In the select a product screen, hover over Messenger and click on Set Up
- To start using the bot, we need a facebook page to host our bot.
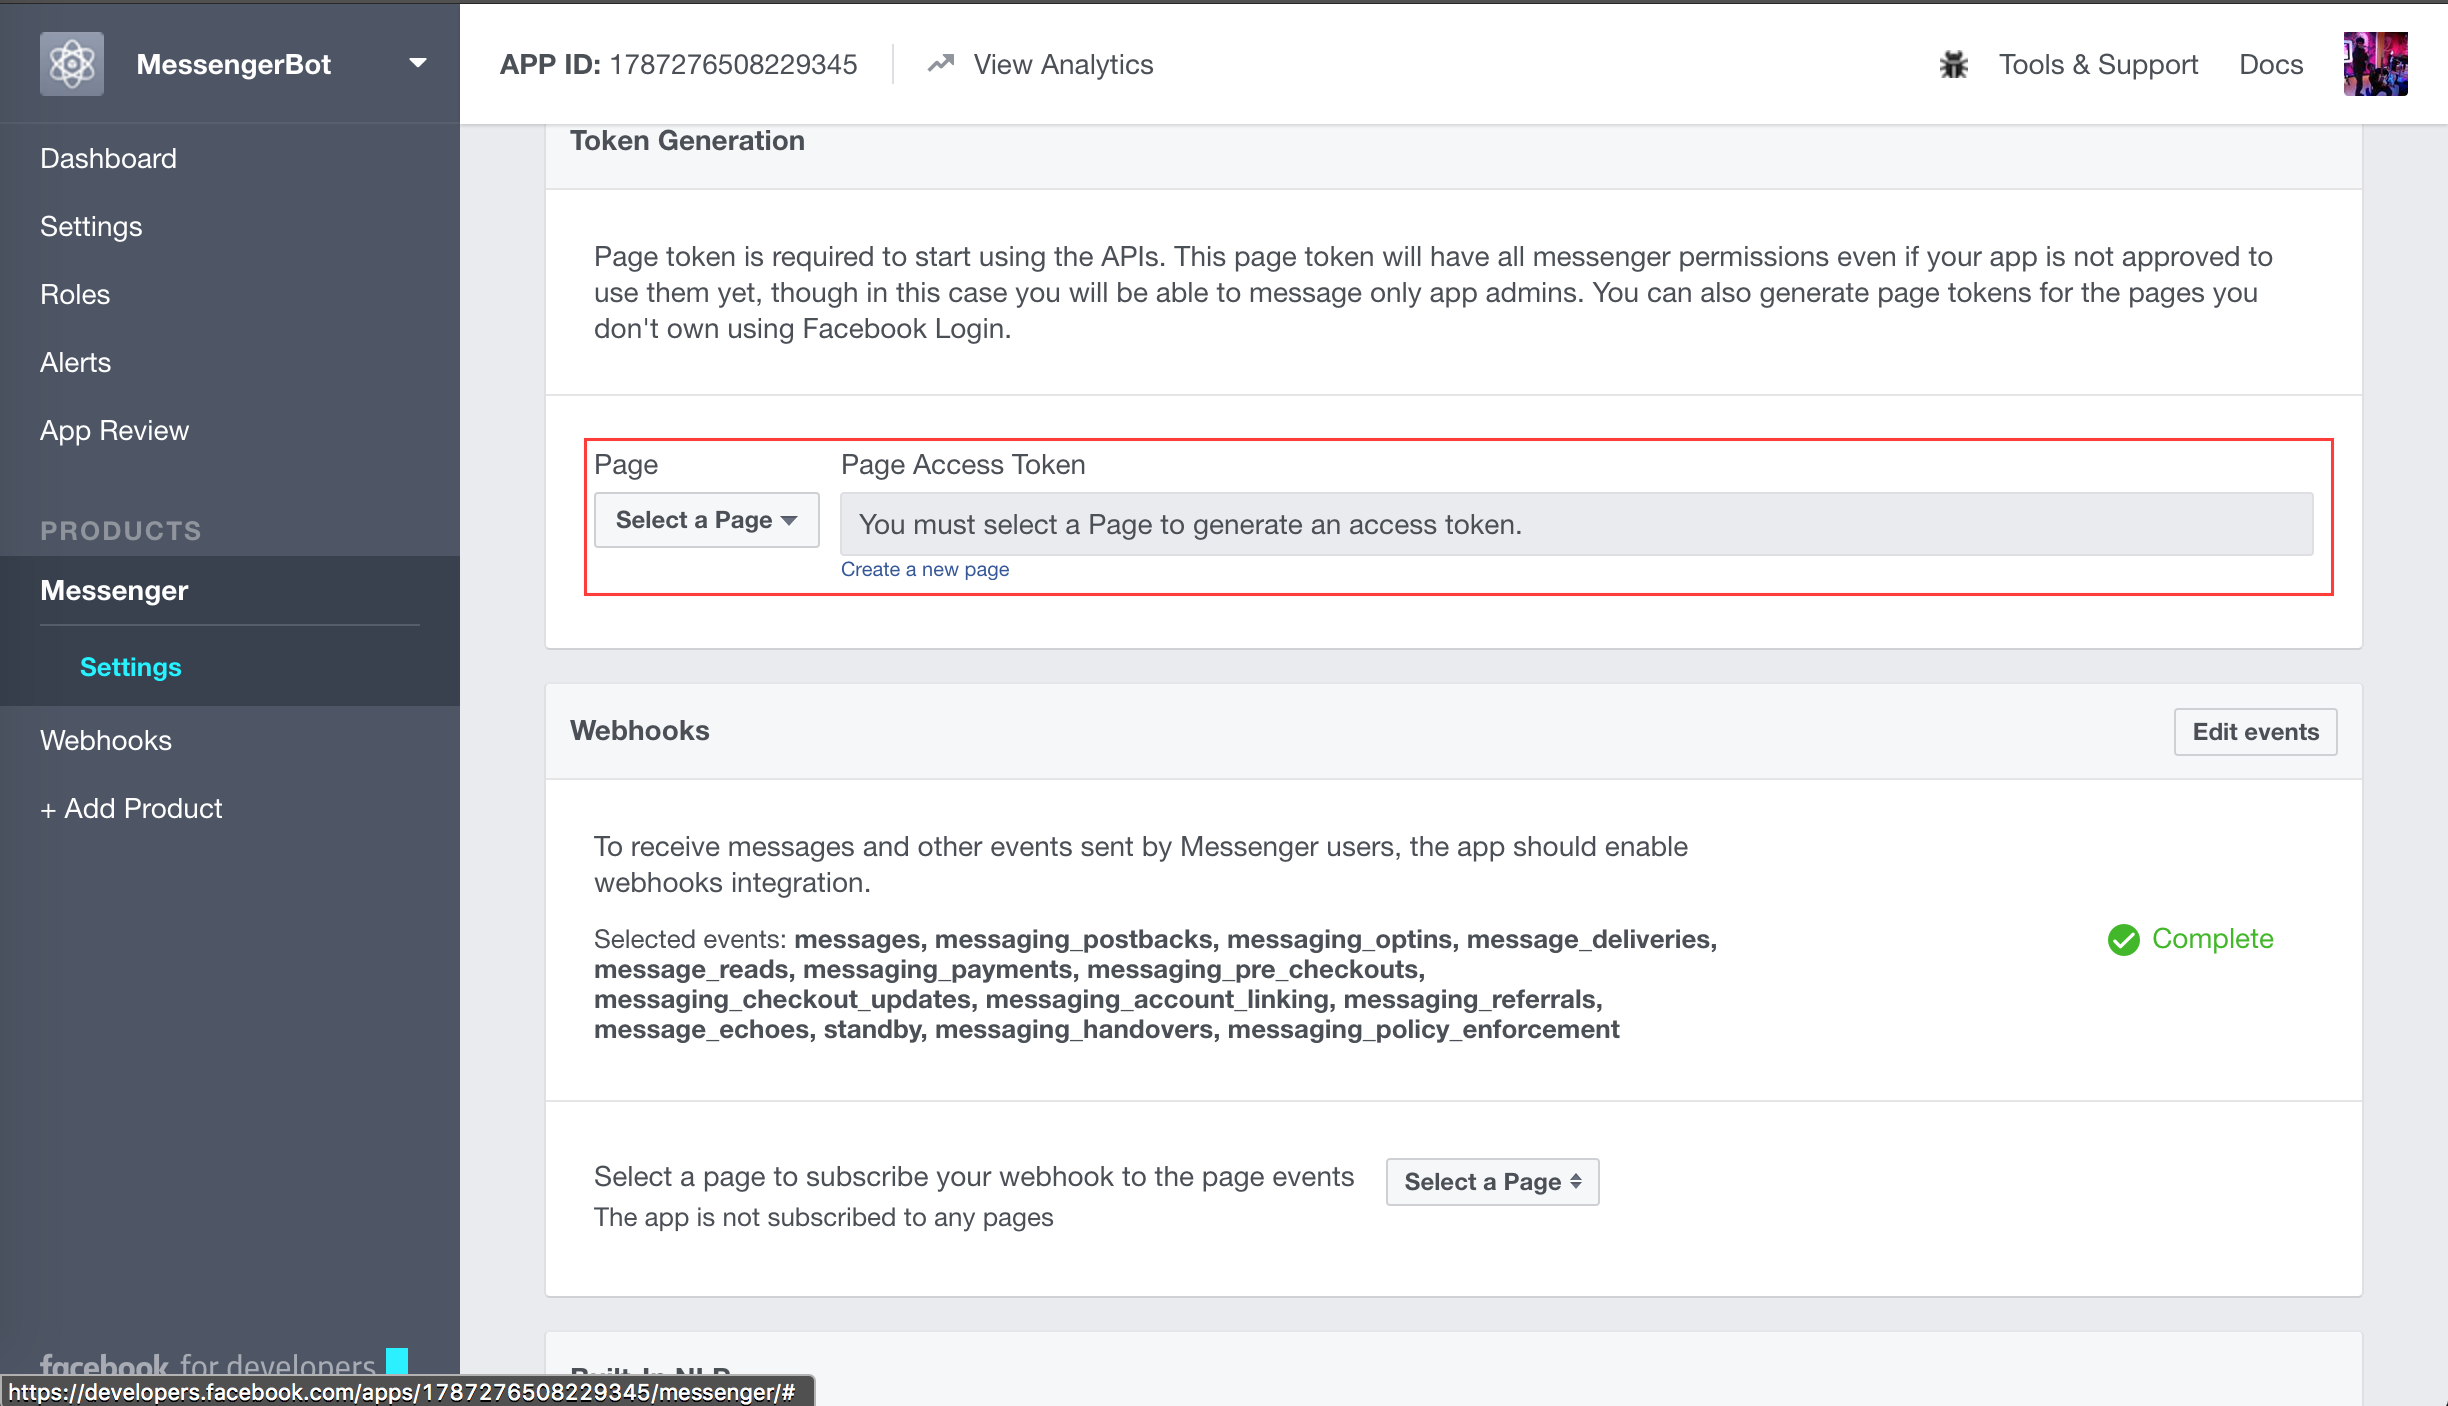
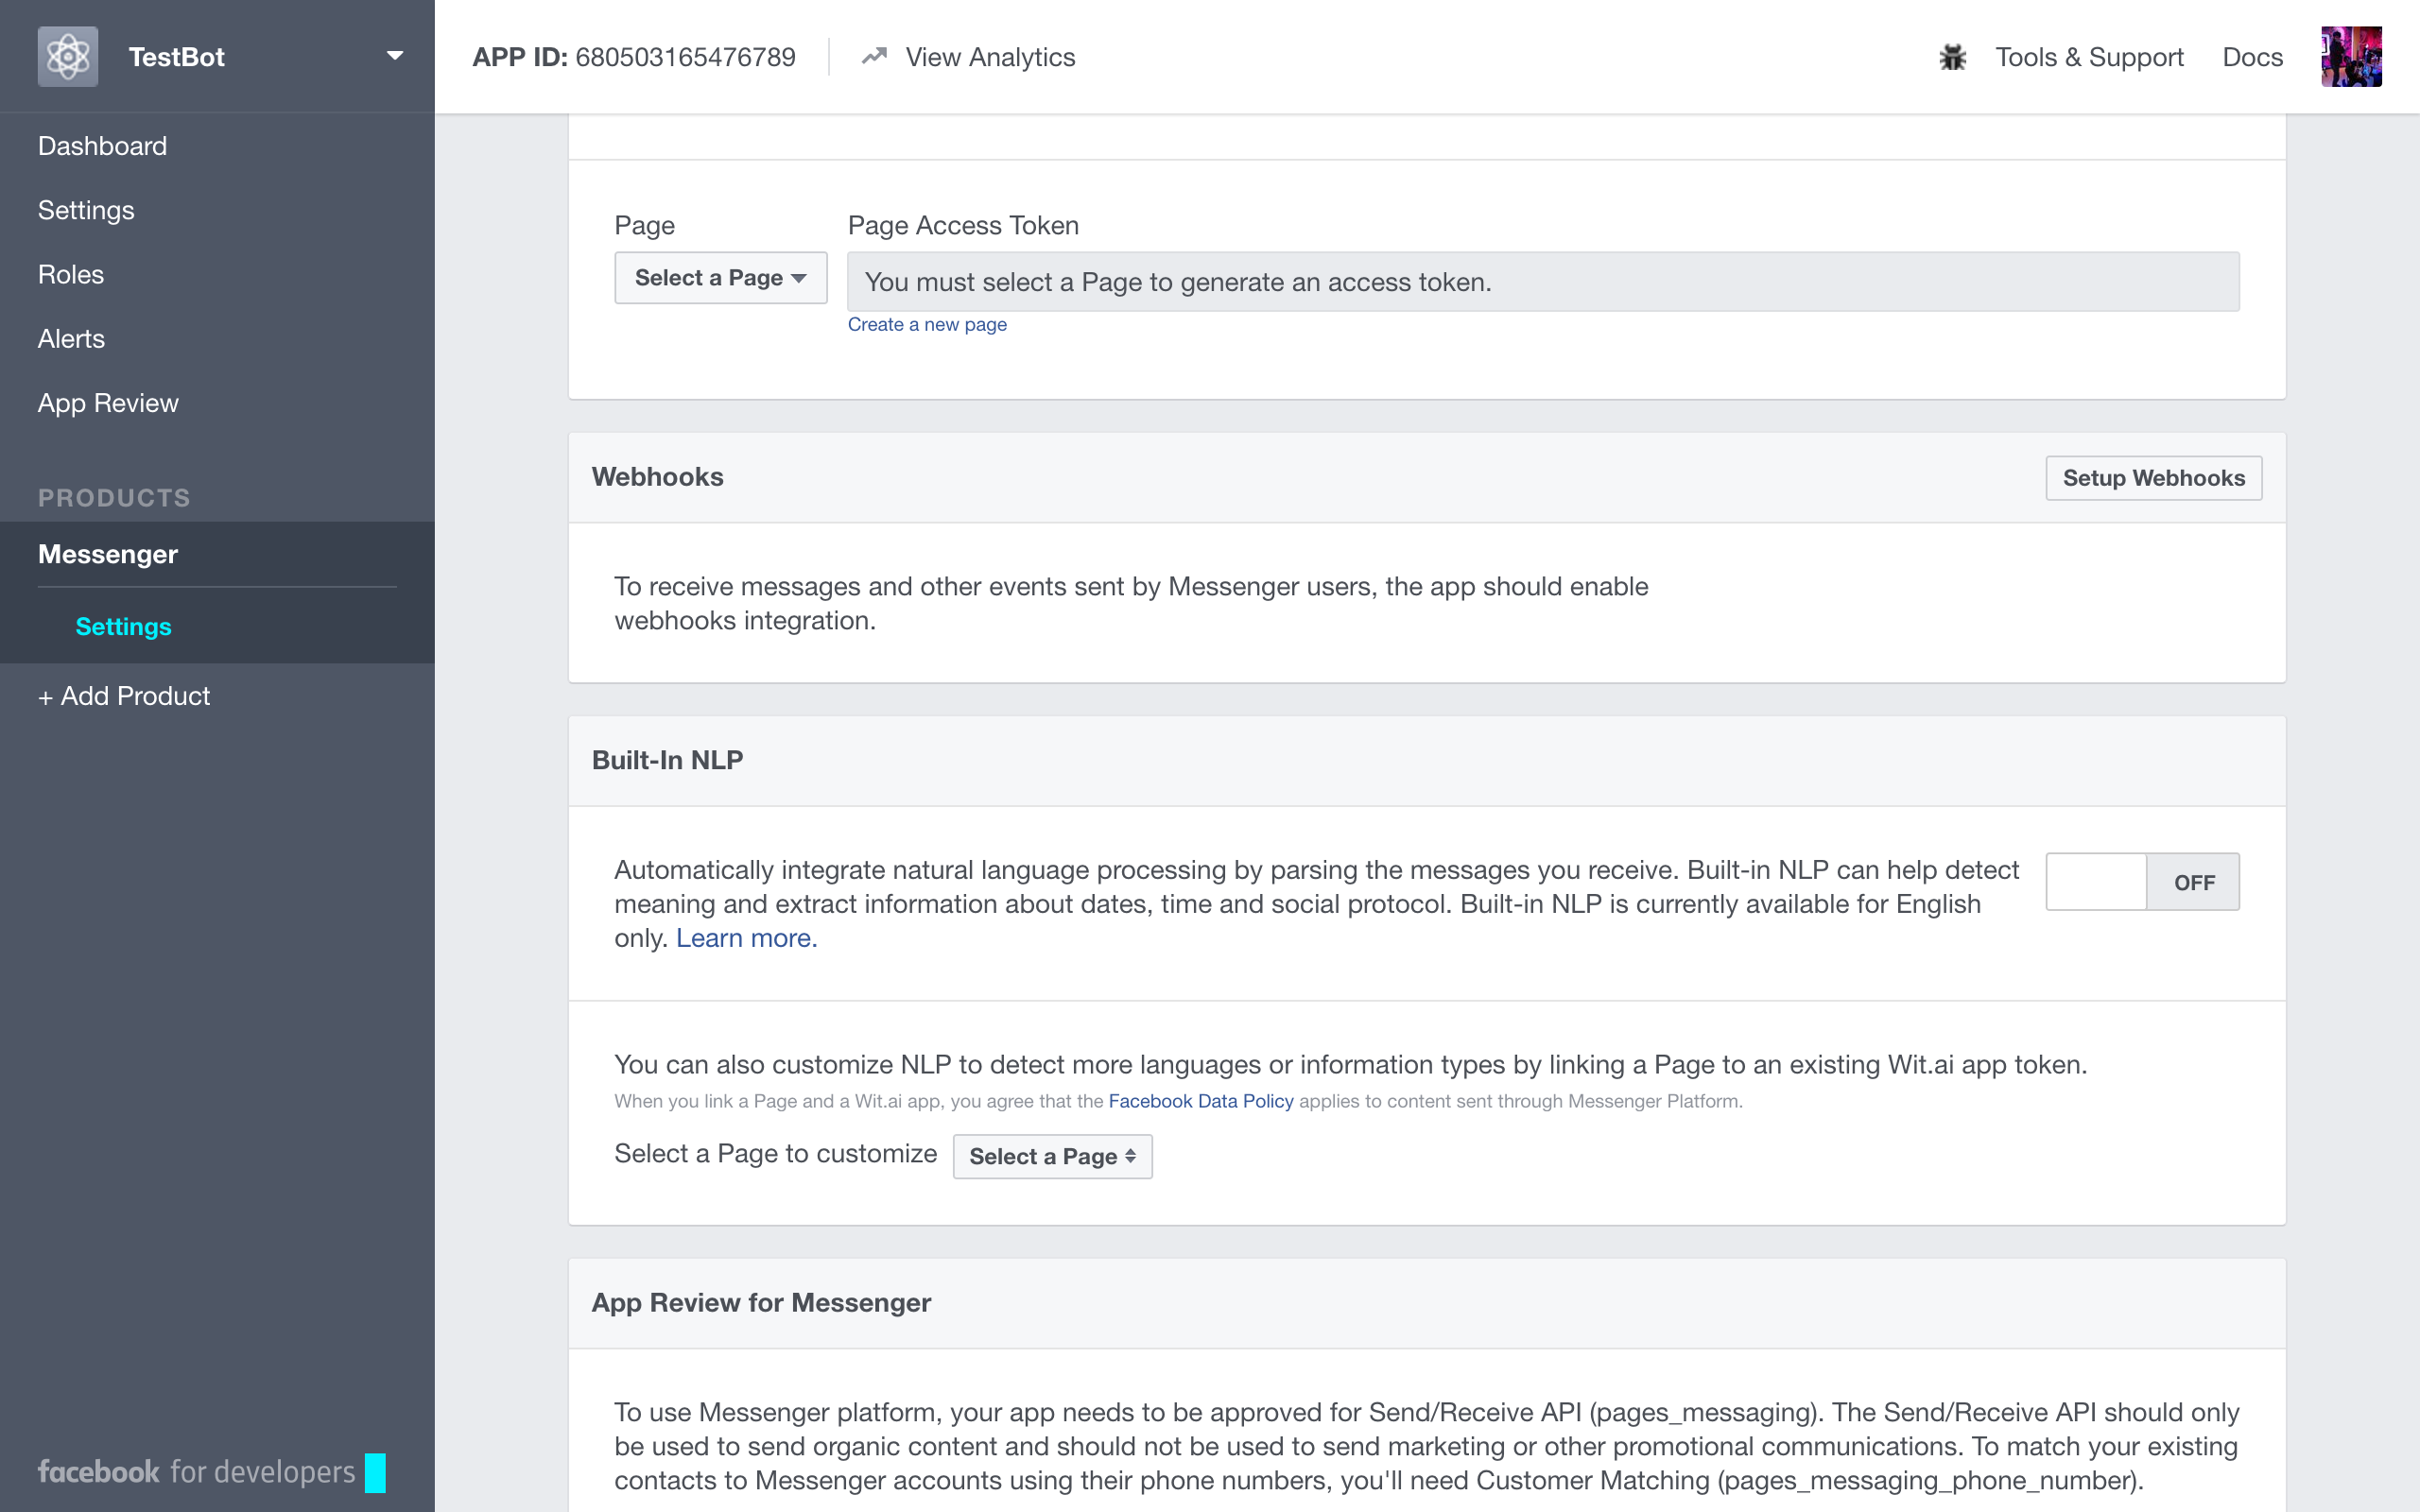
- Scroll over to the Token Generation section
- Choose a page from the dropdown (Incase you do not have a page, create one)
- Once you have selected a page, a Page Access Token will be generated for you.
- Save this token somewhere.
- Now, we need to trigger the facebook app to start sending us messages
- Switch back to the terminal
- Paste the following command:
# Replace <PAGE_ACCESS_TOKEN> with the page access token you just generated.
$ curl -X POST "https://graph.facebook.com/v2.6/me/subscribed_apps?access_token=<PAGE_ACCESS_TOKEN>"- In this project, we are using https://www.themoviedb.org/ to get information about the movie, to access their APIs you need an API key. You can find instructions to get one here.
$ hasura quickstart jaison/fb-bot
$ cd fb-bot
# Add FACEBOOK_VERIFY_TOKEN to secrets. This is any pass phrase that you decide on, keep a note on what you are choosing as your verify token, we will be using it later while setting things up for your bot on the facebook developer page.
$ hasura secrets update bot.fb_verify_token.key <YOUR-VERIFY-TOKEN>
# Add FACEBOOK_PAGE_ACCESS_TOKEN to secrets
$ hasura secrets update bot.fb_page_token.key <YOUR-FB-PAGE-ACCESS-TOKEN>
# Add Movie db api token to secrets
$ hasura secrets update bot.movie_db_token.key <YOUR-MOVIEDB-API-TOKEN>
# Deploy
$ git add . && git commit -m "Deployment commit"
$ git push hasura master
After the git push completes:
$ hasura microservice listYou will get an output like so:
INFO Getting microservices...
INFO Custom microservices:
NAME   STATUS    INTERNAL-URL(tcp,http)   EXTERNAL-URL
bot    Running   bot.default              https://bot.apology69.hasura-app.io

INFO Hasura microservices:
NAME            STATUS    INTERNAL-URL(tcp,http)   EXTERNAL-URL
auth            Running   auth.hasura              https://auth.apology69.hasura-app.io
data            Running   data.hasura              https://data.apology69.hasura-app.io
filestore       Running   filestore.hasura         https://filestore.apology69.hasura-app.io
gateway         Running   gateway.hasura
le-agent        Running   le-agent.hasura
notify          Running   notify.hasura            https://notify.apology69.hasura-app.io
platform-sync   Running   platform-sync.hasura
postgres        Running   postgres.hasura
session-redis   Running   session-redis.hasura
sshd            Running   sshd.hasura
vahana          Running   vahana.hasura
Find the EXTERNAL-URL for the service named bot(in this case -> https://bot.apology69.hasura-app.io).
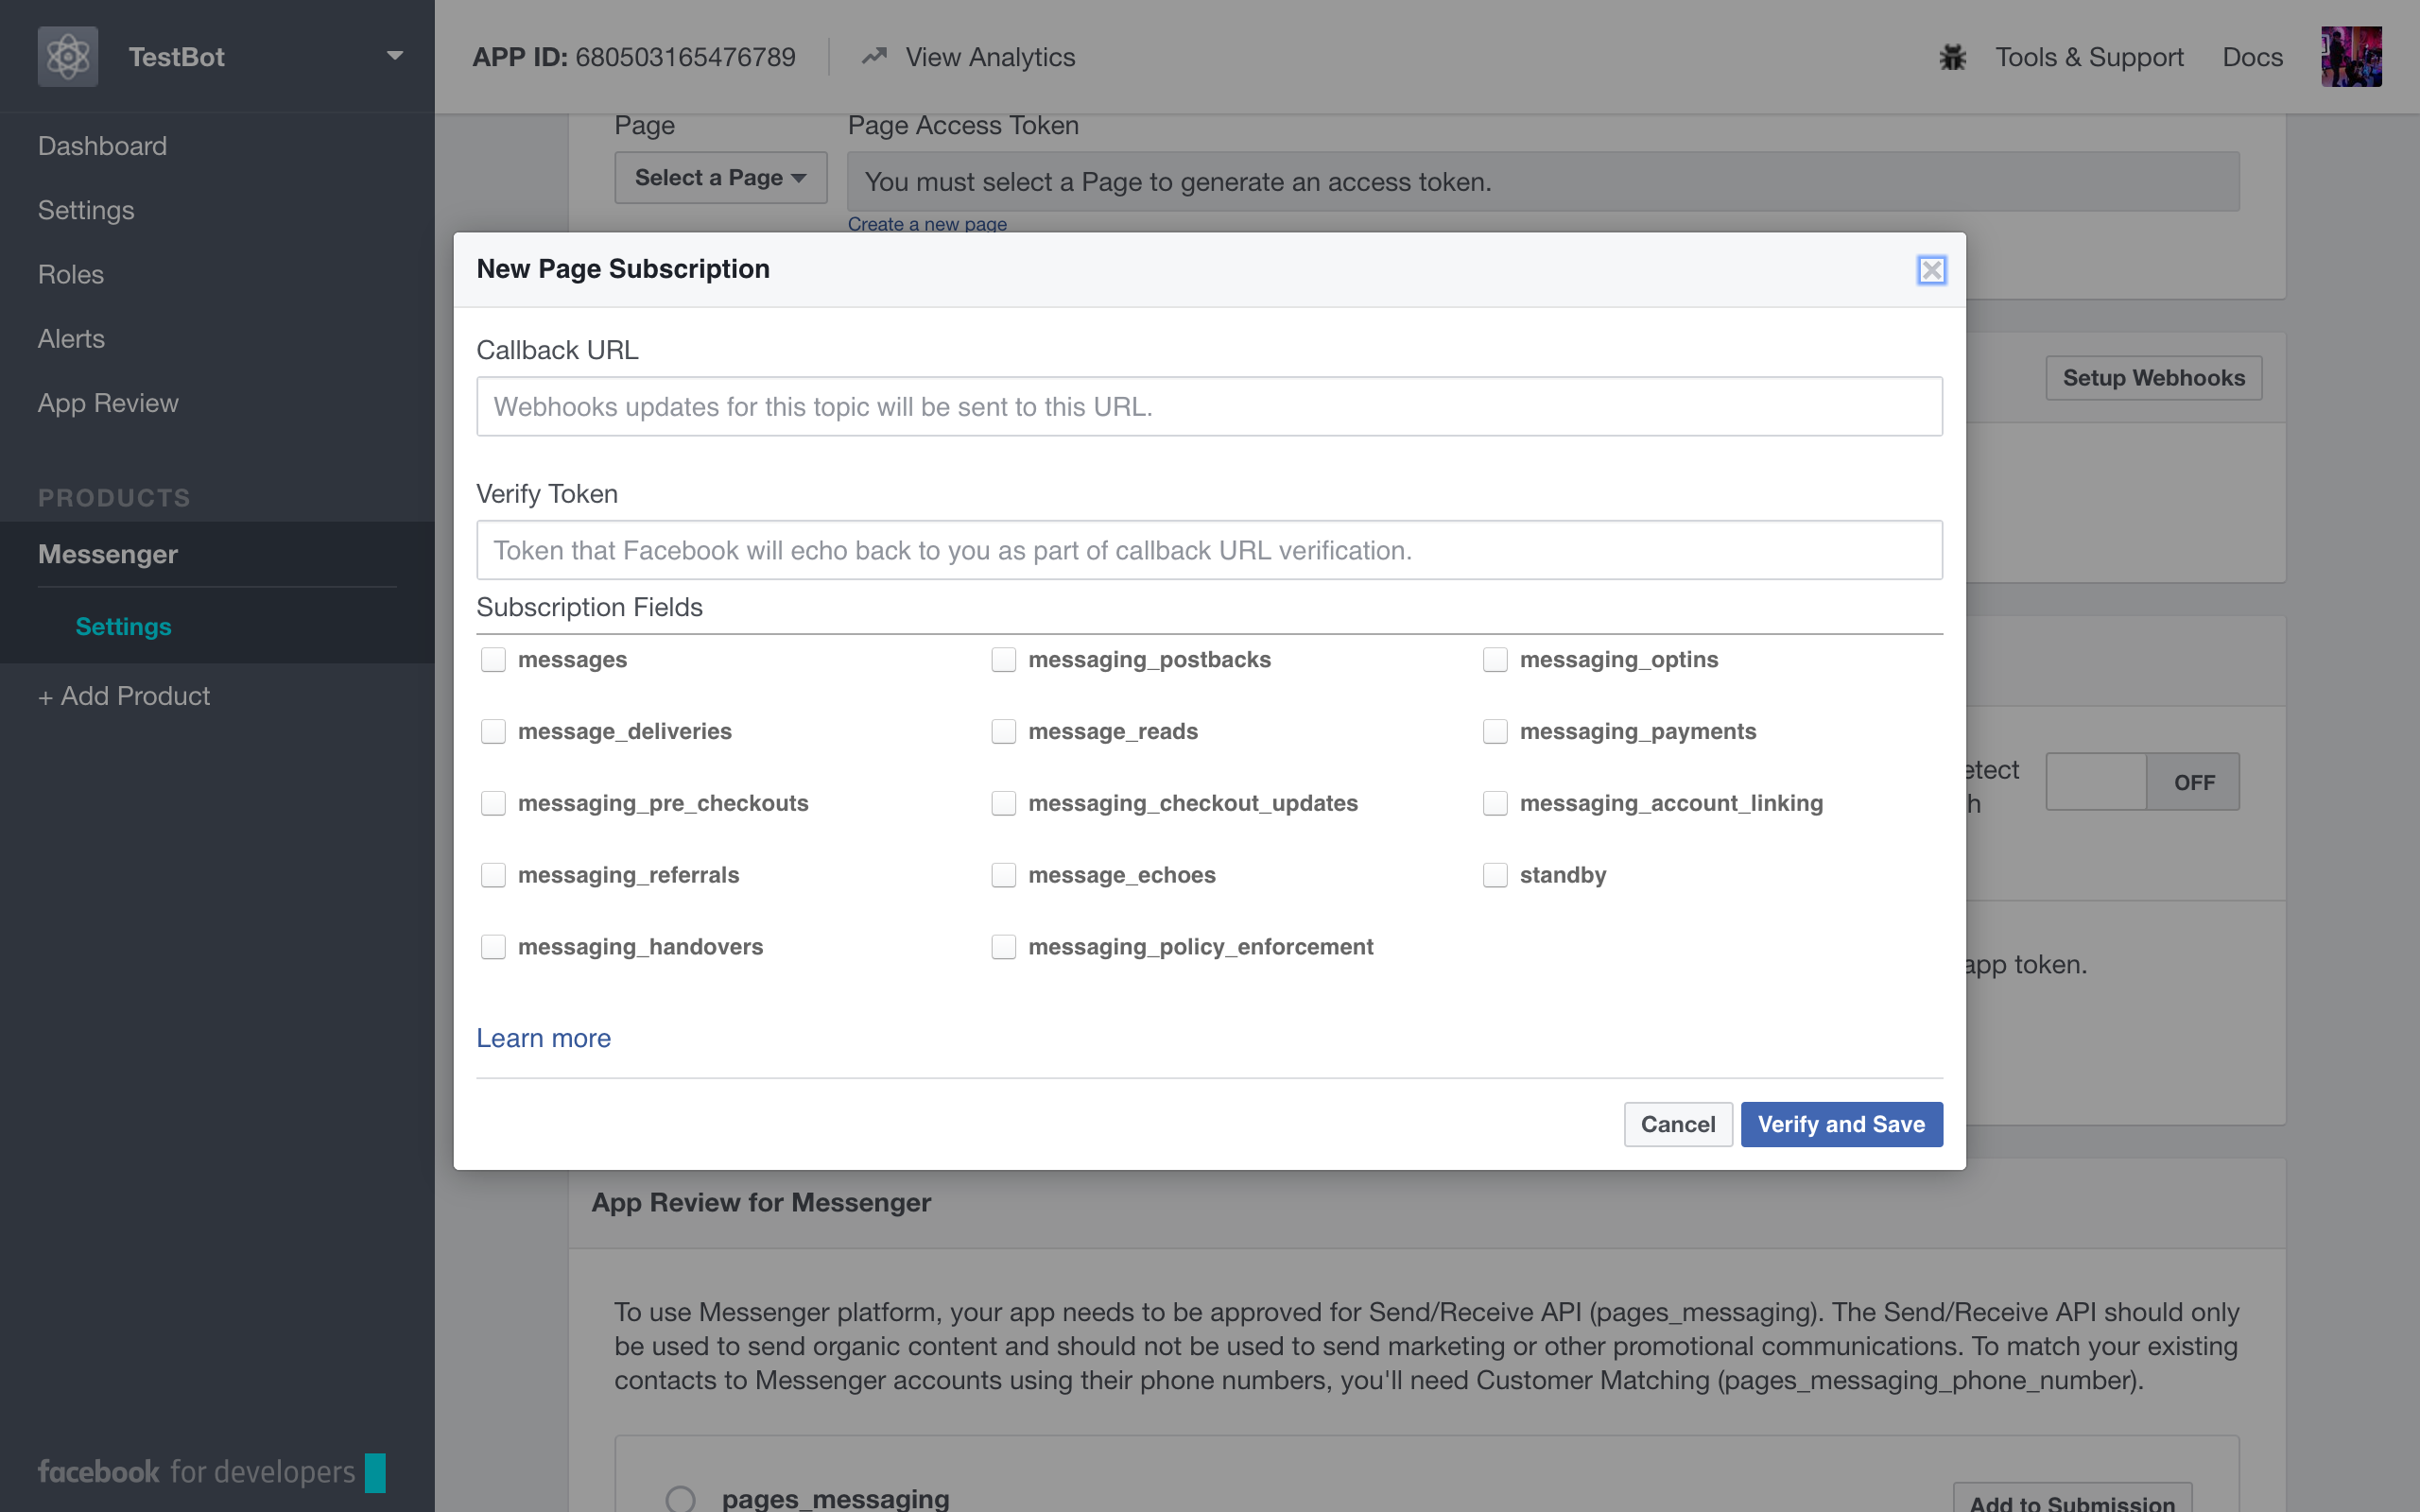
In your fb app page, scroll down until you find a card name Webhooks. Click on the setup webhooks button.
- The
callback URLis the URL that the facebook servers will hit to verify as well as forward the messages sent to our bot. The nodejs app in this project uses the/webhookpath as thecallback URL. Making thecallback URLhttps://bot.YOUR-CLUSTER-NAME.hasura-app.io/webhook (in this case -> https://bot.apology69.hasura-app.io/webhook/) - The
verify tokenis the verify token that you set in your secrets above (in the command $ hasura secrets update bot.fb_verify_token.key ) - After selecting all the
Subsciption Fields. Submit and save. - You will also see another section under
Webhooksthat saysSelect a page to subscribe your webhook to the page events, ensure that you select the respective facebook page here.
Next, open up your facebook page.
-
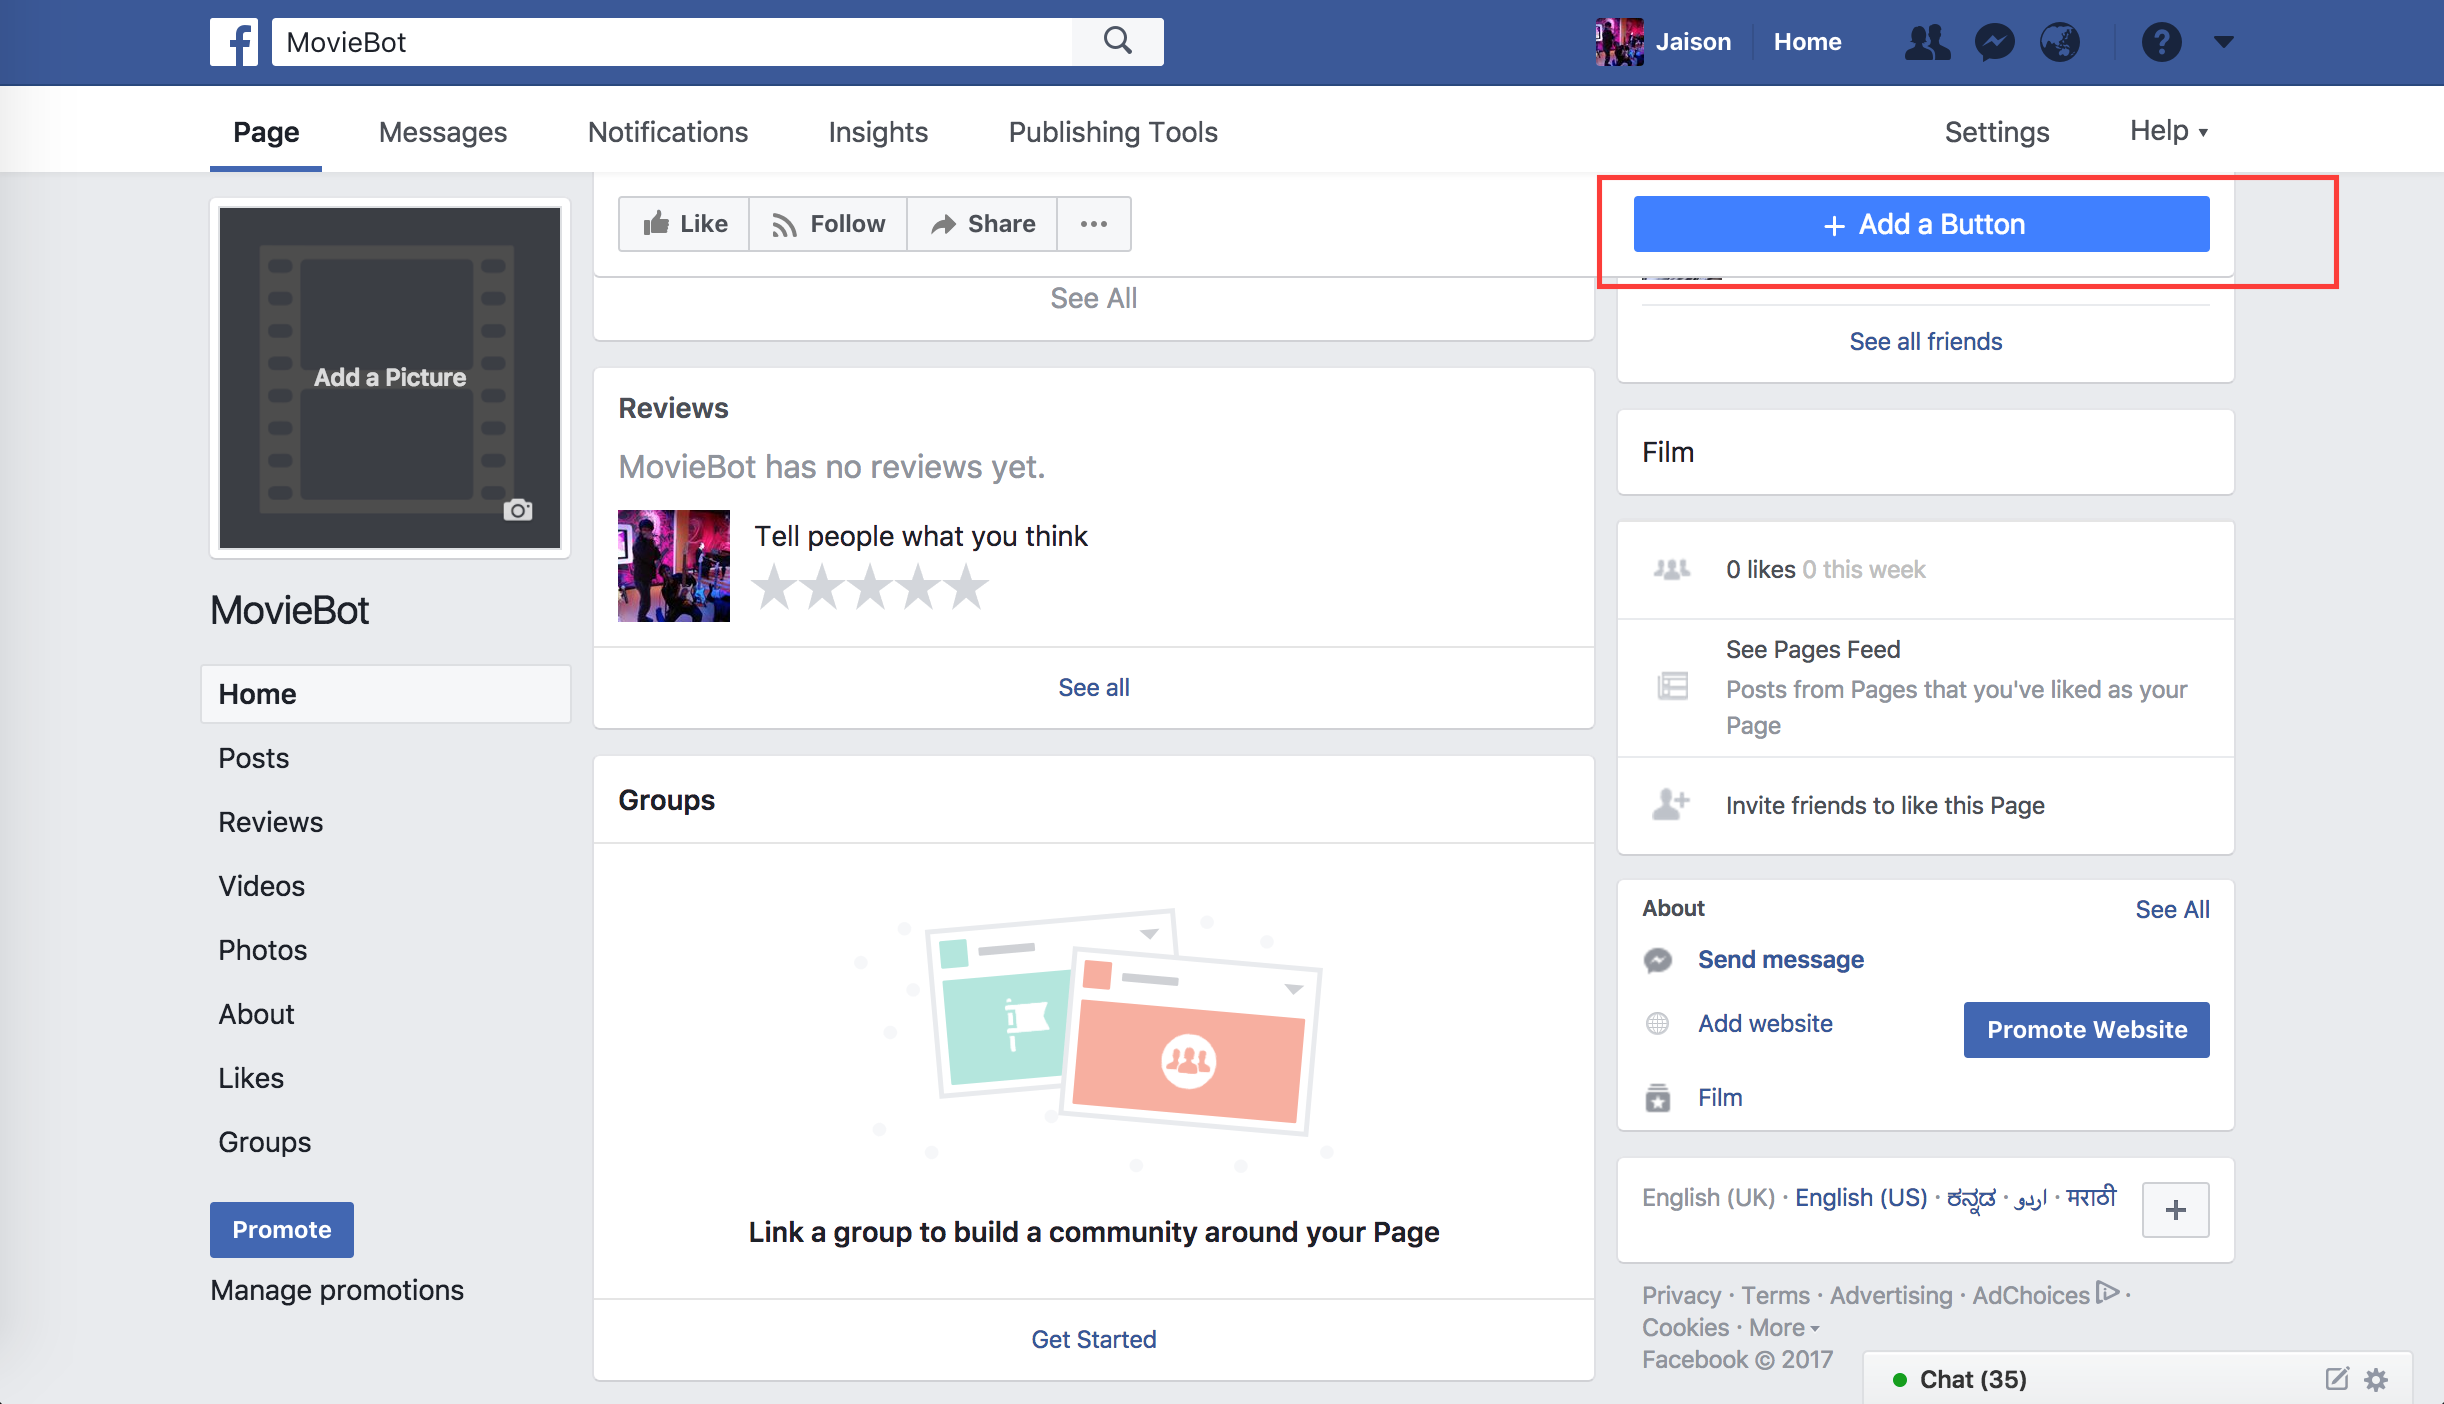
Hover over the Send Message button and click on Test Button.
-
Instead, if your button says + Add Button, click on it.
- Next, click on Use our messenger bot. Then, Get Started and finally Add Button.
- You will now see that the + Add button has now changed to Get Started. Hovering over this will show you a list with an item named Test this button. Click on it to start chatting with your bot.
- Send a message to your bot.
Test out your bot, on receiving a movie name it should respond with details about that movie.
Follow along for a step by step guide on developing and deploying this facebook messenger bot on Hasura.
- Architecture
- Getting started
- Developing the Facebook Messenger bot
- Managing secrets and tokens
- Publishing your bot
- Future Scope
$ hasura loginThe above command will redirect you to your browser asking you to login to Hasura. If you do not have an account with Hasura, you can register as well. After you have successfully logged in, return back to your terminal.
$ hasura quickstart base
$ cd base
The above command does the following:
- Creates a new folder in the current working directory called
base - Creates a new trial hasura cluster for you and sets that cluster as the default cluster for this project
- Initializes
baseas a git repository and adds the necessary git remotes.
In this step, we are going to create our own custom microservice on Hasura which will run our nodejs-express app.
# Let's call our microservice 'bot'
$ hasura microservice generate bot --template=nodejs-express
# Generate routes and remotes
$ hasura conf generate-route bot >> conf/routes.yaml
$ hasura conf generate-remote bot >> conf/ci.yamlTo deploy your project on the Hasura cluster.
$ git add . && git commit -m "Initial Commit"
$ git push hasura masterTo check the list of microservices currently running on your cluster:
$ hasura microservice listYou will get an output like so:
INFO Getting microservices...
INFO Custom microservices:
NAME   STATUS    INTERNAL-URL(tcp,http)   EXTERNAL-URL
bot    Running   bot.default              https://bot.apology69.hasura-app.io

INFO Hasura microservices:
NAME            STATUS    INTERNAL-URL(tcp,http)   EXTERNAL-URL
auth            Running   auth.hasura              https://auth.apology69.hasura-app.io
data            Running   data.hasura              https://data.apology69.hasura-app.io
filestore       Running   filestore.hasura         https://filestore.apology69.hasura-app.io
gateway         Running   gateway.hasura
le-agent        Running   le-agent.hasura
notify          Running   notify.hasura            https://notify.apology69.hasura-app.io
platform-sync   Running   platform-sync.hasura
postgres        Running   postgres.hasura
session-redis   Running   session-redis.hasura
sshd            Running   sshd.hasura
vahana          Running   vahana.hasura
apology69 is the name of the cluster. You would get a different cluster and hence the EXTERNAL_URL for your Custom microservice named bot would be https://bot.YOUR-CLUSTER-NAME.hasura-app.io. Currently, this endpoint only returns a simple "Hello World!".
The code for the app is inside the microservices/bot directory. Open the server.js file located at microservices/bot/app/src using the text editor of your choosing:
var express = require('express');
var app = express();

//your routes here
app.get('/', function (req, res) {
  res.send("Hello World!");
});

app.listen(8080, function () {
  console.log('Example app listening on port 8080!');
});
As you can see, our app is listening on Port 8080, which is the default port that our microservice listens to as well. Another thing to note is that the module 'express' is already added to our app.
With this, we now have a simple nodejs-express app running on a publicly accessible url being served over HTTPS.
Navigate to microservices/bot/app/src (the directory with the package.json file)
$ npm install request body-parser --save- The above command installs two modules(libraries) "request" and "body-parser" into our app.
- request is for sending out messages and body-parser is to process messages.
- Once again, open up the server.js and add the following at the top of your file:
    var bodyParser = require('body-parser');
    var request = require('request');
and the following after var app = express();
    // Process application/x-www-form-urlencoded
    app.use(bodyParser.urlencoded({extended: false}));

    // Process application/json
app.use(bodyParser.json());- Your server.js file should now look like so:
    var bodyParser = require('body-parser');
    var request = require('request');
    var express = require('express');
    var app = express();

    // Process application/x-www-form-urlencoded
    app.use(bodyParser.urlencoded({extended: false}));

    // Process application/json
    app.use(bodyParser.json());

    //your routes here
    app.get('/', function (req, res) {
      res.send("Hello World!");
    });

    app.listen(8080, function () {
      console.log('Example app listening on port 8080!');
});- Navigate to https://developers.facebook.com/apps/
- Click on '+ Create a new app’.
- Give a display name for your app and a contact email.
- In the select a product screen, hover over Messenger and click on Set Up
- Scroll down to the Webhooks section and click on the Setup Webhooks button.
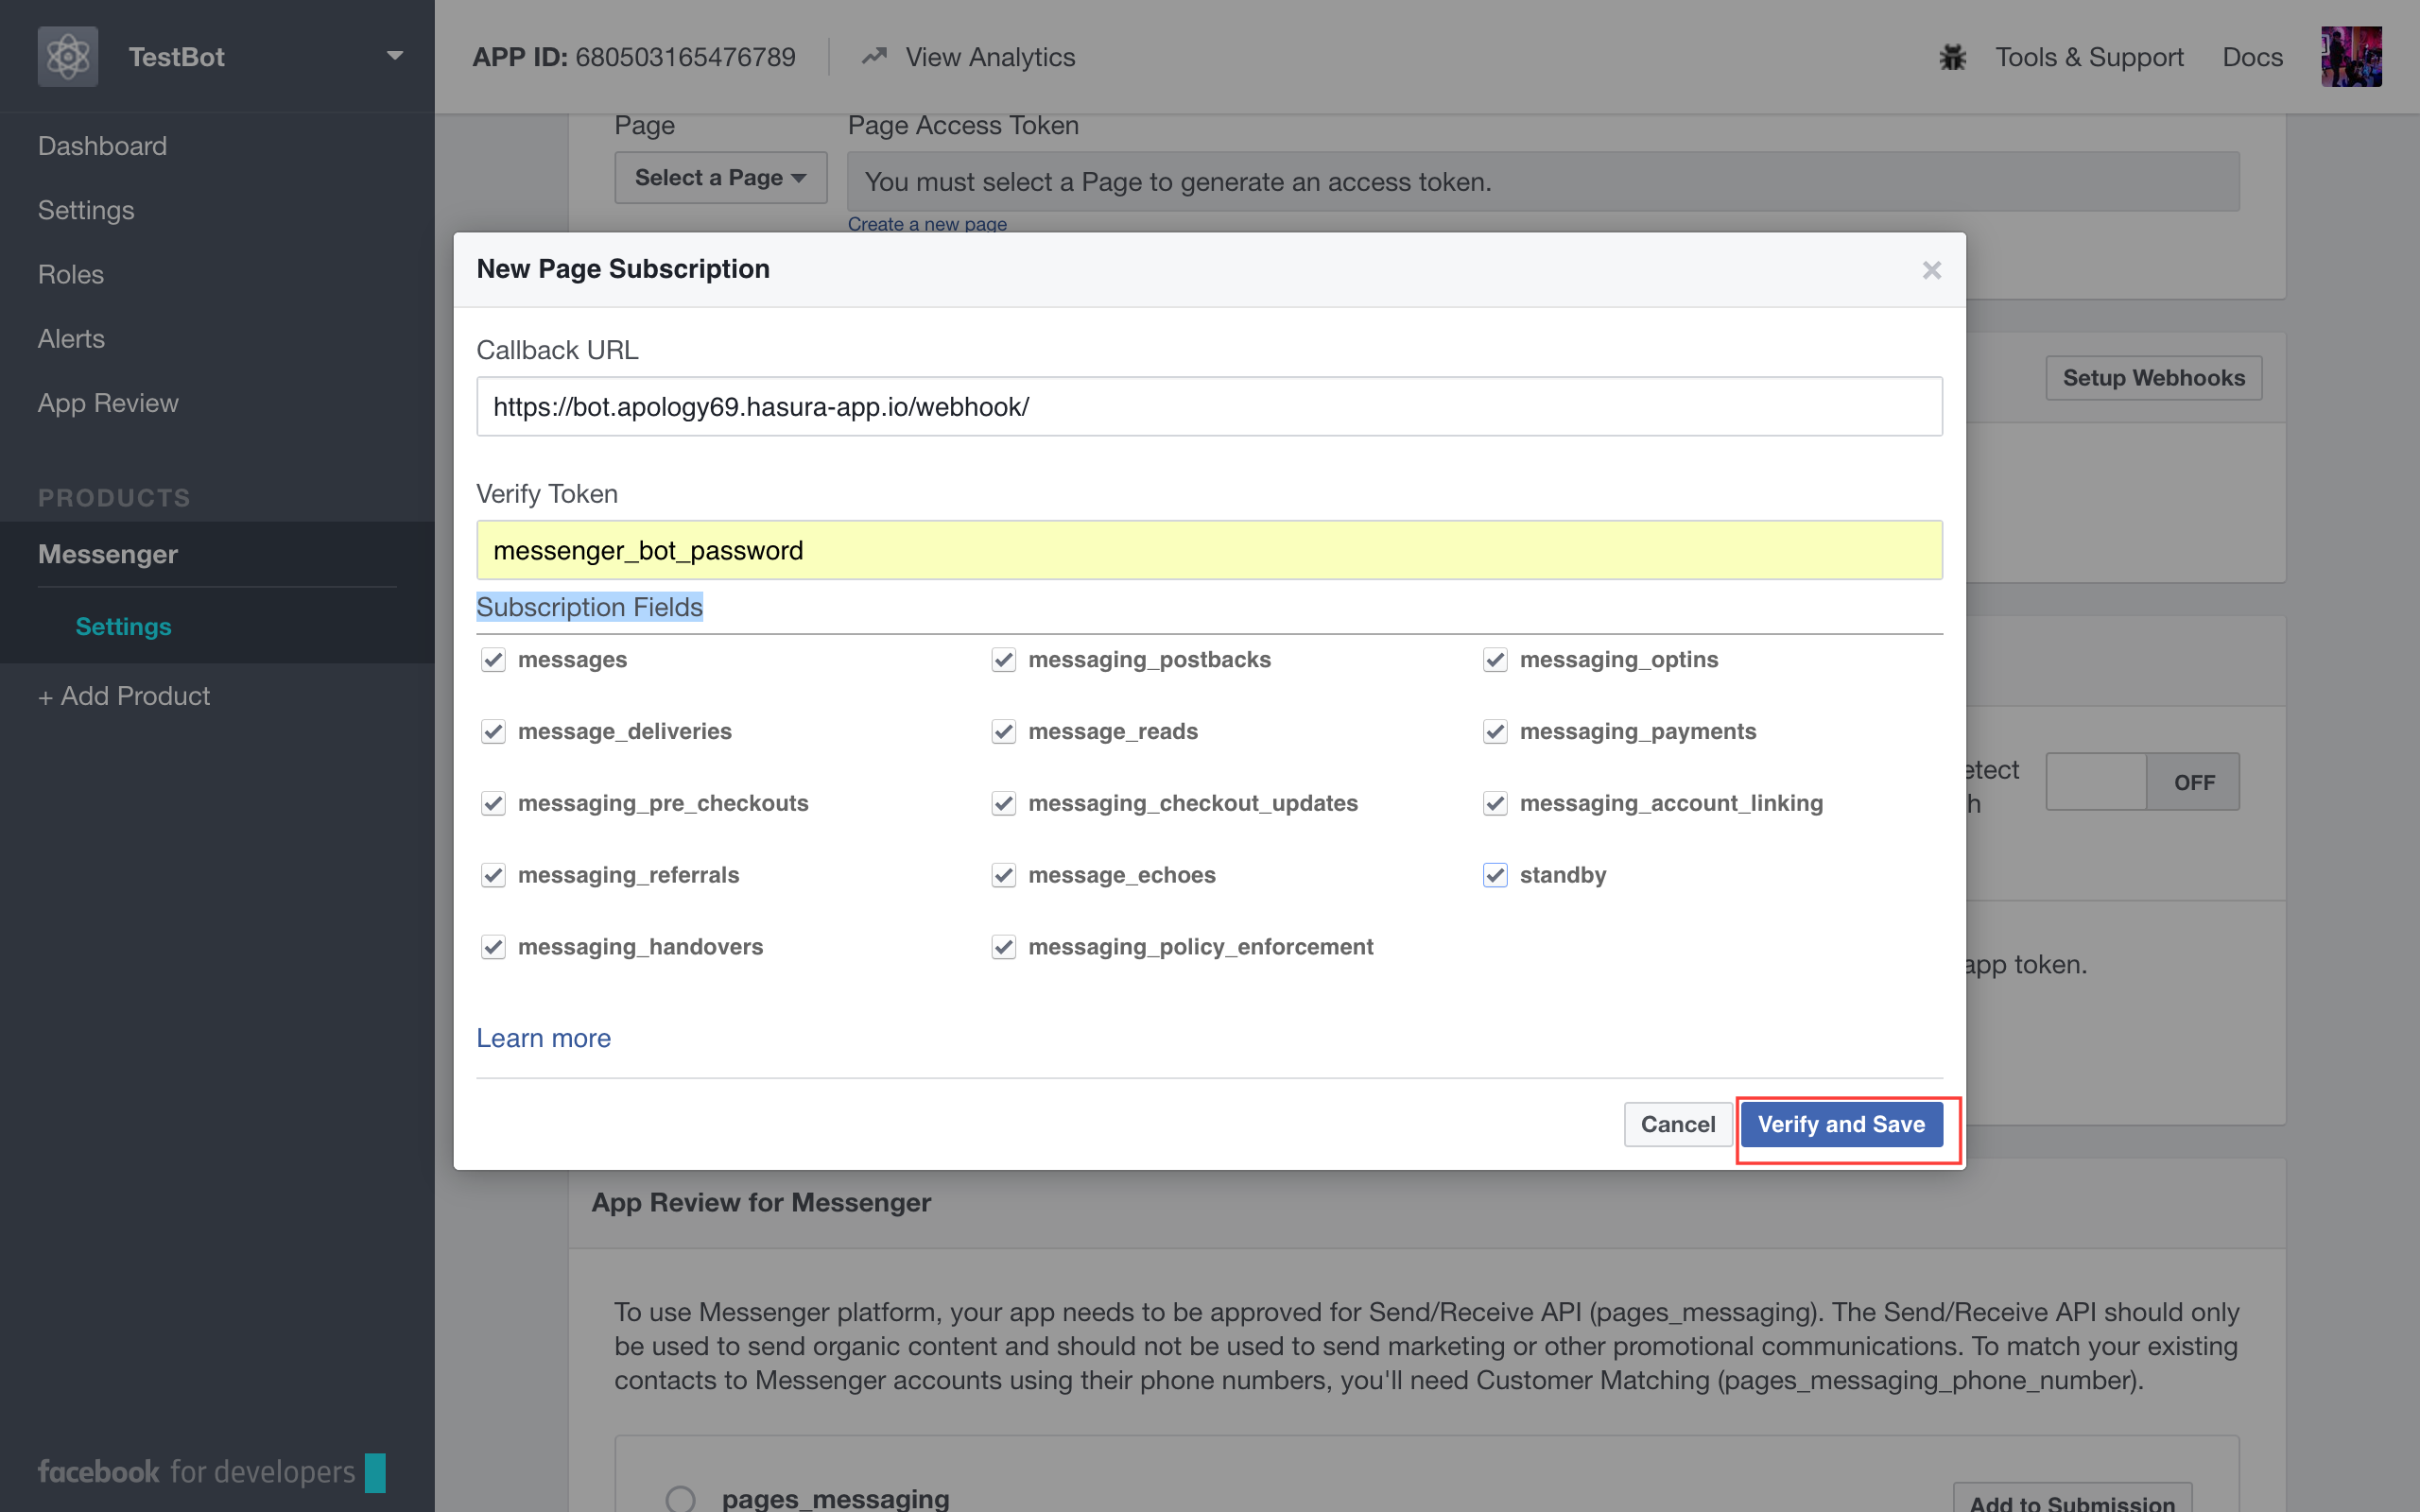
On the pop up that comes up, we need to fill in a box with a Callback URL and another one with a Verify Token.
-
The Callback URL is the url that the facebook servers will hit
- To verify our server with the Verify Token we give it. This will be a
GETrequest. - To send the messages that our bot receives from users. This will be a
POSTrequest.
- To verify our server with the Verify Token we give it. This will be a
-
This means that we need to create a path on our server which can be used by the facebook server to communicate to our server. To do this, switch back to your terminal and open service.js file.
-
Paste the following code:
    let FACEBOOK_APP_PASSWORD = 'messenger_bot_password';

    // for Facebook verification
    app.get('/webhook/', function (req, res) {
      if (req.query['hub.verify_token'] === FACEBOOK_APP_PASSWORD) {
          res.send(req.query['hub.challenge'])
      }
      res.send('Error, wrong token')
    })

    // All callbacks for Messenger will be POST-ed here
    app.post("/webhook", function (req, res) {
        console.log('Request received at webhook: ' + JSON.stringify(req.body));
        res.sendStatus(200);
    });
In the above code, we are:
-
choosing an arbitrary password that we will use as our Verify Token while Enabling Webhooks.
-
creating a path \webhook\ which will accept :
-
A
GETrequest to verify the Verify Token being sent by the facebook servers. Incase, the token is not the same as the one we have set, we respond with an error. -
A
POSTrequest where all of the messages that our bot receives will be posted to, by the facebook server.- At this point, we are just printing out the received request and responding with a status code of 200.
-
-
Let's deploy this code
# Navigate to the root hasura project directory
$ git add . && git commit -am "Added webhook"
$ git push hasura master
Note: For the rest of the tutorial, when we say "Deploy your code", you need to perform the above mentioned steps.
-
Now, switch back to your facebook app page and fill in the pop up with:
- Callback URL: https://bot.YOUR-CLUSTER-NAME.hasura-app.io/webhook/ //Replace YOUR-CLUSTER-NAME with the name of your cluster.
- Verify Token: messenger_bot_password
- Subscription Fields: Check all
-
Click on Verify and save.
To start using the bot, we need a facebook page to host our bot.
- Scroll over to the Token Generation section
- Choose a page from the dropdown (Incase you do not have a page, create one)
- Once you have selected a page, a Page Access Token will be generated for you.
- Copy this page access token in your
server.jsfile
let FACEBOOK_PAGE_ACCESS_TOKEN = "EAATZCaDcXCGMBAKAFATDhosSC5PyrdwrIqmAlGuLvYVq1lnuzOTFeDZCFkgARElOffIZAZCiIJYGvzkN9cIbZAYDT7WyD3aWlmsWAoawsMqUh4VpZAmgBZAwREjZAaHy3usjoAfgcSWg7ZAI9J2P4FGJiOyO3pc5WgZAgZDZD";-
Now, we need to trigger the facebook app to start sending us messages
- Switch back to the terminal
- Paste the following command:
# Replace <PAGE_ACCESS_TOKEN> with the page access token you just generated.
$ curl -X POST "https://graph.facebook.com/v2.6/me/subscribed_apps?access_token=<PAGE_ACCESS_TOKEN>"- Let's check if everything is working fine.
- In your server.js file, add the following
    app.post('/webhook/', function(req, res) {
      console.log(JSON.stringify(req.body));
      res.sendStatus(200);
    })
We have created a POST endpoint with the same path name as '\webhook' and we are simply printing out the request in the console and responding with a status of 200;
- Deploy this code.
- Switch to your browser and open up the page you just created to generate the Page Access Token.
- Click on the button named + Add Button.
- Next, click on Use our messenger bot. Then, Get Started and finally Add Button.
- You will now see that the + Add button has now changed to Get Started. Hovering over this will show you a list with an item named Test this button. Click on it to start chatting with your bot.
- Send a message to your bot.
$ hasura ms logs bot- The response printed in the logs will look like so
    {
    	"object": "page",
    	"entry": [
    		{
    			"id": "2713137123371784",
    			"time": 1502352288969,
    			"messaging": [
    				{
    					"sender": {
    						"id": "123123123123"
    					},
    					"recipient": {
    						"id": "2354234324234"
    					},
    					"timestamp": 1502352288017,
    					"message": {
    						"mid": "mid.$asdqfqfqefqcw",
    						"seq": 47322,
    						"text": "Hello"
    					}
    				}
    			]
    		}
    	]
}- The senderId and the text keys need to be extracted from this reponse.
- Switch back to your server.js file
- Add the following to your your POST '\webhook' function:
    app.post('/webhook/', function(req, res) {
      console.log(JSON.stringify(req.body));
      //1
      if (req.body.object === 'page') {
        //2
        if (req.body.entry) {
          //3
          req.body.entry.forEach(function(entry) {
            //4
            if (entry.messaging) {
              //5
              entry.messaging.forEach(function(messagingObject) {
                  //6
                  var senderId = messagingObject.sender.id;
                  //7
                  if (messagingObject.message) {
                    //8
                    if (!messagingObject.message.is_echo) {
                      //9
                      var textMessage = messagingObject.message.text;
                      //10
                      sendMessageToUser(senderId, textMessage);
                    }
                  }
              });
            } else {
              console.log('Error: No messaging key found');
            }
          });
        } else {
          console.log('Error: No entry key found');
        }
      } else {
        console.log('Error: Not a page object');
      }
      res.sendStatus(200);
})-
In the above code we are basically parsing through the request and extracting the message:
- 1: We are checking whether the object field in request being sent has a value page
- 2: Next, we are checking whether it has a key named entry
- 3: After ensuring that it does an entry key, we are looping through each element in the entry array.
- 4: For each element inside entry, we are checking whether it has a messaging key.
- 5: After ensuring that it does have a messaging key, we are then looping through each element inside the messaging array.
- 6: Getting senderId of the user who sent us the message.
- 7: For each element inside messaging, we are checking whether it has a message key.
- 8: When we send a message to our bot, the facebook server echos back that message with a field is_echo as true. In such cases, we are ignoring the messages.
- 9: Extracting the message sent by the user to a variable called textMessage.
- 10: We send the senderId and the textMessage extracted from the request body to a function named sendMessageToUser. This function sends the textMessage sent to it, to the senderId provided.
-
Let's have a look at our sendMessageToUser function.
    function sendMessageToUser(senderId, message) {
      request({
        url: 'https://graph.facebook.com/v2.6/me/messages?access_token=' + FACEBOOK_PAGE_ACCESS_TOKEN,
        method: 'POST',
        json: {
          recipient: {
            id: senderId
          },
          message: {
            text: message
          }
        }
      }, function(error, response, body) {
            if (error) {
              console.log('Error sending message to user: ' + error);
            } else if (response.body.error){
              console.log('Error sending message to user: ' + response.body.error);
            }
      });
}- This is a graph API provided by Facebook to send a message to our bot.
- Deploy this code.
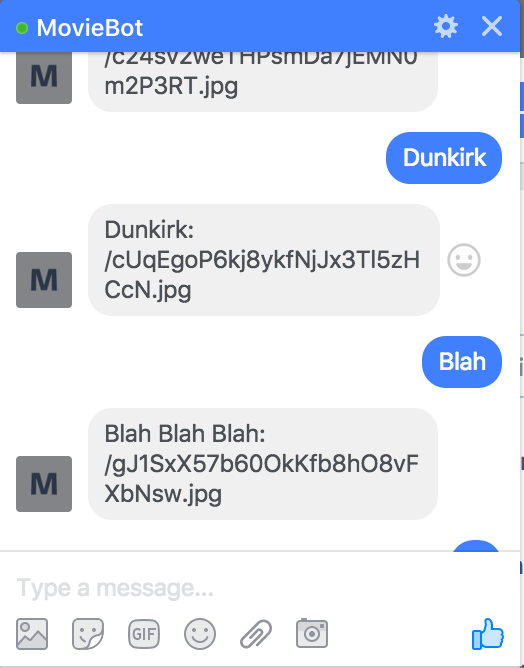
- Switch back to your bot and send it a message. It should respond with the same message.
Now that our bot responds to the user. Let's take the message sent by the user (assuming that it is a movie name), get some details on the movie.
-
Switch back to your
server.jsfile -
To fetch details on the movie, we are going to use the APIs provided by https://www.themoviedb.org/
-
APIs provided by https://www.themoviedb.org/ are not open, so you'll need to create an account with them and get an API key.
-
After creating an account, follow the instructions here to get an API key.
-
We are going to use a npm library called moviedb
- Switch to your terminal
- Navigate to /bot/app/src/
- Type npm install moviedb --save and hit enter.
- Add the following to your server.js
-
    //Replace YOUR_API_KEY with the api key you got from https://www.themoviedb.org/
let mdb = require('moviedb')('YOUR_API_KEY');- Next, we are going to write a new function to get the movie details:
    function getMovieDetails(senderId, movieName) {
      mdb.searchMovie({ query: movieName }, (err, res) => {
        if (err) {
          console.log('Error using movieDB: ' + err);
          sendMessageToUser(senderId, 'Error finding details on ' + movieName);
        } else {
            console.log(res);
            sendMessageToUser(senderId, 'Found information on ' + movieName);
          } else {
            sendMessageToUser(senderId, message);
          }
        }
      });
}-
Here, we are fetching details on the movie and printing it out on the console.
- mbd.searchMovie is a method provided by the moviedb library.
-
Deploy the code to see what details we get on the movie.
-
Test out the API we are using at https://developers.themoviedb.org/3/search/search-movies and take a look at the response that you are getting.
    {
      "page": 1,
      "total_results": 5,
      "total_pages": 1,
      "results": [
        {
          "vote_count": 1149,
          "id": 374720,
          "video": false,
          "vote_average": 7.5,
          "title": "Dunkirk",
          "popularity": 51.70826,
          "poster_path": "/cUqEgoP6kj8ykfNjJx3Tl5zHCcN.jpg",
          "original_language": "en",
          "original_title": "Dunkirk",
          "genre_ids": [
            28,
            18,
            36,
            53,
            10752
          ],
          "backdrop_path": "/fudEG1VUWuOqleXv6NwCExK0VLy.jpg",
          "adult": false,
          "overview": "Miraculous evacuation of Allied soldiers from Belgium, Britain, Canada, and France, who were cut off and surrounded by the German army from the beaches and harbor of Dunkirk, France, between May 26 and June 04, 1940, during Battle of France in World War II.",
          "release_date": "2017-07-19"
        },
        .....
      ]
}- The results key is what contains a list of object with details on the movie.
- For now, let's just access a single object from this list and respond back to the user with the movie name and overview.
- Your getMovieDetails function will now look like this.
    function getMovieDetails(senderId, movieName) {
      mdb.searchMovie({ query: movieName }, (err, res) => {
        if (err) {
          console.log('Error using movieDB: ' + err);
          sendMessageToUser(senderId, 'Error finding details on ' + movieName);
        } else {
          console.log(res);
          if (res.results) {
            if (res.results.length > 0) {
              var result = res.results[0];
              var movieName  = result.original_title
              var overview = result.overview;
              sendMessageToUser(senderId, movieName + ": " + overview);
            } else {
              sendMessageToUser(senderId, 'Could not find any information on ' + movieName);
            }
          } else {
            sendMessageToUser(senderId, message);
          }
        }
      });
}- Deploy this code and test it out.
Currently, the response sent by our bot looks ugly. So let's improve our response UI.
- Switch to your server.js file.
- Add the following function
    function sendUIMessageToUser(senderId, elementList) {
      request({
        url: FACEBOOK_SEND_MESSAGE_URL,
        method: 'POST',
        json: {
          recipient: {
            id: senderId
          },
          message: {
            attachment: {
              type: 'template',
              payload: {
                template_type: 'generic',
                elements: elementList
              }
            }
          }
        }
      }, function(error, response, body) {
            if (error) {
              console.log('Error sending UI message to user: ' + error.toString());
            } else if (response.body.error){
              console.log('Error sending UI message to user: ' + JSON.stringify(response.body.error));
            }
      });
}- This function accepts a senderId and an elementList. We will get to what the element list is in a bit.
- Next, modify your getMovieDetails function like so:
    function getMovieDetails(senderId, movieName) {
      var message = 'Found details on ' + movieName;
      mdb.searchMovie({ query: movieName }, (err, res) => {
        if (err) {
          console.log('Error using movieDB: ' + err);
          sendMessageToUser(senderId, 'Error finding details on ' + movieName);
        } else {
          console.log(res);
          if (res.results) {
            if (res.results.length > 0) {
              //1
              var elements = []
              //2
              var resultCount =  res.results.length > 5 ? 5 : res.results.length;
              //3
              for (i = 0; i < resultCount; i++) {
                var result = res.results[i];
                //4
                elements.push(getElementObject(result));
              }
              sendUIMessageToUser(senderId, elements);
            } else {
              sendMessageToUser(senderId, 'Could not find any informationg on ' + movieName);
            }
          } else {
            sendMessageToUser(senderId, message);
          }
        }
      });
}-
In the above code:
- 1: We are initializing an empty array called elements.
- 2: Here, we have a variable whose value will be at max 5 or the number of elements in the result given to us (if its more than 5).
- 3: We are now looping through the elements in res.results.
- 4: getElementObject() is a function that we will write to get details on the movie in a format that is recognizable by our bot. We are pushing that returned value into the elements array.
-
Let's have a look at what getElementObject() looks like:
    function getElementObject(result) {
      var movieName  = result.original_title
      var overview = result.overview;
      var posterPath = 'http://image.tmdb.org/t/p/w185/' + result.poster_path;
      return {
        title: movieName,
        subtitle: overview,
        image_url: posterPath,
        buttons: [
            {
              type: "web_url",
              url: 'https://www.themoviedb.org/movie/' + result.id,
              title: "View more details"
            }
        ]
      }
}-
In the above code, we are returning a JSON object with some data. Everything should be self explanatory except
- buttons:
- This is show a button to the user named View more details
- The type: "web_url" lets our bot know that, if a user clicks this button a new page should open with the value specified in the url key. Here, the url key is just a link to themoviedb.org/movie with the movie id.
- buttons:
-
Deploy this code and test out your bot
- Clicking on View more details should take you to a new page.
Congratulations! We have just built a messenger bot!!
One thing that is missing in our bot is that, in the time between receiving the name of the movie to replying to the user with the details. The user does not have any idea about what is going on, it should be nice to show a loading indicator of sorts (the three dots that comes up in messenger when a user is typing something). Let's see how we can do that.
- Switch to your server.js file and add the following new function:
    function showTypingIndicatorToUser(senderId, isTyping) {
      var senderAction = isTyping ? 'typing_on' : 'typing_off';
      request({
        url: 'https://graph.facebook.com/v2.6/me/messages?access_token=' + FACEBOOK_PAGE_ACCESS_TOKEN,
        method: 'POST',
        json: {
          recipient: {
            id: senderId
          },
          sender_action: senderAction
        }
      }, function(error, response, body) {
        if (error) {
          console.log('Error sending typing indicator to user: ' + error);
        } else if (response.body.error){
          console.log('Error sending typing indicator to user: ' + response.body.error);
        }
      });
}- The function accepts a senderId and a boolean value(isTyping). Based on the value of isTyping, the variable senderAction takes a value between typing_on and typing_off. Using this, we use the Graph API to send a request to the Facebook server.
- You can now use this function in your getMovieDetails function like so:
    function getMovieDetails(senderId, movieName) {
      showTypingIndicatorToUser(senderId, true);
      var message = 'Found details on ' + movieName;
      mdb.searchMovie({ query: movieName }, (err, res) => {
        showTypingIndicatorToUser(senderId, false);
        if (err) {
          console.log('Error using movieDB: ' + err);
          sendMessageToUser(senderId, 'Error finding details on ' + movieName);
        } else {
          console.log(res);
          if (res.results) {
            if (res.results.length > 0) {
              var elements = []
              var resultCount =  res.results.length > 5 ? 5 : res.results.length;
              for (i = 0; i < resultCount; i++) {
                var result = res.results[i];
                elements.push(getElementObject(result));
              }
              sendUIMessageToUser(senderId, elements);
            } else {
              sendMessageToUser(senderId, 'Could not find any informationg on ' + movieName);
            }
          } else {
            sendMessageToUser(senderId, message);
          }
        }
      });
    }
Let's see this in action:
Currently, your secrets are stored in the server.js file. And since you are going to version control your code, it is better to store these secrets elsewhere, where it is not open for anyone to view/use.
For this particular example, we have the FACEBOOK_VERIFY_TOKEN, FACEBOOK_PAGE_ACCESS_TOKEN and the Api token obtained from themoviedb. Let's store these in hasura secrets.
# Navigate to the root hasura project directory
# Add FACEBOOK_VERIFY_TOKEN to secrets
$ hasura secrets update bot.fb_verify_token.key messenger_bot_password
# Add FACEBOOK_PAGE_ACCESS_TOKEN to secrets
$ hasura secrets update bot.fb_page_token.key EAATZCaDcXCGMBAKAFATDhosSC5PyrdwrIqmAlGuLvYVq1lnuzOTFeDZCFkgARElOffIZAZCiIJYGvzkN9cIbZAYDT7WyD3aWlmsWAoawsMqUh4VpZAmgBZAwREjZAaHy3usjoAfgcSWg7ZAI9J2P4FGJiOyO3pc5WgZAgZDZD
# Add Movie db api token to secrets
$ hasura secrets update bot.movie_db_token.key asdasdafaeqwqwdqwddqThe secrets we have set above are going to be accessed in our nodejs app as environment variables. To do this, open up k8s.yaml file located at microservices/bot
Add the following below item.spec.spec.image
env:
  - name: FACEBOOK_VERIFY_TOKEN
    value:
      secretKeyRef:
        key: bot.fb_verify_token.key
        name: hasura-secrets
  - name: FACEBOOK_PAGE_ACCESS_TOKEN
    value:
      secretKeyRef:
        key: bot.fb_page_token.key
        name: hasura-secrets
  - name: MOVIE_DB_TOKEN
    value:
      secretKeyRef:
        key: bot.movie_db_token.key
        name: hasura-secrets
Your k8s.yaml should now look like:
apiVersion: v1
items:
- apiVersion: extensions/v1beta1
  kind: Deployment
  metadata:
    creationTimestamp: null
    labels:
      app: bot
      hasuraService: custom
    name: bot
    namespace: '{{ cluster.metadata.namespaces.user }}'
  spec:
    replicas: 1
    strategy: {}
    template:
      metadata:
        creationTimestamp: null
        labels:
          app: bot
      spec:
        containers:
        - image: hasura/hello-world:latest
          env:
            - name: FACEBOOK_VERIFY_TOKEN
              value:
                secretKeyRef:
                  key: bot.fb_verify_token.key
                  name: hasura-secrets
            - name: FACEBOOK_PAGE_ACCESS_TOKEN
              value:
                secretKeyRef:
                  key: bot.fb_page_token.key
                  name: hasura-secrets
            - name: MOVIE_DB_TOKEN
              value:
                secretKeyRef:
                  key: bot.movie_db_token.key
                  name: hasura-secrets
          imagePullPolicy: IfNotPresent
          name: bot
          ports:
          - containerPort: 8080
            protocol: TCP
          resources: {}
        securityContext: {}
        terminationGracePeriodSeconds: 0
  status: {}
- apiVersion: v1
  kind: Service
  metadata:
    creationTimestamp: null
    labels:
      app: bot
      hasuraService: custom
    name: bot
    namespace: '{{ cluster.metadata.namespaces.user }}'
  spec:
    ports:
    - port: 80
      protocol: TCP
      targetPort: 8080
    selector:
      app: bot
    type: ClusterIP
  status:
    loadBalancer: {}
kind: List
metadata: {}
To access these in server.js
let mdb = require('moviedb')(process.env.MOVIE_DB_TOKEN);
let FACEBOOK_VERIFY_TOKEN = process.env.FACEBOOK_VERIFY_TOKEN;
let FACEBOOK_PAGE_ACCESS_TOKEN = process.env.FACEBOOK_PAGE_ACCESS_TOKEN;Currently, our bot is not published and for it to work with users other than you. You need to submit your bot to Facebook for review. Once Facebook approves your bot, it will be live :) The steps involved in publishing your bot to Facebook can be found here.
Currently, our bot is quite simple and does no analysis(NLP) on the messages sent by the user. You can integrate with wit.ai to do this.
