
##Getting started with Android for ASP.NET Developers
Before we start, I've created 2 branches.
masterhas the codes that we cover for this tutorial,full_implementationcovers the exercises i provided at the end of the tutorial. So if you have any diffiulty while going through the excercises, switch to 'full_implementation` and refer the code.
Starting off with a new development platform such as Android can be hard, often there is a steap learning curve involved. I’ve been working as a web developer for the last 4 years. Recent circumstances in my company prompted me to learn Android.
But to my surprise, adopting android turned out to be a piece of cake, thanks to my web development skills. Here, i’m going to explain the various phases of Android development and how they can be compared to Web design & development.
seriously, it’s easier than we thought!!!
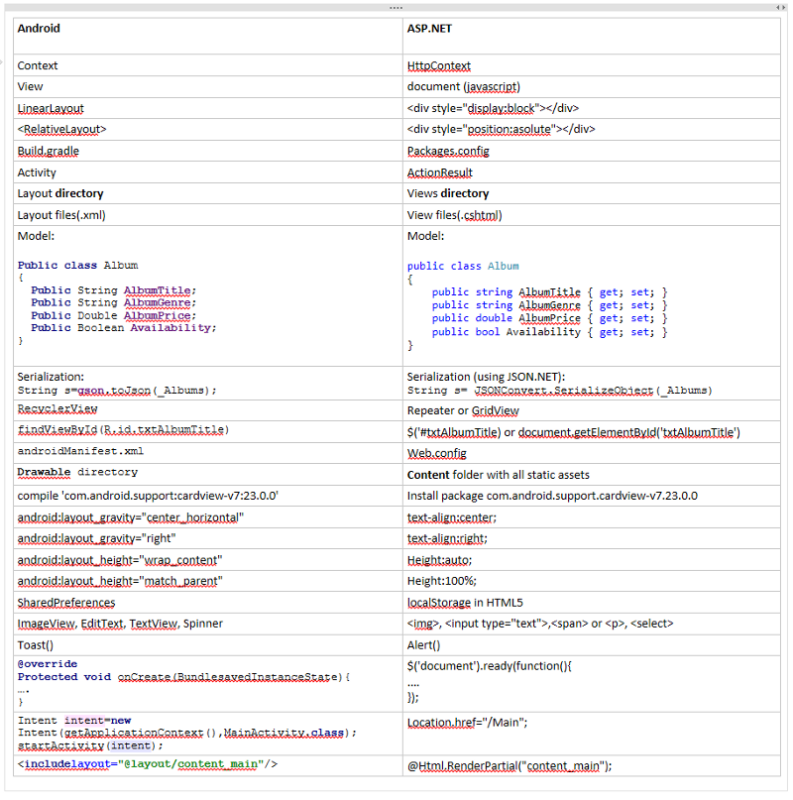
You can easily map several concepts in Android straight to ASP.NET and front end development, here is a list of terminologies i compiled. We will be coverin all of it in this training, feel free to refer it anytime during our tutorial:
In this tutorial, we are creating a Music library!!
I’m gonna assume that you are already familiar with Java, if not, you can find several good java training websites. My suggestion would be http://www.c4learn.com/javaprogramming/ or better yet, follow this youtube training series.
If you are a C# developer, chances are that you will pick it up quite easy, you don’t even have to follow the tutorials (i didn’t!!!)
Let’s divide our short training to 7 simple steps:
- Install JDK and Android Studio
- Getting to know Android Project Structure
- Planning our Music Library App Structure
- App Development
- Exercise
- Conclusion
Allright then, Let’s roll…
1. Install JDK and Android Studio
If you already have Android Studio installed, you may skip this part.
Android Studio, from Google, is for Android development just as Visual Studio is for ASP.NET development. I will divide this process to 3 simple steps:
- Download JDK (Java Development Kit). Android Studio needs JDK to be able to run.Go ahead and grab it from http://www.oracle.com/technetwork/java/javase/downloads/jdk8-downloads-2133151.html.
- Now download Android studio from http://developer.android.com/sdk/index.html.
- Once done , Please follow these steps http://developer.android.com/sdk/installing/adding-packages.html to download the necessary SDK packages for us to get started. At the least, you will require:
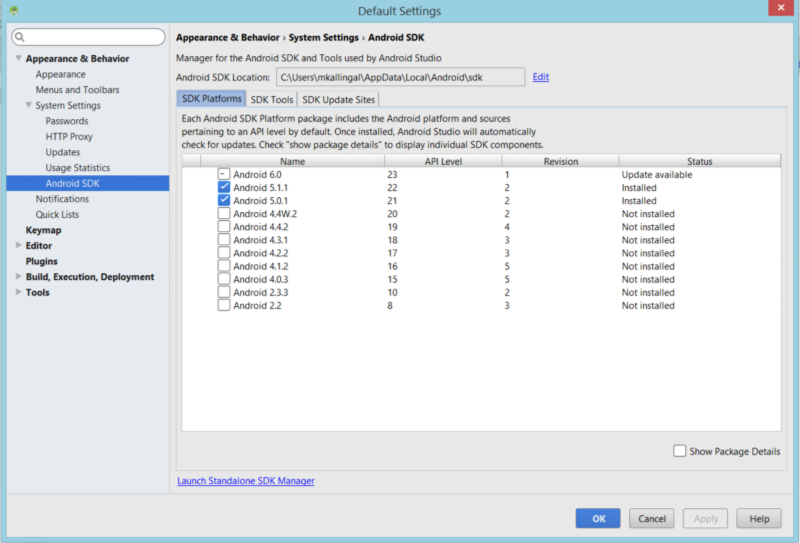
These are the SDK Platforms i downloaded, I would suggest download the latest API level available; all are downward compatible (all the way down to 8), so not necessary to download everything.
##2. Getting to know the Android Project Structure
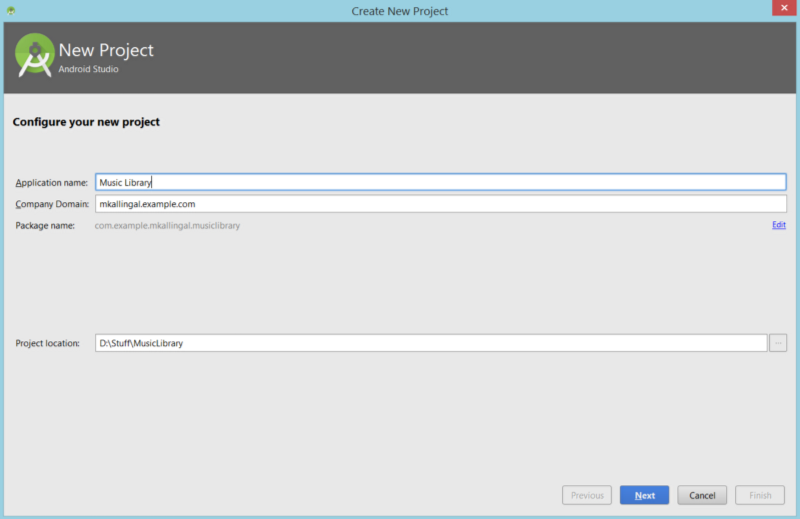
First, lets create our Music Library App project.
- From the welcome screen, click on Start a new Android studio project.
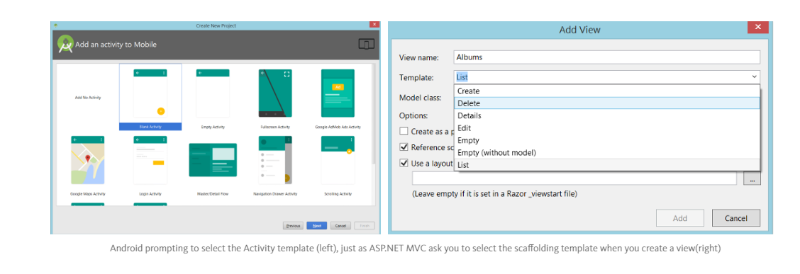
A.S will now prompt you to create your first Activity.
An Activity is an ActionResult in ASP.NET MVC
. You can select from several boilerplate templates available. For our training purposes, let’s go ahead and click Blank Activity and hit Next.
Finally give a name for your Activity (By default, the first activity you create in Android is called MainActivity,feel free to change it, if you need to). This will create:
MainActivity.java, just like an ActionResult in ASP.NET, where all your code behind goes toactivity_main.xml, your view file, just as the View in ASP.NET (ie, Home.cshtml)content_main.xml, its a partial view. You can ignore it, if you need to and create your UI inactivity_main.xmlfile itself.
Hit the finish button and we are through the Project setup wizard.
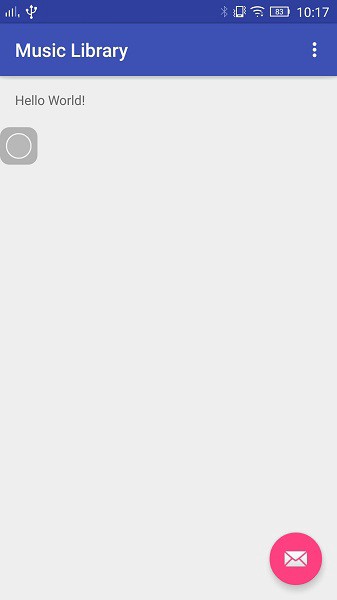
Once the project is created, click the Run button (either go to Run->Run App or click on the green Play button from the top bar).
For this stage, you need an Android device or an android emulator on your PC. Please refer http://developer.android.com/training/basics/firstapp/running-app.html on how to configure your device for android studio to run the app. Now click the Run button and you will see the below screen on your device.
Let’s look at the project structure A.S created for us, we are going to compare this with an ASP.NET MVC project structure:
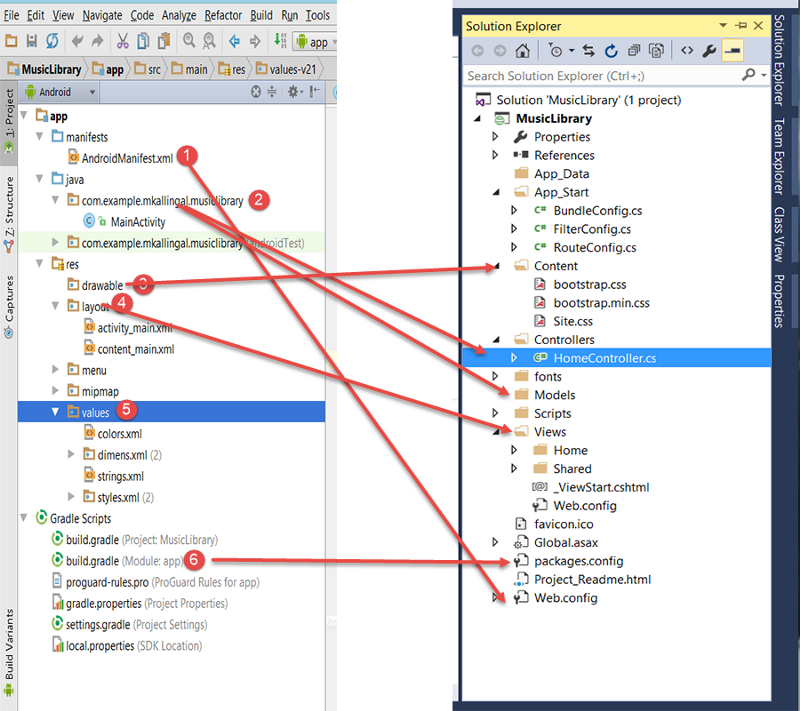
- AndroidManifest.xml:
The Web.config of ASP.NET. All the global parameters such as Permissions, features, Build tool, Activities registration; all goes to AndroidManifest.xml
- java/com.>project<.>app<:
That’s the code behind directory. Contains Java code source for the app activities. It’s the same as Controllers and Models in ASP.NET.
- drawable:
Same as the Content folder in ASP.NET. All the images and styles MUST go to this directory.
- layout:
These are the views of our App, same as the Views in ASP.NET. Layouts files have .xml extension as opposed to .cshtml in ASP.NET.
- Values:
This is new for us. This directory is used to define strings, colors, dimensions, styles and static arrays of strings or integers. By convention each type is stored in a separate file, e.g. strings are defined in the values/strings.xml file, where as colors goes to values/colors.xml file
- Build.gradle:
It’s the Packages.config of ASP.NET. Every third party libraries that we want to use in our project, must be defined here.
For this project, add the following libraries in Build.gradle,
compile 'com.android.support:cardview-v7:23.0.0'
compile 'com.android.support:recyclerview-v7:23.0.0'
compile 'com.google.code.gson:gson:2.3.1'
At the beginner level, this is all you need to know to get started with our project.
3. Planning our Music Library App Structure
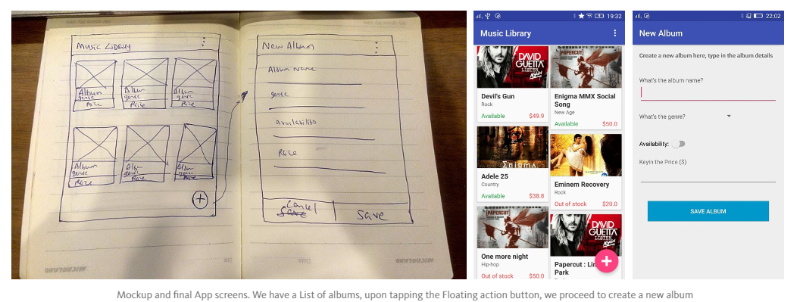
For our music library app, we are going to create 2 screens.
- Create a new album
- List all albums
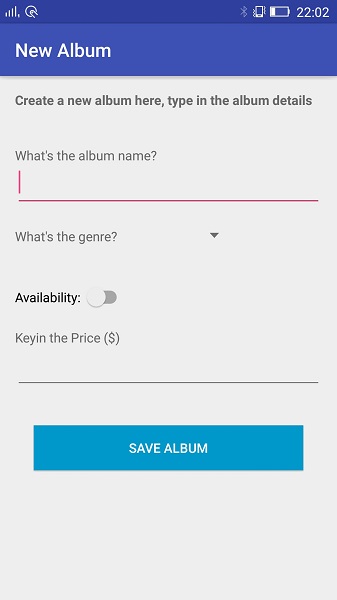
I created a rough mock-up of what we are going to create:
##4. Getting Started with the Development
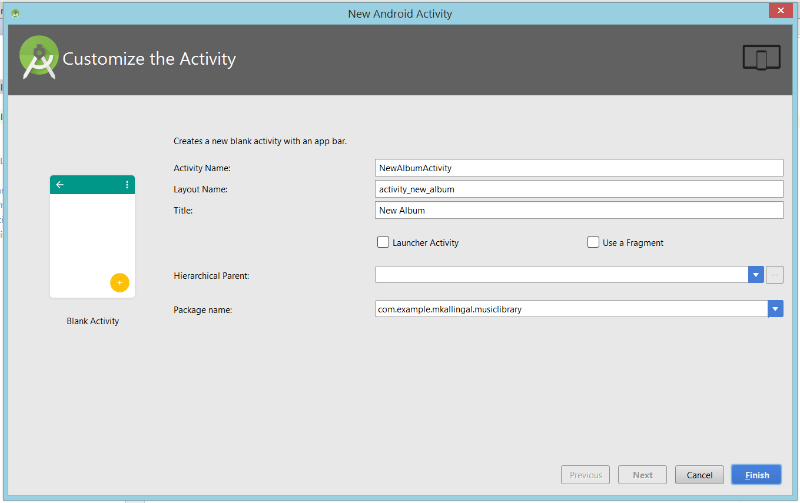
For an easier transition, we will start with creating the New Album Activity.
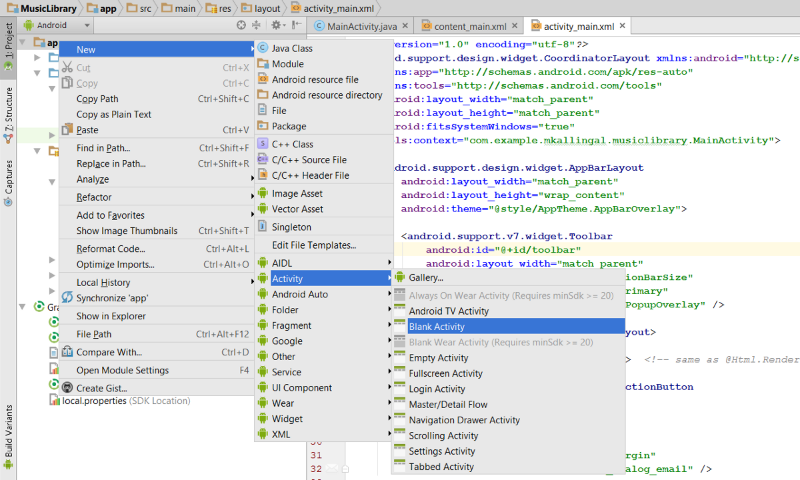
Right click on app →New →Activity → BlankActivity and name it as NewAlbumActivity and click Finish.
Once done, proceed to layout directory and open activity_new_album.xml file. This is where you design your UI. You can switch between Design/Source view (toggler can be found at the bottom left corner).
Android UI has
- Layouts ((http://www.tutorialspoint.com/android/android_user_interface_layouts.htm))
- Widgets (http://www.tutorialspoint.com/android/android_user_interface_controls.htm)
There are several controls available, that you can make use of. Since it’s impossible for me to cover it all here, please proceed to the respective links to learn more about them.
for our acitivity_new_album layout, we need to create 4 textboxes and 1 spinner (dropdown).
    <?xml version="1.0" encoding="utf-8"?>
<LinearLayout xmlns:android="http://schemas.android.com/apk/res/android"
xmlns:app="http://schemas.android.com/apk/res-auto"
xmlns:tools="http://schemas.android.com/tools"
android:layout_width="match_parent"
android:layout_height="match_parent"
android:orientation="vertical"
android:paddingBottom="@dimen/activity_vertical_margin"
android:paddingLeft="@dimen/activity_horizontal_margin"
android:paddingRight="@dimen/activity_horizontal_margin"
android:paddingTop="@dimen/activity_vertical_margin"
app:layout_behavior="@string/appbar_scrolling_view_behavior"
tools:context="com.example.mkallingal.musiclibrary.NewAlbumActivity"
tools:showIn="@layout/activity_new_album">

<!--
All child elements in Linear Layout will stack up either vertically ( android:orientation=”vertical”) or horizontally ( android:orientation=”horizontal”)
same as <div style="display:block"> in html
-->

<!-- TextView is same as a <span> or <p> in html-->

<TextView
android:id="@+id/textView"
android:layout_width="wrap_content"
android:layout_height="wrap_content"
android:text="Create a new album here, type in the album details"
android:textStyle="bold" />

<LinearLayout
android:layout_width="match_parent"
android:layout_height="wrap_content"
android:layout_marginTop="40dp"
android:orientation="vertical">

<TextView
android:layout_width="wrap_content"
android:layout_height="wrap_content"
android:text="What's the album name?" />

<EditText
android:layout_width="match_parent"
android:id="@+id/txtAlbumTitle"
android:layout_height="wrap_content"
android:layout_marginTop="3dp" />
<!--Same as <input type=”text” /> in html-->
</LinearLayout>


<LinearLayout
android:layout_width="wrap_content"
android:layout_height="wrap_content"
android:layout_marginTop="20dp"
android:orientation="horizontal">

<TextView
android:layout_width="wrap_content"
android:layout_height="wrap_content"
android:text="What's the genre?" />

<Spinner
android:id="@+id/ddlAlbumGenre"
android:layout_width="fill_parent"
android:layout_marginLeft="8dp"
android:prompt="@string/action_settings"
android:layout_height="wrap_content"
android:entries="@array/genre_arrays" />

<!-- same as <select> in HTML, for this example, the options are put in a string array in strings.xml-->

</LinearLayout>


<LinearLayout
android:layout_width="match_parent"
android:layout_height="wrap_content"
android:layout_marginTop="40dp"
android:orientation="vertical">
<android.support.v7.widget.SwitchCompat
android:id="@+id/chkAvailability"
android:layout_width="wrap_content"
android:text="Availability: "
android:layout_height="wrap_content" />
</LinearLayout>

<LinearLayout
android:layout_width="match_parent"
android:layout_height="wrap_content"
android:layout_marginTop="20dp"
android:orientation="vertical">

<TextView
android:layout_width="wrap_content"
android:layout_height="wrap_content"
android:text="Keyin the Price ($)" />

<EditText
android:id="@+id/txtAlbumPrice"
android:inputType="numberDecimal"
android:layout_width="match_parent"
android:layout_height="wrap_content"
android:layout_marginTop="3dp" />

</LinearLayout>


<Button
android:id="@+id/btnSave"
android:layout_width="match_parent"
android:layout_height="wrap_content"
android:layout_gravity="center_horizontal"
android:layout_marginLeft="20dp"
android:textColor="#fff"
android:background="@android:color/holo_blue_dark"
android:layout_marginRight="20dp"
android:layout_marginTop="40dp"
android:text="Save Album" />

</LinearLayout>
if you click on the design view, you will see the UI as below:
important!!!
for the Spinner (dropdown) to fill all Genres, i given the data soure as “@array/genre_arrays”, so please open values →strings.xml and add the following lines:
<string-array name="genre_arrays">
<item></item>
<item>Rock</item>
<item>Metal</item>
<item>Hip-hop</item>
<item>Hard Rock</item>
<item>Country</item>
<item>New Age</item>
</string-array>
also in colors.xml, add the following colors:
<item name="red" type="color">#FFFF4444</item>
<item name="darkgreen" type="color">#2DA44B</item>
<item name="darkred" type="color">#FFCC0000</item>
<item name="darktext" type="color">#666</item>
<item name="darkertext" type="color">#333</item>
<item name="lighttext" type="color">#999</item>
Below are 6 album covers i used in this training, please save these images to res →drawables directory and name them, cover_1,cover_2,cover_3,cover_4,cover_5 and cover_6 respectively.


Please save the above images with the respective names in your drawables folder.
As you can see, i created a LinearLayout as my parent, because i wanted to stack all my controls vertically one by one, (defined byandroid:orientation=”vertical”).
Every elements you define in the layout must have android:layout_width and android:layout_height as required attributes. The values must be either:
- match_parent (match the size of the parent element)
- wrap_content (wrap it to the content)
For this exercise, you may copy the above and play around with the attributes and elements. You can always switch to design view to oversee how the UI is laid out.
We also need a model for our album, Create a class file Album.java and add the following model,
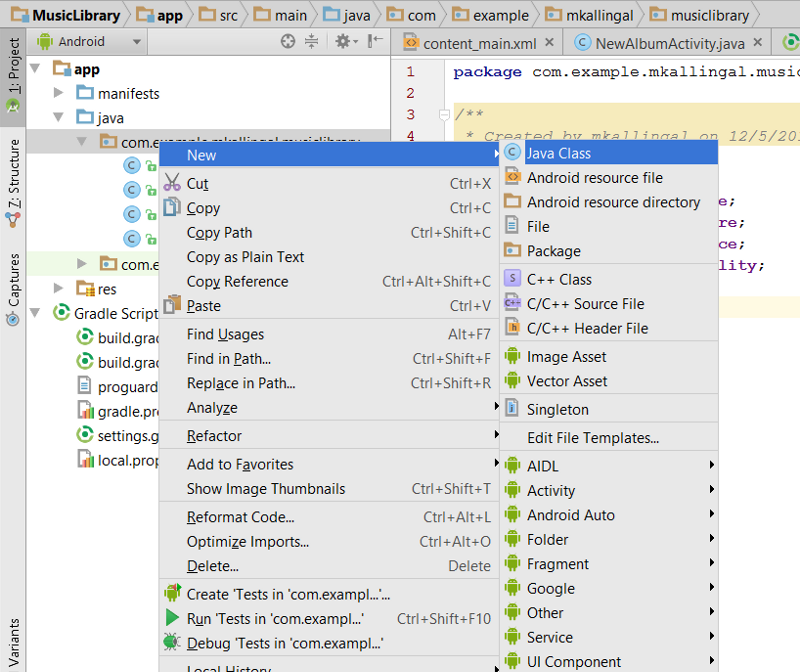
right click on com.>project<.>app< →New →Java Class, name it Album.java
public class Album {
public String AlbumTitle;
public String AlbumGenre;
public Double AlbumPrice;
public Boolean Availability;
}
Now for the code behind,NewAlbumActivity.java, create the event for Save button inside onCreate event:
@Override
protected void onCreate(Bundle savedInstanceState) {
super.onCreate(savedInstanceState);
setContentView(R.layout.activity_new_album);
Toolbar toolbar = (Toolbar) findViewById(R.id.toolbar);
setSupportActionBar(toolbar);

/*
* findViewById() is used to access any control that you want to access from your view.
* It's the same as $('#control_id'); in jQuery. Once you have access to the object, you will have access to several -
* getter/setter for that control including event handlers
*
*/

final TextView txtAlbumName= (TextView)findViewById(R.id.txtAlbumTitle); // same as $('#txtAlbumName') in jQuery
final Spinner ddlAlbumGenre= (Spinner) findViewById(R.id.ddlAlbumGenre);
final TextView txtAlbumPrice= (TextView) findViewById(R.id.txtAlbumPrice);
final SwitchCompat chkAvailability= (SwitchCompat) findViewById(R.id.chkAvailability);
Button _btnSave= (Button) findViewById(R.id.btnSave);

/*
* add an event handler to _btnSave
*/
_btnSave.setOnClickListener(new View.OnClickListener() {
@Override
public void onClick(View v) {
Album _Album=new Album();
_Album.AlbumTitle = txtAlbumName.getText().toString();
_Album.AlbumGenre= ddlAlbumGenre.getSelectedItem().toString();
_Album.AlbumPrice= Double.valueOf(txtAlbumPrice.getText().toString());
_Album.Availability= chkAvailability.isChecked();

/*
* Now we need to store this information in our device.There are several storage options available in android, for more-
* detials, please visit http://developer.android.com/intl/ja/guide/topics/data/data-storage.html
* For our case, we want to store our model as a key-value pair. SO we'll go with "SharedPreferences"
* In order to store as string, we need to serialize our model to string, for this, we need to add the library to our -
* build.gradle (packages.config in ASP.NET). open Gradle Scripts -> build.gradle(Module:app) and add this line:
* compile 'com.google.code.gson:gson:2.3.1'
* It will download the .jar file and add it to our library, it's that easy!!!
* So now you can instantiate gson by new Gson();
* */

gson=new Gson();
String SerializedString = gson.toJson(_Album);

/*
* Let's nsert it to our storage, SharedPreferences
* Think of it as the LocalStorage API in HTML5
* For our tutorial, we need to make sure if we have inserted any albums before, we need to handle this case
*/


try {
SharedPreferences _Preferences= getSharedPreferences("MusicLibrary", 0);
final String _ALBUMS_Key="Albums";
String _AlbumsString=_Preferences.getString(_ALBUMS_Key, ""); //signature: Preferences.getString(Key (string),Default_value(string))
SharedPreferences.Editor editor = _Preferences.edit();
if(_AlbumsString.length()!=0){

/*
* So we need to retrieve the serialized list, deserialize to List<Album>, add the new album into it, serialize it again and save it
* to the SharedPreferences
*/
Type _TypeofAlbum = new TypeToken<List<Album>>() {
}.getType();
List<Album> _Albums = gson.fromJson(_AlbumsString, _TypeofAlbum);
_Albums.add(_Album);
String _SerializedAlbums = gson.toJson(_Albums);
editor.putString(_ALBUMS_Key,_SerializedAlbums);
editor.apply();
}else{
/*
* Instantiate a new List<Album>, add our new album into it, serialize it and save it to SharedPreferences
*/
List<Album> _Albums=new ArrayList<Album>();
_Albums.add(_Album);
String _SerializedAlbums = gson.toJson(_Albums);
editor.putString(_ALBUMS_Key, _SerializedAlbums);
editor.apply();
}
Snackbar.make(v, "Album inserted successfully", Snackbar.LENGTH_LONG)
.setAction("Action", null).show();
Intent intent = new Intent(getApplicationContext(), MainActivity.class);
startActivity(intent);
} catch (JsonSyntaxException e) {
e.printStackTrace();
Toast.makeText(getApplicationContext(),e.getMessage(),Toast.LENGTH_LONG).show();
}
}
});


}
That’s all!!!we done with Creating a new album. But how to get to our newly created activity? For that, lets replace the boilerplate code android created for the Floating Action Button in MainActivity.java.
below code has the same effect of location.href=’/NewAlbum’ in javascript.
//MainActivity.java
protected void onCreate(Bundle savedInstanceState) {
super.onCreate(savedInstanceState);

/*Always MUST ensure setContentView is declared on onCreate method for Activity classes, android will inflate that Layout and display it as the view for that activity
* */

setContentView(R.layout.activity_main);
Toolbar toolbar = (Toolbar) findViewById(R.id.toolbar);
setSupportActionBar(toolbar);

FloatingActionButton fab = (FloatingActionButton) findViewById(R.id.fab);
fab.setOnClickListener(new View.OnClickListener() {
@Override
public void onClick(View view) {
Intent intent = new Intent(getApplicationContext(), NewAlbumActivity.class);
startActivity(intent);
//same as location.href='/NewAlbum'
}
});
}
tapping the Floating Action Button on main screen will now bring you to NewAbumActivity. Try to add a new Album, did everything go smooth?nope?
you can always refer to the source code i uploaded to Bitbucket for comparison, https://bitbucket.org/irshu_lx/android-music-library-app/src.
Once you have a clean build, we will add RecyclerView to our MainActivity, to show all the Albums.
RecyclerView is a GridView or a ListView in ASP.NET. It lets you lay out a Collection of items on the screen. Every RecyclerView should have an Adapter attached to it, just as a GridViewAdapter in ASP.NET WebForms.
replace the content_main.xml with the following code:
<android.support.v7.widget.RecyclerView android:id="@+id/rvAlbums" tools:listitem="@layout/recycer_view_item_layout" android:layout_width="match_parent" android:layout_height="wrap_content" /> Every RecyclerView must also have a ListItem template created too. Here you define how each item on your RecyclerView should be displayed. Create a recycler_view_item_layout.xml layout file and paste the following in it:
<android.support.v7.widget.CardView xmlns:card_view="http://schemas.android.com/apk/res-auto" xmlns:android="http://schemas.android.com/apk/res/android" android:id="@+id/card_view" android:layout_width="match_parent" android:layout_height="wrap_content" card_view:cardUseCompatPadding="true" card_view:cardCornerRadius="1dp" android:layout_marginBottom="4dp">
Every RecyclerView must also have a ListItem template created too. Here you define how each item on your RecyclerView should be displayed.
Create a recycler_view_item_layout.xml layout file and paste the following in it:
<?xml version="1.0" encoding="utf-8"?>
<RelativeLayout xmlns:android="http://schemas.android.com/apk/res/android"
xmlns:app="http://schemas.android.com/apk/res-auto"
xmlns:tools="http://schemas.android.com/tools"
android:layout_width="match_parent"
android:layout_height="match_parent"
android:paddingLeft="6dp"
android:paddingRight="6dp"
app:layout_behavior="@string/appbar_scrolling_view_behavior"
tools:context="com.example.mkallingal.musiclibrary.MainActivity"
tools:showIn="@layout/activity_main">

<!--RecyclerView is a widget google added as part of material design, it's an improved version of the legacy ListView in android.
for this to work, we need to add two packages to our packages.config,
add the below two lines to your build.gradle
compile 'com.android.support:cardview-v7:23.0.0'
compile 'com.android.support:recyclerview-v7:23.0.0'
-->

<android.support.v7.widget.RecyclerView
android:id="@+id/rvAlbums"
tools:listitem="@layout/recycer_view_item_layout"
android:layout_width="match_parent"
android:layout_height="wrap_content" />
</RelativeLayout>
Every RecyclerView must also have a ListItem template created too. Here you define how each item on your RecyclerView should be displayed.
Create a recycler_view_item_layout.xml layout file and paste the following in it:
<?xml version="1.0" encoding="utf-8"?>
<LinearLayout xmlns:android="http://schemas.android.com/apk/res/android"
android:orientation="vertical" android:layout_width="match_parent"
android:layout_height="match_parent">

<!--Cardview is a widget google added as part of material design
for this and RecyclerView to work, we need to add two packages to our packages.config,
add the below two lines to your build.gradle
compile 'com.android.support:cardview-v7:23.0.0'
compile 'com.android.support:recyclerview-v7:23.0.0'
-->
<android.support.v7.widget.CardView
xmlns:card_view="http://schemas.android.com/apk/res-auto"
xmlns:android="http://schemas.android.com/apk/res/android"
android:id="@+id/card_view"
android:layout_width="match_parent"
android:layout_height="wrap_content"
card_view:cardUseCompatPadding="true"
card_view:cardCornerRadius="1dp"
android:layout_marginBottom="4dp">
<LinearLayout
android:paddingBottom="5dp"
android:layout_width="match_parent"
android:orientation="vertical"
android:layout_height="wrap_content">
<ImageView
android:src="@drawable/cover_1"
android:id="@+id/imgAlbumCover"
android:layout_width="match_parent"
android:layout_height="100dp"
android:contentDescription="@string/action_settings"
android:scaleType="centerCrop" />
<TextView
android:id="@+id/lblAlbumTitle"
android:layout_width="match_parent"
android:layout_height="wrap_content"
android:textSize="16sp"
android:textStyle="bold"
android:layout_marginLeft="10dp"
android:text="---"
android:textColor="@color/darkertext"
android:paddingTop="8dp"
android:layout_alignParentBottom="false" />


<RelativeLayout
android:layout_width="match_parent"
android:layout_height="wrap_content">
<TextView
android:id="@+id/lblAlbumGenre"
android:layout_width="match_parent"
android:layout_height="wrap_content"
android:textSize="12sp"
android:text="---"
android:layout_marginLeft="10dp"
android:textColor="@color/darktext"
android:layout_alignParentBottom="false" />
</RelativeLayout>

<RelativeLayout
android:layout_width="match_parent"
android:layout_marginTop="10dp"
android:layout_height="wrap_content">
<TextView
android:id="@+id/lblAlbumAvailability"
android:layout_width="wrap_content"
android:layout_height="wrap_content"
android:textSize="14sp"
android:text="---"
android:layout_marginLeft="10dp"
android:textColor="@color/darkgreen"
android:layout_alignParentBottom="false" />
<TextView
android:id="@+id/lblAlbmPrice"
android:layout_width="wrap_content"
android:layout_height="wrap_content"
android:textSize="14sp"
android:text="---"
android:layout_marginRight="10dp"
android:textColor="@color/red"
android:layout_alignParentRight="true" />

</RelativeLayout>


</LinearLayout>
</android.support.v7.widget.CardView>
</LinearLayout>

Every RecyclerView must also have a ListItem template created too. Here you define how each item on your RecyclerView should be displayed.

Create a `recycler_view_item_layout.xml` layout file and paste the following in it:

<?xml version="1.0" encoding="utf-8"?>
<LinearLayout xmlns:android="http://schemas.android.com/apk/res/android"
android:orientation="vertical" android:layout_width="match_parent"
android:layout_height="match_parent">

<!--Cardview is a widget google added as part of material design
for this and RecyclerView to work, we need to add two packages to our packages.config,
add the below two lines to your build.gradle
compile 'com.android.support:cardview-v7:23.0.0'
compile 'com.android.support:recyclerview-v7:23.0.0'
-->
<android.support.v7.widget.CardView
xmlns:card_view="http://schemas.android.com/apk/res-auto"
xmlns:android="http://schemas.android.com/apk/res/android"
android:id="@+id/card_view"
android:layout_width="match_parent"
android:layout_height="wrap_content"
card_view:cardUseCompatPadding="true"
card_view:cardCornerRadius="1dp"
android:layout_marginBottom="4dp">
<LinearLayout
android:paddingBottom="5dp"
android:layout_width="match_parent"
android:orientation="vertical"
android:layout_height="wrap_content">
<ImageView
android:src="@drawable/cover_1"
android:id="@+id/imgAlbumCover"
android:layout_width="match_parent"
android:layout_height="100dp"
android:contentDescription="@string/action_settings"
android:scaleType="centerCrop" />
<TextView
android:id="@+id/lblAlbumTitle"
android:layout_width="match_parent"
android:layout_height="wrap_content"
android:textSize="16sp"
android:textStyle="bold"
android:layout_marginLeft="10dp"
android:text="---"
android:textColor="@color/darkertext"
android:paddingTop="8dp"
android:layout_alignParentBottom="false" />


<RelativeLayout
android:layout_width="match_parent"
android:layout_height="wrap_content">
<TextView
android:id="@+id/lblAlbumGenre"
android:layout_width="match_parent"
android:layout_height="wrap_content"
android:textSize="12sp"
android:text="---"
android:layout_marginLeft="10dp"
android:textColor="@color/darktext"
android:layout_alignParentBottom="false" />
</RelativeLayout>

<RelativeLayout
android:layout_width="match_parent"
android:layout_marginTop="10dp"
android:layout_height="wrap_content">
<TextView
android:id="@+id/lblAlbumAvailability"
android:layout_width="wrap_content"
android:layout_height="wrap_content"
android:textSize="14sp"
android:text="---"
android:layout_marginLeft="10dp"
android:textColor="@color/darkgreen"
android:layout_alignParentBottom="false" />
<TextView
android:id="@+id/lblAlbmPrice"
android:layout_width="wrap_content"
android:layout_height="wrap_content"
android:textSize="14sp"
android:text="---"
android:layout_marginRight="10dp"
android:textColor="@color/red"
android:layout_alignParentRight="true" />

</RelativeLayout>


</LinearLayout>
</android.support.v7.widget.CardView>
</LinearLayout>

Now Let’s create an adapter for the RecyclerView, we will bring in a constructor, so we can pass our Context and List as parameters.
public class AlbumsRecyclerViewAdapter extends RecyclerView.Adapter<AlbumsRecyclerViewAdapter.AlbumViewHolder> {
private List<Album> _Albums;
private Context _Context;
private ArrayList<Integer> ImagesList;
public AlbumsRecyclerViewAdapter(Context _context, List<Album> _albums){
this._Context= _context;
this._Albums=_albums;

/*I'm gonna create an array of Album arts i have in my drawables directory.
* Please remove this code, after you bring in the AlbumArt in our model as part of the exercise
* */
ImagesList=new ArrayList<Integer>();
ImagesList.add(R.drawable.cover_1);
ImagesList.add(R.drawable.cover_2);
ImagesList.add(R.drawable.cover_3);
ImagesList.add(R.drawable.cover_4);
ImagesList.add(R.drawable.cover_5);

}
@Override
public AlbumViewHolder onCreateViewHolder(ViewGroup parent, int viewType) {
/*this event is fired every time android wants to create a new column to our RecyclerView. We have to tell Android what layout we need to inflate for that column
*/
View _Item = LayoutInflater.from(parent.getContext()).inflate(R.layout.recycer_view_item_layout, parent, false);
return new AlbumViewHolder(_Item);
}

@Override
public void onBindViewHolder(AlbumViewHolder holder, int position) {
Album _Album= this._Albums.get(position);
holder.AlbumTitle.setText(_Album.AlbumTitle);
holder.AlbumGenre.setText(_Album.AlbumGenre);
holder.AlbumPrice.setText("$"+String.valueOf(_Album.AlbumPrice));
holder.AlbumAvailability.setText(_Album.Availability?"Available":"Out of stock");

/* often time when we want to get access to our colors or drawables, we need to get to getResources(), this method can always be found on the View or Context classs
*/

if(_Album.Availability){
holder.AlbumAvailability.setTextColor( holder.itemView.getResources().getColor(R.color.darkgreen));
}else{
holder.AlbumAvailability.setTextColor( holder.itemView.getResources().getColor(R.color.red));
}
Random random = new Random();
int index = random.nextInt(5);

/*
* i wanted to get a random image from my images array to display it as the album art for that item
*/

holder.AlbumCover.setImageDrawable( holder.itemView.getResources().getDrawable(ImagesList.get(index)));

}

@Override
public int getItemCount() {
return this._Albums.size();
}

public class AlbumViewHolder extends RecyclerView.ViewHolder implements View.OnClickListener {
public TextView AlbumTitle;
public TextView AlbumGenre;
public TextView AlbumPrice;
public TextView AlbumAvailability;
public ImageView AlbumCover;
public AlbumViewHolder(View itemView) {
super(itemView);
itemView.setOnClickListener(this);
AlbumTitle = (TextView) itemView.findViewById(R.id.lblAlbumTitle);
AlbumGenre = (TextView) itemView.findViewById(R.id.lblAlbumGenre);
AlbumAvailability= (TextView) itemView.findViewById(R.id.lblAlbumAvailability);
AlbumPrice= (TextView) itemView.findViewById(R.id.lblAlbmPrice);
AlbumCover=(ImageView) itemView.findViewById(R.id.imgAlbumCover);
}
@Override
public void onClick(View view) {
Toast.makeText(view.getContext(), "Clicked Position = " + getPosition(), Toast.LENGTH_SHORT).show();
}
}
}
As a final stage, now we have to instantiate our adapter and pass the Context and List<Albums> from the MainActivity. Below code takes care of that. Add the following code at the end of onCreate method:
@Override
protected void onCreate(Bundle savedInstanceState) {
super.onCreate(savedInstanceState);


List<Album> _Albums= getAlbums();

if(_Albums!=null&&_Albums.size()>0){
RecyclerView rvGrid= (RecyclerView) findViewById(R.id.rvAlbums);
rvGrid.setHasFixedSize(true);
/*
* set grid layout (masonry style) for our recyclerview.
*/
_staggeredGridLayoutManager = new StaggeredGridLayoutManager(2, 1);
rvGrid.setLayoutManager(_staggeredGridLayoutManager);
/*
* Context in android is similar to HttpContext in ASP.NET. It has all the details about the state, the resources and other details
* of our app
* We need to set an Adapter for our RecyclerView. I created AlbumsRecyclerViewAdapter.java in our app, so i'm gonna feed that
* adapter to RecycerView
* */

AlbumsRecyclerViewAdapter rcAdapter = new AlbumsRecyclerViewAdapter(getApplicationContext(), _Albums);
rvGrid.setAdapter(rcAdapter);
}


}

private List<Album> getAlbums() {
SharedPreferences _Preferences= getSharedPreferences("MusicLibrary", 0);
final String _ALBUMS_Key="Albums";
String _AlbumsString=_Preferences.getString(_ALBUMS_Key, "");
Type _TypeofAlbum = new TypeToken<List<Album>>() {
}.getType();
List<Album> _Albums = gson.fromJson(_AlbumsString, _TypeofAlbum);
return _Albums;
}
And we are done!!!
Compile the code and see if you get a clean build. Most probably you wont, try to debug or refer to the code.
5. Exercise
I have created 2 branches, master branch has the codes we have completed for this tutorial, full_implementation covers the below exercise as well.
Here are the tasks you need to complete as part of this training:
- Add Album Description and Album Art as properties to our model Album.java
- Allow user to select Album Art from his gallery, then upload the image to internal memory
- Create an AlbumDetails activity
- Create an EditAlbum activity
- Allow user to delete an album from the library
##6. Conclusion
If you made it this far, Congratulations!!! you can now start developing your own android apps natively. But of course, there are a lot of stuff you still need to explore, but i believe that will be a piece of cake for you already…
Don’t let yourself down if you run into bugs. Keep trying. I myself had dozens of bugs while creating this very sample application.
Thank you for referring to this tutorial, if you have any questions regarding this training, please inbox me to irshu@outlook.com, also follow my facebook page, www.facebook.com/irshux
Have fun with Android development!!!