


-
Performance. Achieved by webpack tree shaking, script bundle minification and compression (gzip and Brotli). Complimented by server-side caching and bundle size containment described below.
Benchmarking Tool Result Throttling Google LightHouse 
not throttled Google LightHouse 
throttled to slow 4G,
CPU slowdownThe tool is embedded into Chrome so you can easily benchmark yourself. Follow this link for the details.
-
Caching. The backend implements HTTP caching and allows long term storage of script bundles in browser's cache that further enhances performance yet supports smooth deployment of versioning changes in production (eliminating the risk of stale bundles getting stuck in the cache).
-
Code splitting. Based on innovative ability to optionally split your React Application into multiple Single Page Applications (SPA). For example, one SPA can offer an introductory set of screens for the first-time user or handle login. Another SPA could implement the rest of the application, except for Auditing or Reporting that can be catered for by yet another SPA. This approach would be beneficial for medium-to-large React applications that can be split into several domains of functionality, development and testing. To achieve better performance it's recommended to split when the size of a production bundle reaches 100 KB.
-
Seamless debugging. Debug a minified/obfuscated, compressed production bundle and put breakpoints in its TypeScript code using both VS Code and Chrome DevTools. Development build debugging: put breakpoints in the client and backend code and debug both simultaneously using a single instance of VS Code.
-
Overall simplicity. For any starter project or boilerplate, the probability of having bugs/issues down the track increases along with the amount of code. It is shown by the code size badge and can be checked for any GitHub repository using the link:
https://img.shields.io/github/languages/code-size/<user-name>/<repo-name>. For Crisp React, the React client and the Express backend each contribute ~50% of the codebase.
The code size of other starter projects was a main motivation to develop this solution. The other projects were enjoyable for learning purposes however the amount of code was percieved to be excessive for use in production. -
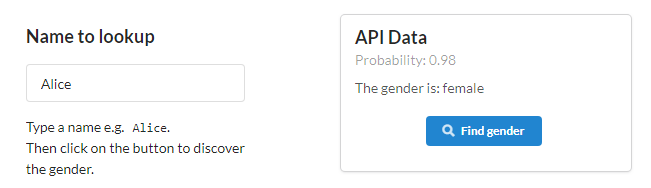
API. The backend communicates with a cloud service on behalf of clients and makes data available via an API endpoint. It's consumed by the clients. The Name Lookup API is used as a sample:
The implementation provides reusable code, both client-side and backend, making it easier to switch to another API. In fact this approach has been taken by the sibling Crisp BigQuery repository created by cloning and renaming this solution - it uses Google BigQuery API instead.
This arrangement brings a security benefit: The clients running inside a browser in a non-trusted environment do not have credentials to access a cloud service that holds sensitive data. The backend runs in the trusted environment you control and does have the credentials. -
SSR. Build-time SSR (also known as prerendering) is supported. The solution allows to selectively turn the SSR on or off for the chosen parts (e.g. SPAs) of the React application. This innovative flexibility is important because as noted by the in-depth article on this subject, SSR is not a good recipe for every project and comes with costs. For example, the costs analysis could lead to a conclusion the Login part of an application is a good fit for SSR whereas the Reporting module is not. Implementing each part as an SPA with selectively enabled/disabled SSR would provide an optimal implementation and resolve this design disjuncture.
The SSR related costs depend on:
-
Implementation complexity that results in a larger and more knotty codebase to maintain. That in turn leads to more potential problems while implementing the required functionality, writing test cases and resolving support issues.
-
Run-time computing overhead causing server delays (for run-time SSR) thus defeating or partially offsetting the performance benefits of SSR.
-
Run-time computing overhead reducing the ability to sustain workloads (for run-time SSR coupled with complex or long HTML markup) which makes it easier to mount DoS attack aimed at webserver CPU exhaustion. In a case of cloud deployment, the frequency of malicious requests could be low enough to avoid triggering DDoS protection offered by the cloud vendor yet sufficient to saturate the server CPU and trigger autoscaling thus increasing the monetary cost. This challenge can be mitigated using a rate limiter which arguably should be an integral part of run-time SSR offerings.
Choosing build-time SSR allows to exclude the last two costs and effectively mitigate the first one by providing a concise implementation comprised of just few small source files. The implementation is triggered as an optional post-build step and is consistent with script bundle compression also performed at the build time to avoid loading the webserver CPU.
-
-
Containerisation. Docker multi-staged build is used to ensure the backend run-time environment doesn't contain the client build-time dependencies e.g.
client/node_modules/. It improves security and reduces container's storage footprint.- As a single-click container deployment option, you can build and deploy the container on Cloud Run. The prerequisites are to have a Google Cloud account with at least one project created and billing enabled.

The build will take a while due to free Cloud Shell using a free cloud VM with modest specs. After the build and deployment are finished you can click on the provided link and see the page rendered by the client.
❗ It is highly recommended to either add a firewall protection to the created service or to delete it if the deployment was used as a demo/proof of concept. The explanation why this is needed can be found there. Delete the service using the command:
gcloud run services delete crisp-react --platform=managed --region=us-central1 --project=<project-name>
It can be conveniently executed from the Cloud Shell session opened during the deployment. Update theregionwith the one chosen during the deployment and replace<project-name>with your project name. Alternatively delete the service using Cloud Run Console.
- As a single-click container deployment option, you can build and deploy the container on Cloud Run. The prerequisites are to have a Google Cloud account with at least one project created and billing enabled.
-
Sample websites. Skeleton, production.


- Getting Started
- Features
- Usage
- SSR
- Containerisation
- Custom Domain and CDN
- What's Next
- Pitfall Avoidance
- Q & A
- License
Install yarn if not already installed: npm install yarn -g
With VS Code
Prerequisites: Chrome and VS Code with 'Debugger for Chrome' extension.
- Clone the
crisp-reactrepository:
git clone https://github.com/winwiz1/crisp-react.git
cd crisp-react
- Install dependencies:
yarn install - Open the workspace file in VS Code:
code ./crisp-react.code-workspace - Start the debugging configuration
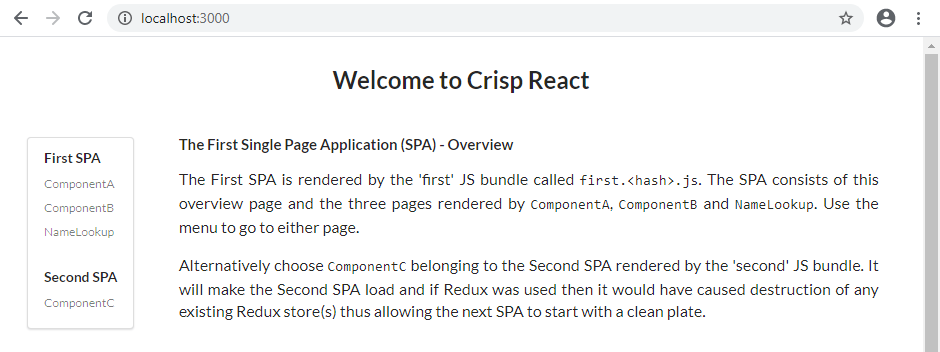
'Debug Client and Backend (workspace)'. - Wait until an instance of Chrome starts. You should see the Overview page:
- Choose the
NameLookupcomponent from the menu. You should see its page: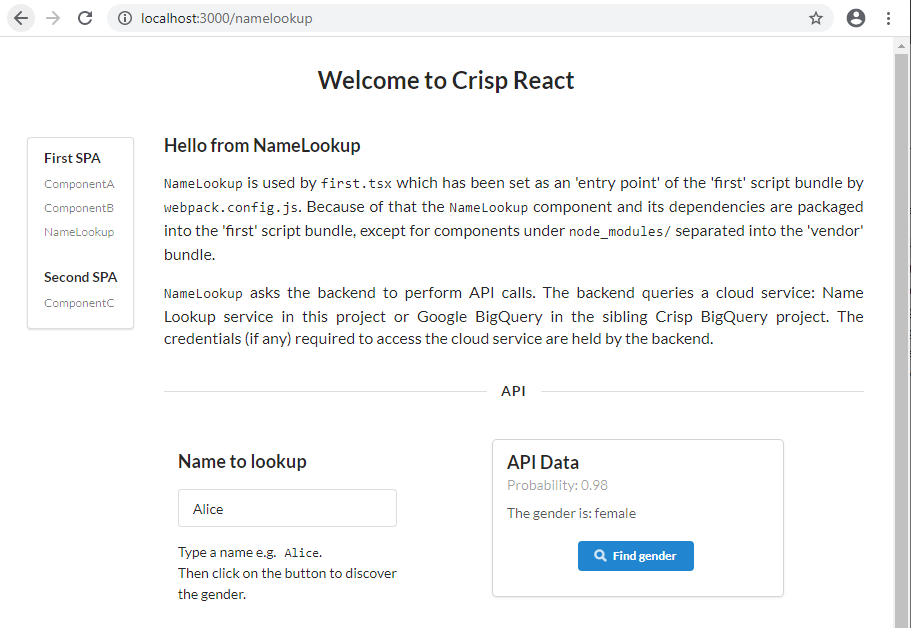
- Stop the running debugging configuration (use the 'Stop' button on VS Code Debugging toolbar two times or press
Control+F5twice).


Without VS Code
After executing the following commands:
git clone https://github.com/winwiz1/crisp-react.git cd crisp-react yarn install && yarn start:prodyou will have a running instance of backend (e.g. Express) serving the newly built React app that can be seen by pointing a browser to
localhost:3000.Terminate the backend by pressing
Control+C.
The section can be concluded by optionally renaming the solution. Rename the top-level directory from crisp-react to your-project and set the SPAs.appTitle variable in the spa.config.js file accordingly. Ignore the rest of the file for a moment, it's covered in depth in the SPA Configuration section.
Each subproject supports execution of the following commands/scripts:
yarn compile
yarn lint
yarn test
yarn dev
along with additional commands described in Usage.
The client subproject:
- Starts webpack-dev-server listening on port 8080 in the development mode.
- Creates build artifacts (html files, script bundles and source maps) in the production mode. The artifacts are meant to be copied over to the backend subproject to be served by Express.
- Additionally can start an instance of Chrome controlled via Inspector protocol (with caching disabled for better debugging) and point it to either webpack-dev-server or the backend server.
webpack-dev-server can be referred to as 'devserver'.
The backend subproject:
- In the production mode starts Express listening on port 3000 to serve from disk the build artifacts created by the client subproject .
- In the development mode starts Express listening on the same port and working as a proxy for webpack-dev-server.
- Implements HTTP caching arrangement which disables the caching for .html files and enables it for script bundles. A typical React application comes with .html files that are rather small whereas the bundles can be significantly larger. On the other hand, the build process keeps the names of .html files static and embeds a hash into the names of script bundles. As a result the caching arrangement ensures smooth deployment of versioning changes.
The optional splitting of a React application into multiple SPAs (each rendered by its own bundle) improves the application loading time. The vendor bundle contains node_modules/ dependencies and is reused between SPAs so that there is no need to download it again when switching from one SPA to another.
Every SPA has a landing page displayed during initial rendering by the component included into the SPA. In webpack terminology such a component is called entry point. An SPA (and its bundle) is comprised of this component, the components it imports and their dependencies. Let's see how Crisp React defines the SPAs.
The client subproject builds an application with SPAs defined by the SPA Configuration block in the spa.config.js file:
/****************** Start SPA Configuration ******************/
  var SPAs = [
    new SPA({
      name: "first",
      entryPoint: "./src/entrypoints/first.tsx",
      redirect: true
    }),
    new SPA({
      name: "second",
      entryPoint: "./src/entrypoints/second.tsx",
      redirect: false
    })
  ];
  SPAs.appTitle = "Crisp React";
/****************** End SPA Configuration ******************/
Each SPA is defined using 3 pieces of data: name, entry point (e.g. the landing page component) and a boolean flag. Ignore the flag for a moment. There is also an appTitle, it provides the application-wide default setting for the <title> tag in the <head> section of all pages. The title can be easily overwritten as needed.
SPA's name "first" is used to define the SPA's landing page e.g. /first.html and name the bundle that renders the SPA: first<hash>.js. More information about all the configuration data pieces is provided in the configuration file comments. The file is copied during the backend build from the client subproject and used to configure the client, the backend and the unit tests.
The demo website built using the SPA configuration shown above is available.
To reconfigure the application to have a separate SPA for login and another one for the rest of the application, change the SPA Configuration block as follows:
/****************** Start SPA Configuration ******************/
  var SPAs = [
    new SPA({
      name: "login",
      entryPoint: "./src/entrypoints/login.tsx",
      redirect: false
    }),
    new SPA({
      name: "app",
      entryPoint: "./src/entrypoints/app.tsx",
      redirect: true
    })
  ];
  SPAs.appTitle = "DemoApp";
/****************** End SPA Configuration ******************/
and then follow the instructions provided in the configuration file comments.
Since any SPA is comprised of the landing page component (entry point) and its imports, the coding to support the SPA reconfiguration can start by making login.tsx render the login page: either directly or maybe with the help of an imported component that will ask for user credentials. Another component could render a page asking for alternative credentials e.g. biometrics or ask for multifactor authentication (MFA).
The entry point app.tsx would import the component responsible for rendering the page presented to the user after logging in. Express could potentially be modified to ensure only authenticated users can download the bundle for this SPA.
The newly written app.tsx should verify the client is logged in (for example by checking the cookie set by backend after successful login) and if not redirect to the landing page of the 'login' SPA: /login.html. In the same manner login.tsx should check if the client has been authenticated and if so redirect to /app.html.
No modifications are required for the backend which will be reconfigured to:
- Serve the two HTML pages, namely
/login.htmland/app.html, which are the landing pages of our two SPAs. - Redirect to
/app.html(due to the booleanredirectflag set) other requests in the form/<path>or/<path>.htmlprovided the<path>doesn't include a subdirectory. It's the standard behavior required by all SPAs and implemented in webpack-dev-server using thehistoryApiFallbacksetting. - Return 404 error for all other requests except for script bundles and source maps.
To turn off code splitting using multiple SPAs simply leave one SPA in the SPA Configuration block.
Tip: Let's assume over the time the application has grown and acquired extensive reporting capabilities, perhaps with a reporting dashboard that imports many components. In this case the third SPA and its entry point
reporting.tsxcan be added to the SPA Configuration block. The entry point would import the dashboard and use it for rendering. Such an addition would take little time but bring performance and development/testing benefits. For example, some tests can focus on a React application which has the reporting SPA as the only entry in the SPA Configuration block thus taking the rest of the application out of the testing scope.
Both libraries (Semantic UI and Typestyle respectively) provide React with the type safety afforded by TypeScript.
Debuggable test cases written in TypeScript. Integration with React Testing Library on the client and Supertest on the backend. Both using Jest as an engine.
The client and backend can be tested independently by executing the yarn test command. Alternatively the same command can be executed at the workspace level.
The repository is integrated with Travis CI and the test outcome is reflected by the test badge.
The Usage Scenarios below are grouped depending on whether the client or the backend subproject is used.
💡 This section can be skipped at first reading. You can proceed to the next section.
In case there are any changes made to the SPA Configuration block and the changes are recent (e.g. no client and backend builds have been performed since then), execute the yarn build command at the workspace level before starting the debugging configurations described below in the Client and Server Usage sections.
Tip: The commands executed in VS Code Terminal can also be executed from a command or shell prompt in the relevant directory and vice versa.
To start with client scenarios open the client subdirectory in VS Code. Then open the Terminal.
Execute in Terminal: yarn dev. Wait until the command finishes.
Start a browser and point it to localhost:8080. You should see the First SPA overview page.
VS Code: Open src/components/Overview.tsx and alter the text on the page. As you type, note the compilation progress in the Terminal followed by automatic browser refresh. The newly typed content should be shown on the overview page. If instead of starting a browser you used already running instance, then you might need to refresh the browser to get Live Reloading working.
To finish, press Control+C in the Terminal.
When to use: Develop the part of UI that doesn't need backend data.
VS Code: Start the Launch Chrome Connected to Devserver debugging configuration.
Wait until an instance of Chrome starts and shows the overview page.
VS Code: Put a breakpoint on the following line: src/components/ComponentB.tsx:14.
Use the overview page menu to choose the ComponentB. The breakpoint in VS Code will be hit. Press F5 to continue execution. Alternatively use Chrome to continue execution. Note Live Reloading is supported.
To finish, remove the breakpoint and stop the running debugging configuration (use Debugging toolbar or press Shift+F5).
When to use: Troubleshoot the client provided backend data is not required.
Follow the "Debug client using devserver and VS Code" scenario to see the overview page.
In the instance of Chrome started, open Chrome DevTools.
Use 'Sources -> Filesystem -> Add folder to workspace' to add client/src directory. In this directory open the file src/components/ComponentB.tsx and put a breakpoint on the line 14.
Use the overview page menu to choose the ComponentB. The breakpoint in Chrome DevTools will be hit. Go to VS Code and note it knows the execution has stopped on this line of code and lets you inspect variables. Use Chrome or VS Code to continue execution. Note Live Reloading is supported.
To finish, remove the breakpoint and stop the running debugging configuration (use Debugging toolbar or press Shift+F5).
When to use: Troubleshoot UI, inspect DOM tree, etc. provided backend data is not required.
To perform the development build execute in Terminal: yarn build. The build artifacts can be found under client/dist directory.
💡 You might want to edit
client/webpack.config.jsfile and change the threemetaXxxvariables to alter the<meta>tags describing your website to the search engines.
To perform the production build execute in Terminal: yarn build:prod. The build artifacts including the bundles with various compressions can be found under the same directory. If a bundle is too small to benefit from compression then it won't be compressed.
When to use: As a preparatory step when the backend is required. This step will be executed automatically by the backend usage scenarios below when needed.
Terminal: yarn test
VS Code: Put a breakpoint in any .test.tsx file.
VS Code: Start 'Debug Jest Tests' debugging configuration. Wait until the breakpoint is hit.
To finish, remove the breakpoint and stop the running debugging configuration (use Debugging toolbar or press Shift+F5).
Terminal: yarn lint
Open a command prompt in the directory containing the workspace file crisp-react.code-workspace .
Execute command: yarn build:prod.
When to use: Prior to backend deployment, for example before copying the backend to the filesystem of a Docker container.
Open a command prompt in the directory containing the workspace file crisp-react.code-workspace .
Execute command: yarn start:prod. It will build both the client application and the backend.
To run without build execute: yarn run:prod.
To stop the backend terminate the running command e.g. press Control+C.
Open the workspace file crisp-react.code-workspace in VS Code.
Start the debugging configuration Debug Client and Backend (workspace).
Wait until an instance of Chrome starts. You should see the overview page.
VS Code: Open client/src/components/Overview.tsx and alter the text on the page. After a few seconds delay the new content should be shown in the browser.
To finish, stop the running debugging configuration (use the ‘Stop’ button on VS Code Debugging toolbar two times or press Control+F5 twice).
Open a command prompt in the server subdirectory.
Execute command: yarn test
Open the server subdirectory in VS Code.
Put a breakpoint in .test.tsx file.
Start 'Debug Jest Tests' debugging configuration. Wait until the breakpoint is hit.
To finish, remove the breakpoint and stop the running debugging configuration.
Open a command prompt in the server subdirectory.
Execute command: yarn lint
Open the workspace file crisp-react.code-workspace in VS Code.
Start the debugging configuration Debug Client and Backend (workspace).
Wait until an instance of Chrome starts. You should see the overview page.
Using VS Code example:
Note that VS Code can mark a breakpoint with a circle that is grey and hollow rather than red and solid, referring to it as 'Unverified breakpoint'. You can check the breakpoint has been set and marked with solid red circle by highlighting the relevant process (client or server) on VS Code Debug sidebar in the CALL STACK view.
Put a breakpoint on the following line:
server/src/Server.ts:59.In the browser choose the ComponentC from the menu, the breakpoint will be hit. Remove the breakpoint and resume the execution.
Put a breakpoint on the line
client/src/components/ComponentB.tsx:14.Use the menu to go back to the First SPA and then choose the ComponentB. The breakpoint will be hit. Remove the breakpoint and resume the execution. Choose the ComponentA from the menu.
Using Chrome DevTools example:
In the instance of Chrome started, open Chrome DevTools.
Use 'Sources -> Filesystem -> Add folder to workspace' to add
client/src directory. In this directory open the file src/components/ComponentB.tsx and put a breakpoint on line 14.Use the overview page menu to choose the ComponentB. The breakpoint in Chrome DevTools will be hit. Remove the breakpoint and use Chrome or VS Code to continue execution.
To finish, stop the running debugging configuration (use the ‘Stop’ button on VS Code Debugging toolbar two times or press Control+F5 twice).
Open the workspace file crisp-react.code-workspace in VS Code.
Edit file client/webpack.config.js to change the sourceMap setting of the TerserPlugin config to true.
Start the debugging configuration Debug Production Client and Backend (workspace).
Wait until an instance of Chrome starts. You should see the overview page. Now you can use VS Code to set breakpoints in both client and backend provided the relevant process is highlighted/selected as explained in the previous scenario. You can also use Chrome DevTools to debug the client application as shown above.
To finish, stop the running debugging configuration (use the Debugging toolbar or press Control+F5 once).
SSR is enabled for production builds. In order to turn it off rename the postbuild:prod script in package.json, for example prepend an underscore to the script name. This will reduce the build time.
By default SSR is disabled for the first SPA and enabled for the second SPA. To toggle this setting follow the instructions provided in the respective file comments.
A container acts as a mini operating system providing your code with run-time dependencies. One of the benefits of this approach is that your programs are less likely to break during deployments in different e.g. hosting provider supplied environments. It makes a container (represented by the sequence of build instructions in Dockerfile) to be a robust deployment vehicle.
Assuming the deployment demo in the Project Highlights section has been completed, a container has already been built in the cloud and deployed to Google Cloud Run. In this section we will build the container locally and expect it to run in two other deployments (in the local environment facilitated by Docker and the cloud one provided by Heroku) without any further adjustments.
Install Docker. To build a Docker container and start it, execute start-container.cmd or start-container.sh. Then point a browser to localhost:3000. Both files can also be executed from an empty directory in which case uncomment the two lines at the top. Moreover, it can be copied to a computer or VM that doesn't have NodeJS installed. The only prerequisites are Docker and Git.
Install Heroku CLI. Then log to Heroku using the heroku login command. Execute the following commands to build and deploy a container:
git clone https://github.com/winwiz1/crisp-react.git
cd crisp-react
heroku container:login
heroku create <app-name>
heroku stack:set container -a <app-name>
heroku container:push web -a <app-name>
heroku container:release web -a <app-name>
Replace the <app-name> placeholder with your Heroku app name. The app will have the URL: <app-name>.herokuapp.com.
If you own a domain name and intend to implement the optional steps described in the Custom Domain and CDN section, then you can improve security by making the app name random, for example my-crisp-app-XXXXXXXXXXXX where the last part represents a random pattern. The app name can be changed at any time using the Settings page at https://dashboard.heroku.com/apps/<app-name>/settings.
The remainder of this section contains additional considerations that apply to deploying the solution on Cloud Run. The considerations are not specific to this solution and would be relevant for any React SPA.
Although Cloud Run provides an ample free tier usage in terms of bandwidth and number of requests, you are billed for the incoming requests once the free usage threshold, 2 million calls per month, is exceeded. This scenario wouldn’t be infeasible if the service URL is discovered and used to mount a Layer 7 DDoS attack (or come close to it by emulating a significant workload). There is an additional cost for the running time exceeding its free threshold which can be exacerbated by the service scaling itself up under attack.
Therefore adding a firewall with IP address black/whitelisting and rate limiting or deleting the service promptly after a demonstration helps to mitigate this risk. Alternatively a Cloud Run service can be deployed in non-public access mode (--ingress internal), however this is outside of our scope aimed at a public website creation.
It would appear that using ingress control or rate limiting was not possible in the past with Cloud Run in public access mode. This functionality is currently available however it's not added directly to Cloud Run. Rather it requires a serverless network endpoint group (NEG). Once a NEG has been created, you can use other GCP products e.g. external HTTPS load balancer to implement rate limiting or Cloud Armor to control ingress. You might want to check if the price of either product fits into your budget.
This section compliments the deployment described under the Using Heroku heading. It maps Heroku app URL to a custom domain you own. After that, Cloudflare CDN is added to Heroku servers

to take advantage of the distributed cache provided by Cloudflare and achieve better performance with improved security. Both custom domain and CDN are optional. If you haven't used Cloudflare previously this answer could be useful.
Prerequisites:
- Custom domain name ownership,
- Cloudflare account. It's free and can be created by following this link.
The steps:
-
Log to the registrar of your custom domain e.g.
yourdomain.comand create a subdomain, for examplecrisp-react.yourdomain.com. While you can choose any valid name for the subdomain, 'crisp-react' will be assumed for the next steps. -
Click on the "Add domain" button on Heroku Settings page at
https://dashboard.heroku.com/apps/<app-name>/settingsto addcrisp-react.yourdomain.comas a custom domain to your app. Heroku will provide a name of a host similar toxxxxx.herokudns.com. Copy this name to the clipboard. -
Use the DNS settings provided by the registrar to add a DNS record:
Record Type Host or Name Value or Points To or Content CNAMEcrisp-reactxxxxx.herokudns.comIt will take some time for the new record to propagate across the globe. Once this delay is over, the Heroku app will be available from
crisp-react.yourdomain.com. -
Log to Cloudflare dashboard and add the root domain
yourdomain.comas a site to your account. Choose either the Free or a paid Cloudflare plan. As for SSL settings, select the Full option if the Heroku app is accessible via HTTPS protocol and the Flexible option if it uses HTTP.At the end Cloudflare will provide you with the hostnames of the two of its name servers. Use the DNS settings provided by the registrar (some registrars keep name servers under different menu/setting) to replace the name servers of your registrar with the ones provided by Cloudflare.
-
Adjust Cloudflare DNS setting for the newly added site. During the step (4) Cloudflare likely have discovered most of the DNS records applicable to the domain
yourdomain.comfrom the registrar and automatically imported those. However theCNAMErecord added at the step (3) could be missing in which case you will need to add it again, this time to Cloudflare DNS settings.In case there is no site or app mapped to
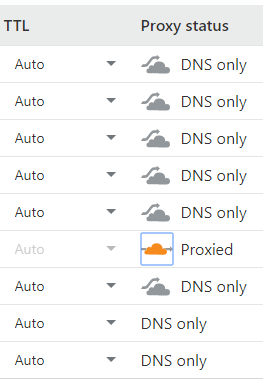
yourdomain.comor in case there is one but you are not interested in it being processed by Cloudflare, change 'Proxy Status' of Cloudflare DNS entries from 'Proxied' to 'DNS only' leaving only theCNAMErecord created at the step (3) or (5) in the 'Proxied' state:
The setting can be toggled by clicking on the orange Cloudflare icon.
-
Use Cloudflare Page Rules to add the following two rules:
-
The first rule:
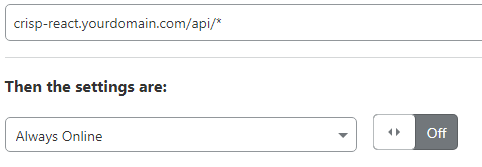
-
The second rule:
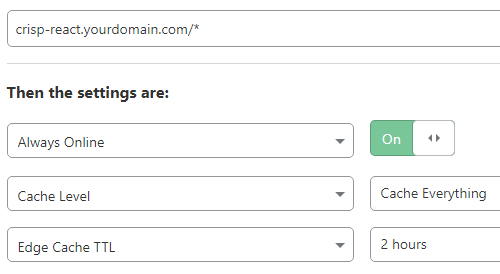
The order of the rules is important. Since only one page rule is applied, the more specific API rule should be on the top.
The maximum cache duration was limited to 2 hours on the Free plan, however Cloudflare has removed this restriction. For example, you can set the duration to 7 days and ensure the subsequent re-caching occurs every week for all .html pages, script bundles etc.
-


After the steps are completed the Heroku app will be using distributed caching and a free SSL certificate for the custom domain. Also the cache related statistics, monitoring and the breakdown of incoming requests by country will be available from Cloudflare even on the Free plan.
You can test DNS resolution for crisp-react.yourdomain.com using tools like nslookup or dig to check it resolves to IP addresses that belong to Cloudflare, similarly to the demo site.
Consider the following steps to add the desired functionality:
- Start with Client Usage Scenarios to develop UI in absence of API data. For example, develop the initial look and feel of the login page. Take advantage of the Live Reloading to speed up the development. The client scenarios ensure the backend is not started needlessly.
- Implement an API endpoint in the backend, in addition or instead the existing sample API endpoint. For example, a login endpoint. Technically it can be done by renaming the
SampleXxxpattern in the names of source files and classes withLoginXxx, then modifying the classes as needed. This approach can be observed in the sibling Crisp BigQuery repository, theSampleXxxpattern was replaced withBigQueryXxx. - Switch to Backend Usage Scenarios to consume the API endpoint in the client. Modify the API related classes
BackendManagerandBackendRequestas needed. Keep taking advantage of Live Reloading that is supported for client and backend code.
One of the goals pursued by the Backend Usage Scenarios is to avoid the following common pitfalls:
- 🔥 Running the webpack-dev-server in production.
⚠️ Getting CORS security violations triggered by the browser which detects that script bundles were downloaded from one server (frontend) and then the code from the bundles attempts to call API endpoints provided by another server (backend). There are CORS related HTTP headers that exist to water down or cancel completely the security which browsers implement for a reason. In some cases using such headers is unavoidable, for example the code from some Google SDKs is embedded into clients at the build time and not downloaded from Google at run-time, so many Google APIs wouldn't work without CORS headers. But its usage is best to be kept to the minimum because it raises the requirements for backend hardening.- 👎 Not implementing SPA related fallback in the backend. It should redirect requests for unknown pages to the SPA landing page. For example, this behaviour is enabled in webpack-dev-server using the
historyApiFallbacksetting which exists specifically to support SPAs. The fallback behavior is required for any SPA because a user can see the path to an internal page (e.g./aor/bor/namelookup) in the navigation bar and can either retype it manually and press Enter or refresh the browser. In both cases the backend gets hit with a request for an internal SPA page it is not aware of and responding with the 404 Not Found error doesn't look good for the user. Due to security considerations the fallback tolerance should have its limits and clearly invalid requests should still trigger an error.
The backend scenarios ensure the client gets everything (build artifacts including script bundles, API responses) from the backend only. This leaves no room for CORS issues. The SPA related fallback is implemented in development and production automatically and in accordance with SPA configuration.
The webpack-dev-server is never started in production. This is hardly a good idea. The server, as its name suggests, is meant to be used in development only.
Q: I have changed both SPA names in the SPA Configuration block and kept the rest including the entry points intact. I expect everything to keep working using my new names for the SPA landing pages instead of the old /first.html and /second.html. However navigation via the menu and Back/Forward browser buttons seems to be broken. How can it be fixed.
A: Clear the browser's history and cache. Alternatively use an incognito tab. The client, the backend and the tests should work with the new names.
Q: Which versions of Internet Explorer are supported.
A: This project aims to work with browsers that are supported by vendors and can be made secure via security updates. Therefore IE11 is supported whereas IE10 and the earlier versions are not. The unsupported versions render a blank page with explanatory message asking to upgrade.
Q: Can I use dynamic imports in addition to multiple SPAs for code splitting?
A: Yes, dynamic imports are fully supported. For example, if there is a Reporting bundle and one component is known to be used infrequently, then it's a good candidate to be separated from the bundle using a dynamic import:
const ReportingWrapperXXX = React.lazy(() => import(
  /* webpackChunkName: "reporting-xxx" */
  /* webpackMode: "lazy" */
  /* webpackPrefetch: "false" */
  '<path>/InfrequentReporting'
));
...
// Can have its own Redux store to coexist with the main Redux store
export const ReportingPanelXXX: React.FC = _props => {
  return (
    <Provider store={reportingStoreXXX}>
      <React.Suspense fallback={<div>Loading...</div>}>
        <ReportingWrapperXXX />
      </React.Suspense>
    </Provider>
  );
}
Remember to change the settings in tsconfig.json:
"removeComments": false,
"module": "esnext",
otherwise the dynamic import will be ignored and webpack 'magic comments' removed.
Note:
React.lazyhas a restriction, it works with default exports only. The restriction should be lifted in the future. When webpack detects dynamic imports, it emits code that loads the bundle it created asynchronously andSuspense/lazyneeds to wait for the loading to complete. This technology is less straightforward and probably less mature than building a static bundle and referencing it via the<script>tag in .html file.
In case you have a utility class used infrequently, it can also be imported dynamically. This can be done using await import and without Suspense/lazy. The sibling Crisp BigQuery repository (derived from Crisp React) provides a working example.
Q: Do dynamic imports negate the need to have multiple SPAs.
A: It depends. These two are complimentary techniques. Obviously once a bundle grows larger, it starts affecting performance as its loading time increases. But the reverse is also true, having too many small bundles could result in more network round-trips and the bundle compression will become less efficient. It can also complicate attempts to scrutinise network traffic including requests for bundles.
Q: How can I add my own HTML including polyfills etc. to the generated .html files?
A: Use react-helmet to add additional HTML tags to the <head> element and modify the existing ones. Alternatively use the client\src\entrypoints\head-snippet.html file. Its content is inserted into the <head> element. You can add a bodyHtmlSnippet by changing the HtmlWebpackPlugin configuration in webpack.config.js (search for headHtmlSnippet and add similar code).
Q: How can I fix TypeScript compilation errors?
A: Note the TypeScript version in package.json. Ensure the TypeScript version shown at the VS Code status bar when .ts or .tsx file is opened is not lower.
Q: Breakpoints in Chrome DevTools are not hit. How can I fix it?
A: Open the Settings page of the Chrome DevTools and ensure 'Enable JavaScript source maps' and 'Disable cache (while DevTools is open)' boxes are ticked. Close the Settings page and on the Network tab tick the 'Disable cache' box. If debugging a production build, change the sourceMap setting of the TerserPlugin config to true in webpack.config.js, then restart debugging.
Q: Breakpoints in VS Code are not hit. How can it be fixed.
A: Try to remove the breakpoint and set it again. If the breakpoint is in the client code, refresh the page.
Q: I'm debugging the backend in VS Code by running one of the debugging configurations specified in launch.json. How can I get one of the yarn scripts (e.g. copyfiles or prestart in the scripts section of package.json) executed before the debugging starts?
This question is inspired by the issue #11
A: What gets executed before a debugging configuration starts is controlled by its optional preLaunchTask setting. This setting refers to a task from tasks.json by the task name. The name is defined by the tasks'label setting. To get a yarn script executed, add another task (let's call it prestart) to run the prestart script and chain both tasks using dependsOn:
tasks.json
{
  "version": "2.0.0",
  "tasks": [
    {
      "label": "tsc",
      "type": "typescript",
      "tsconfig": "tsconfig.json",
      "problemMatcher": [
        "$tsc"
      ],
      "group": {
        "kind": "build",
        "isDefault": true
      }
    },
    {
      "label": "tsc-watch",
      "type": "typescript",
      "tsconfig": "tsconfig.json",
      "option": "watch",
      "problemMatcher": [
        "$tsc-watch"
      ],
      "isBackground": true,
      "presentation": {
        "echo": true,
        "reveal": "always",
        "focus": false,
        "panel": "new"
      },
      "dependsOn": [
        "prestart",
      ]
    },
    {
      "label": "kill process in terminal",
      "type": "process",
      "command": "${command:workbench.action.terminal.kill}"
    },
    {
      "label": "prestart",
      "type": "npm",
      "script": "prestart",
      "presentation": {
        "reveal": "never"
      }
    }
  ]
}
Q: I need to add Redux.
A: Have a look at the sibling Crisp BigQuery repository created by cloning and renaming this solution. It uses Redux.
Crisp React project with its 'server' and 'client' subprojects is open source software licensed as MIT.